
Popular categories
Looking for a yarn?


Comments / Questions (64)
![]() Neydir wrote:
Neydir wrote:
Ciao caro. Ho molta difficoltà a comprendere queste ricette perché in Brasile è completamente diverso. Ma mi interessa molto capire, soprattutto nelle parti in cui dici: "Ripetere questi aumenti altre 8-10-10-12-13-14 volte ogni 4-3-3-2½-2-2 cm= 60- 64-66-70-74-78 m." . Mi dispiace, perché queste espressioni mi sono completamente nuove. Se potessi aiutarmi o avere un video per seguire il lavoro passo dopo passo, te ne sarei immensamente grata. Grande abbraccio!
05.07.2024 - 22:02DROPS Design answered:
Buongiorno Neydir, in quel punto si devono ripetere gli aumenti per il numero di volte indicato per ogni taglia: il primo numero è per la taglia S e così via.
29.07.2024 - 15:54
![]() Mrs M Ringham wrote:
Mrs M Ringham wrote:
I am knitting 2nd size when l have not got enough stitches. Should the 8 stitches for the front band be added to the 38 stitches needed to start this piece
18.11.2021 - 13:59DROPS Design answered:
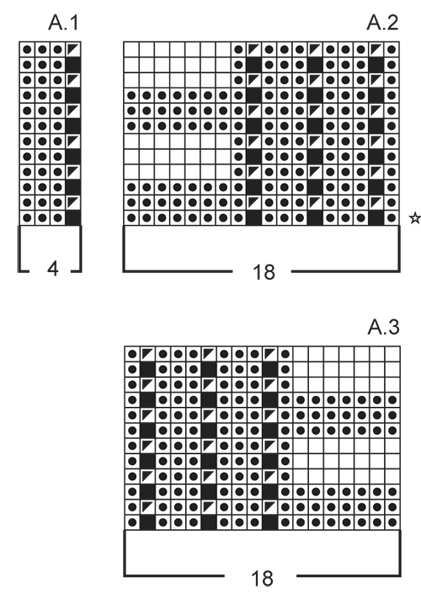
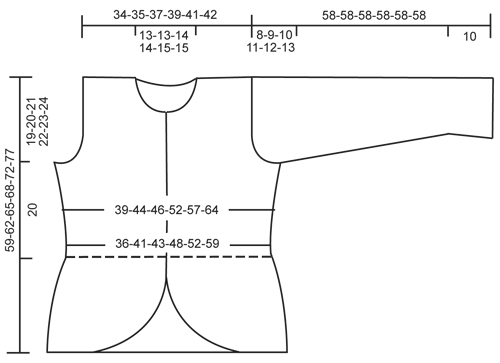
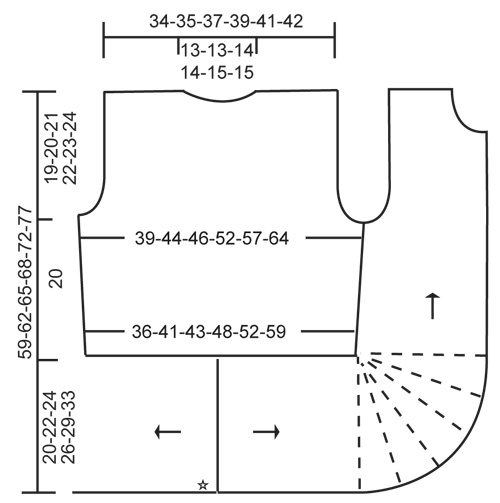
Dear Mrs Ringham, in 2nd size you cast on 38 sts for edge/front piece and work as follows (right piece) A.3 (= 18 sts), 19 sts in garter st, 1 edge st in garter stitch = 18+19+1= 38 sts. Happy knitting!
19.11.2021 - 07:42
![]() Giorgia wrote:
Giorgia wrote:
Grazie per la spiegazione! ne chiedo un'ulteriore relativa agli INTRECCI per gli scalfi : devo intrecciare a diritto sul ferro a diritto e a rovescio sul ferro rovescio anche se in questo modello le maglie sono lavorate al contrario?
06.07.2020 - 10:55DROPS Design answered:
Buongiorno Giorgia. Per intrecciare, lavora le maglie come si presentano. In questo caso , ha maglie rov sul diritto del lavoro, quindi le chiude lavorandole a rovescio. Sul rovescio del lavoro ha maglie a diritto e le chiude lavorandole a diritto. Buon lavoro!
06.07.2020 - 16:45
![]() Giorgia wrote:
Giorgia wrote:
Problema col DIETRO TAGLIA M. Voi scrivete "lavorare come segue: 1 m di vivagno a m legaccio, A.1 (= 4 m) fino a quando rimangono 2 m sul f, lavorare la 1° m A.1...."perchè la mia penultima maglia risulta essere il gett. +maglia pass. ma il ferro successivo(FERRO ROVESCIO) prevede dopo la m di vivagno 3 m a diritto. Non riesco a capire ????
03.07.2020 - 19:03DROPS Design answered:
Buongiorno Giorgia. Al ferro successivo (sul rovescio) lavora 1 m vivagno, poi lavora il simbolo della prima maglia di A1, (quindi lavora insieme a rov la gettata e la maglia passata), poi 3 maglie diritto e così via in modo che il motivo sia allineato correttamente. Buon lavoro!
03.07.2020 - 22:33
![]() Giorgia wrote:
Giorgia wrote:
Innanzitutto vi ringrazio per le celere risposta e per mettere a nostra disposizione questi splendidi modelli, ma non riesco proprio a capire cosa significhi "lavorare 1 ferro diritto dal rovescio del lavoro"..
19.06.2020 - 16:34DROPS Design answered:
Buongiorno Giorgia. Sul davanti sinistro, per iniziare a lavorare il diagramma sul diritto del lavoro (parte del lavoro che si vede quando indossato) è necessario lavorare un ferro a diritto sulla parte del lavoro che rimane all'interno quando il capo è indossato (parte che nelle spiegazione viene indicata come rovescio del lavoro). Buon lavoro!
19.06.2020 - 18:21
![]() Giorgia wrote:
Giorgia wrote:
Quando si inizia il davanti sinistro in modo speculare a quello destro non riesco a capire quando scrivete :"Cioè lavorare 1 f dir dal rovescio del lavoro prima di lavorare il motivo". Dopo aver avviato il numero di maglie necessario alla mia taglia e fatta 1 costa a legaccio, cosa devo fare? Lavoro il ferro seguente tutto a rovescio e poi il successivo ferro lo lavoro seguendo lo schema A2?
19.06.2020 - 08:08DROPS Design answered:
Buongiorno Giorgia, deve lavorare 1 costa a legaccio, 1 ferro diritto dal rovescio del lavoro e poi inizia a lavorare il motivo come indicato.
19.06.2020 - 15:48
![]() June Long wrote:
June Long wrote:
I love this pattern having just purchased it can it be worked on two needles instead of a circular one thank you
02.10.2019 - 15:31DROPS Design answered:
Dear Mrs Long, this pattern is worked in different pieces worked back and forth on circular needle to get enough room for all stitches, you can here use straight needles instead. Read more here about circular needles. Happy knitting!
02.10.2019 - 16:01
![]() Nicole wrote:
Nicole wrote:
Hallo ich bin gerade beim rechten Vorderteil mit den verkürtzten Reihen fertig,nun heißt es Markierer anbringen die Arbeit wird von hier gemessen. Nun meine Frage: wird die Arbeit an der Blende gemessen oder an der kraus rechten Seite wo die Arbeit ja kürzer ist.? Würde mich über Antwort freuen damit ich weiterstricken kann 😊,lg
13.04.2019 - 10:58DROPS Design answered:
Liebe Nicole, jetzt messen Sie an der rechten Seite bzw vom Ende den verkürzten Reihen - siehe auch Maßskizze. Viel Spaß beim stricken!
23.04.2019 - 09:33
![]() Diana wrote:
Diana wrote:
It\'s a very nice pattern and is well explained. Thanks again
29.03.2019 - 05:47
![]() Malika Katharina Raduenz wrote:
Malika Katharina Raduenz wrote:
Guten Abend, ich verstehe diese Anleitung überhaupt nicht! Wieviele Maschen muss ich anschlagen für Größe XL, 83 oder 85? Und was bedeutet diese Strickrichtung?? Auf mich wirkt diese Anleitung durcheinander und unübersichtlich! Schade. Ich habe schöne Stücke mit Drops gestrickt.... Malika
07.12.2018 - 21:30DROPS Design answered:
Liebe Frau Raduenz, in der Größe XL schlagen Sie für den Rückenteil 83 M. Rückenteil ist von unten nach oben gestrickt. Dann stricken Sie die beiden Vorderteilen, die zuerst quer von der Mitte Rückenteil gestrickt sind (siehe Pfeil und Sternchen in der Maßskizze), dann stricken Sie die verkürtzten Reihen (gestrichelten Linien) und dann von unten nach oben. Viel Spaß beim stricken!
10.12.2018 - 11:08
|
|||||||||||||||||||
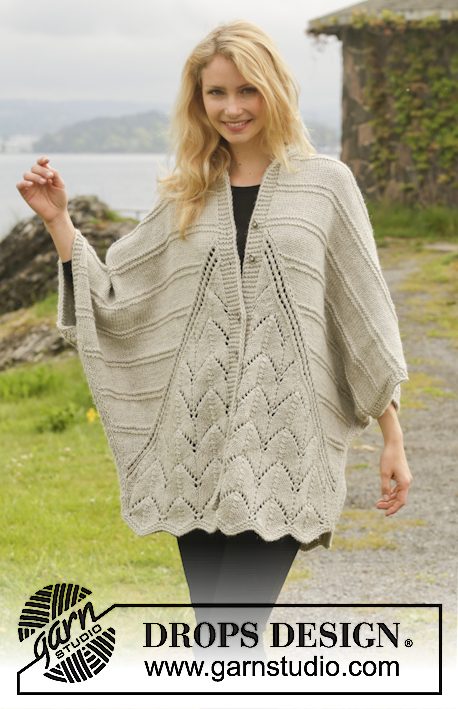
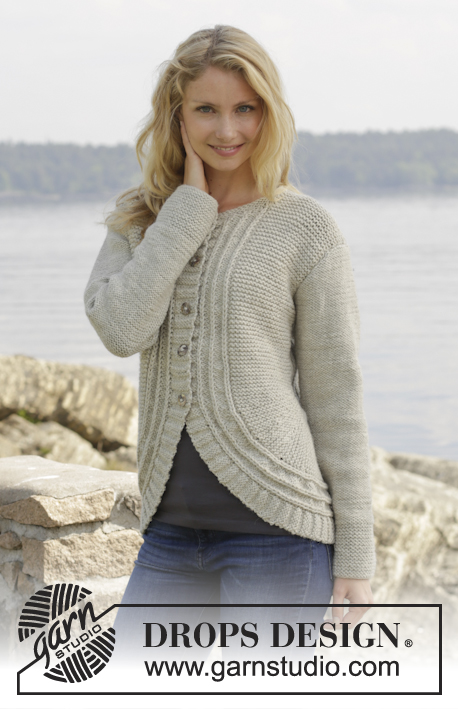
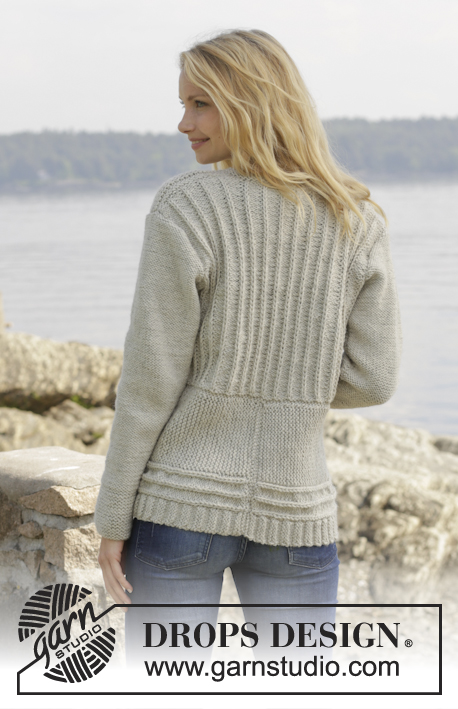
Enchanted#enchantedcardigan |
|||||||||||||||||||
 |
 |
||||||||||||||||||
Knitted DROPS jacket with False English rib and short rows in "Nepal". Size S-XXXL
DROPS 157-25 |
|||||||||||||||||||
|
GARTER ST (back and forth on needle): K all rows. 1 ridge = 2 rows K. PATTERN: See diagrams A.1-A.3. The diagram shows all rows in pattern seen from RS. INCREASE TIP (applies to sleeve): Inc inside 1 edge st in garter st and 1 P by making 1 YO. On next round work YO twisted, i.e. work in the back loop of st instead of front, to avoid holes. DECREASE TIP: Dec inside 1 edge st in garter st. All dec are done from RS! Dec before 1 edge st as follows: K 2 tog. Dec after 1 edge st as follows: Slip 1 st as if to K, K 1, psso. SHORT ROWS: Work short rows on front piece to get a rounded edge on the piece. Also work short rows between pattern A.2/A.3! Work short rows as follows with 1st row from RS: Row 1 and 2: Work 8 sts in all sizes, turn and work back. Row 3 and 4: Work 12 sts in all sizes, turn and work back. Row 5 and 6: Work 16 sts in all sizes, turn and work back. Row 7 and 8: Work 19-19-20-20-19-20 sts, turn and work back. Row 9 and 10: Work 21-21-23-23-21-23 sts, turn and work back. Continue to work 3 sts more on every turn until all sts have been worked. Repeat from 1st row a total of 5 times. (The rounded edge now measures approx. 28-31-34-37-41-46 cm on the outer side and 3 cm on the inside.) BUTTONHOLES: Dec for buttonholes on right band. 1 buttonhole = K tog second and third st from mid front and make 1 YO. Dec for buttonholes when piece measures (measured from the marker in the side): SIZE S: 1-8-15-22-29 cm SIZE M: 1-8-15-22-30 cm SIZE L: 1-8-15-22-30 cm SIZE XL: 1-8-16-23-31 cm SIZE XXL: 1-8-16-23-31 cm SIZE XXXL: 1-9-17-25-32 cm ---------------------------------------------------------- JACKET: Worked back and forth in parts on circular needle and sewn tog when finished. BACK PIECE: Cast on 63-71-75-83-91-103 sts (incl 1 edge st in garter st in each side) on circular needle size 5 mm with Nepal. Work 1 ridge in GARTER ST - see explanation above. Then work as follows: 1 edge st in garter st, A.1 (= 4 sts) until 2 sts remain on row, work 1st st in A.1, 1 edge st in garter st. Continue like this with pattern, AT THE SAME TIME when piece measures 4 cm, inc inside 1 edge st in garter st in each side of piece by making 1 YO. On next row work YOs twisted to avoid holes, then P the new sts (seen from RS)! Repeat inc every 4-4-4-3-3-3 cm 2-2-2-3-3-3 more times = 69-77-81-91-99-111 sts. REMEMBER THE KNITTING TENSION! When piece measures 20 cm in all sizes, cast off for armholes on each side as follows: Cast off 3-4-5-6-7-8 sts 1 time and 1 st 1-3-3-6-7-11 times = 61-63-65-67-71-73 sts. Continue with pattern as before until piece measures 37-38-39-40-41-42 cm. On next row from RS cast off for neck as follows: Work the first 21-22-22-23-24-25 sts, cast off the next 19-19-21-21-23-23 sts and work the remaining 21-22-22-23-24-25 sts. Then finish each shoulder separately as follows: Continue back over left shoulder and dec 1 st towards the neck on next row from RS = 20-21-21-22-23-24 sts for shoulder. When piece measures 38-39-40-41-42-43 cm, work 1 ridge and loosely cast off. Work the other shoulder the same way. RIGHT EDGE PIECE/FRONT PIECE: Cast on 35-38-42-45-50-57 sts (incl 1 edge st in garter st) on circular needle size 5 mm with Nepal. Work 1 ridge in garter st. Then work as follows from RS: Pattern A.3 (= 18 sts), 16-19-23-26-31-38 sts in garter st, 1 edge st in garter st. When piece measures approx. 18-21-23-24-26-30 cm, work SHORT ROWS - see explanation above, AT THE SAME TIME on last row in 1st repetition with short rows, inc 1 st by making a YO between A.3 and sts in garter st = 36-39-43-46-51-58 sts. Work YOs twisted on next row to avoid holes. Repeat inc on last row in the remaining repetitions of short rows 3-4-1-2-0-0 more times = 39-43-44-48-51-58 sts on needle. When all short rows have been worked, insert 1 marker. NOW MEASURE PIECE FROM HERE! Continue with garter st and pattern as before. Remember BUTTONHOLES - see explanation above. When piece measures 4 cm, inc in the side as on back piece (i.e. the shorter side). After all inc, there are 42-46-47-52-55-62 sts on needle. When piece measures 20 cm, cast off for armhole in the side as on back piece (i.e in same side of piece as inc) = 38-39-39-40-41-43 sts. When piece measures 30-31-31-32-32-33 cm, slip the first 9 sts on needle from RS on a stitch holder for neck. Then cast off sts as follows on every row from neck: 3 sts 1 time, 2 sts 2 times and 1 st 2 times = 20-21-21-22-23-25 sts remain for shoulder. When piece measures 38-39-40-41-42-43 cm, work 1 ridge and cast off. LEFT EDGE PIECE/FRONT PIECE: Cast on and work as right edge piece/front piece but reversed. I.e. K 1 row from WS before working pattern like this: 1 edge st in garter st, 16-19-23-26-31-38 sts in garter st, A.2 over the remaining 18 sts on needle. Do not dec for buttonholes. SLEEVE: Worked back and forth on circular needle in reversed stocking st. Cast on 42-42-44-44-46-48 sts (incl 1 edge st each side) on needle size 5 mm with Nepal. Work 10 cm in garter st. Continue with reversed stocking st. On next row inc 1 st in each side of sleeve - Read INCREASE TIP! Repeat inc every 4-3-3-2½-2-2 cm 8-10-10-12-13-14 more times = 60-64-66-70-74-78 sts. When piece measures 50-49-48-47-46-45 cm (shorter measurements in the larger sizes because of longer sleeve cap and wider shoulders) cast off for sleeve cap at beg of every row in each side: 3 sts 1 time, 2 sts 3 times and 1 st 1-2-3-4-5-6 times, then cast off 2 sts in each side until piece measures 57 cm, then cast off 3 sts 1 time in each side, cast off remaining sts. Piece measures approx. 58 cm. Knit another sleeve. ASSEMBLY: Sew cast on edge on edge pieces tog mid back - sew edge to edge to avoid a chunky seam. Then sew edge piece to bottom edge of back piece. Sew the shoulder seams. Sew side seams and sleeve seams inside 1 edge st and sew sleeves in body. Sew the buttons on to the left band. NECK EDGE: Pick up approx. 72 sts (incl sts on stitch holders) around the neck. Work 2 ridges and cast off from WS. Cut and fasten the yarn. |
|||||||||||||||||||
Diagram explanations |
|||||||||||||||||||
|
|||||||||||||||||||
 |
|||||||||||||||||||
 |
|||||||||||||||||||
 |
|||||||||||||||||||
Have you finished this pattern?Tag your pictures with #dropspattern #enchantedcardigan or submit them to the #dropsfan gallery. Do you need help with this pattern?You'll find 27 tutorial videos, a Comments/Questions area and more by visiting the pattern on garnstudio.com. © 1982-2026 DROPS Design A/S. We reserve all rights. This document, including all its sub-sections, has copyrights. Read more about what you can do with our patterns at the bottom of each pattern on our site. |
|||||||||||||||||||


With over 40 years in knitting and crochet design, DROPS Design offers one of the most extensive collections of free patterns on the internet - translated to 17 languages. As of today we count 324 catalogues and 12290 patterns translated into English (UK/cm). 12290
We work hard to bring you the best knitting and crochet have to offer, inspiration and advice as well as great quality yarns at incredible prices! Would you like to use our patterns for other than personal use? You can read what you are allowed to do in the Copyright text at the bottom of all our patterns. Happy crafting!
Post a comment to pattern DROPS 157-25
We would love to hear what you have to say about this pattern!
If you want to leave a question, please make sure you select the correct category in the form below, to speed up the answering process. Required fields are marked *.