
Popular categories
Looking for a yarn?


Comments / Questions (69)
![]() Rosemarie wrote:
Rosemarie wrote:
Hello, I am confused on this pattern, so we follow the M.1 for the right side only and the wrong side we just purl all stitches? how do you deal with the slip stitch? Thank you!
29.01.2026 - 21:51DROPS Design answered:
Hi Rosemarie! The diagram shows every row seen from the right side. Read here How to read knitting diagrams Happy knitting!
29.01.2026 - 22:30
![]() Elje wrote:
Elje wrote:
Leider kann ich das Diagramm für M1 und M2 nicht sehen.
19.01.2026 - 17:35DROPS Design answered:
Liebe Elje, beide Diagramme finden Sie unten der Seite, rechts der Maßskizze (unter den Ärmel). Viel Spaß beim Stricken!
20.01.2026 - 09:32
![]() Monika Klein wrote:
Monika Klein wrote:
Diese 5 reihen rechts - heisst das hinreihe rechts und rückreihe rechts wie bei krausrippen? Danke
27.10.2025 - 14:21DROPS Design answered:
Liebe Monika, ja genau, das sind immer rechts gestrickte Reihen, also kraus rechts. Viel Spaß beim Weiterstricken!
27.10.2025 - 14:41
![]() Cecilia wrote:
Cecilia wrote:
Buongiorno, non capisco come devo fare le diminuzioni per le maniche: per la taglia M le spiegazioni dicono che devo diminuire 2 m per 2 volte e 1 maglia per 6 volte, significa che per ogni lato devo fare queste calature o, per ogni lato devo fare 2 m per 1 volta e 1 maglia per tre volte? E le altre calature devo fare 2 calature per lato ogni ferro, cioè 2 maglie all'inizio e 2 alla fine sia al dritto che al rovescio? Grazie!
18.08.2025 - 18:48DROPS Design answered:
Buonasera Cecilia, deve intrecciare 2 maglie ad ogni lato per 2 volte, poi 1 maglia per 6 volte.: vuol dire che deve intrecciare 2 maglie all'inizio del ferro, lavorare il ferro, girare il lavoro, intrecciare 2 maglie, lavorare il ferro, girare il lavoro, intrecciare 2 maglie, girare il lavoro, intrecciare 1 maglia a così via. Buon lavoro!
18.08.2025 - 23:27
![]() Jz wrote:
Jz wrote:
On a wideo I found a purl stitch much more complicated than my normal US/UK purl. It looks like you want to have 3 purls in one stitch. Is that done on purpose.
30.06.2025 - 20:26DROPS Design answered:
Dear Jz, this might be the Norwegian way to work a purl stitch - see video. Happy knitting!
01.07.2025 - 08:14
![]() Ylva wrote:
Ylva wrote:
Fijn patroon en goede pasvorm.
05.06.2025 - 14:55
![]() Seince Jocelyne wrote:
Seince Jocelyne wrote:
Est ce que je pourrais avoir les explications pour effectuer ce tricot à l aiguilles SVP
07.04.2025 - 19:09DROPS Design answered:
Bonjour Mme Seince, souhaitez-vous tricoter ce modèles sur aiguilles droites? Si oui, vous pouvez tout à fait car on tricote ici le bas du gilet en une seule pièce mais en allers et retours, puis on termine chaque devant et le dos séparément. Les manches se tricotent également en allers et retours sur aiguille circulaire, vous pouvez ainsi juste suivre les indications. Vous trouverez ici quelques astuces pour adapter un modèle sur aiguilles droites. Bon tricot!
08.04.2025 - 09:26
![]() Pauline Head wrote:
Pauline Head wrote:
My question is what size needles to use for the first 4 rows of garter stitch for the jacket. The materials section of the pattern says to use 3.5mm/US 4 needles for garter st and lace pattern. The directions for the jacket says to use 4mm/US 6 needles to work 4 rows of garter st for the first 4 rows. Which size needle is correct for the beginning of the project?r\nThank you for your help.
22.01.2025 - 01:37DROPS Design answered:
Dear Mrs Head, start with needle size 4 mm / US 6 and change to smaller needles when explained in the pattern, ie for sections worked with garter stitch and M.2. Then you will change back to larger needle, etc... Happy knitting!
22.01.2025 - 09:25
![]() Anne-Mieke wrote:
Anne-Mieke wrote:
Het vestje sluit links over rechts, ik dacht dat een damesvest altijd rechts over links moest sluiten.
24.12.2024 - 22:32
![]() Paz Diaz wrote:
Paz Diaz wrote:
Para un busto de 85cm. Que talla necesito?
13.11.2024 - 19:34DROPS Design answered:
Hola Paz, para un busto de 85cm se recomienda hacer la talla L.
17.11.2024 - 19:39
|
||||||||||||||||||||||
Meringue#meringuecardigan |
||||||||||||||||||||||
 |
 |
|||||||||||||||||||||
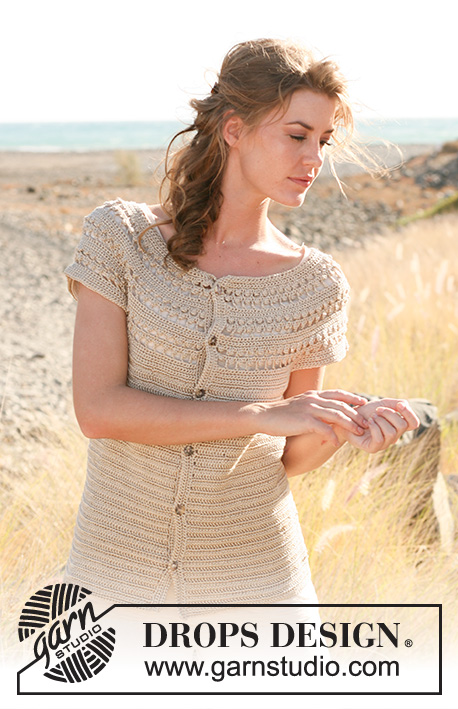
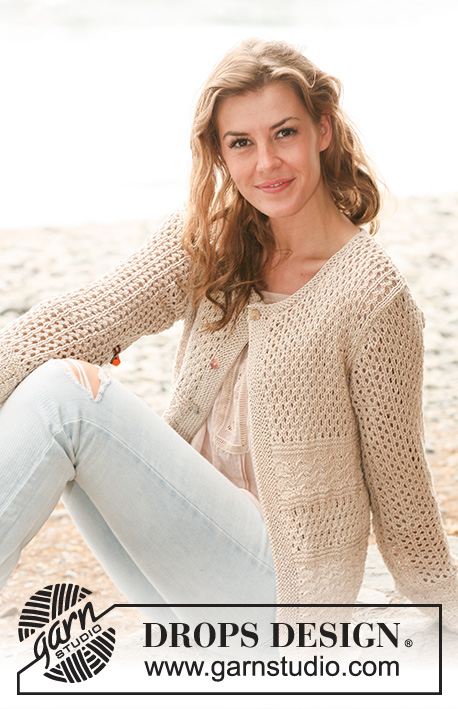
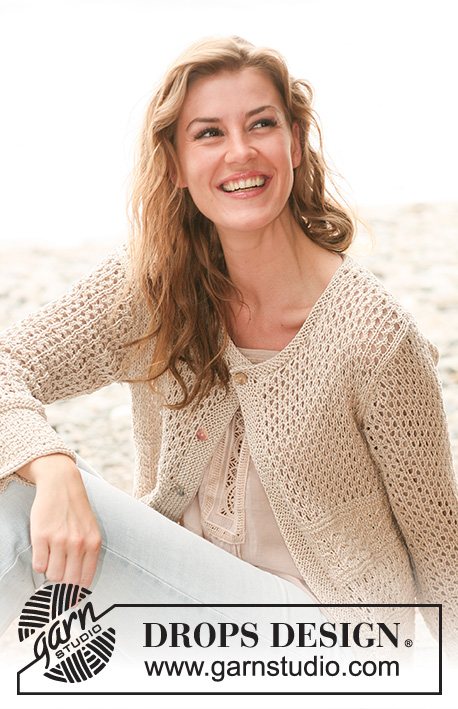
Knitted DROPS jacket with textured pattern and lace pattern in "Muskat". Size: S - XXXL.
DROPS 130-11 |
||||||||||||||||||||||
|
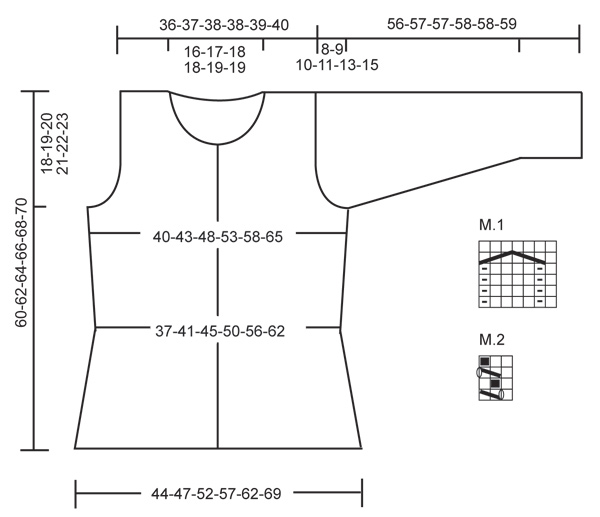
GARTER ST (back and forth on needle): K all rows. PATTERN: See diagram M.1 (= 7 sts) and M.2 (= 3 sts). The diagram shows the pattern from RS. INCREASE TIP: Inc by making 1 YO from RS. On next row K YO twisted (i.e. work in the back loop of st instead of front) to avoid holes. BUTTON HOLES: Cast off for button holes on right front band. 1 button hole = cast off 1 st. On next row cast on 1 new st over the cast off st. Cast off for button holes when piece measures (measured from neckline): SIZE S-L: 1, 9, 17, 25 and 33 cm SIZE XL-XXXL: 1, 9, 17, 25, 33 and 41 cm -------------------------------------------------------- JACKET: Worked back and forth on circular needle. Cast on 185-199-220-241-262-290 sts (incl 1 edge st in each side) on circular needle size 4 mm with Muskat. Work 4 rows in GARTER ST - see explanation above, then work PATTERN - see explanation above - on next row from RS as follows: 1 edge st in garter st, repeat M.1 until 2 sts remain, finish with 1 st in stocking st and 1 edge st in garter st. Continue like this with M.1 vertically. When piece measures 18 cm (finish after 1 whole repetition of M.1) switch to circular needle size 3.5 mm. K 1 row from RS while AT THE SAME TIME dec 26-25-28-28-25-26 sts evenly = 159-174-192-213-237-264 sts. K 5 rows. On next row from RS work pattern as follows: 1 edge st in garter st, repeat M.2 until 2 sts remain, finish with 1 st in stocking st and 1 edge st in garter st. Continue like this with M.2 vertically. REMEMBER THE KNITTING TENSION! When piece measures 26 cm (finish after 2nd or 4th row in M.2) K 1 row from RS while AT THE SAME TIME inc 5-4-0-7-4-5 sts evenly - READ INCREASE TIP! = 164-178-192-220-241-269 sts. K 5 rows. Switch back to circular needle size 4 mm. Then work pattern on next row from RS as follows: 1 edge st in garter st, repeat M.1 until 2 sts remain, finish with 1 st in stocking st and 1 edge st in garter st. Continue like this with M.1 vertically. When piece measures 34 cm (finish after 1 whole repetition of M.1) switch back to circular needle size 3.5 mm. K 1 row from RS while AT THE SAME TIME inc 7-5-6-2-2-7 sts evenly = 171-183-198-222-243-276 sts. K 5 rows. On next row from RS work pattern as follows: 1 edge st in garter st, repeat M.2 until 2 sts remain, finish with 1 st in stocking st and 1 edge st in garter st. Continue like this with M.2 until finished measurements. AT THE SAME TIME when piece measures 42-43-44-45-46-47 cm, cast off and dec for armhole as follows from RS: Work pattern over the first 40-43-46-52-58-67 sts as before, cast off the next 6 sts in stocking st, work pattern over the next 79-85-94-106-115-130 sts as before, cast off the next 6 sts in stocking st, work pattern over the remaining 40-43-46-52-58-67 sts as before. Finish each part separately. BACK PIECE: = 79-85-94-106-115-130 sts. Continue with pattern while AT THE SAME TIME casting off and dec for armholes at beg of row in each side as follows: 2 sts 1-2-2-4-6-8 times and 1 st 0-0-3-5-5-7 times = 75-77-80-80-81-84 sts (work sts that do not fit the pattern in stocking st). When piece measures 58-60-62-64-66-68 cm, cast off the middle 31-33-36-36-37-38 sts for neck and finish each shoulder separately. Continue to dec 1 st on next row from neck = 21-21-21-21-21-22 sts remain on the shoulder. Cast off when piece measures 60-62-64-66-68-70 cm. LEFT FRONT PIECE: = 40-43-46-52-58-67 sts. Cast off and dec for armhole in side as on back piece = 38-39-39-39-41-44 sts. When piece measures 50-52-53-55-56-58 cm, cast off for neck at the beg of row from mid front as follows: 11-12-12-12-14-16 sts 1 time, then cast off 2 sts a total of 3 times = 21-21-21-21-21-22 sts remain on shoulder. Cast off when piece measures 60-62-64-66-68-70 cm. RIGHT FRONT PIECE: Work as left front piece but reversed. SLEEVE: Worked back and forth on circular needle. Cast on 45-45-52-52-52-52 sts (incl 1 edge st in each side) on circular needle size 4 mm with Muskat. Work 4 rows in garter st, then work pattern on next row from RS as follows: 1 edge st in garter st, repeat M.1 until 2 sts remain, finish with 1 st in stocking st and 1 edge st in garter st. Continue like this with M.1 vertically. When piece measures 10 cm (finish after 1 whole repetition of M.1) switch to circular needle size 3.5 mm. K 1 row from RS while AT THE SAME TIME inc 3-3-2-2-2-2 sts evenly = 48-48-54-54-54-54 sts. K 5 rows. On next row from RS work pattern as follows: 1 edge st in garter st, repeat M.2 until 2 sts remain, finish with 1 st in stocking st and 1 edge st in garter st. Continue with M.2 until finished measurements. AT THE SAME TIME when piece measures 12 cm, inc 1 st in each side. Repeat inc every 6½-4-4-2½-2-1½ cm a total of 6-9-9-12-15-18 times = 60-66-72-78-84-90 sts (NOTE! Work the inc sts in stocking st until they fit the pattern again). When piece measures 48-48-47-47-45-44 cm (NOTE! Shorter measurements in the larger sizes because of longer sleeve cap and broader shoulder width), cast off 3 sts at the beg of the next 2 rows for sleeve cap. Then cast off at the beg of row in each side as follows: 2 sts 2-2-2-3-3-3 times, 1 st 5-6-8-7-10-13 times, then cast off 2 sts in each side until piece measures 55-56-56-57-57-58 cm. Cast off 3 sts 1 time in each side. Cast off. Now sleeve measures approx. 56-57-57-58-58-59 cm. ASSEMBLY: Sew the shoulder seams. Sew sleeves tog inside 1 edge st and sew in sleeves. LEFT FRONT BAND: Knit up approx. 95-98-100-104-106-110 sts inside 1 edge st on left front piece on circular needle size 3.5 mm with Muskat. Work 12 rows in garter st (6 ridges) back and forth on needle. Cast off. RIGHT FRONT BAND: Work as on left front band. AT THE SAME TIME when 5 rows K have been worked, cast off for 5-5-5-6-6-6 BUTTON HOLES - see explanation above - on next row from WS. NECKLINE: Knit up approx. 95-98-105-105-110-110 sts around the neckline (also knit up over the front bands) on circular needle size 3.5 mm with Muskat. Work 6 rows in garter st. Cast off. Sew the buttons on to the left front band. |
||||||||||||||||||||||
Diagram explanations |
||||||||||||||||||||||
|
||||||||||||||||||||||
 |
||||||||||||||||||||||
Have you finished this pattern?Tag your pictures with #dropspattern #meringuecardigan or submit them to the #dropsfan gallery. Do you need help with this pattern?You'll find 22 tutorial videos, a Comments/Questions area and more by visiting the pattern on garnstudio.com. © 1982-2026 DROPS Design A/S. We reserve all rights. This document, including all its sub-sections, has copyrights. Read more about what you can do with our patterns at the bottom of each pattern on our site. |
||||||||||||||||||||||


With over 40 years in knitting and crochet design, DROPS Design offers one of the most extensive collections of free patterns on the internet - translated to 17 languages. As of today we count 324 catalogues and 12290 patterns translated into English (UK/cm). 12290
We work hard to bring you the best knitting and crochet have to offer, inspiration and advice as well as great quality yarns at incredible prices! Would you like to use our patterns for other than personal use? You can read what you are allowed to do in the Copyright text at the bottom of all our patterns. Happy crafting!
Post a comment to pattern DROPS 130-11
We would love to hear what you have to say about this pattern!
If you want to leave a question, please make sure you select the correct category in the form below, to speed up the answering process. Required fields are marked *.