
Popular categories
Looking for a yarn?


Comments / Questions (30)
![]() Stéphanie wrote:
Stéphanie wrote:
Je tricote le pantalon. Quand vous dites, milieu dos et milieu devant ( 57 mailles entre les 2). J’ai 116 mailles, je ne comprends pas, ce ne devrait pas être 58 mailles? Et est-ce que le milieu dos c’est le début du tour ? Je débute dans le tricot circulaire ! Merci pour vos réponses J’aime beaucoup vos patron et votre laine !
16.10.2025 - 22:06DROPS Design answered:
Bonjour Stéphanie et merci. Les marqueurs vont être ici placés dans une maille (pas entre les mailles), ainsi vous aurez bien 57 m entre les marqueurs + 1 m avec chacune un marqueurs = 57x2 + 2=116. Bon tricot!
17.10.2025 - 08:08
![]() Eeva Salo wrote:
Eeva Salo wrote:
Jos housuosassa (koko 12/18 kk) on ennen haarakiilaa 104 silmukkaa, ja lisätään sekä edessä että takana kaksi silmukkaa yhdeksän kertaa, eikö silmukkamäärä silloin ole 104 + 9*2*2 = 140 silmukkaa, ei 122 silmukkaa?
27.04.2025 - 21:28
![]() Helle Teglgaard wrote:
Helle Teglgaard wrote:
Når arbejdet måler (bukser) 11 cm, tages 1 maske ud på hver side af de 3 midterste masker. Så kommer de 15 masker rib ikke til at passe, eller er det midt bag, man skal tage masker ud. God weekend og hilsen fra Helle
24.01.2025 - 15:59DROPS Design answered:
Hei Helle. Jo, du øker midt foran, og disse økte maskene strikkes i glattstrikk, mens de 15 maskene i vrangbord i hver side fortsettes å strikkes i vrangbord. mvh DROPS Design
27.01.2025 - 10:08
![]() Sonia wrote:
Sonia wrote:
Dans le patron du pantalon ça dit faire 8cm côtes ensuite j'ai fait mes diminutions et ça dit se poursuivre pour 11 cm est ce que c'est 11 cm avec le 8cm de tour de taille inclus ou c'est en plus ? Un gros merci de votre aide
15.04.2024 - 19:47DROPS Design answered:
Bonjour Sonia, les 11 cm doivent être mesurés à partir du rang de montage, autrement dit, c'est 3 cm après les diminutions de la taille faites à 8 cm de hauteur totale. Bon tricot!
16.04.2024 - 08:06
![]() Liz M wrote:
Liz M wrote:
I have a problem with the sleeve Pattern says ‘ Cast off for sleeve cap at beg of every row each side: 2-3-3 (4-4) sts until piece measures 21-22-24 (29-33) cm, ’ - does this mean every row for four cm or once then carry on for four cm? Thanks
15.09.2023 - 02:17DROPS Design answered:
Hi Liz, You cast off the correct number of stitches at the beginning of every row, until the piece measures the length stated. So if it is 4 sts you are casting off each time, then cast off 4sts at the beginning of every row to finished length. Happy knitting!
15.09.2023 - 06:40
![]() Marie Simonová wrote:
Marie Simonová wrote:
Ve Vašem popise máte špatně dané počty ok v rozložení na zadní a přední díly ( nepočítá se s odečtem dříve uvedeným! Prosím o odpověď!
07.06.2023 - 15:36DROPS Design answered:
Dobrý den, paní Simonová, děkujeme za upozornění - v návodu chyběla mj. informace o přidávání, které počet ok opět srovná. Návod nyní prošel kompletní revizí a měl by již být zcela v pořádku (všechny jeho části). Věřím, že vám udělá radost! Hana
17.06.2023 - 09:14
![]() Dana wrote:
Dana wrote:
2×(37 plus 6 krajovych ok),coz z navodu neni patrne, je 86 ok. Plus 65 pro zadni dil je 151 ok,tj. puvodni pocet ok pred ubiranim 40 ok. Navod je cely spatne, pocitam tedy vse od prvni rady se 151 oky, a je to super! Fakt. Prosim znovu o opravu.
17.08.2022 - 18:46
![]() Dana wrote:
Dana wrote:
Dobry den, Mate v navodu kabatku spravny pocet ok? Pisete,ze se ma umistit znacku za 37.oko z kazde strany (zatim celkem 37x2=74 ok) a zbyde 65 ok pro zadni dil (74+65=139 ok). Mam ale po ubrani 40 ok pouze 111 ok!!! Udaj 139 ok se v navodu vyskytl jakonpocet ok mezi legy pred ubranim! Pokracuju dal tedy prepicitanim: Znacku za 28. oko z kazdecstrany a zbyde 55 ok pro zadni dil. Doufsm,zecse s navodem dal nejak domluvim. Prosim o opravu.
17.08.2022 - 18:25DROPS Design answered:
Hi, if you can write your question in English, we can try to help you :)
16.11.2022 - 13:42
![]() Denise Van Dijk wrote:
Denise Van Dijk wrote:
I am knitting the jacket. Cast on with 3.5mm for ribbing, change to 4.5mm for stockinette stitch then change again to 3.5mm for ribbing (middle part), but it does not tell you to change back to 4.5mm for the remaining stockinette stitch. Is this correct? So the top part of the jacket after the middle ribbing the stockinette stitch is done with 3.5mm or should you change back to 4.5mm? Also is it correct the sleeves are knitted only with 3.5mm so 4.5mm is not used at all for the sleeve
05.07.2022 - 23:23DROPS Design answered:
Hi Denise, The jacket is finished in rib and the sleeves are worked in rib the whole way up so, yes, you continue to use needles size 3.5 mm on the jacket and for the whole of the sleeves. Happy knitting!
06.07.2022 - 06:53
![]() Ute K wrote:
Ute K wrote:
Bezüglich der Jacke: nach dem Bündchen sollen Maschen abgenommen werden...das habe ich mit unterschiedlichen Methoden ausprobiert. Ergebnis: das Bündchen klappt hoch, sobald das Strickstück etwas länger ist. Ich würde die Extramaschen des Bündchens jetzt weglassen. Ansonsten eine schöne Jacke!
22.02.2021 - 08:40
|
|
DROPS Baby 20-8 |
|
 |
 |
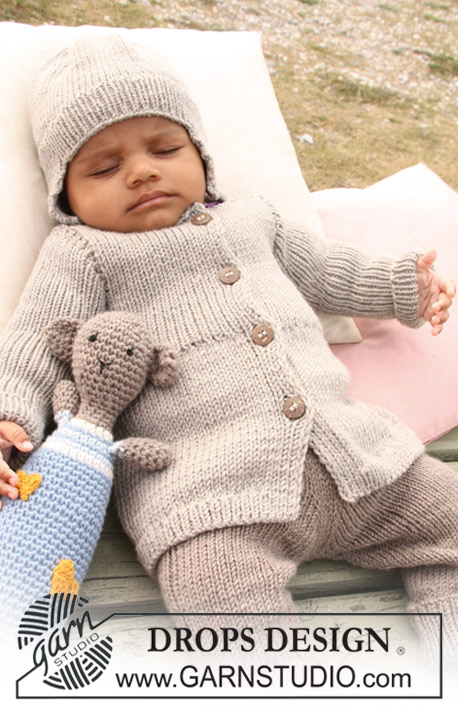
Set of knitted jacket, pants and hat for baby and children with rib and crochet teddy bear in DROPS Merino Extra Fine
DROPS Baby 20-8 |
|
|
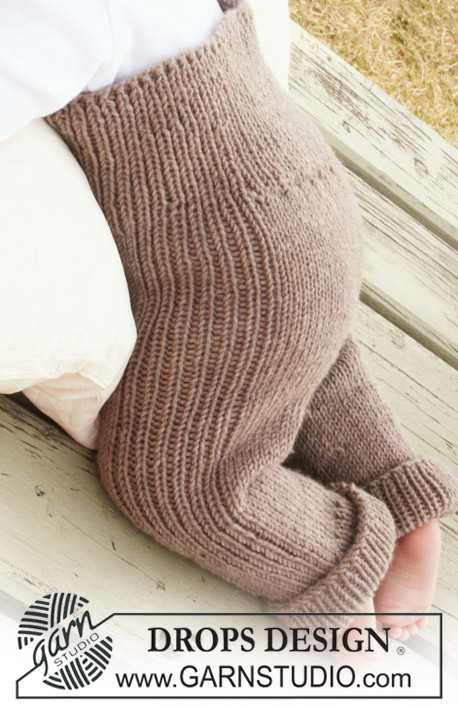
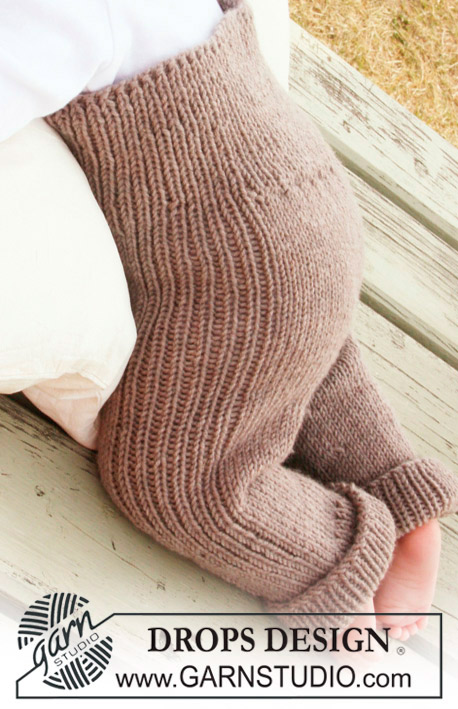
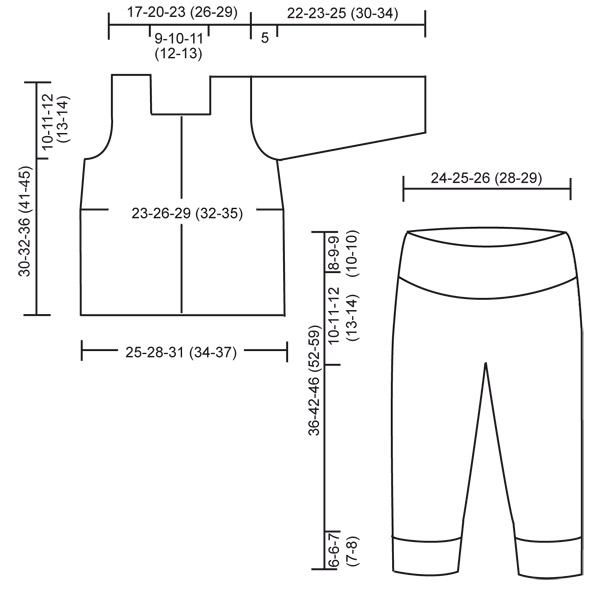
JACKET: INCREASING TIP: Inc 1 st by making 1 YO. On next row work YO into back of loop to avoid a hole. BUTTONHOLES: Make buttonholes on right front band. 1 BUTTONHOLE = cast off 4th front band st from mid front and cast on 1 new st on return row. Make buttonholes when piece measures: SIZE 1/3 MONTHS: 6, 12, 18 and 24 cm. SIZE 6/9 MONTHS: 8, 14, 20 and 26 cm. SIZE 12/18 MONTHS: 5, 11, 17, 23 and 29 cm. SIZE 2 YEARS: 5, 12, 19, 26 and 33 cm. SIZE 3/4 YEARS: 9, 16, 23, 30 and 37 cm. -------------------------------------------------------- JACKET: Worked back and forth on circular needle. Cast on 151-167-185 (201-219) sts on circular needle size 3.5 mm with Merino Extra Fine. Work rib K1/P1. When rib measures 2-2-2 (3-3) cm change to circular needle size 4.5 mm. Work next row from RS as follows: Rib K1/P1 on the first 6 sts, stocking st on the next 139-155-173 (189-207) sts, AT THE SAME TIME dec 40-44-50 (54-60) sts evenly, finish with rib P1/K1 on the last 6 sts = 111-123-135 (147-159) sts. 6 sts each side = front bands, front bands worked in rib throughout. NOTE! Remember BUTTONHOLES - see above! Continue in stocking st with 6 front band sts each side. REMEMBER THE KNITTING TENSION! When piece measures 14-15-18 (22-25) cm (adjust to a row from WS) P 1 row from WS (front bands as before) AT THE SAME TIME inc 28-34-38 (42-48) sts evenly (do not inc on front bands) – see INCREASING TIP! = 139-157-173 (189-207) sts. Insert a marker 37-42-46 (50-55) sts in from each side (back piece = 65-73-81 (89-97) sts). Change to circular needle size 3.5 mm and continue in rib K1/P1 on all sts. When piece measures 20-21-24 (28-31) cm cast off 6 sts each side for armhole (i.e. 3 sts each side of marker - cast off with K over K and P over P) and complete each piece separately. BACK PIECE: = 59-67-75 (83-91) sts. Cast off to shape the armhole at beg of every row each side: 2 sts 3-3-2 (2-2) times and 1 st 0-0-1 (1-1) times = 47-55-65 (73-81) sts. When piece measures 28-30-34 (39-43) cm cast off the middle 25-29-31 (33-35) sts for neck (cast off with K over K and P over P) and complete each shoulder separately = 11-13-17 (20-23) sts. Continue in rib as before with 1 garter st towards neck. Cast off with K over K and P over P when piece measures 30-32-36 (41-45) cm. LEFT FRONT PIECE: = 34-39-43 (47-52) sts. Cast off for armhole at the side as described for back piece = 28-33-38 (42-47) sts. When piece measures 26-28-31 (35-39) cm cast off 17-20-21 (22-24) sts towards mid front for neck (cast off with K over K and P over P) = 11-13-17 (20-23) sts left on shoulder. Continue in rib as before with 1 garter st towards neck. Cast off with K over K and P over P when piece measures 30-32-36 (41-45) cm. RIGHT FRONT PIECE: = 34-39-43 (47-52) sts. Like left front piece but mirrored. SLEEVE: Worked in the round. Cast on 42-44-44 (48-48) sts on double pointed needles size 3.5 mm. Insert a marker at beg of round. Work rib K1/P1 until finished measurements. AT THE SAME TIME when piece measures 4 cm inc 1 st each side of marker – incorporate inc sts in rib as you go along. Repeat the inc on every 3-2-1.5 (2-2) cm a total of 4-6-9 (10-12) times = 50-56-62 (68-72) sts. When piece measures 17-18-20 (25-29) cm cast off 6 sts under sleeve for armhole (i.e. 3 sts each side of marker) and complete piece back and forth on needle. Cast off for sleeve cap at beg of every row each side: 2-3-3 (4-4) sts until piece measures 21-22-24 (29-33) cm, now cast off 3 sts each side and cast off remaining sts with K over K and P over P. ASSEMBLY: Sew shoulder seams. Set in sleeves and sew on buttons. --------------------------------------------------------- PANTS: DECREASING TIP: Dec as follows before marker: K2 tog. Dec as follows after marker: slip 1 st as if to K, K1, psso. --------------------------------------------------------- --------------------------------------------------------- PANTS: PANTS: Worked in the round on needle from waist down. Cast on 110-114-118 (130-134) sts on circular needle size 3.5 mm with light brown mix. Work rib, K1/P1 for 8-9-9 (10-10) cm. Change to circular needle size 4.5 mm and work next round as follows: * K1, P1 *, repeat from *-* a total of 4 times, work stocking st on the next 39-41-43 (49-51) sts AT THE SAME TIME dec 6-6-6 (8-8) sts evenly = 33-35-37 (41-43) sts stocking st, * P1, K1 *, repeat from *-* a total of 7 times, P1, stocking st on the next 41-43-45 (51-53) sts AT THE SAME TIME dec 8-8-8 (10-10) sts evenly = 33-35-37 (41-43) sts stocking st, * P1, K1 *, repeat from *-* a total of 3 times and finish with P1. There are now 96-100-104 (112-116) sts on needle. Insert 1 marker in the middle st at front and 1 marker in the middle st at back (= 47-49-51 (55-57) sts between sts with markers). Continue in the round in stocking st and 15 sts in rib each side. REMEMBER THE KNITTING TENSION! When piece measures 11-13-14 (16-17) cm inc 1 st each side of the 3 middle sts at front - inc by picking up st from previous round and K this. Repeat the inc on every other round a total of 9-9-9 (10-10) times = 114-118-122 (132-136) sts. On next round cast off the 3 middle sts at front and the 3 middle sts at back (i.e. st with marker and 1 st each side of this st) and work each leg separately. Piece measures approx 18-20-21 (23-24) cm. Slip the 54-56-58 (63-65) sts for one leg on a stitch holder and the 54-56-58 (63-65) sts for the other leg on double pointed needles size 4.5 mm. LEG: Continue in stocking st in the round with 15 sts rib on the outside of leg as before – insert a marker at beg of round = inside of leg. When leg measures 2-2-2 (3-3) cm dec 1 st on each side of marker – SEE DECREASING TIP! Repeat the dec on every 2-3-3.5 (4-5.5) cm a total of 5 times = 44-46-48 (53-55) sts. When leg measures 12-16-18 (22-27) cm change to double pointed needles size 3.5 mm. Work 1 round stocking st, AT THE SAME TIME inc 4-4-6 (5-5) sts evenly – NOTE! Do not inc on rib sts at the side = 48-50-54 (58-60) sts. Continue in rib, K1/P1 in the round on all sts (make sure rib fits rib at the side). When leg measures 18-22-25 (29-35) cm (pants measure a total of 36-42-46 (52-59) cm from the waist) cast off LOOSELY with K over K and P over P. Work the other leg in the same way. ASSEMBLY: Sew opening between legs. -------------------------------------------------------- HAT: INCREASING TIP: Inc 1 st by making a YO. K YO into back of loop on return row to avoid a hole. ---------------------------------------------------------- HAT: Worked in the round, from top down. Cast on 8-10-13 (15-18) sts on double pointed needles size 4 mm (leave a thread end to use when tightening the top tog afterwards). Work 1 round stocking st, AT THE SAME TIME inc 7-10-12 (15-17) sts evenly – see INCREASING TIP! = 15-20-25 (30-35) sts. Insert 5 markers in piece with 3-4-5 (6-7) sts between each. Continue in stocking st, AT THE SAME TIME on second round inc 1 st each side of all markers. Repeat the inc on every other round a total of 6 times = 75-80-85 (90-95) sts. Change to circular needle size 4 mm. REMEMBER THE KNITTING TENSION! Continue in stocking st. When piece measures 11-12-13 (14-15) cm inc 25-26-29 (30-31) sts evenly (inc between approx every 3rd and 4th st) = 100-106-114 (120-126) sts. Change to circular needle size 3.5 mm and continue in rib K1/P1 on all sts. When rib measures 3 cm cast off as follows - NOTE! Round beg 10-10-8 (8-7) sts before mid back: cast off 21-21-17 (17-15) sts with K over K and P over P (= mid back), slip the next 25-27-33 (35-39) sts on a stitch holder for earflap, cast off the next 29-31-31 (33-33) sts (= forehead). Now work earflap back and forth on the last 25-27-33 (35-39) sts as follows: continue in rib K1/P1, AT THE SAME TIME dec 1 st at beg of every row a total of 9-10-13 (14-16) times each side = 7 sts. On next row cast off remaining sts with K over K and P over P. Earflap measures approx 5-6-8 (8.5-10) cm. Work the other earflap in the same way. Tighten the top of hat tog and fasten thread. TIE STRINGS: Cut 2 threads measuring 75 cm each and twist them hard. Pull string through bottom of earflap and fold it double to let it twist again. Tie a knot at the end of string. Repeat at the other earflap. --------------------------------------------------------- TEDDY: CROCHET INFO: Replace first dc on round with 1 ch and finish each round with 1 sl st in first dc from beg of round. CROCHET DC TOG: Crochet 2 dc tog to 1 dc as follows: Insert hook in first st, pick up thread, insert hook in next st, pick up thread, make 1 YO and pull thread through all 3 sts on hook. --------------------------------------------------------- HEAD AND BODY: Beg at the top of head and after the head crochet the body. Then crochet ears, arms, and the hearts, which are sewn on afterwards. HEAD: SEE CROCHET INFO! Crochet 4 ch with crochet hook size 4 mm with light brown mix and form a ring with 1 sl st in first ch. ROUND 1: Crochet 6 dc in ring. ROUND 2: 2 dc in each dc = 12 dc. ROUND 3: * 1 dc in first dc, 2 dc in next dc *, repeat from *-* = 18 dc. ROUND 4: * 1 dc in each of the first 2 dc, 2 dc in next dc *, repeat from *-* = 24 dc. ROUND 5: * 1 dc in each of the first 3 dc, 2 dc in next dc *, repeat from *-* = 30 dc. ROUND 6-11: Crochet 1 dc in each dc = 30 dc. ROUND 12: * 1 dc in each of the first 3 dc, then crochet the next 2 dc tog (see above) *, repeat from *-* = 24 dc. ROUND 13: Crochet 1 dc in each dc = 24 dc. ROUND 14: * 1 dc in each of the first 2 dc, then crochet the next 2 dc tog *, repeat from *-* = 18 dc. ROUND 15: * 1 dc in first dc, then crochet the next 2 dc tog *, repeat from *-* = 12 dc. Now fill the head with cotton wool and continue in the round for body without cutting the thread. ROUND 16-18: Crochet 1 dc in each dc = 12 dc. ROUND 19: * 1 dc in each of the first 2 dc, 2 dc in next dc *, repeat from *-* = 16 dc. Change to off-white. ROUND 20: * 1 dc in each of the first 3 dc, 2 dc in next dc *, repeat from *-* = 20 dc. Change to light grey/blue. ROUND 21: Crochet 1 dc in each dc = 20 dc. Change to light grey/green. ROUND 22: * 1 dc in each of the first 4 dc, 2 dc in next dc *, repeat from *-* = 24 dc. Change to light grey/blue. ROUND 23: Crochet 1 dc in each dc = 24 dc. Change to light grey/green. ROUND 24: * 1 dc in each of the first 3 dc, 2 dc in next dc *, repeat from *-* = 30 dc. Change to off-white. ROUND 25: Crochet 1 dc in each dc = 30 dc. Change to light grey blue and crochet the rest of the body as follows: ROUND 26-29: Crochet 1 dc in each dc = 30 dc. ROUND 30: * 1 dc in each of the first 9 dc, 2 dc in next dc *, repeat from *-* = 33 dc. ROUND 31-39: Crochet 1 dc in each dc = 33 dc. ROUND 40: * 1 dc in each of the first 10 dc, 2 dc in next dc *, repeat from *-* = 36 dc. ROUND 41-46: Crochet 1 dc in each dc = 36 dc. ROUND 47: * 1 dc in each of the first 10 dc, then crochet the next 2 dc tog *, repeat from *-* = 33 dc. ROUND 48: Crochet 1 dc in each dc = 33 dc. ROUND 49: * 1 dc in each of the first 9 dc, then crochet the next 2 dc tog *, repeat from *-* = 30 dc. ROUND 50: * 1 dc in each of the first 3 dc, then crochet the next 2 dc tog *, repeat from *-* = 24 dc. ROUND 51: Crochet 1 dc in each dc = 24 dc. ROUND 52: * 1 dc in each of the first 2 dc, then crochet the next 2 dc tog *, repeat from *-* = 18 dc. ROUND 53: Crochet 1 dc in each dc = 18 dc. ROUND 54: * 1 dc in first dc, then crochet the next 2 dc tog *, repeat from *-* = 12 dc. ROUND 55: Crochet 2 dc tog all the way round = 6 dc. Fill the body with cotton wool, cut the thread, pull thread through remaining sts, tighten and fasten. LEGS: Crochet 4 ch with crochet hook size 4 mm with light brown mix and form a ring with 1 sl st in first ch. ROUND 1: Crochet 8 dc in ring. ROUND 2: * 1 dc in first dc, 2 dc in next dc *, repeat from *-*= 12 dc. ROUND 3: Crochet 1 dc in each dc = 12 dc – NOTE: Crochet in back loop of st. ROUND 4: Crochet 1 dc in each dc = 12 dc – NOTE: Crochet through both loops again. ROUND 5: Crochet 1 dc in each dc, at the same time crochet 2 dc tog at the beg and at the end of round = 10 dc. ROUND 6: Crochet 1 dc in each dc, at the same time crochet tog 5th and 6th dc and crochet tog 7th and 8th dc on round = 8 dc. Cut the thread. Crochet 1 more leg in the same way. Fill the legs with cotton wool and sew the legs to bottom of body. ARMS: Crochet 4 ch with crochet hook size 4 mm with light brown mix and form a ring with 1 sl st in first ch. ROUND 1: Crochet 4 dc in ring. ROUND 2: Crochet 2 dc in each dc = 8 dc. ROUND 3-6: Crochet 1 dc in each dc = 8 dc. Change to light grey/green. ROUND 7: Crochet 1 dc in each dc = 8 dc Fill the arm with cotton wool, place piece flat and crochet 1 dc in each dc through both layers = 4 dc. Cut the thread. Crochet 1 more arm in the same way and sew arms to the side of body at the top. EARS: Crochet 4 ch with crochet hook size 4 mm with light brown mix and form a ring with 1 sl st in first ch. ROUND 1: Crochet 6 dc in ring. ROUND 2: * 1 dc in first dc, 2 dc in next dc *, repeat from *-* = 9 dc. ROUND 3: * 1 dc in each of the first 2 dc, 2 dc in next dc *, repeat from *-* = 12 dc. ROUND 4-6: Crochet 1 dc in each dc = 12 dc. Place piece flat and crochet 1 dc in each dc through both layers = 6 dc, turn piece and crochet 2 dc tog across the row = 3 dc. Cut the thread and sew ear to the top of head to the side. Crochet 1 more ear and attach to the opposite side of head. SMALL HEART: Crochet 2 ch with crochet hook size 3 mm with guacamole (try to find a yellow section of the yarn) and crochet 3 dc in first ch, turn piece. Crochet 1 ch, then 1 dc in each st = 5 dc (includes ch at beg and end of row), turn piece. Crochet 3 ch, 1 tr in first ch, 1 dc in middle of heart, 3 ch, 1 tr in first ch, 1 sl st in ch from beg of previous row. Cut the thread and sew the heart to the front of teddy. LARGE HEART: Crochet 2 ch with crochet hook size 3 mm with guacamole (try to find a yellow section of the yarn) and crochet 3 dc in first ch, turn piece. Crochet 1 ch, then 1 dc in each st = 5 dc (includes ch at beg and end of row), turn piece. Crochet 1 ch, then 1 dc in each st = 6 dc (includes ch at beg of row), turn piece. Crochet 4 ch, 1 tr in first ch, 1 dc in the middle of heart, 4 ch,1 tr in first ch, 1 sl st in ch from beg of previous row. Cut the thread and sew the heart to the front of teddy. Crochet 1 more heart and sew to the back of teddy. SCARF: Crochet 4 ch with crochet hook size 3 mm with guacamole, crochet 1 dc in second ch from hook and 1 dc in each of the next 2 ch = 3 dc + 1 ch, turn piece. Now crochet 4 dc back and forth until scarf measures approx 25-30 cm. Cut the thread and fasten. Embroider eyes and mouth at the front of teddy with black. |
|
 |
|
Have you finished this pattern?Tag your pictures with #dropspattern or submit them to the #dropsfan gallery. Do you need help with this pattern?You'll find 23 tutorial videos, a Comments/Questions area and more by visiting the pattern on garnstudio.com. © 1982-2026 DROPS Design A/S. We reserve all rights. This document, including all its sub-sections, has copyrights. Read more about what you can do with our patterns at the bottom of each pattern on our site. |
|


With over 40 years in knitting and crochet design, DROPS Design offers one of the most extensive collections of free patterns on the internet - translated to 17 languages. As of today we count 325 catalogues and 12298 patterns translated into English (UK/cm). 12298
We work hard to bring you the best knitting and crochet have to offer, inspiration and advice as well as great quality yarns at incredible prices! Would you like to use our patterns for other than personal use? You can read what you are allowed to do in the Copyright text at the bottom of all our patterns. Happy crafting!
Post a comment to pattern DROPS Baby 20-8
We would love to hear what you have to say about this pattern!
If you want to leave a question, please make sure you select the correct category in the form below, to speed up the answering process. Required fields are marked *.