
Popular categories
Looking for a yarn?


Comments / Questions (58)
![]() Catarina wrote:
Catarina wrote:
Kofta för strl 6/9 mån. Har följt era instruktioner men kommer fel hela tiden på varv 1. Om det första jag gör på varv 1 är att "virka 1 st i 4 lm från nålen, *hoppas över 1 lm, 1 st i varje av följande 3 lm*" etc så får jag stolpar i löpmaskorna från 6-8, 10-12... etc fram till 66-68. Jag fattar inte hur ni menar att jag ska ha 4 st i början och i slutet av varvet. Jag har INGEN i första lm och bara två i slutet. Hur ska man göra maska för maska ?
10.10.2021 - 01:50
![]() Isabelle Bock wrote:
Isabelle Bock wrote:
Jeg søger som Susanne en opskalering af opskriften - men dame modellerne er klart for store til en 6 eller 9 årig (mine kandidater til jakken). Kan I hjælpe?
18.03.2021 - 17:36
![]() Carina wrote:
Carina wrote:
Hej! Har samma problem som "Gun Hansson 03.03.2017 - 17:11" skrev om till er. Men svaret från er till henne är ju jättekonstigt och hjälper inte alls. Problemet gäller första varvet med stolpar där det står att varvet slutar med 4 st i var sida. Det har ju ingenting att göra med vad som händer längre fram i arbetet. Det blir inte 4 st i var sida! Tacksam om ni kan ge ett bättre svar, helst på svenska !
10.04.2020 - 10:43DROPS Design answered:
Hej Carina, jo du virkar st hela varvet ut och de 4 st (ut av de totalt 48-52-52-56-56st) i varje sida är framkanten!
29.04.2020 - 09:48
![]() Laura wrote:
Laura wrote:
Ik ben het vestje aan het haken, maar kom er niet uit bij de pas toer 2. Daar staat dat je moet meerderen. In de beschrijving staat dat je bij je markeringen moet meerderen in totaal zijn dat 4 meerderingen. Maar bovenaan staat bij de informatie voor het haken dat je aan iedere kant van de stekenmarkeerder 1 moet meerderen, dan kom je op 8 meerderingen. Welke moet ik aanhouden? Hoeveel moet er per toer erbij gehaakt worden? Alvast bedankt voor het antwoord!
23.03.2020 - 13:31DROPS Design answered:
Dag Laura,
Het is de bedoeling dat je de beschrijving aanhoud wbt het aantal meederingen. Dat betekent dus dat je eerst een aantal keren (afhankelijk van de maat die je breit) 4 stokjes meerdert bij elke hulpdraad (/raglanlijn) en daarna een aantal keren (afhankelijk van de maat die je breit) 2 stokjes meerdert bij iedere hulpdraad. Bovenaan bij de uitleg staat hoe je 4 of 2 stokjes meerdert. In de beschrijving van het patroon staat wanneer en hoe vaak je meerdert.
25.03.2020 - 11:06
![]() Marimar wrote:
Marimar wrote:
Bonjour, Je suis en train de faire le point éventail pour le bas des manches selon vos explications écrites, mais je ne les comprends pas à partir du 2ème rang. J'ai consulté votre vidéo et là cela ne correspond pas du tout à vos explications écrites. Je suis perdue . Merci de m'aider à comprendre
23.02.2020 - 22:55DROPS Design answered:
Bonjour Mme Marimar, au 1er rang vous avez crocheté des arceaux de 2 ml espacés d'1 ms. Au début du 2ème rang, vous crochetez des mailles coulées autour du 1er arceau pour que le 2ème rang commence au milieu du 1er arceau, puis vous crochetez: 3 ml (=1ère bride), *4b, 2 ml, 4b autour de l'arceau suivant, 1 bride dans l'arceau suivant* et répétez de *-* tout le rang. Bon crochet!
24.02.2020 - 09:44
![]() Marimar wrote:
Marimar wrote:
Bonjour, Quand vous dites : " 1er RANG (= envers) : Y compris 4 B de chaque côtes pour les bordures devant " Que voulez vous dire ? Je ne comprend pas. Merci pour votre aide
20.02.2020 - 22:53DROPS Design answered:
Bonjour Mme Marimar, à la fin du 1er rang crocheté sur l'envers, vous avez 48-52-52 (56-56) brides au total, les 4 brides de bordure des devants de chaque côté sont comprises dans ce nombre, on n'aura pas à les augmenter en plus. Bon crochet!
21.02.2020 - 08:35
![]() Fernanda wrote:
Fernanda wrote:
Buongiorno Non ho capito Bisogna lavorare le maniche a parte e poi unire e lavorare insieme il dritto e il rovescio non capisco bene grazie
10.11.2019 - 12:27DROPS Design answered:
Buonasera Fernanda, deve lavorare lo sprone, poi passare a lavorare una manica alla volta e poi lavorare il davanti e il dietro. Buon lavoro!
10.11.2019 - 17:43
![]() Fernanda wrote:
Fernanda wrote:
I segna punti portandoli su ad ogni giro vanno rimessi alla stessa altezza Grazie
08.11.2019 - 20:13DROPS Design answered:
Buongiorno Fernanda, i segnapunti vanno semplicemente spostati durante la lavorazione, sono sempre nello stesso punto. Buon lavoro!
09.11.2019 - 11:26
![]() JMFS wrote:
JMFS wrote:
I'm done with the yoke and the sleeves! Now to begin the body. I think I understand it - we're going to crochet from the right front to the left front, crocheting the armholes closed, and then seam the sleeves after. Is that correct? Or is the left front to the right front? I confuse myself by thinking about it. :D This is the 2nd raglan pattern I've done and it's different than the first, but equally fun!
22.10.2019 - 02:08DROPS Design answered:
Dear JMFS, first row on body will be worked from RS over the left front piece, over stitches on back piece and over stitches on right front piece = stitches between markers as described (increasing evenly). From WS you will then work from the right front piece towards the left front piece. Working the first row will "close" the armholes, then when body is finished you will sew the sleeve and close the hole under armhole. Happy crocheting!
22.10.2019 - 10:55
![]() Susanne Mikkelsen wrote:
Susanne Mikkelsen wrote:
Min datter på 15 år (str xs/s) er også mega vild med denne cardigan, er det muligt at scalere den op, så man kunne hækle den i hendes str. ?
21.09.2019 - 17:38DROPS Design answered:
Hej Susanne, jeg er sikker på at du finder den her: jakker - damer - hæklet God fornøjelse!
25.09.2019 - 08:19
|
|
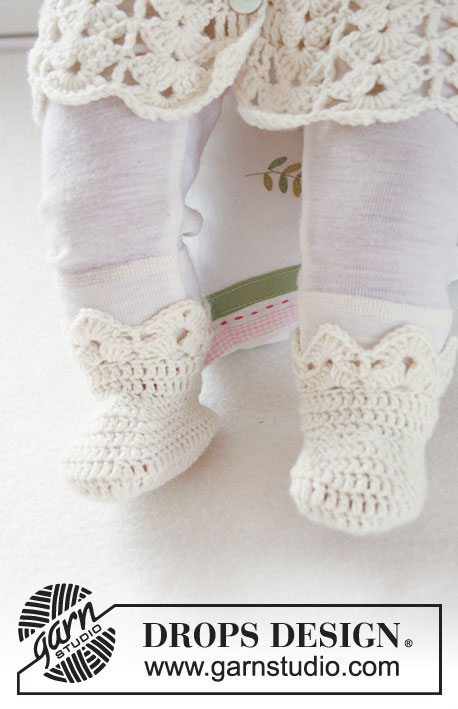
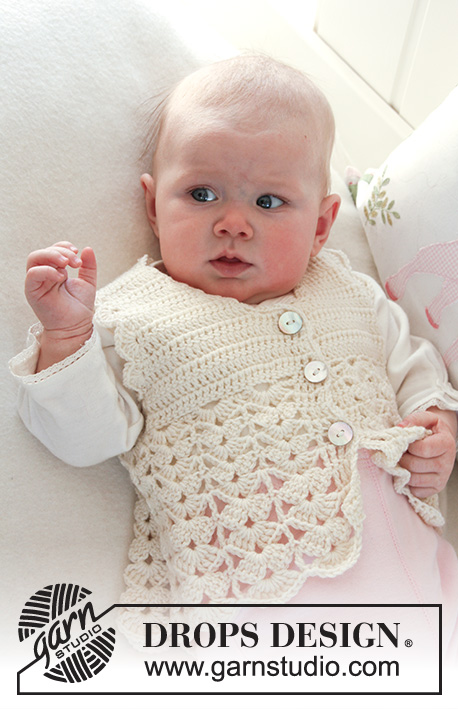
Sweet Buttercup#sweetbuttercupset |
|
 |
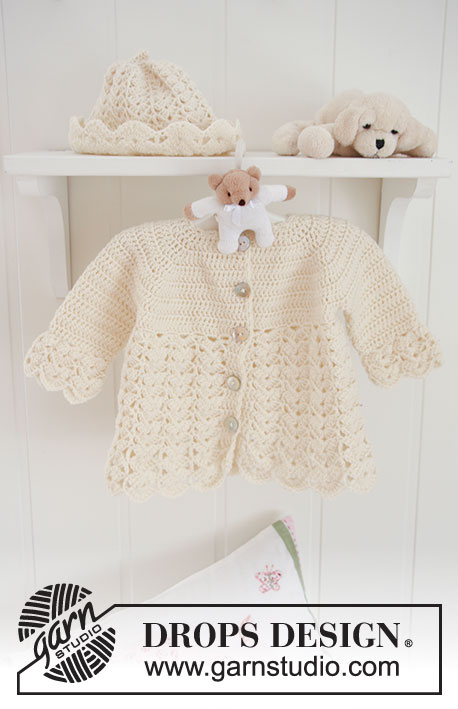 |
Set of crochet jacket with raglan, and hat with fan pattern for baby and children in DROPS BabyMerino
DROPS Baby 19-8 |
|
|
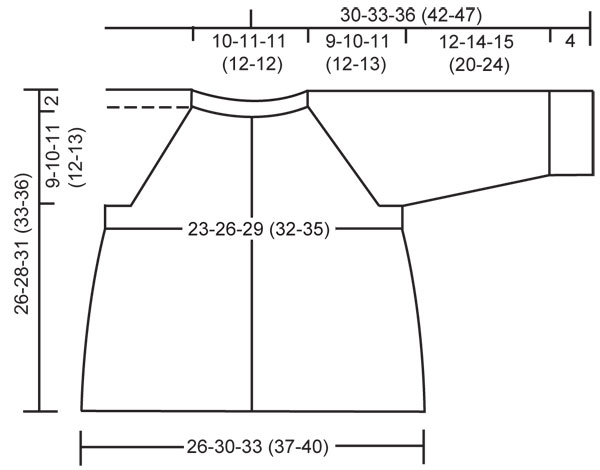
JACKET: CROCHET INFO (applies to yoke and sleeves): Replace first tr on row with 3 ch and finish each row with 1 tr in 3rd ch from beg of previous row. INCREASING TIP-1 (applies to raglan): Inc for raglan on each side of all 4 markers. INC 4 TR BY EACH MARKER AS FOLLOWS: Beg inc in 3rd tr before marker and work 2 tr in this tr, 2 tr in next tr, 1 tr in each of the next 2 tr (marker sits between these 2 tr), 2 tr in next tr and 2 tr in next tr (= 16 tr inc on row). INC 2 TR BY EACH MARKER AS FOLLOWS: Beg inc in 2nd tr before marker and work 2 tr in this tr, 1 tr in each of the next 2 tr (marker sits between these 2 tr), 2 tr in next tr (= 8 tr inc on row). INCREASING TIP-2: Inc 1 tr by working 2 tr in 1 tr. DECREASING TIP (applies to sleeve): Dec 1 tr at beg of row by replacing 1 tr with 1 sl st. Dec 1 tr at the end of row by turning piece when 1 tr remain on row and work return row as before with 1 tr in each tr. BUTTONHOLES: Make buttonholes on right front band. 1 BUTTONHOLE = replace 3rd tr from mid front with 1 ch. On next row crochet 1 tr in this ch. Make buttonholes when piece measures: SIZE 1/3 MONTHS: 2, 7, 12, 17 og 22 cm. SIZE 6/9 MONTHS: 2, 8, 13, 19 og 24 cm. SIZE 12/18 MONTHS: 2, 8, 14, 20 og 26 cm. SIZE 2 YEARS: 2, 7, 12, 17, 22 og 27 cm. SIZE 3/4 YEARS: 2, 8, 13, 19, 24 og 30 cm. ---------------------------------------------------------- ---------------------------------------------------------- JACKET: Crochet in tr from shoulders towards bottom edge. Beg with yoke, then crochet sleeves from the top towards sleeve edges, and then body piece, back and forth from mid front in fan patterns. YOKE: Crochet 66-71-71 (76-76) LOOSE ch with crochet hook size 3.5 mm and Baby Merino. ROW 1 (= WS): Crochet 1 tr in 4th ch from hook, * skip 1 ch, 1 tr in each of the next 3 ch *, repeat from *-* until 2-3-3 (4-4) ch remain, skip 1 ch and 1 tr in each of the last 1-2-2 (3-3) ch = 48-52-52 (56-56) tr on row (includes 4 tr each side towards mid front for front band), turn piece. Now insert 4 markers in piece as follows (from RS): SIZE 1/3 MONTHS: marker A between 11th and 12 tr, marker B between 17th and 18th tr, marker C between 31st and 32nd tr, and marker D between 37th and 38th tr. SIZE 6/9 + 12/18 MONTHS: marker A between 12th and 13th tr, marker B between 18th and 19th tr, marker C between 34th and 35th tr, and marker D between 40th and 41st tr. SIZE 2 + 3/4 YEARS: marker A between 13th and 14th tr, marker B between 19th and 20th tr, marker C between 37th and 38th tr, and marker D between 43rd and 44th tr. Let the markers follow the piece as you go along. Now continue as follows - See CROCHET INFO AND REMEMBER THE CROCHET TENSION! Crochet 1 tr in each tr, AT THE SAME TIME on first row inc 4 tr for raglan by each marker – See INCREASING TIP-1! Repeat the inc on every row a total of 4-5-7 (8-10) times – remember BUTTONHOLES on right front band. Now inc 2 tr by each marker on every row a total of 6-6-5 (5-4) times = 160-180-204 (224-248) tr on row. There are now 11-12-13 (14-15) rows on piece and piece measures approx 11-12-13 (14-15) cm from shoulder (piece will measure approx 9-10-11 (12-13) cm from neckline). Cut the thread. SLEEVE: Now measure piece from here! Crochet 1 tr in each tr back and forth on the 34-38-44 (48-54) tr between marker A and B. AT THE SAME TIME when piece measures 3 cm dec 1 tr each side – See DECREASING TIP. Repeat the dec each side on every 3-4-2 (2-2) cm a total of 3-3-6 (7-10) times = 28-32-32 (34-34) tr. Continue with 1 tr in each tr. When sleeve measures 12-14-15 (20-24) cm crochet cuff with Fan Pattern as follows: ROW 1: * 2 ch, skip approx 1 to 3 tr, 1 dc in next tr *, repeat from *-* so that you end up with 11-11-11 (13-13) ch-loops. ROW 2: Crochet sl sts to the middle of first ch-loop, 3 ch, * 4 tr + 2 ch + 4 tr in next ch-loop, 1 tr in next ch-loop *, repeat from *-*, turn piece. ROW 3: 3 ch, * 4 tr + 2 ch + 4 tr in the middle of the tr-group (i.e. in ch-loop at the top of fan), 1 tr in tr from previous row *, repeat from *-*, turn piece. Repeat row 3 one more time, cut the thread and crochet the other sleeve in the same way between marker C and D. BODY PIECE: Continue in Fan Pattern back and forth from mid front as follows: ROW 1: crochet 1 tr in each of the 25-28-31 (34-37) tr on left front piece to marker A, AT THE SAME TIME inc 4-4-5 (5-6) tr evenly (do not inc on front band) – See INCREASING TIP-2 = 29-32-36 (39-43) tr, crochet 1 tr in each of the 42-48-54 (60-66) tr on back piece from marker B to marker C, AT THE SAME TIME inc 8-8-10 (10-12) tr evenly = 50-56-64 (70-78) tr and crochet 1 tr in each of the 25-28-31 (34-37) tr on right front piece from marker D, AT THE SAME TIME inc 4-4-5 (5-6) tr evenly = 29-32-36 (39-43) tr = 108-120-136 (148-164) tr in total on row, turn piece. ROW 2: 3 ch, 1 tr in each of the next 3 tr (= front band), 3 ch, skip 2 tr, * 1 dc in next tr, 3 ch, skip approx 2 tr (skip 3 tr occasionally) *, repeat from *-* so that you end up with 30-34-38 (42-46) ch-loops and 6 or 7 tr remain on row, crochet 3 ch and finish with 1 tr in each of the last 4 tr (= front band). There are now 31-35-39 (43-47) ch-loops with 4 tr each side for front band, turn piece. ROW 3: 3 ch, 1 tr in each of the next 3 tr, skip first ch-loop, * 4 tr + 2 ch + 4 tr in next ch-loop, 1 tr in next ch-loop *, repeat from *-* until 2 ch-loops remain, crochet 4 tr + 2 ch + 4 tr in next ch-loop and finish with 1 tr in each of the 4 tr on front band = 15-17-19 (21-23) fans with 4 tr each side towards mid front for front bands, turn piece. ROW 4: 3 ch, 1 tr in each of the next 3 tr, * 4 tr + 2 ch + 4 tr in the middle of the next tr-group (i.e. in ch-loop at the top of fan), 1 tr in tr from previous row *, repeat from *-* until 1 tr-group remain, 4 tr + 2 ch + 4 tr in the middle of this tr-group and finish with 1 tr in each of the 4 tr on front band, turn piece. Repeat row 4 until piece measures approx 21-23-24 (26-28) cm. CROCHET NEXT ROW AS FOLLOWS: 4 ch, 1 dtr in each of the next 3 tr, * 4 dtr + 2 ch + 4 dtr in the middle of next tr-group, 1 dtr in tr from previous row *, repeat from *-* until 1 tr-group remain, 4 dtr + 2 ch + 4 dtr in the middle of this tr-group and finish with 1 dtr in each of the 4 tr on front band, turn piece. Repeat this row until piece measures approx 26-28-31 (33-36) cm from shoulder. Cut and fasten threads. CROCHET BORDER: Crochet a border with crochet hook size 3.5 mm and Baby Merino round opening of jacket as follows – beg at bottom of right front piece, round neckline on front and back pieces, and down along left front piece: 1 dc in first st, * 3 ch, skip approx 1 cm, 1 dc in next st *, repeat from *-*. ASSEMBLY: Sew sleeve seams and cuffs tog, edge to edge with neat sts. Sew on buttons. ----------------------------------------------------------------------- HAT: CROCHET INFO: Replace first dc on row with 1 ch and finish each round with 1 sl st in ch from beg of round. --------------------------------------------------------- --------------------------------------------------------- Hat crochet from the top down. Crochet 4 ch with crochet hook size 3.5 mm with Baby Merino and form a ring with 1 sl st in first ch. ROUND 1: Crochet 6 dc in ring – See CROCHET INFO. ROUND 2-4: 1 dc in each dc = 6 dc. ROUND 5: 2 dc in each dc = 12 dc. ROUND 6: 2 dc in each dc = 24 dc. ROUND 7: * 1 dc in first dc, 2 dc in next dc *, repeat from *-* = 36 dc. ROUND 8: * 1 dc in each of the first 2 dc, 2 dc in next dc *, repeat from *-* = 48 dc. ROUND 9: * 1 dc in each of the first 3 dc, 2 dc in next dc *, repeat from *-* = 60 dc. ROUND 10: 3 ch, * skip 2 dc (skip 1 dc instead at regular intervals a total of 6-12-18 (24) times), 1 dc in next dc, 2 ch *, repeat from *-* so that you end up with 22-24-26 (28) ch-loops, finish with 1 sl st in ch from beg of round. ROUND 11: Crochet sl sts to the middle of the first ch-loop, 1 ch, * 2 tr + 1 ch + 2 tr in next ch-loop, 1 dc in next ch-loop *, repeat from *-* and finish with 2 tr + 1 ch + 2 tr in the last ch-loop and 1 sl st in ch from beg of round = 11-12-13 (14) fans. ROUND 12-15: 3 ch, * 3 tr + 1 ch + 3 tr in the middle of next tr-group (i.e. in ch at the top of fan), 1 tr in dc/tr from previous round *, repeat from *-* and finish with 3 tr + 1 ch + 3 tr in the middle of the last tr-group and 1 sl st in 3rd ch from beg of round. ROUND 16: 3 ch, * 3 tr + 2 ch + 3 tr in the middle of next tr-group, 1 tr in tr from previous round *, repeat from *-* and finish with 3 tr + 2 ch + 3 tr in the middle of the last tr-group and 1 sl st in 3rd ch from beg of round. ROUND 17: 3 ch, * 4 tr + 2 ch + 4 tr in the middle of next tr-group, 1 tr in tr from previous round *, repeat from *-* and finish with 4 tr + 2 ch + 4 tr in the middle of the last tr-group and 1 sl st in 3rd ch from beg of previous round. Repeat ROUND 17 until hat measures approx 10-11-12 (13) cm from the top of head. CROCHET NEXT ROUND AS FOLLOWS: 4 ch, * 4 dtr + 2 ch + 4 dtr in the middle of next tr-group, 1 dtr in tr from previous round *, repeat from *-* and finish with 4 dtr + 2 ch + 4 dtr in the middle of the last tr-group and 1 sl st in 4th ch from beg of round. Repeat this round until hat measures approx 14-15-16 (18) cm from the top of head. Cut and fasten thread. |
|
 |
|
Have you finished this pattern?Tag your pictures with #dropspattern #sweetbuttercupset or submit them to the #dropsfan gallery. Do you need help with this pattern?You'll find 11 tutorial videos, a Comments/Questions area and more by visiting the pattern on garnstudio.com. © 1982-2026 DROPS Design A/S. We reserve all rights. This document, including all its sub-sections, has copyrights. Read more about what you can do with our patterns at the bottom of each pattern on our site. |
|


With over 40 years in knitting and crochet design, DROPS Design offers one of the most extensive collections of free patterns on the internet - translated to 17 languages. As of today we count 324 catalogues and 12290 patterns translated into English (UK/cm). 12290
We work hard to bring you the best knitting and crochet have to offer, inspiration and advice as well as great quality yarns at incredible prices! Would you like to use our patterns for other than personal use? You can read what you are allowed to do in the Copyright text at the bottom of all our patterns. Happy crafting!
Post a comment to pattern DROPS Baby 19-8
We would love to hear what you have to say about this pattern!
If you want to leave a question, please make sure you select the correct category in the form below, to speed up the answering process. Required fields are marked *.