
Popular categories
Looking for a yarn?


Comments / Questions (4)
![]() Portia Joy wrote:
Portia Joy wrote:
Hi! Tusen hjertelig takk for oppskriften, det var en glede å strikke hele veien. Og instrusksene var veldig klare. Jeg trodde at europeiske bærestykke var veldig vanskelig å få toø, men jeg klarte det på første forsøk. Og den sitter om støpt på meg. Jeg kommer til å stikke det igjen med lett ullgarn. Veldig fornøyd, tusen takk!!!!
13.04.2026 - 09:20
![]() Ineke wrote:
Ineke wrote:
Aha, daar zit het! De tekst:"De telpatronen tonen het patroon aan de goede kant" begreep ik het als: "De telpatronen tonen de heengaande naalden". Hartelijk dank voor de uitleg!
05.04.2026 - 16:59
![]() Helene wrote:
Helene wrote:
Hello, That the button to print the pattern is not working for this pattern
31.03.2026 - 16:09DROPS Design answered:
Hi Helene, I checked it out. It works. Try again or change the browser. Happy knitting!
31.03.2026 - 16:42
![]() Ineke wrote:
Ineke wrote:
Heb n.a.v. proeflapje nld dikte aangepast. Achterpand klopt, maar voorpanden zijn na breien A1, A2 en A3 (42 steken) bijna dubbel zo lang dan de 11cm v.a. de markeerder. Hierdoor wordt het samenvoegen van de panden niet mooi .wat doe ik fout?
31.03.2026 - 16:01DROPS Design answered:
Dag Ineke,
Heb je er rekening mee gehouden dat in de telpatronen zowel de heengaande als de teruggaande naalden zijn getekend?
04.04.2026 - 21:15
|
||||||||||||||||||||||||||||
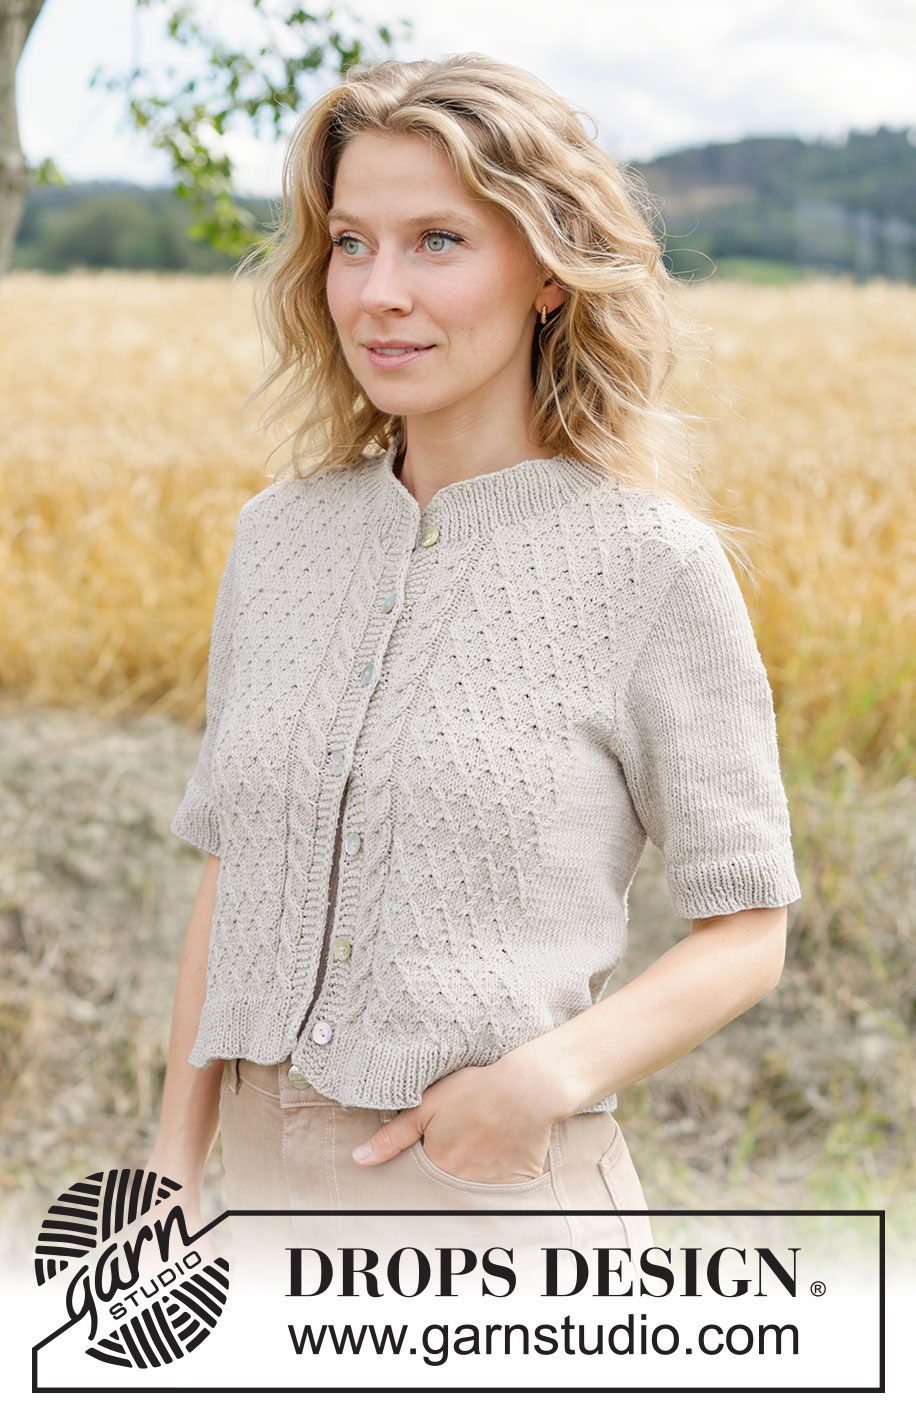
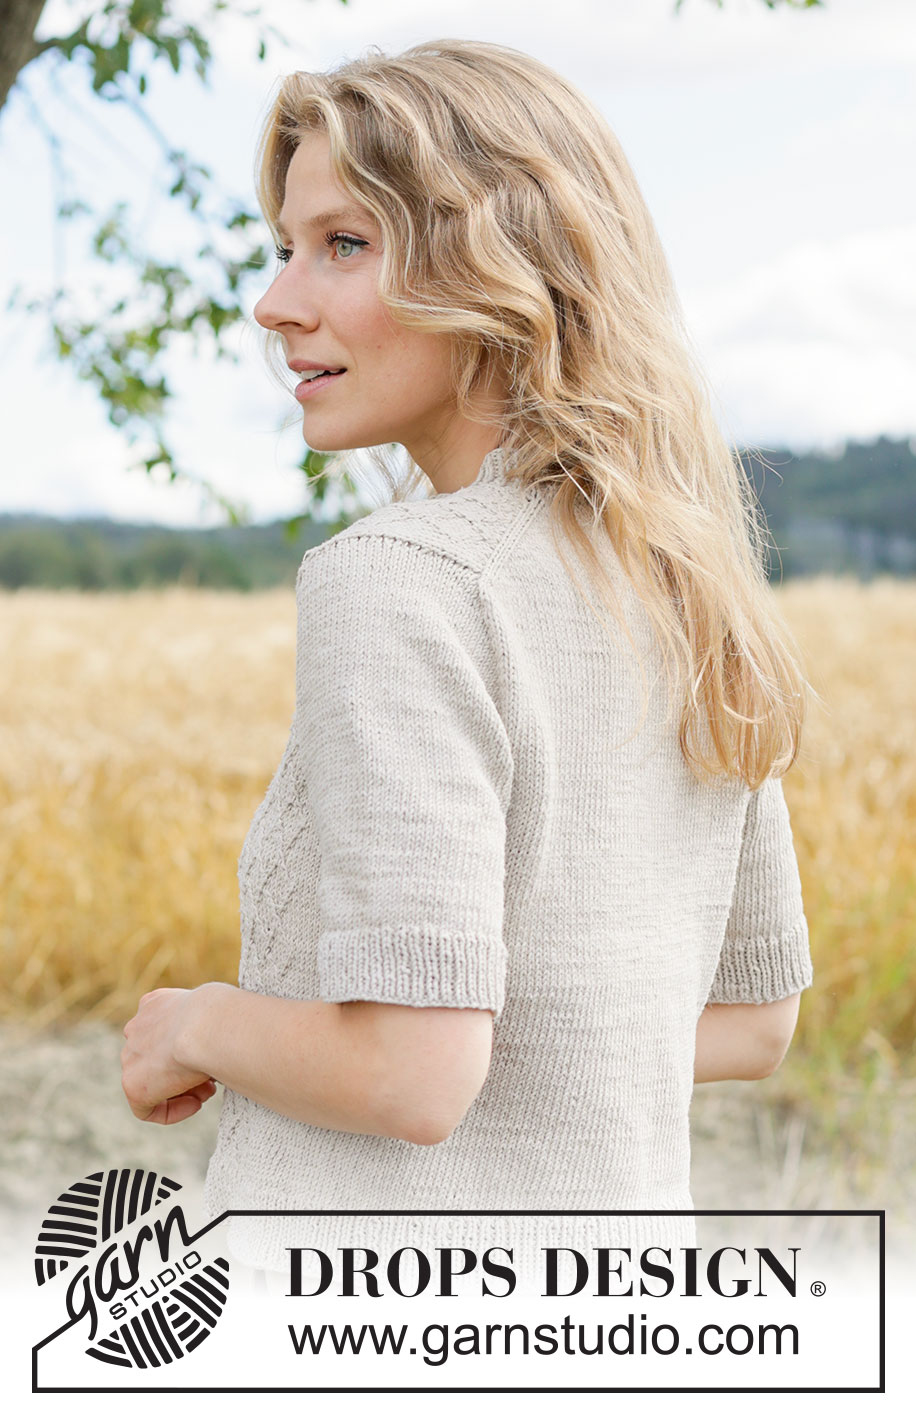
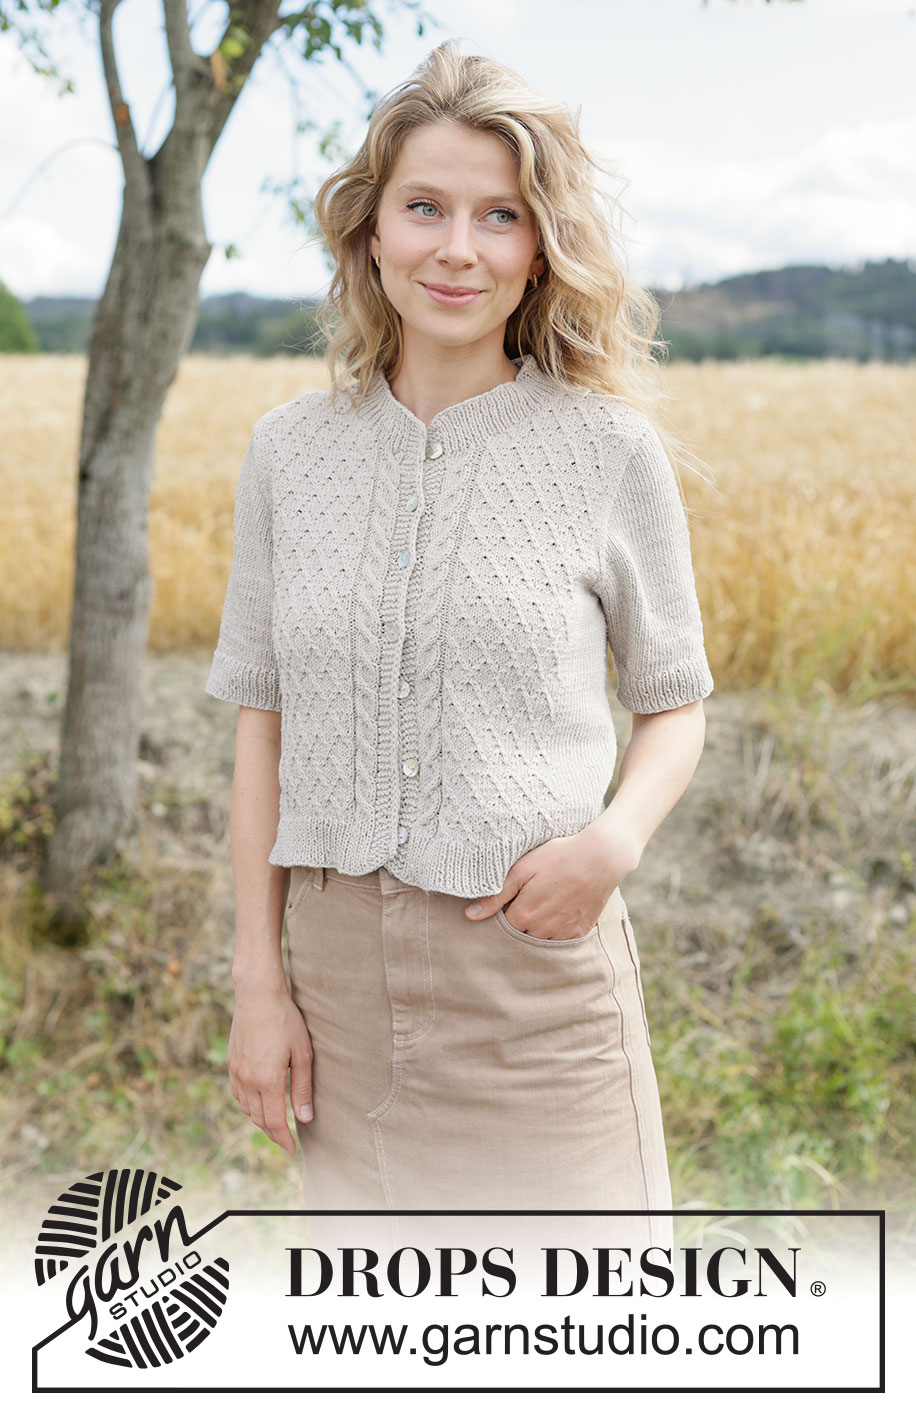
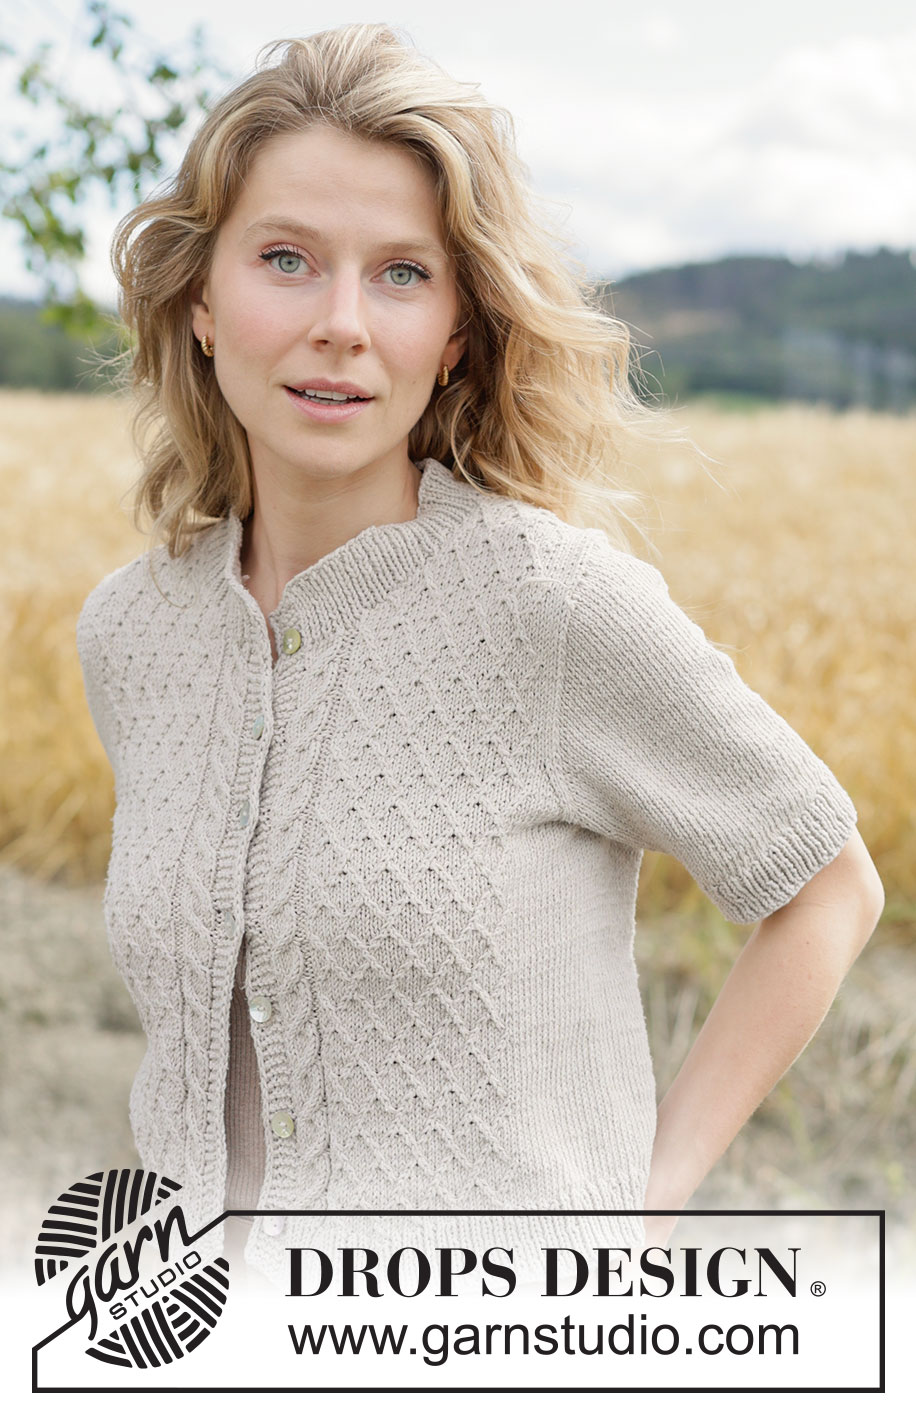
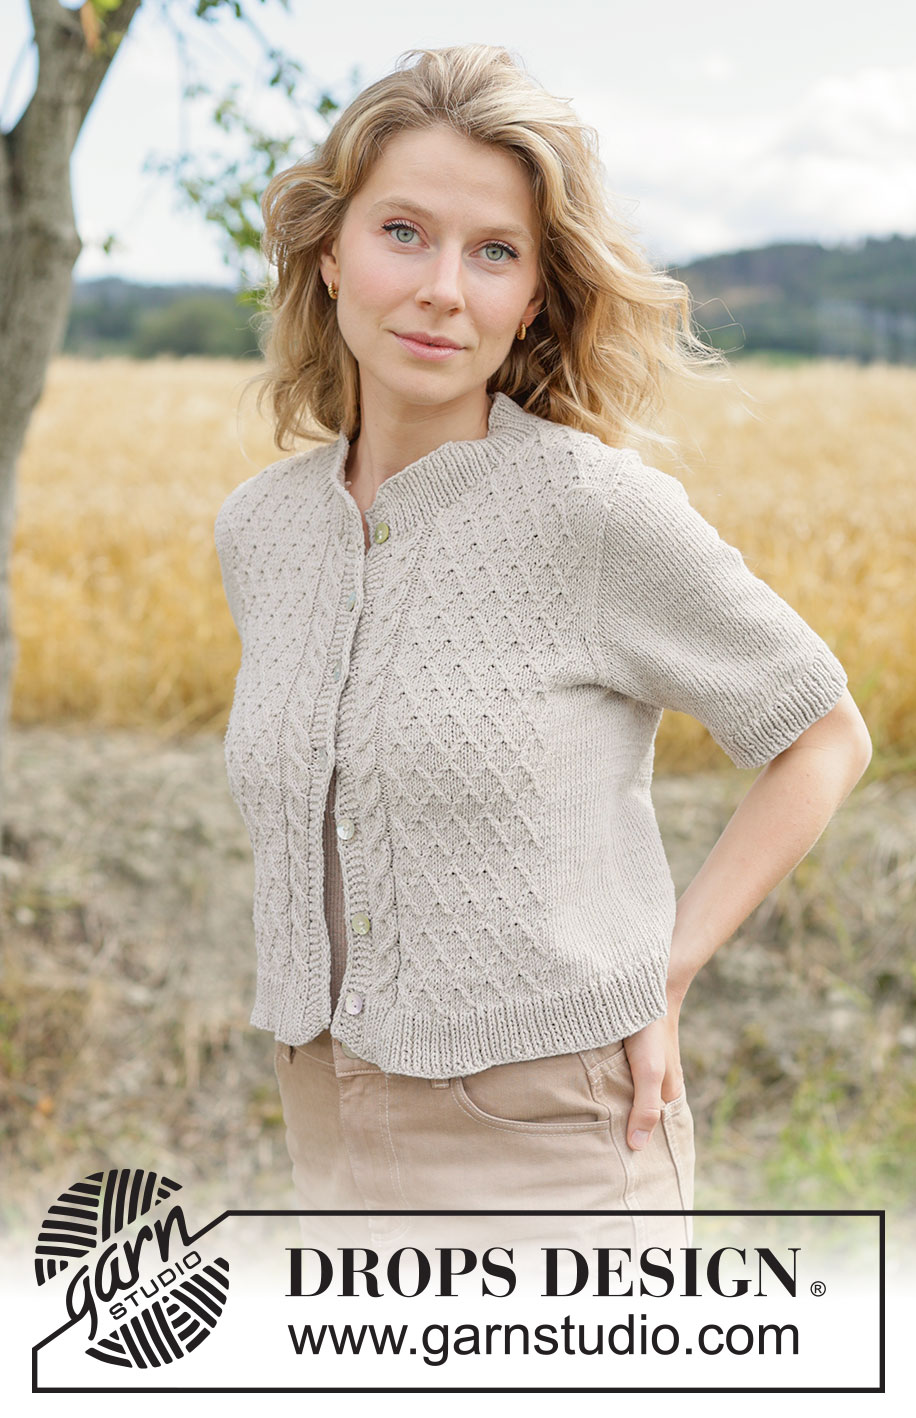
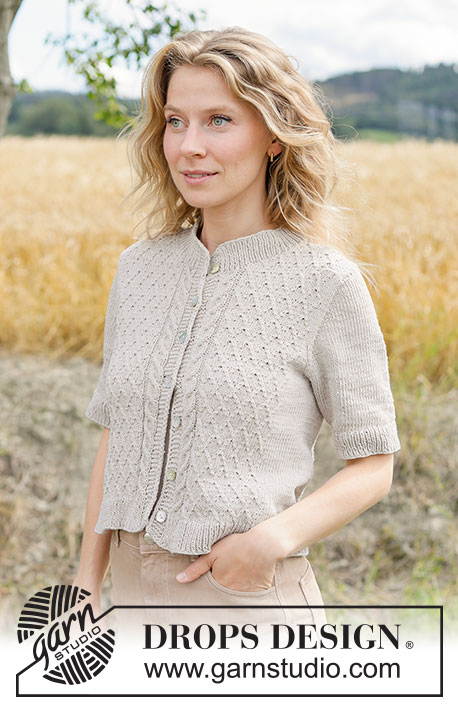
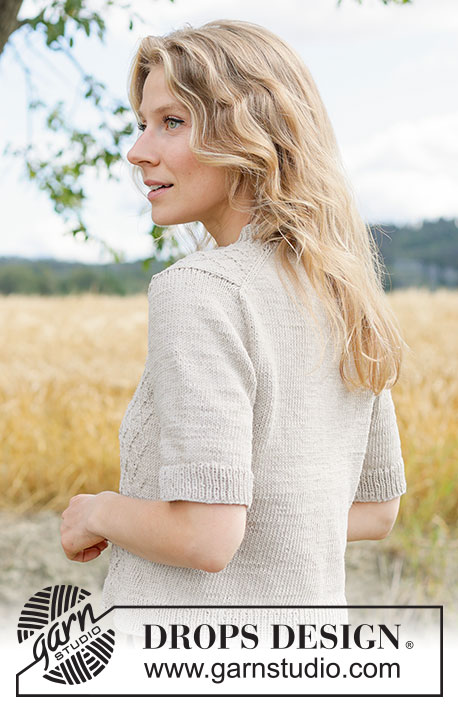
Crossing Sand Cardigan#crossingsandcardigan |
||||||||||||||||||||||||||||
 |
 |
|||||||||||||||||||||||||||
Knitted jacket in DROPS Cotton Light. The piece is worked top down with European yoke, cables, I-cord and short sleeves. Sizes S - XXXL.
DROPS 268-23 |
||||||||||||||||||||||||||||
|
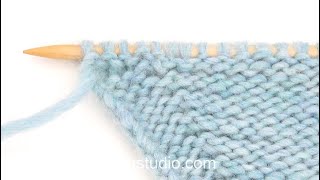
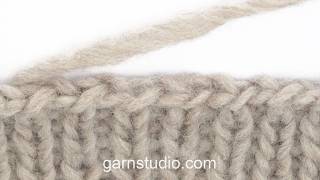
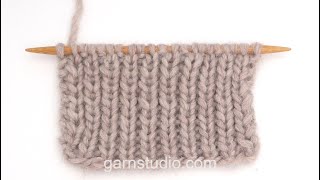
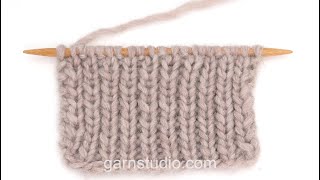
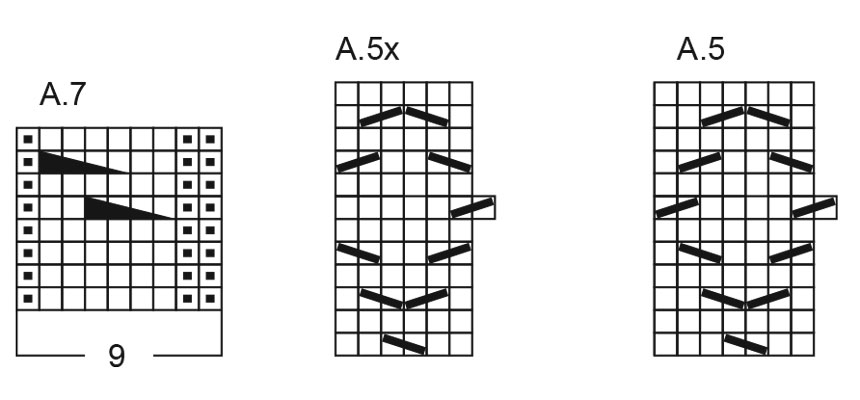
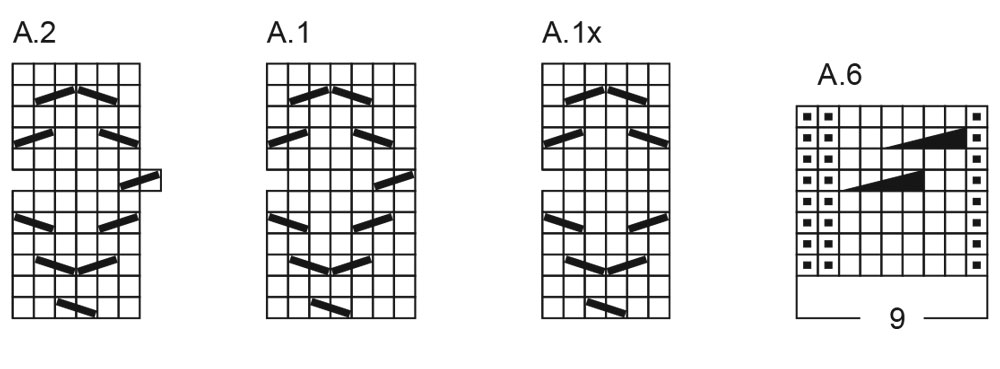
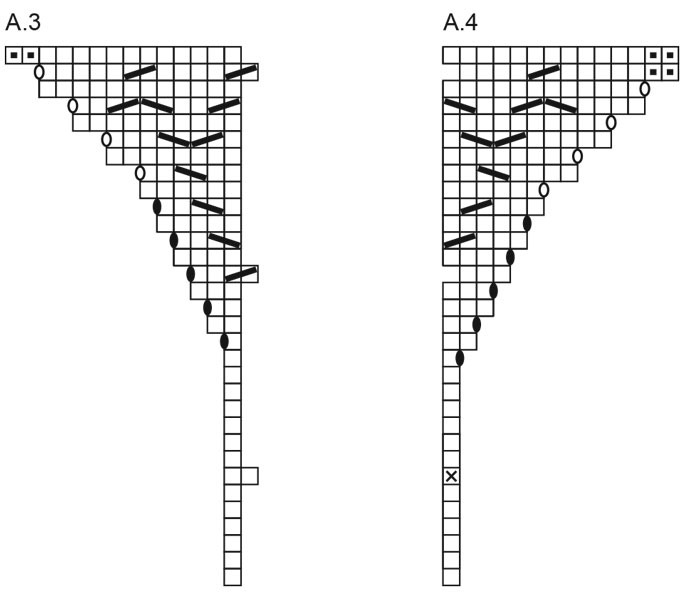
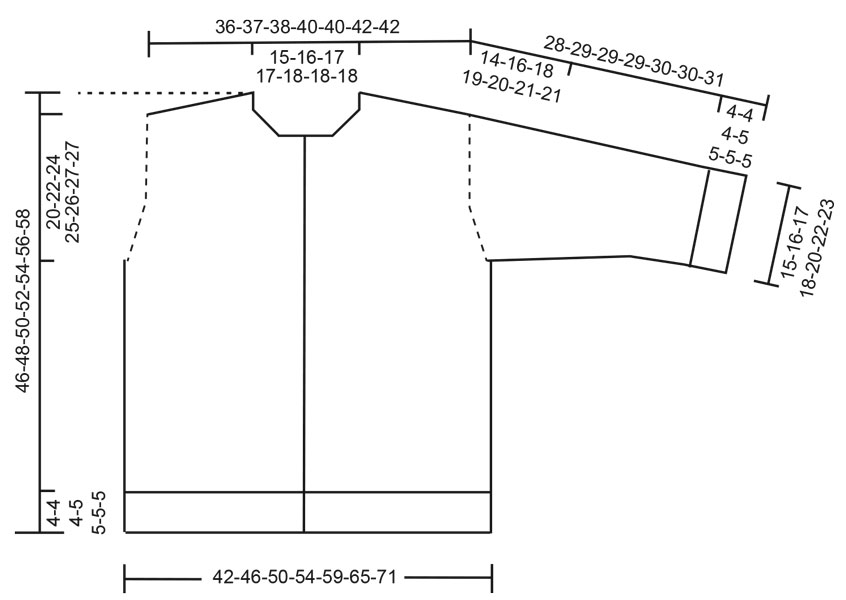
------------------------------------------------------- EXPLANATIONS FOR THE PATTERN: ------------------------------------------------------- PATTERN: See diagrams A.1 to A.7. The diagrams show the pattern from the right side. INCREASE TIP-1: INCREASE 1 STITCH TOWARDS LEFT – from RIGHT SIDE: Use the left needle to pick up the strand between 2 stitches from the row below, pick up the strand from the front and knit through the stitch-loop that lies on the back of the needle. INCREASE 1 STITCH TOWARDS THE RIGHT- from RIGHT SIDE: Use the left needle to pick up the strand between 2 stitches from the row below, pick up the strand from the back and knit through the stitch-loop that lies on the front of the needle. INCREASE TIP-2: INCREASE 1 STITCH TOWARDS THE RIGHT- from WRONG SIDE: Use the left needle to pick up the strand between 2 stitches from the row below, pick up the strand from the back and purl through the stitch-loop that lies on the front of the needle. INCREASE 1 STITCH TOWARDS LEFT – from WRONG SIDE: Use the left needle to pick up the strand between 2 stitches from the row below, pick up the strand from the front and purl through the stitch-loop that lies on the back of the needle. BANDS WITH I-CORD: BEGINNING OF ROW: Work the band as follows (6 stitches): Slip 1 stitch purl-wise with yarn in front, knit 1, work 4 garter stitches. END OF ROW: Work the band as follows (6 stitches): Work until there are 6 stitches left on the row, work 4 garter stitches, slip 1 stitch purl-wise with yarn in front, knit 1. Work like this from both the right and wrong side. BUTTONHOLES: Work the buttonholes on the right band (when the garment is worn) from the right side, when there are 5 stitches left on the row as follows: ROW 1 (right side): Make 1 yarn over, knit 2 together, knit 1, slip 1 stitch purl-wise with the strand in front, knit 1. ROW 2 (wrong side): Work the band as before, knitting the yarn over to leave a hole. The first buttonhole is worked on the first row from the right side after all stitches have been cast on for the neckline. Then work the other 5-6-6-6-6-6-7 buttonholes with 6½-6-6-6-6½-6½-6 cm between each one. The bottom buttonhole is worked in the transition between the stocking stitch and rib on the body. SLEEVE TIP: When knitting up stitches under the sleeve, you can get a small hole in the transition between stitches on the body and sleeve. This hole can be closed by picking up the strand between 2 stitches and working this strand twisted together with the first stitch between body and sleeve. DECREASE TIP: Decrease 1 stitch on each side of the marker-thread as follows: Work until there are 3 stitches left before the marker-thread, knit 2 together, knit 2 (marker-thread sits between these 2 stitches), slip 1 stitch knit-wise, knit 1 and pass the slipped stitch over the knitted stitch (2 stitches decreased). ------------------------------------------------------- START THE PIECE HERE: ------------------------------------------------------- JACKET – SHORT OVERVIEW OF THE PIECE. The pattern uses both long and short needles; start with the length which fits the number of stitches and change when necessary. Work according to points 1 – 5. 1. BACK PIECE: Cast on stitches for the back of the neck. Work the back piece in stocking stitch, back and forth, increasing stitches on each side until the shoulder stitch count has been achieved. The back piece has slightly diagonal shoulder. 2. FRONT PIECES: Start by knitting up stitches along one back shoulder, working pattern downwards and increasing for the neckline. Repeat on the other shoulder. 3. YOKE: Join the front and back pieces, working first 1 front piece, knitting up stitches for the sleeve along the side of the front piece, working the back piece, knitting up stitches for the sleeve along the side of the second front piece, then working this front piece. The yoke is continued back and forth from mid-front. 4. INCREASE FOR BODY AND SLEEVES: While working the yoke, increase stitches first for the sleeves, then for the body and sleeves. 5. BODY AND SLEEVES: When all the increases are finished and the yoke is the correct length, it is divided for the body and sleeves. The body is continued back and forth while the sleeves wait. Then the sleeves are worked in the round, top down. Stitches are knitted up along the neckline and the neck is worked back and forth to finish. ------------------------------------------------------- BACK PIECE: The piece is worked back and forth. Cast on 33-35-37-37-39-39-39 stitches with circular needle size 4 mm and DROPS Cotton Light. Purl 1 row from the wrong side. Now increase inside 3 stitches on each side as follows: ROW 1 (right side): Read INCREASE TIP-1. Knit 3, increase 1 stitch towards the left, knit until there are 3 stitches left on the row, increase 1 stitch towards the right, knit 3. ROW 2 (wrong side): Read INCREASE TIP-2. Purl 3, increase 1 stitch towards the right, purl until there are 3 stitches left on the row, increase 1 stitch towards the left, purl 3. AFTER ROW 2: Work ROWS 1 and 2 a total of 11-11-11-12-12-13-13 times (22-22-22-24-24-26-26 rows worked) = 77-79-81-85-87-91-91 stitches. Remember to maintain the knitting tension. Cut the strand and place the stitches on a stitch holder. RIGHT FRONT PIECE: Find the right back shoulder as follows: Lay the back piece flat, right side up, with the stitch holder/thread towards you; right-hand side of piece = right shoulder. Start from the right side by the armhole on the right back shoulder, knit up 1 stitch outermost on the shoulder (edge stitch), then knit up 1 stitch in each row worked inside the outermost stitch as far as the neck (22-22-22-24-24-26-26 stitches) = 23-23-23-25-25-27-27 shoulder-stitches. Insert 1 marker by the neck. All measurements on the front piece are taken from this marker, measured in the knitting direction. Purl the first row from the wrong side, increasing 1-1-1-1-1-2-2 stitches evenly spaced = 24-24-24-26-26-29-29 stitches. Continue as follows: ROW 1 (right side): Knit 4-4-4-6-6-3-3, work A.1, then A.2, 2-2-2-2-2-3-3 times, work A.3. ROW 2 (wrong side): Work A.3, then A.2, 2-2-2-2-2-3-3 times, work A.1, purl 4-4-4-6-6-3-3 – from the wrong side always knit above knit and purl above purl. Repeat ROWS 1 and 2 until A.3 is finished in height = 37-37-37-39-39-42-42 stitches. The increases for the neckline are finished. The piece measures approx. 11 cm from the marker. Approx. 2-2-2-1-1-1-1 cm of the neckline-depth will lie on the back piece. Cut the strand and place the stitches on a stitch holder. Work the left front piece along the left back shoulder as follows. LEFT FRONT PIECE: Start from the right side by the neck on the left back shoulder and knit up 1 stitch in each row worked, inside the outermost stitch as far as the armhole (22-22-22-24-24-26-26 stitches), finish by knitting up 1 stitch outermost on the shoulder (edge stitch) = 23-23-23-25-25-27-27 shoulder-stitches. Insert 1 marker by the neck. All measurements on the front piece are taken from this marker, measured in the knitting direction. Purl the first row from the wrong side, increasing 1-1-1-1-1-2-2 stitches evenly spaced = 24-24-24-26-26-29-29 stitches. Continue as follows: ROW 1 (right side): Work A.4, then A.2, 2-2-2-2-2-3-3 times, work A.5, knit 4-4-4-6-6-3-3. ROW 2 (wrong side): Purl 4-4-4-6-6-3-3, work A.5, then A.2, 2-2-2-2-2-3-3 times, work A.4 – from the wrong side always knit above knit and purl above purl. Repeat ROWS 1 and 2 until A.4 is finished in height = 37-37-37-39-39-42-42 stitches Cut the strand and place the stitches on a stitch holder. Now knit up stitches for the sleeves and join all the pieces on the same circular needle as follows. YOKE: Start by casting on 13 stitches with circular needle size 4 mm, then from the right side work the left front piece as follows (continuing the pattern - remember to begin on the same row in all diagrams, i.e., A.2 starts on row 9): Purl 2, work A.1x, then A.2, 3-3-3-3-3-4-4 times, work A.5, knit 2-2-2-4-4-1-1, slip 1 stitch knit-wise, knit 1, pass the slipped stitch over the knitted stitch (1 decreased stitch), insert 1 marker, knit up 23 stitches along the side of the left front piece (= sleeve-stitches, knitted up inside the outermost stitch), insert 1 marker, knit together the first 2 stitches on the back piece (1 decreased stitch), knit until there are 2 stitches left on the back piece, slip 1 stitch knit-wise, knit 1, pass the slipped stitch over the knitted stitch (1 decreased stitch), insert 1 marker, knit up 23 stitches along the side of the right front piece (= sleeve-stitches, knitted up inside the outermost stitch), insert 1 marker, knit together the first 2 stitches on the right front piece (1 decreased stitch), knit 2-2-2-4-4-1-1, work A.1, then A.2, 3-3-3-3-3-4-4 times, work A.5x, purl 2 and cast on 13 stitches = 219-221-223-231-233-243-243 stitches. There are 23 stitches on each sleeve, 49-49-49-51-51-54-54 stitches on each front piece and 75-77-79-83-85-89-89 stitches on the back piece. Continue the pattern back and forth. On the next row from the wrong side, increase 1 stitch on each side of the sleeves inside the markers– remember INCREASE TIP-2 working as follows: Work 6 stitches according to BANDS WITH I-CORD – read explanation above, knit 1, purl 6, knit 2, purl to the first marker, move the marker onto the right needle, increase 1 stitch towards the left, purl to the next marker, increase 1 stitch towards the right (= 25 sleeve-stitches), move the marker onto the right needle, purl to the next marker, move the marker onto the right needle, increase 1 stitch towards the left, purl to the next marker, increase 1 stitch towards the right (= 25 sleeve-stitches), move the marker onto the right needle, purl until there are 15 stitches left, knit 2, purl 6, knit 1, work 6 stitches according to bands with I-cord = 223-225-227-235-237-247-247 stitches. Continue the pattern back and forth, increasing for the sleeves on each row from the right side as follows – remember the first BUTTONHOLE and INCREASE TIP-1: ROW 1 (right side): 6 band-stitches with I-cord, work A.6, then A.1x, work A.2, 3-3-3-3-3-4-4 times, A.5, knit to the first marker, move the marker onto the right needle, increase 1 stitch towards the left, knit to the next marker (= sleeve), increase 1 stitch towards the right, move the marker onto the right needle, knit to the next marker, move the marker onto the right needle, increase 1 stitch towards the left, knit to the next marker (= sleeve), increase 1 stitch towards the right, move the marker onto the right needle, knit 3-3-3-5-5-2-2, work A.1, then A.2, 3-3-3-3-3-4-4 times, A.5x, A.7, 6 band-stitches with I-cord. ROW 2 (wrong side): Knit above knit and purl above purl with 6 band-stitches on each side as before. Work ROWS 1 and 2 a total of 14-15-15-16-14-11-7 times (28-30-30-32-28-22-14 rows worked). There are 53-55-55-57-53-47-39 stitches on each sleeve, 49-49-49-51-51-54-54 stitches on each front piece and 75-77-79-83-85-89-89 stitches on the back piece = 279-285-287-299-297-291-275 stitches. Now increase for both the body and sleeves as follows, increasing on the body 2 stitches inside the markers so there are 2 stitches between the increases on the body and sleeves: ROW 1 (right side): Work the band and pattern until there are 2 stitches left on the left front piece before the first marker, increase 1 stitch towards the right, knit 2, move the marker onto the right needle, increase 1 stitch towards the left, knit to the next marker (= sleeve), increase 1 stitch towards the right, move the marker onto the right needle, knit 2, increase 1 stitch towards the left, knit until there are 2 stitches left before the next marker on the back piece, increase 1 stitch towards the right, knit 2, move the marker onto the right needle, increase 1 stitch towards the left, knit to the next marker (= sleeve), increase 1 stitch towards the right, move the marker onto the right needle, knit 2, increase 1 stitch towards the left, continue pattern and work the band as before (8 increased stitches). ROW 2 (wrong side): Knit above knit and purl above purl with 6 band-stitches on each side. Work ROWS 1 and 2 a total of 5-7-9-10-13-17-22 times (10-14-18-20-26-34-44 rows worked). A total of 20-23-25-27-28-29-30 increases in height on the sleeves and 5-7-9-10-13-17-22 increases in height on the body: 63-69-73-77-79-81-83 stitches on each sleeve, 54-56-58-61-64-71-76 stitches on each front piece and 85-91-97-103-111-123-133 stitches on the back piece = 319-341-359-379-397-427-451 stitches. The sleeve measures approx. 14-16-18-19-20-21-21 cm. When the jacket is folded double at the shoulder, the piece measures approx. 20-22-24-25-26-27-27 cm from top of shoulder Now divide for the body and sleeves. DIVIDE FOR BODY AND SLEEVES Work 54-56-58-61-64-71-76 stitches as before (= front piece), place the next 63-69-73-77-79-81-83 stitches on a stitch holder for the sleeve, cast on 4-6-8-10-12-14-16 stitches (mid-under the sleeve), knit 85-91-97-103-111-123-133 stitches (back piece), place the next 63-69-73-77-79-81-83 stitches on a stitch holder for the sleeve, cast on 4-6-8-10-12-14-16 stitches (mid-under the sleeve), work the last 54-56-58-61-64-71-76 stitches as before (= front piece). The body and sleeves are finished separately. BODY: = 201-215-229-245-263-293-317 stitches. Continue pattern, stocking stitch and the bands until the piece measures 40-42-44-46-48-50-52 cm from the cast-on edge mid-back, with the last row from the wrong side. On the next row from the right side begin the rib, AT THE SAME TIME increase 24-30-36-40-48-48-54 stitches evenly on the row (do not increase across the bands) as follows: Change to circular needle size 3 mm. Work 6 band-stitches as before, rib (knit 1 and purl 1) until there are 7 stitches left (remember to increase), knit 1 and work 6 band-stitches as before = 225-245-265-285-311-341-371 stitches. Continue the rib and bands for 4-4-4-5-5-5-5 cm. Cast off with knit above knit and purl above purl. The jacket measures approx. 44-46-48-51-53-55-57 cm from the cast-on edge mid-back and 46-48-50-52-54-56-58 cm from the shoulder. SLEEVES: Place the 63-69-73-77-79-81-83 sleeve-stitches from one stitch holder onto circular needle size 4 mm and knit up 1 stitch in each of the 4-6-8-10-12-14-16 cast-on stitches under the sleeve – read SLEEVE TIP = 67-75-81-87-91-95-99 stitches. Insert a marker-thread in the middle of the 4-6-8-10-12-14-16 new stitches under the sleeve. The round starts by the marker-thread. Work stocking stitch in the round. AT THE SAME TIME, after the first round, decrease mid-under the sleeve – read DECREASE TIP as follows: Decrease 2 stitches every 2-2-1-1-1-1-1 cm a total of 3-4-5-5-3-2-1 times = 61-67-71-77-85-91-97 stitches. Continue working until the sleeve measures 10-9-7-5-5-4-5 cm from the division. Change to double pointed needles size 3 mm. Work rib (knit 1 and purl 1), AT THE SAME TIME increase 13-13-15-17-17-17-19 stitches evenly on the first round = 74-80-86-94-102-108-116 stitches. When the rib measures 4-4-4-5-5-5-5 cm, cast off with rib. The sleeve measures approx. 14-13-11-10-10-9-10 cm from the division and 28-29-29-29-30-30-31 cm from the knitted up edge on the shoulder. NECK: Use circular needle size 3 mm. From the right side, knit up 109-115-121-121-125-125-125 stitches along the neckline, making sure there is 1 stitch in each band-stitch and with the stitch count divisible by 2 + 1. Work as follows from the wrong side: 6 band-stitches with I-cord, work rib (purl 1 and knit 1) until there are 7 stitches left, purl 1, work 6 band-stitches with I-cord. Work this rib back and forth for 3½-3½-4-4-4-4½-4½ cm. Cast off with knit above knit and purl above purl. ASSEMBLY: Sew buttons onto left front piece. |
||||||||||||||||||||||||||||
Diagram explanations |
||||||||||||||||||||||||||||
|
||||||||||||||||||||||||||||
 |
||||||||||||||||||||||||||||
 |
||||||||||||||||||||||||||||
 |
||||||||||||||||||||||||||||
 |
||||||||||||||||||||||||||||
Have you finished this pattern?Tag your pictures with #dropspattern #crossingsandcardigan or submit them to the #dropsfan gallery. Do you need help with this pattern?You'll find 56 tutorial videos, a Comments/Questions area and more by visiting the pattern on garnstudio.com. © 1982-2026 DROPS Design A/S. We reserve all rights. This document, including all its sub-sections, has copyrights. Read more about what you can do with our patterns at the bottom of each pattern on our site. |
||||||||||||||||||||||||||||


With over 40 years in knitting and crochet design, DROPS Design offers one of the most extensive collections of free patterns on the internet - translated to 17 languages. As of today we count 325 catalogues and 12298 patterns translated into English (UK/cm). 12298
We work hard to bring you the best knitting and crochet have to offer, inspiration and advice as well as great quality yarns at incredible prices! Would you like to use our patterns for other than personal use? You can read what you are allowed to do in the Copyright text at the bottom of all our patterns. Happy crafting!
Post a comment to pattern DROPS 268-23
We would love to hear what you have to say about this pattern!
If you want to leave a question, please make sure you select the correct category in the form below, to speed up the answering process. Required fields are marked *.