
Popular categories
Looking for a yarn?


Comments / Questions (81)
![]() Annie wrote:
Annie wrote:
Hi, making size S and confused with diagrams after A1 has been knitted in full. It says to do A3 all over the body(some places just first stitches of A3). Do I stop YO near sleeves' garter stitches? Video 2 is showing it done differently - with A2 and A4 which incorporate those YOs Thanks
16.04.2026 - 12:37DROPS Design answered:
Dear Annie, after A.1 is done you work/repeat A.3 in width (over 40 sts on front pieces and 80 sts on back piece) and to finish pattern work the next stitch as the first stitch in A.3 so that the pattern is symmetrical (A.3 now starts and ends with 1 st in garter stitch on front and back pieces). Happy knitting!
16.04.2026 - 16:41
![]() Pernilla wrote:
Pernilla wrote:
Har inte sett videon. Kan ni länka?
09.04.2026 - 07:48
![]() Pernilla wrote:
Pernilla wrote:
Hej, Jag får inte mönstret att gå ihop i beskrivningen för fram- och bakstycke (strl M). Första varvet (från avigan) är A6 sedan A3 (1 rm, 9am) till 15 m återstår. Mönstret stämmer på vänster framstyckes mönsterdel, men om jag fortsätter repetera A3 blir mönstret förskjutet när jag kommer till bakstycket. Jag har 235 maskor (exkl. kantmaskorna) Räknar jag bort A6 (6 m) och A5 (5 m)=224 m, vilket inte är jämt delbart med 10 (antalet m i A3). Vad är det jag missar?
24.03.2026 - 19:58DROPS Design answered:
Hej Pernilla, har du set videoerne som er lavet til dette mönster - de viser nøjagtig hvordan du skal gøre :)
09.04.2026 - 07:38
![]() Janneke wrote:
Janneke wrote:
Hallo, De raglan begrijp ik niet helemaal. Meerder ik in elke toer aan de goede kant 4 maal die ik aan de verkeerde kant gedraaid brei EN in elke 2e toer, dus verkeerde kant, 4 maal (x6) zoals beschreven onder raglan?
21.06.2025 - 17:16DROPS Design answered:
Dag Janneke,
Je meerdert EERST in iedere 2e toer aan de goede een aantal keer als je dat gedaan hebt meerder je DAARNA elke 4e toer een aantal keer. Dus je doet het niet tegelijkertijd, maar achter elkaar.
29.06.2025 - 19:14
![]() Brigitte Mogeny wrote:
Brigitte Mogeny wrote:
Bonjour, j'aime beaucoup ce modèle mais je ne sais pas me servir des aiguilles circulaires... Serait il possible d'avoir les explications avec des aiguilles normales... Merci
05.06.2025 - 09:47DROPS Design answered:
Bonjour Mme Mogeny, seules les manches se tricotent ici en rond, on va utiliser les aiguilles circulaires pour l'empiècement et le dos/les devants pour tricoter en allers et retours, vous pouvez donc les tricoter de la même façon sur aiguilles droites, vos mailles seront juste plus serrées - pour continuer les manches après la division, reportez-vous à cette leçon. Bon tricot!
05.06.2025 - 14:13
![]() ANTONIETTA SALVATORE wrote:
ANTONIETTA SALVATORE wrote:
Buongiorno, sono all'inizio del lavoro. al terzo ferro dello sprone mi trovo alla fine delle 20 maglie con 4 maglie in più, prima del diagramma A1. ho fatto 7m,A1, 2m legaccio, 2 dritto, 1gettato, 20m rasata, 1gettato,2 m dritto, 2 legaccio, A2, A3, A3, A4, 2m legaccio, 2m dritto, 1 gettato, 20 m, 1 gettato, 2m dritto, 2 m legaccio, (mi trovo ora 4 maglie in più), 1 gettato, 1 dritto, 1 gettato, 7 m. potete aiutarmi a capire cosa non va? grazie
04.05.2025 - 08:43
![]() Anne-Lise Lima wrote:
Anne-Lise Lima wrote:
Strikker str.M og har 113 masker, men når man legger sammen maskene(utenom raglanmaskene) på 1.pinne under bærestykke:blir det 103 masker. Hva gjør jeg feil?
26.01.2025 - 23:38DROPS Design answered:
Hei Anne-Lise. Du har 113 masker, så strikker du slik (teller ikke med raglan økningene): 7 stolpemasker + A.1 (=1 maske) + 2 masker rille + 2 rett + 20 masker glattstrikk + 2 rett + 2 masker rille + A.2 (10 masker) + A.3 over de neste 20 maskene, + A.4 (11 masker) + 2 masker rille + 2 rett + 20 masker glattstrikk + 2 rett + 2 masker rille + A.1 (=1 maske) + 7 stolpemasker =(bare tall): 7+1+2+2+20+2+2+10+20+11+2+2+20+2+2+1+7= 113 masker. Til denne jakken er det også laget 4 hjelpevideoer, ta gjerne en titt på dem. mvh DROPS Design
27.01.2025 - 13:53
![]() Ruth Burton wrote:
Ruth Burton wrote:
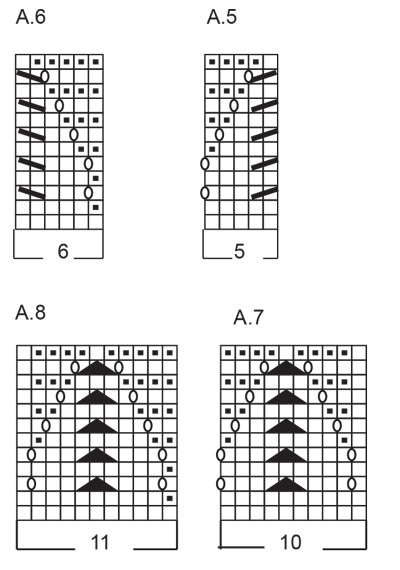
I have worked the pattern to the place I need the charts for 5, 6, 7, 8. They do not seem to be available from the download. help? I really like this pattern and hope I can get these charts. Many thanks.
13.09.2024 - 07:14DROPS Design answered:
Dear Mrs Burton, please make sure you print all pages when launching printing, the last diagrams A.5 to A.8 should be just above the measurement chart. Happy knitting!
13.09.2024 - 09:38
![]() Chris wrote:
Chris wrote:
Bonjour, j'aime bien la bordure avec la technique I-cord mais au final la bande de boutonnage au point mousse "remonte" et ne s'aligne pas. Comment remédier a ce problème ? merci d'avance
09.09.2024 - 16:06DROPS Design answered:
Bonjour Chris, vous pouvez éventuellement bloquer votre gilet (humidifiez-le et laissez-le sécher bien à plat aux mesures finales, avec des épingles (inoxydables) si besoin), les bordures devraient ainsi bien rester en place. En cours d'ouvrage vous pouvez également tricoter des rangs raccourcis à intervalles réguliers si besoin. Bon tricot!
10.09.2024 - 08:58
![]() Judith wrote:
Judith wrote:
Hi! Ik ben dit vest aan het breien in maat S. Ik heb de eerste pas gebreid maar kom niet uit de tweede pas. Zou u mij kunnen vertellen hoe ik die moet breien? Moet ik dan 22 steken tricot breien waar dat de eerste pas 20 waren ivm de meerderingen?
24.07.2024 - 11:22DROPS Design answered:
Dag Judith,
De pas is het gedeelte vanaf de hals tot waar de armsgaten beginnen (en dus tot waar het werk verdeeld wordt voor het lijf en de mouwen). Je breit dus maar 1 pas. Als je maat s breit, dan houdt je het eerste getal aan in de reeks getallen, dus zoals onder de paragraaf 'PAS' staat brei je op een gegeven moment 20 tricotsteken en later weer 20. Dit zijn de tricotsteken van de mouwen. Na die paragraaf ga je verder met het gedeelte voor jouw maat voor de pas.
24.07.2024 - 15:40
|
|||||||||||||||||||
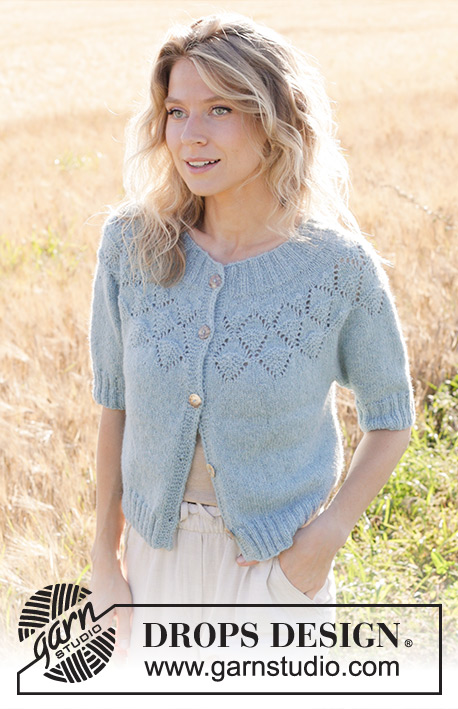
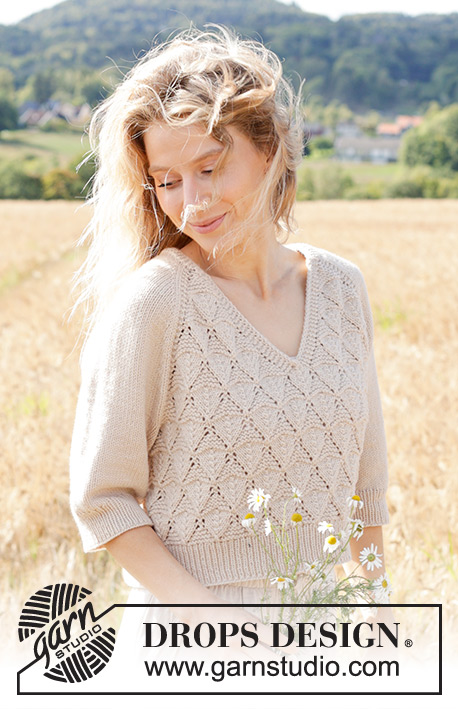
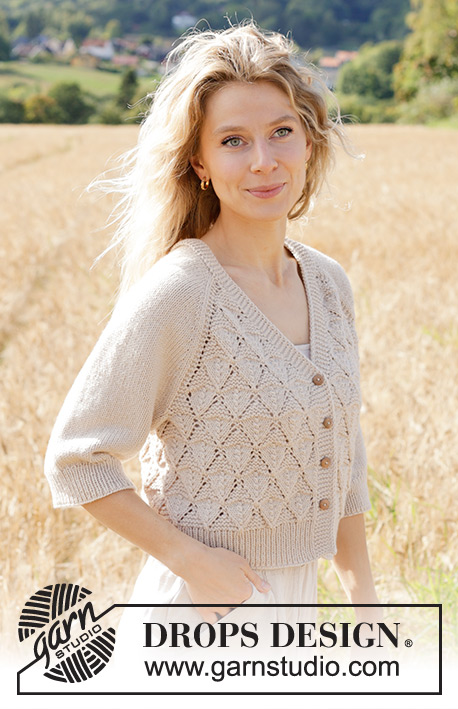
Sand Diamond Cardigan#sanddiamondcardigan |
|||||||||||||||||||
 |
 |
||||||||||||||||||
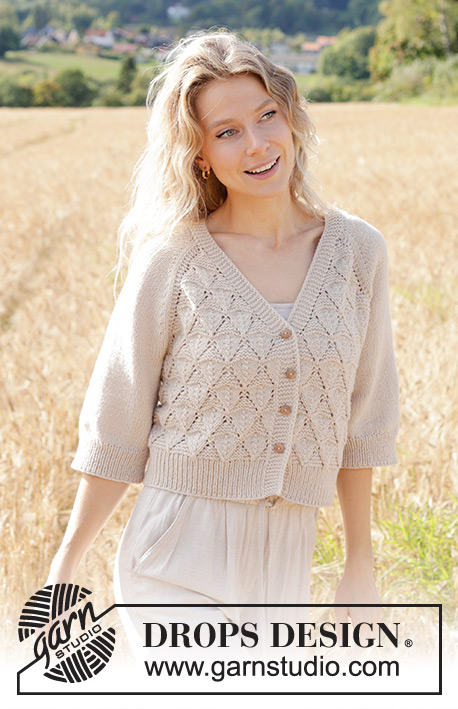
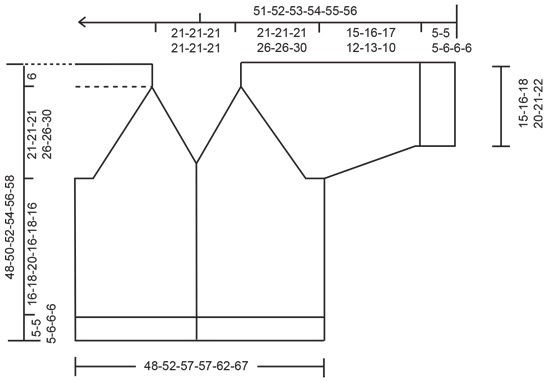
Knitted jacket in DROPS Daisy or DROPS Merino Extra Fine. The piece is worked top down with raglan, V-neck, lace pattern and ¾-length sleeves. Sizes S - XXXL.
DROPS 248-5 |
|||||||||||||||||||
|
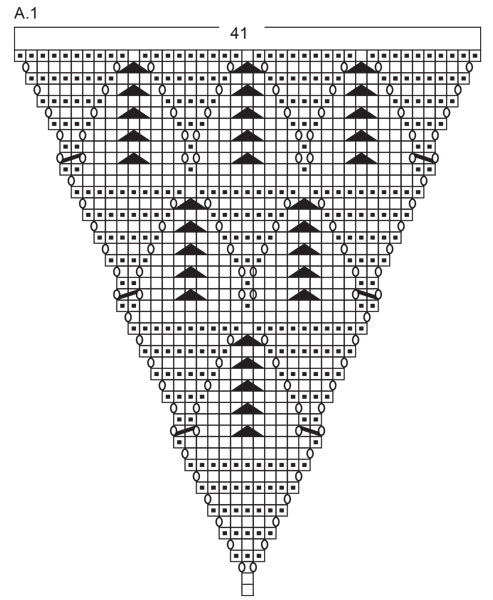
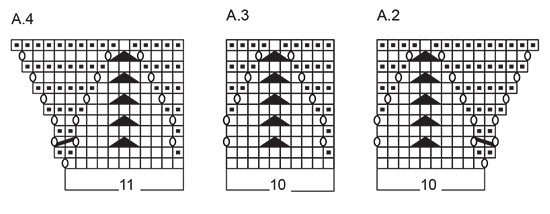
------------------------------------------------------- EXPLANATIONS FOR THE PATTERN: ------------------------------------------------------- GARTER STITCH (worked back and forth): Knit all rows, from both the right and wrong side. 1 ridge in height = knit 2 rows. PATTERN: See diagrams A.1 to A.8. The diagrams show all the rows in the pattern seen from the right side. RIGHT BAND WITH I-CORD: RIGHT SIDE: Work 10 garter stitches, slip 1 stitch purl-wise with strand in front, knit 1. WRONG SIDE: Slip 1 stitch purl-wise with strand in front, knit 1, 10 garter stitches. LEFT BAND WITH I-CORD: RIGHT SIDE: Slip 1 stitch purl-wise with strand in front, knit 1, 10 garter stitches. WRONG SIDE: Work 10 garter stitches, slip 1 stitch purl-wise with strand in front, knit 1. RAGLAN: Increase 1 stitch by making 1 yarn over, which is worked twisted on the next row. The new stitches are then worked in stocking stitch. BUTTONHOLES: Work the buttonholes on the right band from the right side. ROW 1: Work until there are 4 stitches left on the row, make 1 yarn over, knit 2 together, finish the band as before. ROW 2: Knit the yarn over (other band-stitches as before) to leave a hole. The first buttonhole is worked when the increases for V-neck are finished (front piece measures approx. 23 cm, from top of shoulder). The other buttonholes are worked when the front piece measures (from top of shoulder): S: 29, 36 and 43 cm M: 30, 38 and 45 cm L: 30, 39 and 47 cm XL: 30, 39 and 48 cm XXL: 31, 40 and 50 cm XXXL: 31, 41 and 52 cm (= the last buttonhole is worked in the transition between the stocking stitch and rib at the bottom of the front piece). DECREASE TIP (for sleeves): Decrease 1 stitch on each side of the marker-stitch as follows: Work until there are 2 stitches left before the marker-stitch, knit 2 together, knit 1 (= marker-stitch), slip 1 stitch knit-wise, knit 1 and pass the slipped stitch over the knitted stitch. ------------------------------------------------------- START THE PIECE HERE: ------------------------------------------------------- JACKET - SHORT OVERVIEW OF THE PIECE: The pattern uses both long and short needles; start with the length which fits the number of stitches and change when necessary. The piece is worked back and forth with circular needle, top down. Start by working 2 loose bands, then cast on stitches for the neckline between the bands and work the yoke back and forth. When the yoke is finished, divide for the body and sleeves. Continue the body back and forth, while the sleeves wait. The sleeves are then worked in the round. The bands are sewn together mid-back and sewn to the neckline. RIGHT BAND (when the garment is worn): Cast on 12 stitches with circular needle size 4 mm and DROPS Daisy or DROPS Merino Extra Fine. Work RIGHT BAND WITH I-CORD – read description above, back and forth for 4 cm. Now knit together the first 2 stitches from the right side (opposite side to the I-cord). Decrease like this every 3 cm a total of 5 times = 7 band stitches. Continue working until the band measures 21cm, finishing after a row from the wrong side. Cut the strand and lay the piece to one side. LEFT BAND (when the garment is worn): Cast on 12 stitches with circular needle size 4 mm. Work LEFT BAND WITH I-CORD – read description above, back and forth for 4 cm. Now knit together the last 2 stitches from the right side (opposite side to the I-cord). Decrease like this every 3 cm a total of 5 times = 7 band stitches. Continue working until the band measures 21 cm, finish after a row from the right side. Do not cut the strand. Cast on 99-99-99-103-103-103 stitches at the end of the row, then work the 7 stitches from the right band = 113-113-113-117-117-117 stitches. Work 1 row from the wrong side, purling the 99-99-99-103-103-103 cast on stitches and working the 7 band-stitches on each side as before. INFORMATION BEFORE CONTINUING. FRONT AND BACK PIECES: Lace pattern is now worked on the front and back pieces according to the diagrams.. The increases for the V-neck and raglan are drawn into the diagrams. When A.2, A.3 and A.4 have been worked 1 time in height, work 1 more repeat of A.3 between A.2 and A.4. SLEEVES: The sleeves are worked in stocking stitch and increased as described under RAGLAN. YOKE: Work the first row as follows from the right side: 7 band stitches as before, A.1, work 2 GARTER STITCHES – read description above, knit 2, increase 1 stitch for RAGLAN - read description above, 20-20-20-22-22-22 stocking stitches, increase 1 stitch for raglan, knit 2, 2 garter stitches, A,2, A.3 over the next 20 stitches, A.4, 2 garter stitches, knit 2, increase 1 stitch for raglan, 20-20-20-22-22-22 stocking stitches, increase 1 stitch for raglan, knit 2, 2 garter stitches, A.1 and 7 band stitches as before. REMEMBER THE KNITTING TENSION! FIND YOUR SIZE: Pattern is now worked differently in the different sizes. Continue from the section for your size. SIZE S: Increase for raglan and work pattern simultaneously as follows – read both RAGLAN and PATTERN before continuing. RAGLAN: Increase inside 2 stocking stitches on each side of the sleeves every 2nd row 4 times, then every 4th row 10 times = 14 increases on each side of each sleeve. PATTERN: When A.1 has been worked 1 time in height all increases are finished = 289 stitches. Work as follows from the right side: 7 band stitches, A.3 over the next 40 stitches, work the first stitch in A.3, 2 garter stitches, stocking stitch over the sleeve, 2 garter stitches, A.3 over the next 80 stitches, work the first stitch in A.3, 2 garter stitches, stocking stitch over the sleeve, 2 garter stitches, A.3 over the next 40 stitches, work the first stitch in A.3 and 7 band stitches – AT THE SAME TIME on this row work the first BUTTONHOLE – read description above! Work A.3 one time in height, the yoke measures approx. 27 cm from the shoulder. Continue from DIVIDE FOR BODY AND SLEEVES SIZES M-L: Increase for raglan and work pattern simultaneously as follows – read both RAGLAN and PATTERN before continuing. RAGLAN: Increase inside 2 stocking stitches on each side of the sleeves every 2nd row 3-2 times, then every 4th row 13-13 times = 16-15 increases on each side of each sleeve. PATTERN: When A.1 has been worked 1 time in height, the increases towards mid-front are finished; continue increasing for raglan in each transition between body and sleeves, working as follows from the right side: 7 band stitches, A.3 over the next 30 stitches, work A.4, 2 garter stitches, work and increase as before over the sleeve, 2 garter stitches, A.2, A.3 over the next 60 stitches, A.4, 2 garter stitches, work and increase as before over the sleeve, 2 garter stitches, A.2, A.3 over the next 30 stitches, work the first stitch in A.3 and 7 band stitches - AT THE SAME TIME on this row work the first BUTTONHOLE – read description above! Continue increasing like this until A.2, A.3 and A.4 have been worked 1-1 time in height. All increases are finished. There are 317-313 stitches and the yoke measures approx. 27-27 cm from the shoulder. Continue from DIVIDE FOR BODY AND SLEEVES. SIZES XL - XXL: Increase for raglan and work pattern simultaneously as follows – read both RAGLAN and PATTERN before continuing. RAGLAN: Increase inside 2 stocking stitches on each side of the sleeves every 2nd row 11-7 times, then every 4th row 12-14 times = 23-21 increases on each side of each sleeve. PATTERN: When A.1 has been worked 1 time in height, the increases towards mid-front are finished; continue increasing for raglan in each transition between body and sleeves, working as follows from the right side: 7 band stitches, A.3 over the next 30 stitches, work A.4, 2 garter stitches, work and increase as before over the sleeve, 2 garter stitches, A.2, A.3 over the next 60 stitches, A.4, 2 garter stitches, work and increase as before over the sleeve, 2 garter stitches, A.2, A.3 over the next 30 stitches, work the first stitch in A.3 and 7 band stitches - AT THE SAME TIME on this row work the first BUTTONHOLE – read description above! Continue increasing like this until A.2, A.3 and A.4 have been worked 1-1 time in height. Work as follows from the right side: 7 band stitches, A.5, A.3 over the next 30 stitches, work A.4, 2 garter stitches, work and increase as before over the sleeve, 2 garter stitches, A.2, A.3 over the next 70 stitches, A.4, 2 garter stitches, work and increase as before over the sleeve, 2 garter stitches, A.2, A.3 over the next 30 stitches, A.6 and 7 band stitches. Continue increasing like this until A.2, A.3 and A.4 have been worked 1-1 time in height. All increases are finished. There are 369-361 stitches and the yoke measures approx. 32-32 cm from the shoulder. Continue from DIVIDE FOR BODY AND SLEEVES. SIZE XXXL: Increase for raglan and work pattern simultaneously as follows – read both RAGLAN and PATTERN before continuing. RAGLAN: Increase inside 2 stocking stitches on each side of the sleeves every 2nd row 6 times, then every 4th row 17 times = 23 increases on each side of each sleeve. PATTERN: When A.1 has been worked 1 time in height, the increases towards mid-front are finished; continue increasing for raglan in each transition between body and sleeves, working as follows from the right side: 7 band stitches, A.3 over the next 30 stitches, work A.4, 2 garter stitches, work and increase as before over the sleeve, 2 garter stitches, A.2, A.3 over the next 60 stitches, A.4, 2 garter stitches, work and increase as before over the sleeve, 2 garter stitches, A.2, A.3 over the next 30 stitches, work the first stitch in A.3 and 7 band stitches - AT THE SAME TIME on this row work the first BUTTONHOLE – read description above! Continue increasing like this until A.2, A.3 and A.4 have been worked 1 time in height. Work as follows from the right side: 7 band stitches, A.5, A.3 over the next 30 stitches, work A.4, 2 garter stitches, work and increase as before over the sleeve, 2 garter stitches, A.2, A.3 over the next 70 stitches, A.4, 2 garter stitches, work and increase as before over the sleeve, 2 garter stitches, A.2, A.3 over the next 30 stitches, A.6 and 7 band stitches. Continue increasing like this until A.2, A.3 and A.4 have been worked 1 time in height. Work as follows from the right side: 7 band stitches, A.3 over the next 40 stitches, work A.4, 2 garter stitches, work and increase as before over the sleeve, 2 garter stitches, A.2, A.3 over the next 80 stitches, A.4, 2 garter stitches, work and increase as before over the sleeve, 2 garter stitches, A.2, A.3 over the next 40 stitches, work the first stitch in A.3 and 7 band stitches. Continue increasing like this until A.2, A.3 and A.4 have been worked 1 time in height. All increases are finished. There are 389 stitches and the yoke measures approx. 36 cm from the shoulder. Continue from DIVIDE FOR BODY AND SLEEVES. DIVIDE FOR BODY AND SLEEVES – ALL SIZES: Work as follows from the right side: Over the first 50-55-55-60-60-65 stitches, work the band and knit the other stitches (= left front piece), place the next 52-56-54-72-68-72 stitches on a thread for the sleeve, cast on 15-15-25-15-25-25 stitches under the sleeve, knit 85-95-95-105-105-115 stitches, place the next 52-56-54-72-68-72 stitches on a thread for the sleeve, cast on 15-15-25-15-25-25 stitches under the sleeve, knit and work the band over the last 50-55-55-60-60-65 stitches (= right front piece). BODY – ALL SIZES: = 215-235-255-255-275-295 stitches. FIND YOUR SIZE: Work the section for your size below. SIZES S - M - L- XXXL: Start from wrong side and work 2nd row in the diagrams as follows: Work 7 band stitches as before, A.6, A.3 until there are 12 stitches left, A.5 and 7 band stitches as before. Continue in pattern like this. NOTE! Start on row 3 in the diagrams. * Work 7 band stitches as before, A.5, A.3 until there are 13 stitches left, A.6 and 7 band stitches as before. Work the diagrams 1 time in height. Continue with 7 band stitches as before, A.7, A.3 until there are 18 stitches left, A.8 and 7 band stitches as before. Work the diagrams 1 time in height *. Work from *-* until the body measures 16-18-20-16 cm, finishing after a complete repeat of A.3 in height. Go to ALL SIZES. SIZES XL - XXL: Start from wrong side and work 2nd row in the diagrams as follows: Work 7 band stitches as before, A.8, A.3 until there are 17 stitches left, A.7 and 7 band stitches as before. Continue in pattern like this. NOTE! Start on row 3 in the diagrams. * Work 7 band stitches as before, A.7, A.3 until there are 18 stitches left, A.8 and 7 band stitches as before. Work the diagrams 1 time in height. Work 7 band stitches as before, A.5, A.3 until there are 13 stitches left, A.6 and 7 band stitches as before. Work the diagrams 1 time in height *. Work from *-* until the body measures 18-16 cm, finishing after a complete repeat of A.3 in height. Go to ALL SIZES. ALL SIZES: On the next row (= right side) begin the rib, AT THE SAME TIME increase 42-42-48-48-48-58 stitches evenly on the row = 257-277-303-303-323-353 stitches, working as follows: Change to circular needle size 3 mm, work 7 band stitches as before, rib (knit 1, purl 1 – remember the increases) until there are 8 stitches left, knit 1 and 7 band stitches as before. When the rib measures 5-5-5-6-6-6 cm, cast off. The jacket measures approx. 48-50-52-54-56-58 cm from the shoulder. SLEEVES: Place the 52-56-54-72-68-72 stitches from the thread on one side of the piece on circular needle size 4 mm and knit up 1 stitch in each of the 15-15-25-15-25-25 stitches cast on under the sleeve = 67-71-79-87-93-97 stitches. Insert 1 marker in the middle stitch of the 15-15-25-15-25-25 stitches under the sleeve – start the round just before this marker-stitch. Work stocking stitch in the round. When the sleeve measures 3 cm from the division, decrease under the sleeve – read DECREASE TIP, repeat this decrease when the sleeve measures 8-8-9-6-6-6 cm = 63-67-75-83-89-93 stitches. Work until the sleeve measures 15-16-17-12-13-10 cm from the division. Change to double pointed needles size 3 mm. Work rib (knit 1, purl 1), AT THE SAME TIME increase 13-13-15-17-19-19 stitches evenly on round 1 = 76-80-90-100-108-112 stitches. Cast off when the rib measures 5-5-5-6-6-6 cm. ASSEMBLY: Sew the buttons onto the left band. Sew the bands together mid-back, then sew the bands to the neckline, stretching the bands a little to sew it on. |
|||||||||||||||||||
Diagram explanations |
|||||||||||||||||||
|
|||||||||||||||||||
 |
|||||||||||||||||||
 |
|||||||||||||||||||
 |
|||||||||||||||||||
 |
|||||||||||||||||||
Have you finished this pattern?Tag your pictures with #dropspattern #sanddiamondcardigan or submit them to the #dropsfan gallery. Do you need help with this pattern?You'll find 37 tutorial videos, a Comments/Questions area and more by visiting the pattern on garnstudio.com. © 1982-2026 DROPS Design A/S. We reserve all rights. This document, including all its sub-sections, has copyrights. Read more about what you can do with our patterns at the bottom of each pattern on our site. |
|||||||||||||||||||


With over 40 years in knitting and crochet design, DROPS Design offers one of the most extensive collections of free patterns on the internet - translated to 17 languages. As of today we count 324 catalogues and 12290 patterns translated into English (UK/cm). 12290
We work hard to bring you the best knitting and crochet have to offer, inspiration and advice as well as great quality yarns at incredible prices! Would you like to use our patterns for other than personal use? You can read what you are allowed to do in the Copyright text at the bottom of all our patterns. Happy crafting!
Post a comment to pattern DROPS 248-5
We would love to hear what you have to say about this pattern!
If you want to leave a question, please make sure you select the correct category in the form below, to speed up the answering process. Required fields are marked *.