
Popular categories
Looking for a yarn?


|
|||||||||||||||||||
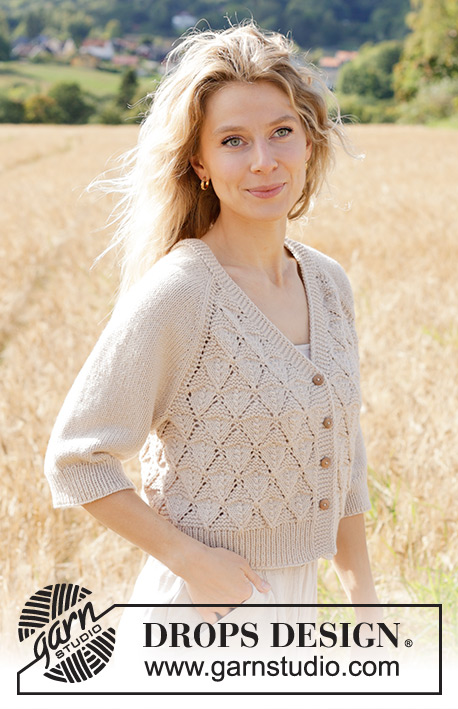
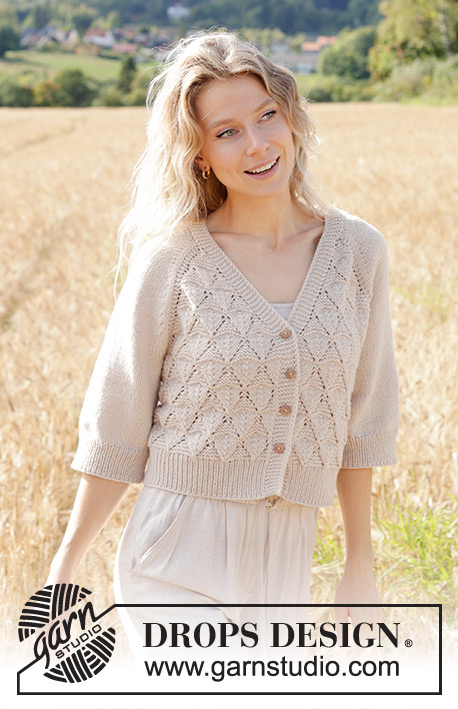
Sand Diamond Cardigan |
|||||||||||||||||||
 |
 |
||||||||||||||||||
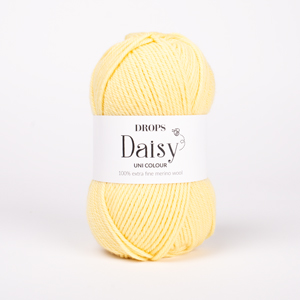
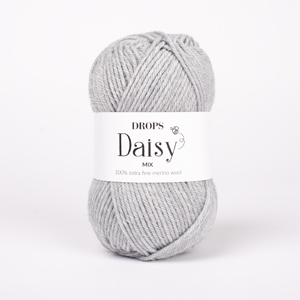
Knitted jacket in DROPS Daisy or DROPS Merino Extra Fine. The piece is worked top down with raglan, V-neck, lace pattern and ¾-length sleeves. Sizes S - XXXL.
DROPS 248-5 |
|||||||||||||||||||
|
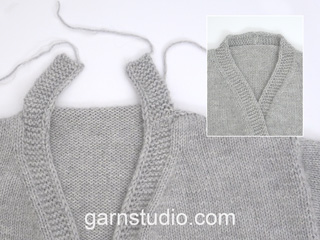
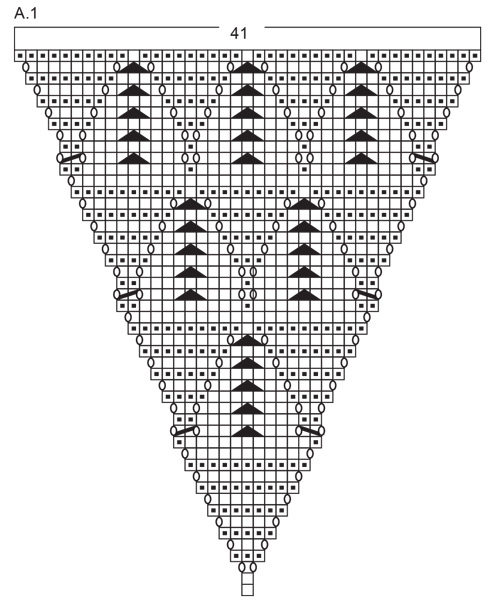
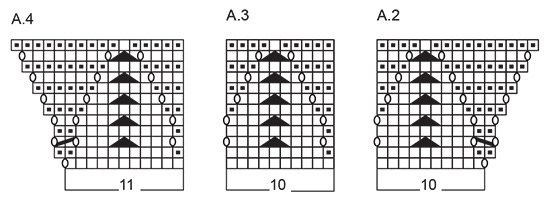
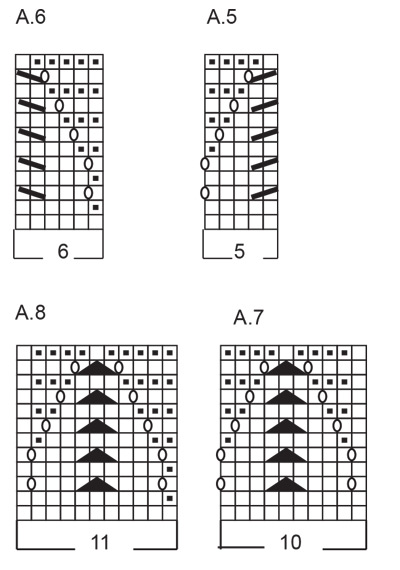
------------------------------------------------------- EXPLANATIONS FOR THE PATTERN: ------------------------------------------------------- GARTER STITCH (worked back and forth): Knit all rows, from both the right and wrong side. 1 ridge in height = knit 2 rows. PATTERN: See diagrams A.1 to A.8. The diagrams show all the rows in the pattern seen from the right side. RIGHT BAND WITH I-CORD: RIGHT SIDE: Work 10 garter stitches, slip 1 stitch purl-wise with strand in front, knit 1. WRONG SIDE: Slip 1 stitch purl-wise with strand in front, knit 1, 10 garter stitches. LEFT BAND WITH I-CORD: RIGHT SIDE: Slip 1 stitch purl-wise with strand in front, knit 1, 10 garter stitches. WRONG SIDE: Work 10 garter stitches, slip 1 stitch purl-wise with strand in front, knit 1. RAGLAN: Increase 1 stitch by making 1 yarn over, which is worked twisted on the next row. The new stitches are then worked in stockinette stitch. BUTTONHOLES: Work the buttonholes on the right band from the right side. ROW 1: Work until there are 4 stitches left on the row, make 1 yarn over, knit 2 together, finish the band as before. ROW 2: Knit the yarn over (other band-stitches as before) to leave a hole. The first buttonhole is worked when the increases for V-neck are finished (front piece measures approx. 23 cm = 9", from top of shoulder). The other buttonholes are worked when the front piece measures (from top of shoulder): S: 29, 36 and 43 cm = 11⅜", 14¼" and 17" M: 30, 38 and 45 cm = 11¾", 15" and 17¾" L: 30, 39 and 47 cm = 11¾", 15¼" and 18½" XL: 30, 39 and 48 cm = 11¾", 15¼" and 19" XXL: 31, 40 and 50 cm = 12¼", 15¾" and 19¾" XXXL: 31, 41 and 52 cm = 12¼", 16⅛" and 20½" (= the last buttonhole is worked in the transition between the stockinette stitch and rib at the bottom of the front piece). DECREASE TIP (for sleeves): Decrease 1 stitch on each side of the marker-stitch as follows: Work until there are 2 stitches left before the marker-stitch, knit 2 together, knit 1 (= marker-stitch), slip 1 stitch knit-wise, knit 1 and pass the slipped stitch over the knitted stitch. ------------------------------------------------------- START THE PIECE HERE: ------------------------------------------------------- JACKET - SHORT OVERVIEW OF THE PIECE: The pattern uses both long and short needles; start with the length which fits the number of stitches and change when necessary. The piece is worked back and forth with circular needle, top down. Start by working 2 loose bands, then cast on stitches for the neckline between the bands and work the yoke back and forth. When the yoke is finished, divide for the body and sleeves. Continue the body back and forth, while the sleeves wait. The sleeves are then worked in the round. The bands are sewn together mid-back and sewn to the neckline. RIGHT BAND (when the garment is worn): Cast on 12 stitches with circular needle size 4 MM = US 6 and DROPS Daisy or DROPS Merino Extra Fine. Work RIGHT BAND WITH I-CORD – read description above, back and forth for 4 cm = 1½". Now knit together the first 2 stitches from the right side (opposite side to the I-cord). Decrease like this every 3 cm = 3 a total of 5 times = 7 band stitches. Continue working until the band measures 21 cm = 8¼", finishing after a row from the wrong side. Cut the strand and lay the piece to one side. LEFT BAND (when the garment is worn): Cast on 12 stitches with circular needle size 4 MM = US 6. Work LEFT BAND WITH I-CORD – read description above, back and forth for 4 cm = 1½". Now knit together the last 2 stitches from the right side (opposite side to the I-cord). Decrease like this every 3 cm = 1⅛" a total of 5 times = 7 band stitches. Continue working until the band measures 21 cm = 8¼", finish after a row from the right side. Do not cut the strand. Cast on 99-99-99-103-103-103 stitches at the end of the row, then work the 7 stitches from the right band = 113-113-113-117-117-117 stitches. Work 1 row from the wrong side, purling the 99-99-99-103-103-103 cast on stitches and working the 7 band-stitches on each side as before. INFORMATION BEFORE CONTINUING. FRONT AND BACK PIECES: Lace pattern is now worked on the front and back pieces according to the diagrams.. The increases for the V-neck and raglan are drawn into the diagrams. When A.2, A.3 and A.4 have been worked 1 time in height, work 1 more repeat of A.3 between A.2 and A.4. SLEEVES: The sleeves are worked in stockinette stitch and increased as described under RAGLAN. YOKE: Work the first row as follows from the right side: 7 band stitches as before, A.1, work 2 GARTER STITCHES – read description above, knit 2, increase 1 stitch for RAGLAN - read description above, 20-20-20-22-22-22 stockinette stitches, increase 1 stitch for raglan, knit 2, 2 garter stitches, A,2, A.3 over the next 20 stitches, A.4, 2 garter stitches, knit 2, increase 1 stitch for raglan, 20-20-20-22-22-22 stockinette stitches, increase 1 stitch for raglan, knit 2, 2 garter stitches, A.1 and 7 band stitches as before. REMEMBER THE KNITTING GAUGE! FIND YOUR SIZE: Pattern is now worked differently in the different sizes. Continue from the section for your size. SIZE S: Increase for raglan and work pattern simultaneously as follows – read both RAGLAN and PATTERN before continuing. RAGLAN: Increase inside 2 stockinette stitches on each side of the sleeves every 2nd row 4 times, then every 4th row 10 times = 14 increases on each side of each sleeve. PATTERN: When A.1 has been worked 1 time in height all increases are finished = 289 stitches. Work as follows from the right side: 7 band stitches, A.3 over the next 40 stitches, work the first stitch in A.3, 2 garter stitches, stockinette stitch over the sleeve, 2 garter stitches, A.3 over the next 80 stitches, work the first stitch in A.3, 2 garter stitches, stockinette stitch over the sleeve, 2 garter stitches, A.3 over the next 40 stitches, work the first stitch in A.3 and 7 band stitches – AT THE SAME TIME on this row work the first BUTTONHOLE – read description above! Work A.3 one time in height, the yoke measures approx. 27 cm = 10⅝" from the shoulder. Continue from DIVIDE FOR BODY AND SLEEVES SIZES M-L: Increase for raglan and work pattern simultaneously as follows – read both RAGLAN and PATTERN before continuing. RAGLAN: Increase inside 2 stockinette stitches on each side of the sleeves every 2nd row 3-2 times, then every 4th row 13-13 times = 16-15 increases on each side of each sleeve. PATTERN: When A.1 has been worked 1 time in height, the increases towards mid-front are finished; continue increasing for raglan in each transition between body and sleeves, working as follows from the right side: 7 band stitches, A.3 over the next 30 stitches, work A.4, 2 garter stitches, work and increase as before over the sleeve, 2 garter stitches, A.2, A.3 over the next 60 stitches, A.4, 2 garter stitches, work and increase as before over the sleeve, 2 garter stitches, A.2, A.3 over the next 30 stitches, work the first stitch in A.3 and 7 band stitches - AT THE SAME TIME on this row work the first BUTTONHOLE – read description above! Continue increasing like this until A.2, A.3 and A.4 have been worked 1-1 time in height. All increases are finished. There are 317-313 stitches and the yoke measures approx. 27-27 cm = 10⅝"-10⅝" from the shoulder. Continue from DIVIDE FOR BODY AND SLEEVES. SIZES XL - XXL: Increase for raglan and work pattern simultaneously as follows – read both RAGLAN and PATTERN before continuing. RAGLAN: Increase inside 2 stockinette stitches on each side of the sleeves every 2nd row 11-7 times, then every 4th row 12-14 times = 23-21 increases on each side of each sleeve. PATTERN: When A.1 has been worked 1 time in height, the increases towards mid-front are finished; continue increasing for raglan in each transition between body and sleeves, working as follows from the right side: 7 band stitches, A.3 over the next 30 stitches, work A.4, 2 garter stitches, work and increase as before over the sleeve, 2 garter stitches, A.2, A.3 over the next 60 stitches, A.4, 2 garter stitches, work and increase as before over the sleeve, 2 garter stitches, A.2, A.3 over the next 30 stitches, work the first stitch in A.3 and 7 band stitches - AT THE SAME TIME on this row work the first BUTTONHOLE – read description above! Continue increasing like this until A.2, A.3 and A.4 have been worked 1-1 time in height. Work as follows from the right side: 7 band stitches, A.5, A.3 over the next 30 stitches, work A.4, 2 garter stitches, work and increase as before over the sleeve, 2 garter stitches, A.2, A.3 over the next 70 stitches, A.4, 2 garter stitches, work and increase as before over the sleeve, 2 garter stitches, A.2, A.3 over the next 30 stitches, A.6 and 7 band stitches. Continue increasing like this until A.2, A.3 and A.4 have been worked 1-1 time in height. All increases are finished. There are 369-361 stitches and the yoke measures approx. 32-32 cm = 12½"-12½" from the shoulder. Continue from DIVIDE FOR BODY AND SLEEVES. SIZE XXXL: Increase for raglan and work pattern simultaneously as follows – read both RAGLAN and PATTERN before continuing. RAGLAN: Increase inside 2 stockinette stitches on each side of the sleeves every 2nd row 6 times, then every 4th row 17 times = 23 increases on each side of each sleeve. PATTERN: When A.1 has been worked 1 time in height, the increases towards mid-front are finished; continue increasing for raglan in each transition between body and sleeves, working as follows from the right side: 7 band stitches, A.3 over the next 30 stitches, work A.4, 2 garter stitches, work and increase as before over the sleeve, 2 garter stitches, A.2, A.3 over the next 60 stitches, A.4, 2 garter stitches, work and increase as before over the sleeve, 2 garter stitches, A.2, A.3 over the next 30 stitches, work the first stitch in A.3 and 7 band stitches - AT THE SAME TIME on this row work the first BUTTONHOLE – read description above! Continue increasing like this until A.2, A.3 and A.4 have been worked 1 time in height. Work as follows from the right side: 7 band stitches, A.5, A.3 over the next 30 stitches, work A.4, 2 garter stitches, work and increase as before over the sleeve, 2 garter stitches, A.2, A.3 over the next 70 stitches, A.4, 2 garter stitches, work and increase as before over the sleeve, 2 garter stitches, A.2, A.3 over the next 30 stitches, A.6 and 7 band stitches. Continue increasing like this until A.2, A.3 and A.4 have been worked 1 time in height. Work as follows from the right side: 7 band stitches, A.3 over the next 40 stitches, work A.4, 2 garter stitches, work and increase as before over the sleeve, 2 garter stitches, A.2, A.3 over the next 80 stitches, A.4, 2 garter stitches, work and increase as before over the sleeve, 2 garter stitches, A.2, A.3 over the next 40 stitches, work the first stitch in A.3 and 7 band stitches. Continue increasing like this until A.2, A.3 and A.4 have been worked 1 time in height. All increases are finished. There are 389 stitches and the yoke measures approx. 36 cm = 14¼" from the shoulder. Continue from DIVIDE FOR BODY AND SLEEVES. DIVIDE FOR BODY AND SLEEVES – ALL SIZES: Work as follows from the right side: Over the first 50-55-55-60-60-65 stitches, work the band and knit the other stitches (= left front piece), place the next 52-56-54-72-68-72 stitches on a thread for the sleeve, cast on 15-15-25-15-25-25 stitches under the sleeve, knit 85-95-95-105-105-115 stitches, place the next 52-56-54-72-68-72 stitches on a thread for the sleeve, cast on 15-15-25-15-25-25 stitches under the sleeve, knit and work the band over the last 50-55-55-60-60-65 stitches (= right front piece). BODY – ALL SIZES: = 215-235-255-255-275-295 stitches. From the wrong side, work row 2 in A.3 with 7 band stitches as before on each side. FIND YOUR SIZE: Work the section for your size below. SIZES S - M - L- XXXL: NOTE! Start on row 3 in the diagrams. * Work 7 band stitches as before, A.5, A.3 until there are 13 stitches left, A.6 and 7 band stitches as before. Work the diagrams 1 time in height. Continue with 7 band stitches as before, A.7, A.3 until there are 18 stitches left, A.8 and 7 band stitches as before. Work the diagrams 1 time in height *. Work from *-* until the body measures 16-18-20-16 cm = 6¼"-7"-8"-6¼", finishing after a complete repeat of A.3 in height. Go to ALL SIZES. SIZES XL - XXL: NOTE! Start on row 3 in the diagrams. * Work 7 band stitches as before, A.7, A.3 until there are 18 stitches left, A.8 and 7 band stitches as before. Work the diagrams 1 time in height. Work 7 band stitches as before, A.5, A.3 until there are 13 stitches left, A.6 and 7 band stitches as before. Work the diagrams 1 time in height *. Work from *-* until the body measures 18-16 cm = 7"-6¼", finishing after a complete repeat of A.3 in height. Go to ALL SIZES. ALL SIZES: On the next row (= right side) begin the rib, AT THE SAME TIME increase 42-42-48-48-48-58 stitches evenly on the row = 257-277-303-303-323-353 stitches, working as follows: Change to circular needle size 3 MM = US 2.5, work 7 band stitches as before, rib (knit 1, purl 1 – remember the increases) until there are 8 stitches left, knit 1 and 7 band stitches as before. When the rib measures 5-5-5-6-6-6 cm = 2"-2"-2"-2⅜"-2⅜"-2⅜", bind off. The jacket measures approx. 48-50-52-54-56-58 cm = 19"-19¾"-20½"-21¼"-22"-22¾" from the shoulder. SLEEVES: Place the 52-56-54-72-68-72 stitches from the thread on one side of the piece on circular needle size 4 MM = US 6 and knit up 1 stitch in each of the 15-15-25-15-25-25 stitches cast on under the sleeve = 67-71-79-87-93-97 stitches. Insert 1 marker in the middle stitch of the 15-15-25-15-25-25 stitches under the sleeve – start the round just before this marker-stitch. Work stockinette stitch in the round. When the sleeve measures 3 cm = 1⅛" from the division, decrease under the sleeve – read DECREASE TIP, repeat this decrease when the sleeve measures 8-8-9-6-6-6 cm = 3⅛"-3⅛"-3½"-2⅜"-2⅜"-2⅜" = 63-67-75-83-89-93 stitches. Work until the sleeve measures 15-16-17-12-13-10 cm = 6"-6¼"-6¾"-4¾"-5⅛"-4" from the division. Change to double pointed needles size 3 MM = US 2.5. Work rib (knit 1, purl 1), AT THE SAME TIME increase 13-13-15-17-19-19 stitches evenly on round 1 = 76-80-90-100-108-112 stitches. Bind off when the rib measures 5-5-5-6-6-6 cm = 2"-2"-2"-2⅜"-2⅜"-2⅜". ASSEMBLY: Sew the buttons onto the left band. Sew the bands together mid-back, then sew the bands to the neckline. |
|||||||||||||||||||
Diagram explanations |
|||||||||||||||||||
|
|||||||||||||||||||
|
|||||||||||||||||||
|
|||||||||||||||||||
|
|||||||||||||||||||

|
|||||||||||||||||||
|
Have you made this or any other of our designs? Tag your pictures in social media with #dropsdesign so we can see them! Do you need help with this pattern?You'll find tutorial videos, a Comments/Questions area and more by visiting the pattern on garnstudio.com. © 1982-2024 DROPS Design A/S. We reserve all rights. This document, including all its sub-sections, has copyrights. Read more about what you can do with our patterns at the bottom of each pattern on our site. |
|||||||||||||||||||


With over 40 years in knitting and crochet design, DROPS Design offers one of the most extensive collections of free patterns on the internet - translated to 17 languages. As of today we count 304 catalogs and 11422 patterns - 11417 of which are translated into English (US/in).
We work hard to bring you the best knitting and crochet have to offer, inspiration and advice as well as great quality yarns at incredible prices! Would you like to use our patterns for other than personal use? You can read what you are allowed to do in the Copyright text at the bottom of all our patterns. Happy crafting!
Comments / Questions (40)
Hello! I want to understand how you placed the right and left bands at the start of the pattern, which sides are front and how they will be joined at the back. I can't seem to grasp the placement and sewing of the bands at the end. I don't want to start the project and end up doing a mistake at the end. Can you please elaborate on that point where bands are knitted together in the row with the cast on stitches in the middle?
24.04.2024 - 21:01DROPS Design answered:
Dear Zarmeen, work first the right front band exactly how explained (1st row = RS) decreasing as explained then put aside. Work then left front band as explained decreasing as explained (= mirrored to right front band) then after left front band is done, do not cut the yarn, work the sts from RS, then cast on new sts for neck/shoulders and work the sts of right front band sts. In this video, we show for another pattern how to work the 2 front band together but remember that's just an example, remember to work the front band stitches here just as explained in the written pattern. Happy knitting!
25.04.2024 - 08:05Skall det ökas 2 m PÅ EN GÅNG på varje sida om ärmen.
23.04.2024 - 17:37Skall det ökas 2 m PÅ EN GÅNG i varje sida av ärmen innanför de 2 rätmaskorna? 4 m x 16= 64 ökade maskor till ärmen.
23.04.2024 - 17:35DROPS Design answered:
Hej Johanna. Du ökar 1 maska på varje sida av ärmen till raglan (ökning innanför 2 slätstickade maskor), så totalt är det 4 ökade maskor på ärmarna på ett varv. Så om du stickar storlek M så ska du öka 16 gånger på ärmarna, dvs 16x4 = 64 maskor ökade. Mvh DROPS Design
24.04.2024 - 11:32Hallo, Ik ben klaar met de pas in maat M en heb 317 steken, exact zoals in de beschrijving, volgende stap is de verdeling voor de mouwen en het lijf. Mijn werkje meet echter maar 22 cm in plaats van 27 cm (vanaf bovenkant halsboord gemeten), dat is 5 cm minder dan aangegeven in de beschrijving en ik vrees dat het te kort gaat zijn. Zal ik nogmaals 1x het patroon breien (12 naalden) alvorens de verdeling voor de mouwen te doen? Dankjewel voor jullie antwoord. Vriendelijke groeten.
23.04.2024 - 12:10DROPS Design answered:
Dag Nancy,
Ja, je kunt gewoon door breien in patroon, zonder meerderingen te maken voor de raglan, tot de juiste lengte. Er komt dan wel a.h.w. een 'knik' in de raglanlijn ter hoogte van de oksel. Dit is niet erg, maar als je dat niet mooi vindt zou je er ook voor kunnen kiezen om toch met deze afmetingen door te gaan. Het armsgat is namelijk relatief vrij groot bij dit patroon. Controleer ook nog even of je de afmetingen goed hebt opgenomen, door het werk plat neer te leggen en dan de maten van jouw werk te vergelijken met de maten die bij de maattekening staan.
24.04.2024 - 12:21Graag wil ik ook verder breien. Als ik met de pas begin in S, moet ik A1 van onder af beginnen. Maar ook dan klopt het aantal steken niet aan het eind van de naald, maar houd ik steken over. Wat doe ik fout?
22.04.2024 - 21:40DROPS Design answered:
7 voorbiessteken, A.1 (= 1 steek), 2 ribbelsteken, 2 recht, 1 steek meerderen, 20 tricotsteken, 1 steek meerderen, 2 recht, 2 ribbelsteken, A.2 (= 10 steken), A.3 over 20 steken (A.4 (= 11 steken), 2 ribbelsteken, 2 recht, 1 steek meerderen, 20 tricotsteken, 1 steek meerderen, 2 recht, 2 ribbelsteken, A.1 (= 1 steek) en 7 voorbiessteken. Als je bovenstaande (schuingedrukte) steken optelt kom je op 113 steken.
24.04.2024 - 12:49Hallo,wie ist dies bei Raglan zu verstehen: In jeder 2. Reihe 3-2 ?in der Höhe, in jeder 4. Reihe 13-13 ? in der Höhe . Werden drei oder zwei das erste mal zugeneommen und beim 2. Mal 13 und nochmal 13. Ist mir nicht erklärlich. Um baldige Antwort danke ich Ihnen da ich weiterstricken möchte.
21.04.2024 - 16:11DROPS Design answered:
Liebe Frau Ehret, beim Abschnitt "M-L" ird manfür den Raglan/Ärmel: 3 Mal in M und 2 Mal in L zunehmen. So wird man insgesamt 16 Mal in M und 15 Mal in L zunehmen. Viel spaß beim Stricken!
22.04.2024 - 09:08Bij de start van de pas met 113 steken kom ik niet uit met de beschrijving. Waar begin ik met A1, boven of onderaan het telpatroon? Als ik bovenaan begin heb ik al 43 steken gebreid en dan komen er nog heel veel
19.04.2024 - 22:37DROPS Design answered:
Dag Jannie,
Je breit eerst 7 voorbiessteken en dan begin je gelijk met A.1. Het telpatroon lees je van onder naar boven, dat betekent dus dat A.1 1 steek heeft op de eerste naald.
22.04.2024 - 21:34Bonjour Je pense qu'il y a une erreur pour DOS/DEVANTS : pour la taille L si on suit les indications "sur l'envers tricoter le rang 2 de A3 avec 7 mailles de bordure..." le motif se trouve décalé. J'ai fait dès ce moment le rang 2 de A5/A3/A6 avec les 7 mailles de bordure de chaque côté et cela fonctionnera très bien.
15.04.2024 - 17:13DROPS Design answered:
Bonjour Christine, quand les diagrammes sont terminés, on a 313 mailles en taille L, on tricote le 1er rang de A.3 sur toutes les mailles lors de la division, ainsi, au rang suivant sur l'envers (le 1er rang du dos/devants), on tricote le 2ème rang de A.3 (on ne doit plus augmenter). Bon tricot!
16.04.2024 - 08:03Har 251 m sammanlagt. 41 m x2 till mönster. Helt ok. Hur många maskor till ärm resp ok när A1 är stickat en gång? Storlek M.
15.04.2024 - 14:21DROPS Design answered:
Hei Yvonne. Hvert erme skal da bestå da: 2 rettmaskene + de økte maskene til raglan + de 20 maskene du hadde i starten + de økte maskene til raglan + 2 rettmaskene. Mvh DROPS Design
23.04.2024 - 07:11Hej igen. Frågan oklar? Har jag missat något då jag inte får ihop det på första varvet A 1.
13.04.2024 - 23:02DROPS Design answered:
Hei Yvonne. Se vårt forrige svar til deg, evnt opplys hvor mange masker du har etter å ha strikket A.1 1 gang i høyden. mvh DROPS Design
15.04.2024 - 09:09