
Popular categories
Looking for a yarn?


Comments / Questions (5)
![]() Pat wrote:
Pat wrote:
In the cardigan why are the buttonholes on the girls side can I reverse this for a boy and how?
28.12.2024 - 16:23DROPS Design answered:
Hi Pat, if you want buttonholes on the other side, just knit them in the same way in the left band (instead of right). In this case you will cast off st at the beginning of row, not at the end. Happy knitting!
28.12.2024 - 18:13
![]() Toni Caldwell wrote:
Toni Caldwell wrote:
Hey, i am new to knitting clothes and this is my first time knitting a cardigan. i was wondering what a band stitches are? Thank you Toni
20.07.2023 - 21:30DROPS Design answered:
Hi Toni, band stitches are front borders. In this pattern there are 5 mid front stitches worked in garter stitch. Happy knitting!
20.07.2023 - 22:47
![]() Valérie wrote:
Valérie wrote:
Bonjour, J'ai le même problème que Chiara. Je n'ai pas fini le motif A3 et je suis à 15 cm (2/3 ans).... Comment puis je faire ?
16.11.2022 - 16:53DROPS Design answered:
Bonjour Valérie, votre tension n'est probablement pas juste en hauteur, vous devez compenser en tricotant les diminutions plus tôt; ou bien vous pouvez aussi terminer A.3 comme indiqué avant de diviser et alors l'empiècement sera plus long que les 15 cm prévus en taille 3/4 ans, vous pouvez aussi augmenter entre les sapins, autrement dit avant la fin de A.3, attention alors à bien suivre les motifs pour qu'ils soient identiques. Bon tricot!
17.11.2022 - 09:49
![]() Maria Chiara Campanini wrote:
Maria Chiara Campanini wrote:
Lo sprone misura 15 cm dal collo. Ma manca un giro di aumenti. Come faccio ?
01.11.2022 - 20:10DROPS Design answered:
Buonasera Maria Chiara, deve arrivare con il numero di maglie corretto prima della divisione: ci dev'essere stato un cambio di tensione durante la lavorazione rispetto al campione. Buon lavoro!
02.11.2022 - 18:03
![]() Chiara Campanini wrote:
Chiara Campanini wrote:
Non ho ancora finito gli aumenti e il motovo A3 e lo sprone misura già 15 cm. Ho 209 punti. Come li divido? Sono pochi per taglia 3/4 anni ? Il campione era corretto con ferri 4 in altezza
31.10.2022 - 14:36DROPS Design answered:
Buonasera Chiara, lo sprone ora misura 15 cm dal segnapunti posizionato alla fine del collo? Buon lavoro!
31.10.2022 - 21:10
|
|||||||||||||||||||
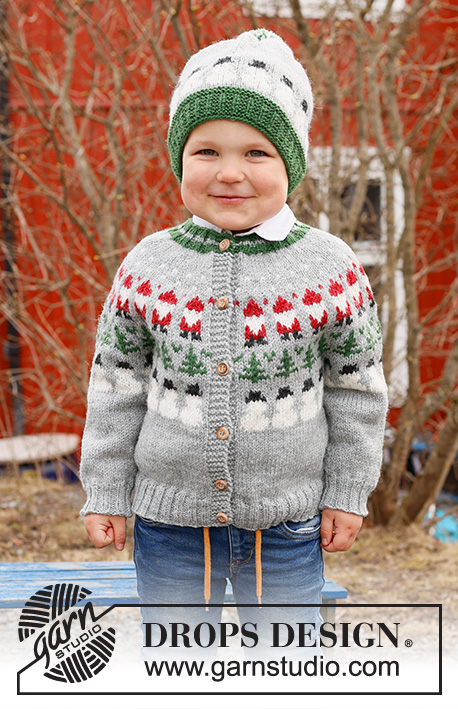
Christmas Time Cardigan#christmastimecardigan |
|||||||||||||||||||
 |
 |
||||||||||||||||||
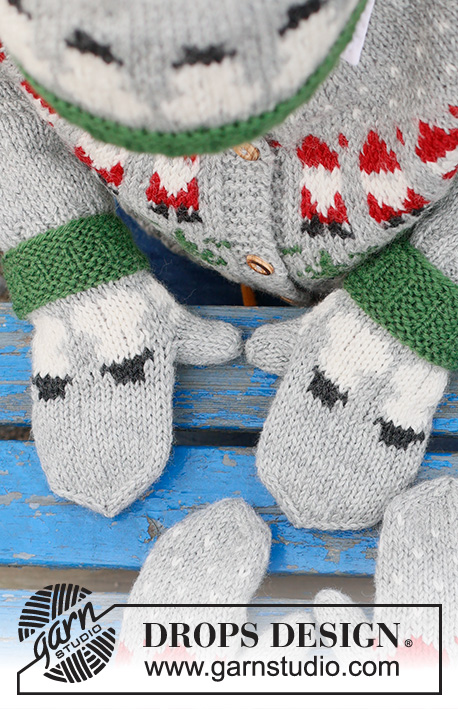
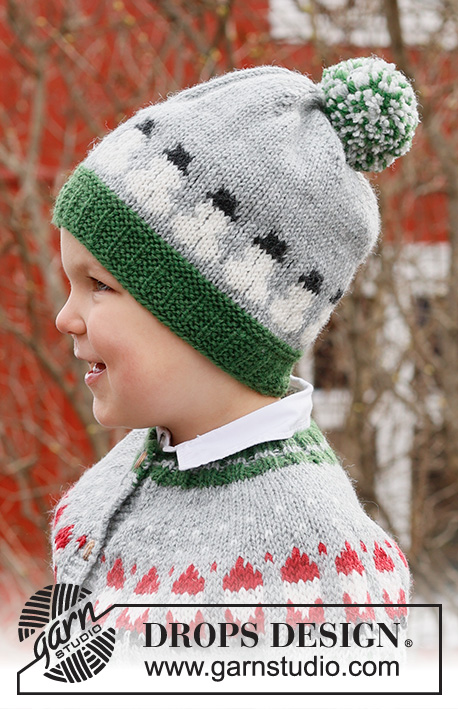
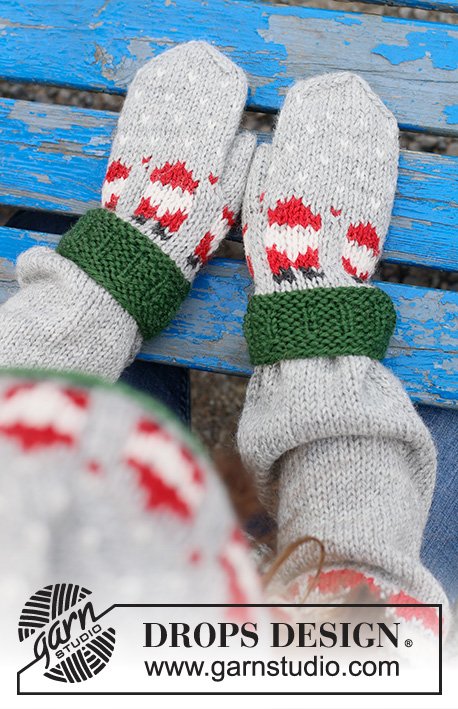
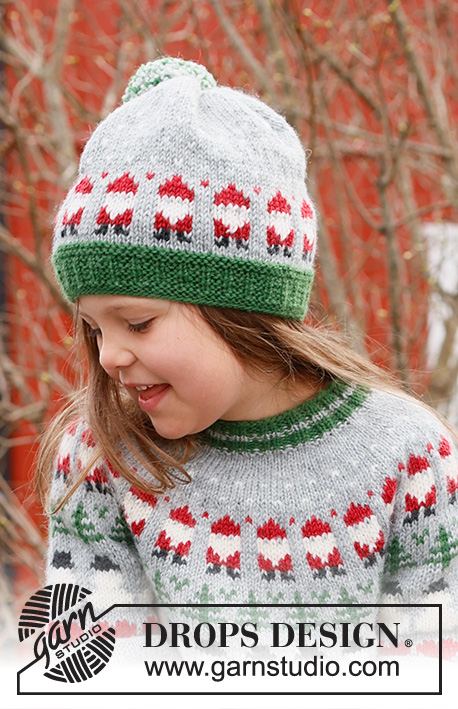
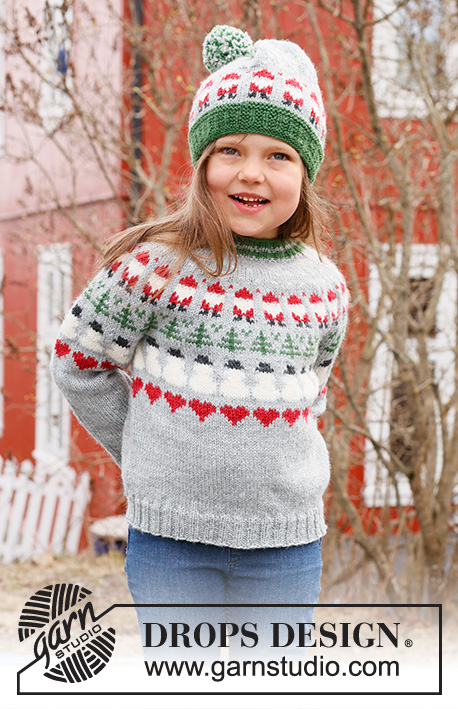
Knitted jacket for children in DROPS Karisma. The piece is worked top down with round yoke and coloured Santa, Christmas tree and snowman-pattern. Sizes 2 – 14 years. Theme: Christmas.
DROPS Children 44-17 |
|||||||||||||||||||
|
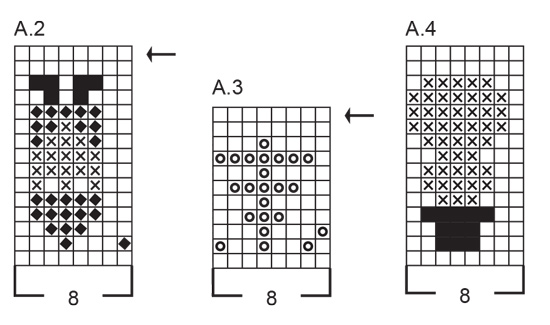
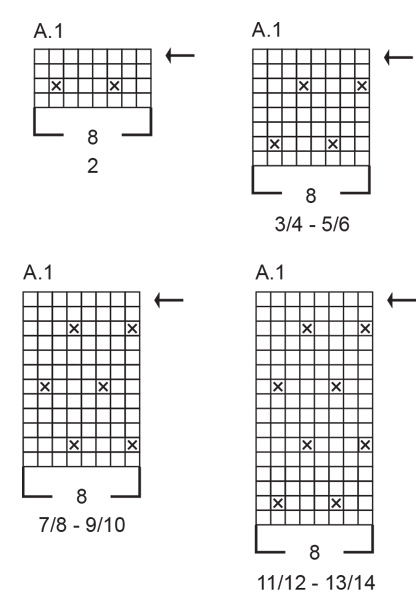
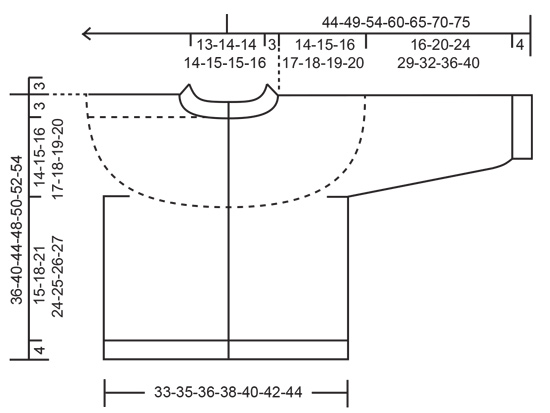
------------------------------------------------------- EXPLANATIONS FOR THE PATTERN: ------------------------------------------------------- RIDGE/GARTER STITCH (worked back and forth): Knit all rows. 1 ridge = knit 2 rows. PATTERN: See diagrams A.1 to A.4. Choose diagram for your size (applies to A.1). The diagrams show all rows in the pattern from the right side and are worked in stocking stitch. KNITTING TIP-1: To avoid the knitting tension losing its elasticity when working pattern it is important that the strands at the back are not tight. Use a size larger needle when working pattern if the piece becomes tight. KNITTING TIP-2: If you want more pattern on the sleeves and body, continue the diagrams in the desired order but remember this will affect the amounts of yarn needed. Position a motif mid-top of sleeve and count out from the mid-stitch where the pattern should begin under the sleeve. INCREASE TIP (evenly spaced): Increase 1 stitch by making 1 yarn over which is worked twisted on the next row to avoid a hole. DECREASE TIP (for sleeves): Decrease 1 stitch on either side of the marker-stitch as follows: Work until there are 2 stitches left before the marker, knit 2 together with colour light grey, knit the marker-stitch with colour light grey and knit 2 twisted together with colour light grey (2 stitches decreased). BUTTONHOLES: Work buttonholes on the right band (when the garment is worn). Work from the right side when there are 3 stitches left on the row as follows: Make 1 yarn over, knit 2 together and knit 1. On the next row (wrong side), knit the yarn over to leave a hole. The first buttonhole is worked when the rib on the neck measures approx. 1½-2 cm. Then work the other 5-5-5-5-5-6-6 buttonholes with approx. 6½-7-8-8½-9-8-8 cm between each one. ------------------------------------------------------- START THE PIECE HERE: ------------------------------------------------------- JACKET – SHORT OVERVIEW OF THE PIECE: The neck and yoke are worked back and forth with circular needle, from mid front and top down. The yoke is divided for body and sleeves and the body continued back and forth with circular needle. The sleeves are worked in the round with double pointed needles. NECK: Cast on 88-92-96-96-100-100-104 stitches with short circular needle size 3 mm and colour forest green DROPS Karisma. Purl 1 row from the wrong side. Work the next row from the right side: 5 band stitches in GARTER STITCH – read description above, * knit 2, purl 2 *, work from *-* until there are 7 stitches left, knit 2 and 5 band stitches in garter stitch. Continue this rib back and forth at the same time as you work stripes as follows: 1 more row with colour forest green, 2 rows with colour light grey, 4 rows with colour forest green, then light grey until the neck measures 3 cm – remember the BUTTONHOLE on the right band – read description above. Knit 1 row from the right side with colour light grey and increase 22-24-26-26-26-26-28 stitches evenly spaced – read INCREASE TIP (do not increase over the bands) = 110-116-122-122-126-126-132 stitches. Purl 1 row from the wrong side (bands knitted and yarn overs purled twisted). Insert 1 marker after the band; the yoke is measured from this marker! YOKE: Change to circular needle size 4 mm. Continue with stocking stitch, colour light grey and 5 band stitches in garter stitch on each side. REMEMBER THE KNITTING TENSION! When the piece measures 2-2-2-2-3-3-3 cm from the marker, increase 21-23-25-25-29-29-31 stitches evenly spaced – remember INCREASE TIP (do not increase over the bands) = 131-139-147-147-155-155-163 stitches. Adjust so the next row is from the wrong side. Work pattern and increase as described below – read KNITTING TIP-1 and PATTERN in the explanations above. The bands are always worked in colour light grey. A.1: Work 5 band stitches in garter stitch, the first stitch in A.1 (seen from the right side), then A.1, 15-16-17-17-18-18-19 times (the diagrams are worked from left to right when working from the wrong side) and 5 band stitches in garter stitch. Continue this pattern. NOTE: When working from the right side repeat A.1 after the band until there are 6 stitches left, work the first stitch in A,1 so the pattern is symmetrical, and 5 band stitches in garter stitch. AT THE SAME TIME on the row marked with an arrow, increase 40-40-48-48-48-56-56 stitches evenly spaced (do not increase over the bands) = 171-179-195-195-203-211-219 stitches. A.2: When A.1 is finished in your size, work A.2 as follows from the wrong side: 5 band stitches in garter stitch, the first stitch in A.2 (seen from the right side), A.2, 20-21-23-23-24-25-26 times and 5 band stitches in garter stitch. Continue this pattern. AT THE SAME TIME on the row marked with an arrow, increase 32-32-32-32-40-40-48 stitches evenly spaced (do not increase over the bands) = 203-211-227-227-243-251-267 stitches. A.3: When A.2 is finished, work A.3 as follows from the right side: 5 band stitches in garter stitch, work A.3, 24-25-27-27-29-30-32 times, the first stitch in A.3 so the pattern is symmetrical and 5 band stitches in garter stitch. Continue this pattern. AT THE SAME TIME on the row marked with an arrow, increase 16-16-16-24-24-24-24 stitches evenly spaced (do not increase over the bands) = 219-227-243-251-267-275-291 stitches. A.4: When A.3 is finished, work A.4 as follows from the wrong side: 5 band stitches in garter stitch, the first stitch in A.4, work A.4, 26-27-29-30-32-33-35 times and 5 band stitches in garter stitch. Continue this pattern – at the same time divide for the body and sleeves as described below. DIVIDE FOR BODY AND SLEEVES: Work until the yoke measures 14-15-16-17-18-19-20 cm from the marker. The increases are finished but the pattern is not and continues on the body and sleeves. On the next row divide as follows: Work 35-37-39-41-43-45-47 stitches (front piece), place the next 44-44-48-48-52-52-56 stitches on a thread for the sleeve, cast on 8 stiches with colour light grey (in side under sleeve), work 61-65-69-73-77-81-85 stitches (back piece), place the next 44-44-48-48-52-52-56 stitches on a thread for the sleeve, cast on 8 stiches with colour light grey (in side under sleeve), work the last 35-37-39-41-43-45-47 stitches (front piece). The body and sleeves are finished separately. The piece is now measured from here! BODY: = 147-155-163-171-179-187-195 stitches. Continue the pattern from the yoke with 5 band stitches in garter stitch on each side – the repeat of A.4 will not fit under the sleeves, work as much repeats as possible mid under sleeve and work the remaining stitches with colour light grey. When A.4 is finished, continue with colour light grey – read KNITTING TIP-2. Work until the body measures 15-18-21-24-25-26-27 cm from the division. Knit 1 row from the right side and increase 13-17-17-17-21-21-21 stitches evenly spaced (do not increase over the bands) = 160-172-180-188-200-208-216 stitches. Change to circular needle size 3 mm and work as follows from the wrong side: 5 band stitches in garter stitch, * purl 2, knit 2 *, work from *-* until there are 7 stitches left, purl 2 and 5 band stitches in garter stitch. Continue this rib for 4 cm. Cast off a little loosely. The jacket measures approx. 36-40-44-48-50-52-54 cm from the shoulder down. SLEEVES: Place the 44-44-48-48-52-52-56 stitches from the thread on the one side of the piece on double pointed needles size 4 mm and knit up 1 stitch in each of the new stitches cast on under the sleeve with colour light grey = 52-52-56-56-60-60-64 stitches. Insert a marker in the 5th of the new stitches under the sleeve (mid-under sleeve); the marker is used when decreasing under the sleeve. Start at the marker and continue in the round with the pattern from the yoke. A.4 will not fit mid under sleeve, work as much repeats as possible mid under sleeve and work the remaining stitches with colour light grey. When A.4 is finished continue with colour light grey – read KNITTING TIP-2. AT THE SAME TIME, when the sleeve measures 3-3-3-3-4-4-4 cm decrease 2 stitches under the sleeve – read DECREASE TIP. Decrease like this every 3½-6-6-9-8-11-9 cm a total of 4-3-4-3-4-3-4 times = 44-46-48-50-52-54-56 stitches. Continue working until the sleeve measures 16-20-24-29-32-36-40 cm from the division (or to desired length. There is approx. 4 cm left). Knit 1 round and decrease 0-2-0-2-0-2-0 stitches evenly spaced = 44-44-48-48-52-52-56 stitches. Change to double pointed needles size 3 mm and work rib (knit 2, purl 2) for 4 cm. Cast off a little loosely. The sleeve measures approx. 20-24-28-33-36-40-44 cm from the division. Work the other sleeve in the same way. ASSEMBLY: Sew the buttons onto the left band. |
|||||||||||||||||||
Diagram explanations |
|||||||||||||||||||
|
|||||||||||||||||||
 |
|||||||||||||||||||
 |
|||||||||||||||||||
 |
|||||||||||||||||||
Have you finished this pattern?Tag your pictures with #dropspattern #christmastimecardigan or submit them to the #dropsfan gallery. Do you need help with this pattern?You'll find 34 tutorial videos, a Comments/Questions area and more by visiting the pattern on garnstudio.com. © 1982-2026 DROPS Design A/S. We reserve all rights. This document, including all its sub-sections, has copyrights. Read more about what you can do with our patterns at the bottom of each pattern on our site. |
|||||||||||||||||||


With over 40 years in knitting and crochet design, DROPS Design offers one of the most extensive collections of free patterns on the internet - translated to 17 languages. As of today we count 324 catalogues and 12290 patterns translated into English (UK/cm). 12290
We work hard to bring you the best knitting and crochet have to offer, inspiration and advice as well as great quality yarns at incredible prices! Would you like to use our patterns for other than personal use? You can read what you are allowed to do in the Copyright text at the bottom of all our patterns. Happy crafting!
Post a comment to pattern DROPS Children 44-17
We would love to hear what you have to say about this pattern!
If you want to leave a question, please make sure you select the correct category in the form below, to speed up the answering process. Required fields are marked *.