
Popular categories
Looking for a yarn?


Comments / Questions (77)
![]() Yvonn wrote:
Yvonn wrote:
Hej igen. Jeg får flere end 18 gentagelser. Da jeg startede på mønstret havde jeg 18 gentagelser, men der er jo taget mange masker ud siden. Jeg kan ikke få mønsteret til at passe. Jeg har 5 masker for meget. Række 9 passer med mønsteret. Så jeg forstår det ikke. Er der ikke nogen man kan ringe til og få hjælp. Det er svært at forklare på papir. Mvh Yvonn
27.04.2026 - 21:12
![]() Yvonn wrote:
Yvonn wrote:
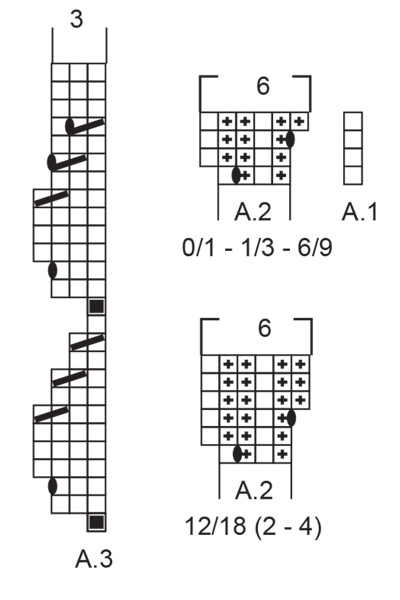
Hej. Jeg strikker str. 6/9 mdr og er gået i stå. Mønster diagram 3-4 og 5 række 11 kan jeg ikke lige finde ud af. Sådan som jeg forstår det 6 kantmasker 2 ret sammen 7 ret og så er det at jeg skal lave et indtag, men mønsteret stopper midt i indtaget. Hvad gør jeg så ?🤔 Håber at i kan hjælpe mig videre.
23.04.2026 - 18:19DROPS Design answered:
Hei Yvonn. Litt usikker på hva du mener med: mønsteret stopper midt i indtaget. For å få en god oversikt når man strikker diagram er å sette maskemarkører etter hver diagram. Først strikkes 6 stolpemaskene, så A.1 (= 2 masker sammen) + A.4 (= 7 rett + ta 1 maske løs av pinnen som om de skulle strikkes rett, strikk 2 rett sammen, løft den løse masken over maskene som ble strikket sammen) x 18 ganger + A.5 (= 7 masker rett + 2 masker sammen) + 6 stolpemasker. mvh DROPS Design
27.04.2026 - 11:59
![]() ML wrote:
ML wrote:
Hi, Can you explain what a band stitch is, I can’t find it in the instruction. Thank you, M
27.03.2026 - 23:00DROPS Design answered:
Dear ML, the band stitches are the 6 stitches worked on each side for the buttonbands (with buttonholes on the right front piece). Happy knitting!
07.04.2026 - 08:26
![]() Dorothea Nückles wrote:
Dorothea Nückles wrote:
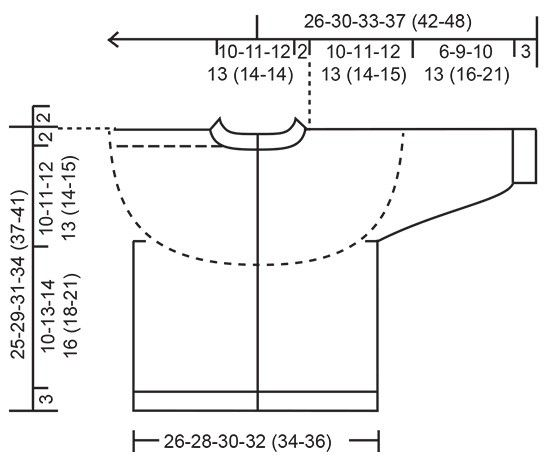
Hallo Drops, bin gerade bei Swing by Spring cardigan am Stricken. Ich stricke die kleinste Größe. Hab die Passe gestrickt und teile nun gerade auf, leider kann diese Verteilung nicht stimmen. Brauche un unbedingt die genauen Maschenzahlen. LG, Dorothea
20.02.2026 - 13:20DROPS Design answered:
Liebe Dorothea, an welcher Stelle kommen Sie denn mit der Verteilung nicht klar? Die Maschenzahlen gehen in der Gesamtzahl auf. Es ist erst mal kein Fehler erkennbar.
24.02.2026 - 10:09
![]() Dorothea wrote:
Dorothea wrote:
Hallo liebes Drops Team, ich stricke z.Zt. den Swing by Spring Cardigan . Leider habe ich beim Stricken mehrere Fehler im Diagramm festgestellt. Ihr Solltest die dringend überarbeiten. Viele liebe Grüße, Dorothea Nückles
19.02.2026 - 21:56DROPS Design answered:
Liebe Dorothea, es wäre hilfreich, wenn Sie die genauen Reihen angeben, mit denen Sie nicht zurechtgekommen sind, dann können wir besser überprüfen, ob Fehler vorhanden sind. Zunächst einmal sehen die Diagramme nicht fehlerhaft aus.
24.02.2026 - 10:11
![]() Monica wrote:
Monica wrote:
Hej! Stickar 12/18 månader. Förstår inte mönstret. Hur gör jag när jag fått 133maskor på varvet. Ska jag fortsätta med mönster A3 hela oket eller ska jag sticka efter A3, A4 då? När stickas A5?
13.02.2026 - 12:45DROPS Design answered:
Hei Monica. Når du har 133 masker bytter du pinne til 3 og strikker 6 kantmasker som før, deretter strikkes A.3 (=1 maske) + A.4 x 19 ganger (= 6 masker x 19= 114 masker) + A.5 (= 6 masker) + 6 kantmasker = 6+1+114+6+6133 masker. Når du etter kantmaskene starter med A.3 og når du avslutter med A.5 før kantmaskene, vil mønstret starte og slutte likt. Siden man øker mange masker på 1. pinne (og flere steder) er diagrammene tegnet med mellomrom mellom noen masker, men når det strikkes, strikkes det maske etter maske (hopp over mellomrommene). mvh DROPS Design
16.02.2026 - 12:46
![]() Dorothea wrote:
Dorothea wrote:
Liebes Drops Team, ich stricke z.Zt. diesen Cardigan, komme aber mit dem Diagramm nicht zurecht. Könntet ihr mir erklären wie ich dieses Diagramm stticken soll. Vielen Dank im voraus. Liebe Grüße, Dorothea Nückles
06.02.2026 - 17:58DROPS Design answered:
Liebe Dorothea, versuchen Sie einfach, Masche für Masche und Reihe für Reihe das zu tun, was laut Diagrammtext angegeben ist. Dann ist es weniger schwierig, als des aussieht. Die "Freiflächen" bzw. Lücken zwischen den einzelnen Kästchen übergehen Sie einfach, das ist leider nicht anders darstellbar, weil immer wieder Maschen zu- und abgenommen werden (z.B. beim Stern-Symbol nehmen Sie 6 Maschen zu, d.h. es werden 7 Maschen in 1 Masche gestrickt) und sich dadurch die Maschenzahl ändert. Probieren Sie das Muster vielleicht zuerst an einem Probestück mit nur einem oder zwei Rapporten aus, um ein besseres Gefühl dafür zu bekommen. Gutes Gelingen!
06.02.2026 - 22:51
![]() Christina Nilsson wrote:
Christina Nilsson wrote:
Ska man sticka A1och A2 på samma varv? Eller först fyra varv A1 och därefter 6 varv A2? Storlek 2-4
03.02.2026 - 09:48DROPS Design answered:
Hej Christina. Du stickar de på samma varv, så det som står förklarat (Nästa varv stickas så här från rätsidan: 6 framkantsmaskor i rätstickning, A.1, A.2 totalt 16-18-19-20 (21-21) gånger på bredden och 6 framkantsmaskor i rätstickning) är alltså ett varv. Mvh DROPS Design
06.02.2026 - 12:25
![]() Ute wrote:
Ute wrote:
Liebes Drops-Team, besten Dank für die Hilfe. Mittlerweile hatte ich auch verstanden, was ich falsch gemacht habe. Vielleicht wäre es hilfreich die Reihen der Strickschrift zu nummerierten. Viele Grüße und vielen Dank für Ihr Mühe.
06.11.2025 - 13:38
![]() Ute wrote:
Ute wrote:
Hallo liebes Drops-Team, nachdem ich die Halsbänder gestrickt hatte wollte ich mit der Passe weitermachen. Leider konnte ich die angegebene Musteranzahl nicht stricken. Denn bei 97 Maschen (Gr. 98/104) konnte ich das Muster A2 nur 14×stricken. Hätte ich an irgendeiner Stelle Maschen zunehmen müssen, um das Muster 21x stricken zu können? Danke schon einmal für Ihre Hilfe. Liebe Grüße Ute
01.11.2025 - 15:32DROPS Design answered:
Liebe Ute, A.2 besteht am Anfang aus 4 Maschen (Sie lesen das Diagramm ja von unten nach oben, nicht von oben nach unten - erst am Ende hat das Diagramm 6 Maschen). Das Muster geht dann 21 x auf: 97 Maschen minus 2 x 6 Blenden-Maschen minus 1 Masche A.1 = 84 Maschen für A.2, 84 Maschen durch 4 Maschen = 21. Viel Spaß beim Weiterstricken!
04.11.2025 - 20:15
|
||||||||||||||||||||||||||||
Swing by Spring Cardigan#swingbyspringcardigan |
||||||||||||||||||||||||||||
 |
 |
|||||||||||||||||||||||||||
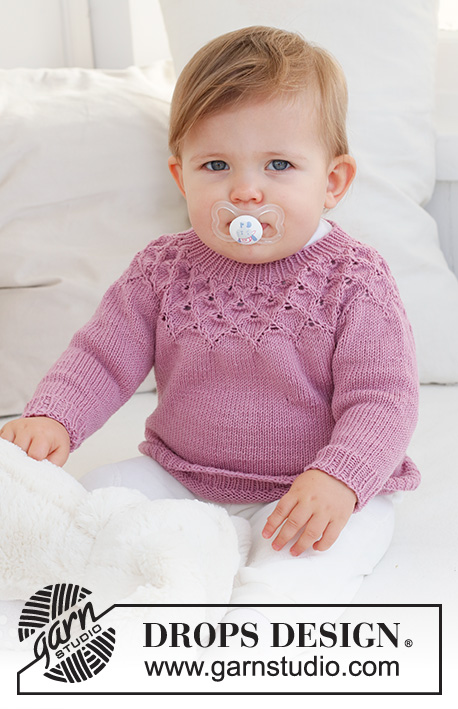
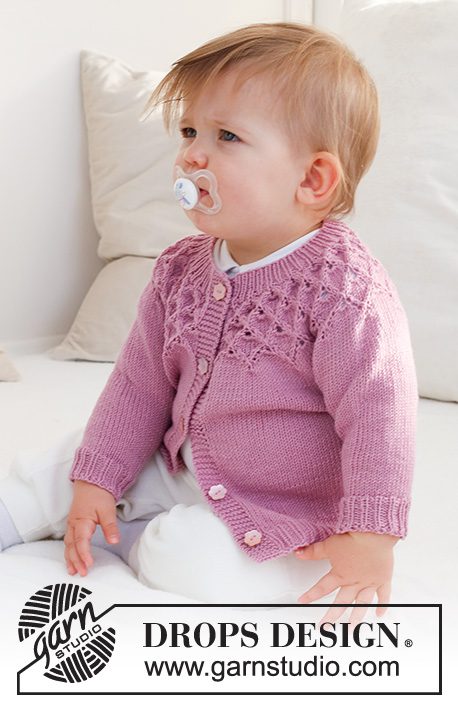
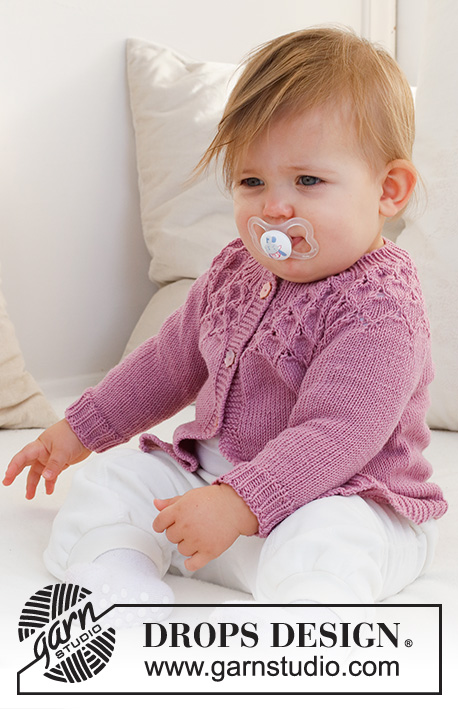
Knitted jacket for babies and children in DROPS BabyMerino. The piece is worked top down, with round yoke and lace pattern. Sizes 0 - 4 years.
DROPS Baby 43-8 |
||||||||||||||||||||||||||||
|
------------------------------------------------------- EXPLANATIONS FOR THE PATTERN: ------------------------------------------------------- RIDGE/GARTER STITCH (worked back and forth): Knit all rows. 1 ridge = knit 2 rows. PATTERN: See diagrams A.1 to A.5. Choose diagram for your size (applies to A.2). The diagrams show all rows in the pattern from the right side. DECREASE TIP (for sleeves): Decrease 1 stitch on either side of the marker as follows: Work until there are 3 stitches left before the marker, knit 2 together, knit 2 (marker sits between these 2 stitches), slip 1 stitch as if to knit, knit 1 and pass the slipped stitch over the knitted stitch. BUTTONHOLES: Work buttonholes on the right band (when the garment is worn). Work from the right side when there are 3 stitches left on the row as follows: Make 1 yarn over, knit 2 together and knit 1. On the next row (wrong side), knit the yarn over to leave a hole. The first buttonhole is worked when the rib on the neck measures 1½-2 cm. Then work the other 4-4-4-4 (5-5) buttonholes with approx. 5-5½-6-6½ (6-6½) cm between each one. ------------------------------------------------------- START THE PIECE HERE: ------------------------------------------------------- JACKET – SHORT OVERVIEW OF THE PIECE. The piece is worked back and forth with circular needle, top down. The yoke is divided for the body and sleeves and the body continued back and forth with circular needle. The sleeves are worked in the round with double pointed needles. NECK: Cast on 77-85-89-93 (97-97) stitches with circular needle size 2.5 mm and DROPS Baby Merino. Work 6 band stitches in GARTER STITCH – read description above, * knit 1, purl 1 *, work from *-* until there are 7 stitches left, knit 1 and 6 band stitches in garter stitch. Work this rib for 2 cm. Remember the BUTTONHOLES on the right band – read description above. YOKE: Work the next row as follows from the right side: 6 band stitches in garter stitch, A.1, A.2 16-18-19-20 (21-21) times in width and 6 band stitches in garter stitch. When A.1 and A.2 are finished there are 109-121-127-133 (139-139) stitches. Change to circular needle size 3 mm. Continue as follows: 6 band stitches in garter stitch, A.3, A.4 15-17-18-19 (20-20) times in width, A.5 and 6 band stitches in garter stitch. REMEMBER THE KNITTING TENSION! On the last row of the pattern increase 0-0-1-1 (5-17) stitches evenly spaced = 203-227-240-252 (268-280) stitches. The piece measures approx. 11-11-11-12 (12-12) cm from the cast-on edge. Continue with stocking stitch and 6 band stitches in garter stitch on each side. When the piece measures 12-13-14-15 (16-17) cm, divide for the body and sleeves as follows: Work 6 band stitches in garter stitch, 29-32-33-35 (38-40) stitches in stocking stitch, place the next 38-44-48-50 (52-54) stitches on a thread for the sleeve, cast on 4-4-6-6 (6-6) stitches under the sleeve, work 57-63-66-70 (76-80) stitches in stocking stitch, place the next 38-44-48-50 (52-54) stitches on a thread for the sleeve, cast on 4-4-6-6 (6-6) stitches under the sleeve, work 29-32-33-35 (38-40) stitches in stocking stitch and 6 band stitches in garter stitch. BODY: = 135-147-156-164 (176-184) stitches. Continue with stocking stitch and 6 band stitches in garter stitch on each side. When the piece measures 10-13-14-16 (18-21) cm from the division, increase 10-10-10-11 (14-15) stitches evenly spaced on the next row from wrong side = 145-157-166-175 (190-199) stitches. Change to circular needle size 2.5 mm. Work the next row as follows from the right side: 6 band stitches in garter stitch, * knit 1, purl 2 *, work from *-* until there are 7 stitches left, knit 1 and 6 band stitches in garter stitch. Cast off with knit from the right side when the rib measures 3 cm. The jacket measures approx. 25-29-31-34 (37-41) cm from the shoulder down. SLEEVES: Place the 38-44-48-50 (52-54) stitches from the thread on the one side of the piece on double pointed needles size 3 mm and knit up 1 stitch in each of the 4-4-6-6 (6-6) stitches cast on under the sleeve = 42-48-54-56 (58-60) stitches. Insert a marker thread in the middle of the 4-4-6-6 (6-6) stitches under the sleeve. Work stocking stitch in the round for 2 cm. Now decrease 2 stitches under the sleeve – read DECREASE TIP. Decrease like this every 2-1½-1-1½ (2-3) cm a total of 2-4-6-6 (6-6) times = 38-40-42-44 (46-48) stitches. When the sleeve measures 6-9-10-13 (16-21) cm, increase 4-5-6-4 (5-6) stitches evenly spaced = 42-45-48-48 (51-54) stitches. Change to double pointed needles size 2.5 mm and work rib (purl 2, knit 1) for 3 cm. Cast off with knit. Work the other sleeve in the same way. ASSEMBLY: Sew the buttons onto the left band. |
||||||||||||||||||||||||||||
Diagram explanations |
||||||||||||||||||||||||||||
|
||||||||||||||||||||||||||||
 |
||||||||||||||||||||||||||||
 |
||||||||||||||||||||||||||||
 |
||||||||||||||||||||||||||||
Have you finished this pattern?Tag your pictures with #dropspattern #swingbyspringcardigan or submit them to the #dropsfan gallery. Do you need help with this pattern?You'll find 30 tutorial videos, a Comments/Questions area and more by visiting the pattern on garnstudio.com. © 1982-2026 DROPS Design A/S. We reserve all rights. This document, including all its sub-sections, has copyrights. Read more about what you can do with our patterns at the bottom of each pattern on our site. |
||||||||||||||||||||||||||||


With over 40 years in knitting and crochet design, DROPS Design offers one of the most extensive collections of free patterns on the internet - translated to 17 languages. As of today we count 324 catalogues and 12290 patterns translated into English (UK/cm). 12290
We work hard to bring you the best knitting and crochet have to offer, inspiration and advice as well as great quality yarns at incredible prices! Would you like to use our patterns for other than personal use? You can read what you are allowed to do in the Copyright text at the bottom of all our patterns. Happy crafting!
Post a comment to pattern DROPS Baby 43-8
We would love to hear what you have to say about this pattern!
If you want to leave a question, please make sure you select the correct category in the form below, to speed up the answering process. Required fields are marked *.