
Popular categories
Looking for a yarn?


Comments / Questions (219)
![]() Vibeke Kirleby wrote:
Vibeke Kirleby wrote:
Jeg har strikket første række i diagram A1, det passer fint. Men anden række passer ikke. Der er ikke plads til 2 ret først og så 2 vrang uden at vrang masker kommer til at være lige over hinanden !! Jeg tæller ikke raglan udtagninger med . Hvad er galt ?
29.03.2023 - 22:30DROPS Design answered:
Hej Vibeke, jo men de skal være lige over hinanden :)
13.04.2023 - 10:17
![]() Eszti wrote:
Eszti wrote:
Csak egy kis hibára szeretném felhívni a figyelmüket, a minta leírása szerint a nyakrészt 2 sima, 2 fordítottal kötjük, pedig a képen látható pulóver 1 sima, 1 fordított szemmel van kötve :)
22.03.2023 - 19:14
![]() Solveig Rasmussen wrote:
Solveig Rasmussen wrote:
Får ikke A.1 til å stemme med maskene i str xl Er det noe sted jeg finner rettelse på evt feil
19.02.2023 - 19:57DROPS Design answered:
Hej Solveig, Diagram A.1 stemmer og det er samme i alle størrelser. Skriv hvad du ikke får til at stemme, så kan vi måske hjælpe dig :)
28.02.2023 - 15:17
![]() Lisa wrote:
Lisa wrote:
What size is the model wearing?
16.02.2023 - 08:59DROPS Design answered:
Dear Lisa, most of the time they are wearing either a size S or a size M, if you are wondering which size you should choose, measure a similar garment you have and like the shape and compare these measurements to those in the chart. Read more here. Happy knitting!
16.02.2023 - 13:55
![]() Stella wrote:
Stella wrote:
Hello! I've noticed that there has been a mistake regarding the number of cast on stitches at the yolk and the ones that are written bellow as where to place the markers. They don't add up. The first cast on stitches should be 86 to align to the correct placement of the markers of the first count. That be said, I have to mention that I'm really enjoying your pattenrs. Thank you! Best regards Stella
10.02.2023 - 08:59DROPS Design answered:
Dear Stella, note that each of the 4 marker threads should be inserted in one stitch (not between stitches), so that you will need 90 sts in size S: 11 + 1 + 21 + 1 + 22+ 1 + 21 + 1 + 11=90. Happy knitting!
10.02.2023 - 09:37
![]() Jessica wrote:
Jessica wrote:
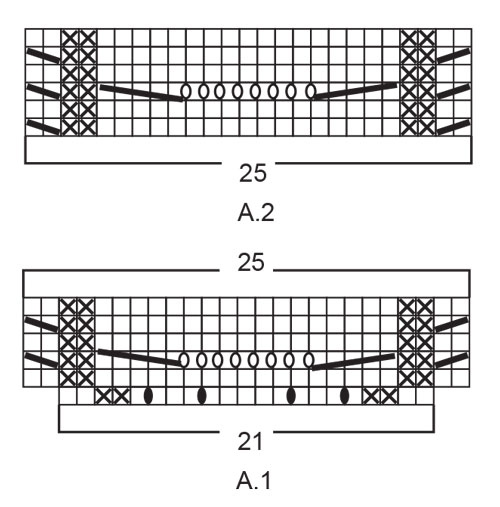
Hello :-) after I have knitted A1 and A2, how do I Continue? Again with the 1st row of A1? Or just repeating A2 again and again? Thank you
04.02.2023 - 09:55DROPS Design answered:
Dear Jessica, after working A.1 once, work A.2 over it. Then, repeat A.2 over and over until the increases are done. Happy knitting!
05.02.2023 - 23:17
![]() Mia wrote:
Mia wrote:
Jeg lurer på om jeg skal ha raglanøkning i diagrammet. Eller kun på utsiden av diagramet. For om jeg øker i diagrammet så blir det bare flere masker og da stemmer ikke diagrammet fordi det blir for mange masker.
29.01.2023 - 02:22DROPS Design answered:
Hei Mis, Økning til raglan skal være utenfor mønsteret, på begge sider av ermene (ved marketrådene). God fornøyelse!
30.01.2023 - 06:46
![]() Aurora wrote:
Aurora wrote:
Hei! Skal raglanøkningen også gjøre i diagrammet på A.1. For om jeg øker på diagramet så vil jo det ikke stemme med diagrammet? Trenger svar så fort som mulig.
29.01.2023 - 01:31DROPS Design answered:
Hei Aurora. Du øker kun ved overgangen mellom bol og erme der du har satt merketrådene. Det økes 1 maske på hver side av 1 maske glattstrikk = 8 masker økt på en økeomgang. mvh DROPS Design
30.01.2023 - 14:27
![]() Natasha wrote:
Natasha wrote:
Hi, I am currently completing the raglan increases, I am now on A2, repeating the pattern until I have completed 25 increases (2nd size). I am very confused as the math doesn’t seem to add up… if I start with 126sts and make 25 increases (8sts increased every increase row), how do I achieve 302sts? My calculations put me at a total of 326sts. Can you please help me understand what I am doing wrong or highlight where I am getting confused please?
03.01.2023 - 23:06DROPS Design answered:
Hi Natasha, Your increases for raglan started when you worked A.1, and you have completed 3 increases for raglan before starting A.2. You then have 126 stitches and increase a further 22 times (3 + 22 = a total of 25 times) while working A.2. 126 + (22 x 8) = 302 stitches. Happy knitting!
04.01.2023 - 07:48
![]() ANNE-LUCIE PARENT wrote:
ANNE-LUCIE PARENT wrote:
Bonjour, dans le diagramme, pour les 5 premières mailles à tricoter ensemble, les explications disent de passer l'avant dernière maille sur la dernière, mais comment y accéder vu qu'on a remis les mailles sur l'aiguille gauche??
22.12.2022 - 11:29DROPS Design answered:
Bonjour Mme Parent, l'avant-dernière maille s'entend à partir de la 1ère des 5 mailles glissées sur l'aiguille gauche,autrement dit, la 2ème à partir de la pointe - cette vidéo montre comment tricoter 5 mailles ensemble à l'endroit (et celle-ci comment tricoter 5 mailles ensemble torse à l'endroit. Bon tricot!
22.12.2022 - 11:38
|
|||||||||||||||||||||||||
Bronze Summer Sweater#bronzesummersweater |
|||||||||||||||||||||||||
 |
 |
||||||||||||||||||||||||
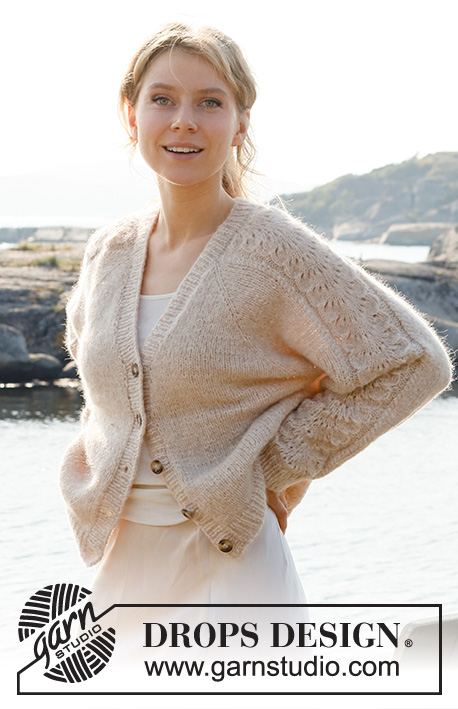
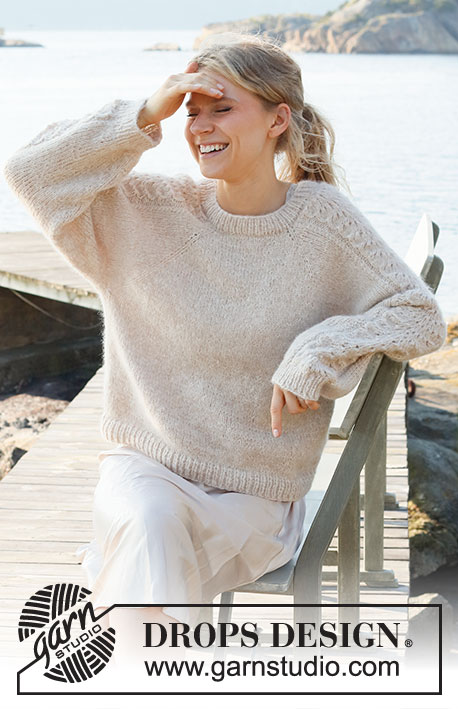
Knitted jumper in DROPS Air. Piece is knitted top down with raglan and lace pattern on sleeves. Size: S - XXXL
DROPS 221-3 |
|||||||||||||||||||||||||
|
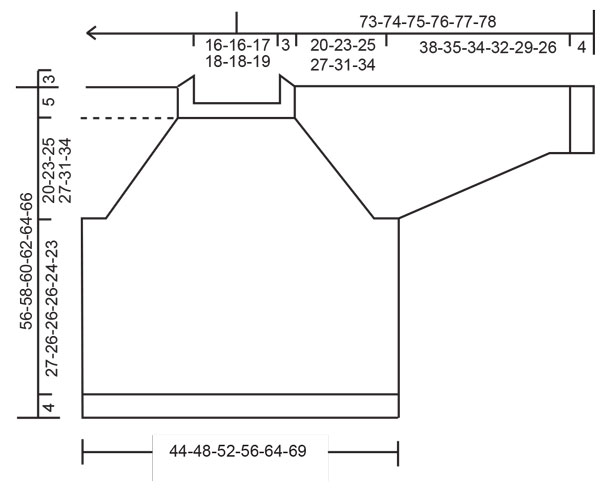
------------------------------------------------------- EXPLANATION FOR THE PATTERN: ------------------------------------------------------- PATTERN: See diagrams A.1 and A.2. RAGLAN: Increase 1 stitch on each side of 1 stitch in stocking stitch (stitch with marker) in every transition between body and sleeves (= 8 stitches increased on round). Increase 1 stitch by making 1 yarn over. On next round work yarn overs twisted to avoid holes. Then work the new stitches in stocking stitch. DECREASE TIP (applies to sleeves): Decrease 1 stitch on each side of marker thread as follows: Work until 3 stitches remain before marker thread and knit 2 together, knit 2 (marker thread is between these stitches), slip 1 stitch knitwise, knit 1, pass slipped stitch over stitch worked. CAST-OFF TIP: To avoid a tight cast-off edge you may use a larger needle size. If this also is too tight, work a 1 yarn over after approx. every 4th stitch while casting off (cast off yarn overs as regular stitches). ------------------------------------------------------- START THE PIECE HERE: ------------------------------------------------------- JUMPER - SHORT OVERVIEW OF THE PIECE: Work yoke in the round on circular needle from mid back, top down. AT THE SAME TIME increase for raglan. Now divide yoke for body and sleeves. Body is worked in the round on circular needle, top down. Work sleeves in the round on double pointed needles/short circular needle, top down. YOKE: Cast on 90-94-98-102-106-110 stitches on circular needle size 4 mm with Air. Knit 1 round. Work rib (= knit 1/purl 1) over all stitches for 3 cm. Switch to circular size 5 mm and insert 1 marker here, now measure piece from here. Insert 4 marker threads in piece as follows (without working the stitches): Count 11-12-13-14-15-16 stitches (= half back piece), insert 1 marker thread in next stitch, count 21 stitches (= sleeve), insert 1 marker thread in next stitch, count 22-24-26-28-30-32 stitches (= front piece), insert 1 marker thread in next stitch, count 21 stitches (= sleeve), insert 1 marker thread in next stitch, 11-12-13-14-15-16 stitches remain on row after last marker thread (= half back piece). Work in stocking stitch over stitches on front piece and on back piece, and A.1 (= 21 stitches) over stitches on each sleeve, AT THE SAME TIME on first round start increase for RAGLAN in every transition between body and sleeves – read explanation above. Continue increases for raglan every other round. When A.1 has been worked 1 time vertically there are 122-126-130-134-138-142 stitches on round. Continue with A.2 (= 25 stitches) over stitches in A.1 with stocking stitch over front piece and back piece, and continue with increase for raglan every other round until increase has been done 22-25-27-29-33-36 times in total on each side of the 4 stitches with marker threads = 274-302-322-342-378-406. REMEMBER THE KNITTING TENSION! After last increase in raglan work without increases until piece measures 20-23-25-27-31-34 cm from marker. Work next round as follows: Work the first 34-38-41-44-49-53 stitches (= half back piece), slip the next 69-75-79-83-91-97 stitches on a stitch holder for sleeve, cast on 6-6-6-8-10-12 new stitches on needle (= in the side under sleeve), work the next 68-76-82-88-98-106 stitches (= front piece), slip the next 69-75-79-83-91-97 stitches on a stitch holder (= sleeve), cast on 6-6-6-8-10-12 new stitches on needle (= in the side under sleeve), work the remaining 34-38-41-44-49-53 stitches (= half back piece). NOW MEASURE PIECE FROM HERE! BODY: = 148-164-176-192-216-236 stitches. Continue in stocking stitch until piece measures 27-26-26-26-24-23 cm from division. Switch to circular needle size 4 mm. Work rib (= purl 1/knit 1) over all stitches. Continue rib like this for 4 cm. Loosely cast off with knit over knit and purl over purl, read CAST-OFF TIP. Jumper measures approx. 56-58-60-62-64-66 cm from shoulder. SLEEVE: Slip the 69-75-79-83-91-97 stitches from stitch holder in one side of piece on a short circular needle/double pointed needles size 5 mm and pick in addition up 1 stitch in each of the 6-6-6-8-10-12 stitches cast on in the side under sleeve = 75-81-85-91-101-109 stitches. Insert 1 marker thread in the middle of the 6-6-6-8-10-12 stitches under sleeve and move the marker thread upwards when working, it is used for decrease later. Begin round at the marker thread and continue with A.2 and stocking stitch in the round. When piece measures 3 cm from division, decrease 2 stitches mid under sleeve - read DECREASE TIP. Decrease like this every 3½-3-2-1½-1-1 cm 10-11-13-16-19-21 times in total = 55-59-59-59-63-67 stitches. Continue until piece measures 38-35-34-32-29-26 cm from division - or desired length (shorter measurements in the larger sizes because of longer yoke). Work 1 round while decreasing 11 stitches evenly over stitches in A.2 = 44-48-48-48-52-56 stitches. Switch to double pointed needles size 4 mm and work rib in the round = knit 1/purl 1 for 4 cm. Cast off with knit over knit and purl over purl (to avoid a tight cast-off edge use double pointed needles size 4 mm). Work the other sleeve the same way. |
|||||||||||||||||||||||||
Diagram explanations |
|||||||||||||||||||||||||
|
|||||||||||||||||||||||||
 |
|||||||||||||||||||||||||
 |
|||||||||||||||||||||||||
Have you finished this pattern?Tag your pictures with #dropspattern #bronzesummersweater or submit them to the #dropsfan gallery. Do you need help with this pattern?You'll find 31 tutorial videos, a Comments/Questions area and more by visiting the pattern on garnstudio.com. © 1982-2026 DROPS Design A/S. We reserve all rights. This document, including all its sub-sections, has copyrights. Read more about what you can do with our patterns at the bottom of each pattern on our site. |
|||||||||||||||||||||||||


With over 40 years in knitting and crochet design, DROPS Design offers one of the most extensive collections of free patterns on the internet - translated to 17 languages. As of today we count 324 catalogues and 12290 patterns translated into English (UK/cm). 12290
We work hard to bring you the best knitting and crochet have to offer, inspiration and advice as well as great quality yarns at incredible prices! Would you like to use our patterns for other than personal use? You can read what you are allowed to do in the Copyright text at the bottom of all our patterns. Happy crafting!
Post a comment to pattern DROPS 221-3
We would love to hear what you have to say about this pattern!
If you want to leave a question, please make sure you select the correct category in the form below, to speed up the answering process. Required fields are marked *.