
Popular categories
Looking for a yarn?


Comments / Questions (26)
![]() Auhida wrote:
Auhida wrote:
Hello, It is unclear which order you knit the charts on the Wrong side rows when knitting flat. Do you still follow the charts in order of 1-5 like you would on the Right side row or do you reorder it to 5-1 and follow the wrong side rows that way?
25.01.2026 - 10:01DROPS Design answered:
Dear Auhida, when working the charts you need to work the stitches of each chart over the stitches of the same chart. If you work charts 1-2-3-4-5 in that order then, when working back, you work the charts in the reverse order: 5-4-3-2-1, always ensuring that you work each chart's stitches above the stitches of the same chart in the previous row. Remember that you now read the chart from left to right, so you should be working above the exact same stitch as pictured in the chart. Happy knitting!
25.01.2026 - 20:21
![]() Elena wrote:
Elena wrote:
Ciao, sto facendo la taglia L, ma ho un problema con l'avvio delle maniche. Tra l'intreccio delle cinque maglie (da ogni lato) per gli scalfi e la spalla, ci sono 20 cm, che per me corrispondono a 56 ferri. (Quindi 28 dritti 28 rovesci visti a dritto, dato che il bordo è fatto a maglia legaccio). In uno scalfo, tra davanti e dietro sono 112 maglie totali. Per il modello L vanno riprese 84 maglie. Quali escludo? Qual è la logica per scegliere quali prendere? Grazie mille!!
11.09.2025 - 19:11DROPS Design answered:
Buongiorno Elena, non c'è una logica per la ripresa delle maglie, deve riprendere a intervalli regolari, in modo che il bordo non risulti arricciato né tirato. Buon lavoro!
14.09.2025 - 09:33
![]() Pauline Nijland wrote:
Pauline Nijland wrote:
Is het ook mogelijk om deze trui gewoon op twee naalden te breien dus niet op een rondbrei naald??
14.11.2024 - 22:51DROPS Design answered:
Dag Pauline,
Om een patroon aan te passen om op rechte naalden te breien hebben we een instructie gemaakt. Deze vind je hier.
16.11.2024 - 18:02
![]() Kerstin Kohl wrote:
Kerstin Kohl wrote:
Hallo ich habe vorhin das erste mal bestellt. Die Bestellung soll nicht zu mir kommen sondern zu meiner Freundin. Aber er hat dort einfach meine Adresse übernommen....Email auch geschrieben. Ich bitte um sofortige Antwort. Glg Kerstin Kohl
23.08.2024 - 17:27
![]() Nicole BUISSON wrote:
Nicole BUISSON wrote:
Bonjour Le diagramme A2 ne correspond pas à l'explication de la torsade Celle-ci est expliqué sur 6 mailles alors que sur le diagramme il y a 9 maillesf Pourriez vous m'aider En vous remerciant Cordialement
11.02.2023 - 16:21DROPS Design answered:
Bonjour Mme Buisson, cette torsade se tricote effectivement sur 6 mailles, mais vous tricoterez la torsade soit sur les 6 premières des 9 mailles jersey, soit sur les 6 dernières de ces mêmes 9 mailles jersey; autrement dit , tricotez le 3ème rang de A.2 ainsi: torsade sur 6 m, 3 m end; puis celle du 9ème rang ainsi: 3 m end, torsade sur 6 m (attention à bien suivre le symbole correspondant à chaque fois). Bon tricot!
13.02.2023 - 09:05
![]() Cornelia wrote:
Cornelia wrote:
The pattern for A2 S-M-L is suddenly dissapeared from the site! Can you please restore that?
17.11.2022 - 12:53DROPS Design answered:
Dear Cornelia, it looks like diagrams are back - if you can't see them, try to refresh the page, clean the cache/cookies and try again, it should work. Happy knitting!
17.11.2022 - 16:08
![]() Cornelia wrote:
Cornelia wrote:
Opeens zijn een paar onderdelen van het patroon verdwenen? A2 voor s-M en L wordt niet meer weergegeven? En ik ben net met het voorpand begonnen, dus dit is wel een probleem!!!
17.11.2022 - 12:35DROPS Design answered:
Dag Cornelia,
Het kan zijn dat de pagina tijdelijk niet goed wou laden. Heb je inmiddels het patroon in beeld kunnen krijgen. Anders eventueel even proberen met Shift + F5 of een andere browser.
20.11.2022 - 17:50
![]() Simona wrote:
Simona wrote:
DROPS Design, thank you for your reply, I could write a question at the beginning in English :) No worry, I already figured out the pattern and finished the front/back of the sweater already :) Thank you again
16.11.2022 - 14:46
![]() Simona wrote:
Simona wrote:
Dobry den, nerozumiem ako mam zacat uberat ocka na priekrcnik. V navode sa uvadza, ze nad prostrednymi 44 ockami mam ubrat 10 ok - prostrednych 44 ociek mi zasiahne aj do schemy A4, A2 a teda ju narusim. Ked si ale porovnam sveter z ilustracneho obrazka, schema A4 a A2 pokracuje az na ramena. Nie je v navode chyba? Dakujem
13.09.2022 - 14:54DROPS Design answered:
Hi, if you can write your question in English, we can try to help you :)
16.11.2022 - 13:46
![]() Dolores wrote:
Dolores wrote:
Buenos dias, me gustaria saber si me pueden ayudar a realizar este modelo en agujas numero 7, o sea el doble de la que aparecen aqui, desde ya muchas gracias.
04.07.2022 - 16:01DROPS Design answered:
Hola Dolores, nosotros no hacemos patrones personalizados. El dibujo de trenza queda mejor con agujas más finas, por lo que la mayoría de nuestros modelos van a usar agujas de menos de 7. Puedes intentar hacer una muestra con aguja de 7mm, comparar con la tensión del patrón y ajustar las cuentas como se explica a continuación:https://www.garnstudio.com/lesson.php?id=25&cid=23.
04.07.2022 - 19:04
|
|||||||||||||||||||||||||
Winter Delight#winterdelightsweater |
|||||||||||||||||||||||||
 |
 |
||||||||||||||||||||||||
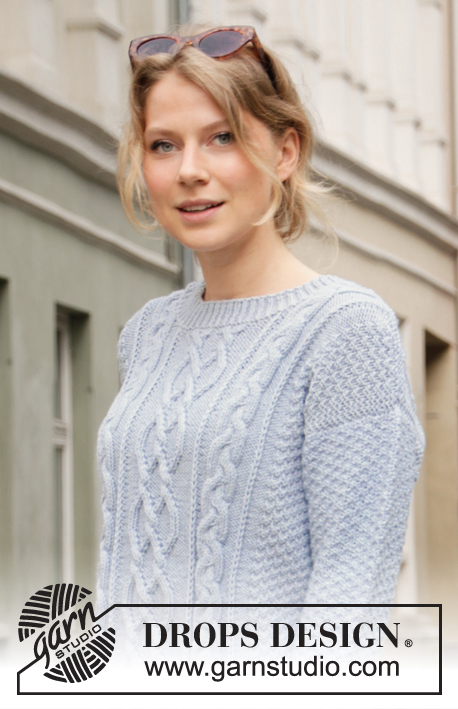
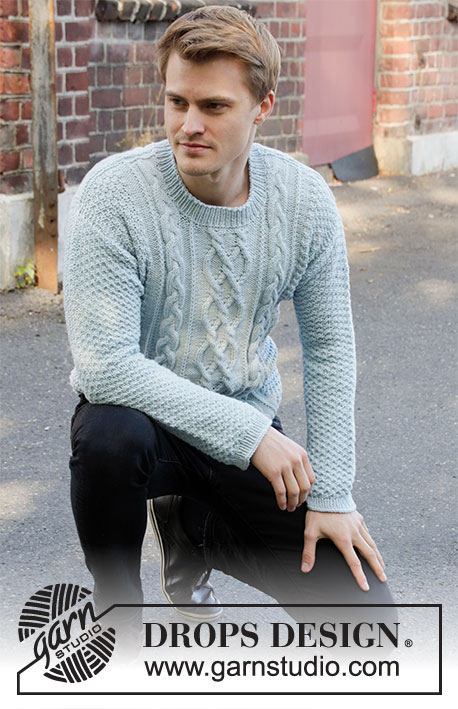
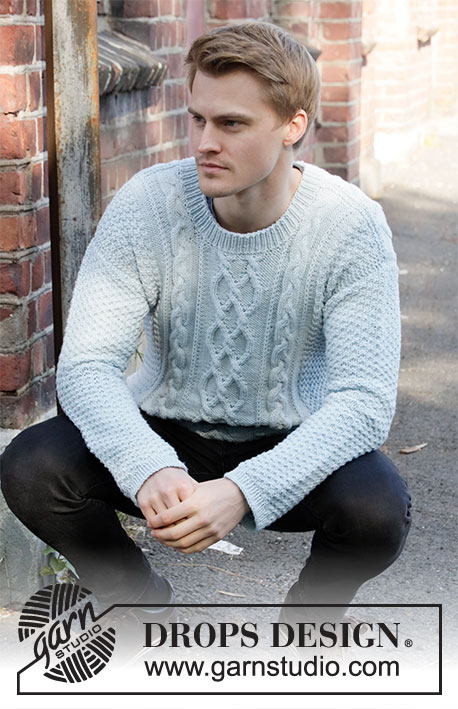
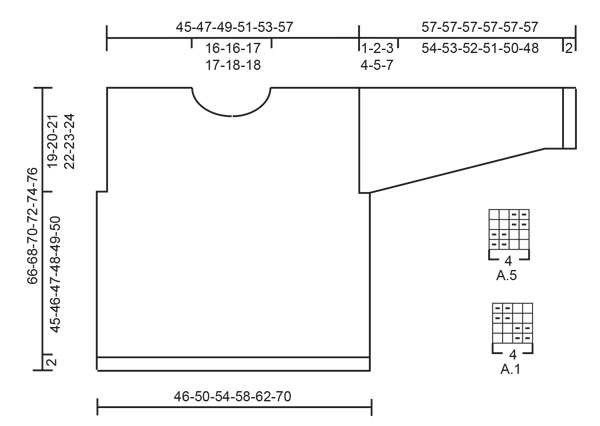
Knitted jumper for men in DROPS Merino Extra Fine or DROPS Soft Tweed. The piece is worked with cables and double moss stitch. Sizes S – XXXL.
DROPS 208-8 |
|||||||||||||||||||||||||
|
------------------------------------------------------- EXPLANATIONS FOR THE PATTERN: ------------------------------------------------------- RIDGE/GARTER STITCH (worked back and forth): Knit all rows. 1 ridge in height = Knit 2 rows. PATTERN: See diagrams A.1 to A.5. Choose diagram for your size (applies to A.2, A.3 and A.4). The diagrams show all rows in the pattern from the right side. KNITTING TIP: In this pattern stitches are knitted up along the armholes and the sleeves are worked top down. This is done to have better control over the length of the sleeves. If you wish, the sleeves can be worked separately and then sewn in; by casting on the same number of stitches as suggested are knitted up in the text and then following the instructions for the sleeves in the same way. Sew in the sleeves (the sleeve is placed under the garter stitch edge around the armhole leaving this edge visible – sew in the outermost stitch of the garter stitch edge). DECREASE TIP-1 (evenly spaced): To work out how to decrease evenly, count the total number of stitches on needle (e.g. 44 stitches) and divide by number of decreases to be made (e.g. 10) = 4.4. The decreases are worked from the right side! In this example decrease by knitting together alternately each 3rd and 4th stitch and each 4th and 5th stitch. DECREASE TIP-2 (for mid under sleeves): Decrease 1 stitch before the marker thread as follows: Work until there are 2 stitches left before the marker thread, knit 2 together if this stitch should be knitted or purl 2 together if this stitch should be purled. Decrease 1 stitch after the marker thread as follows: Knit 2 twisted together if this stitch should be knitted or purl 2 twisted together if this stitch should be purled. ------------------------------------------------------- START THE PIECE HERE: ------------------------------------------------------- JUMPER – SHORT OVERVIEW OF THE PIECE: Front and back pieces are worked back and forth with circular needle, bottom up. The shoulder seams are sewn together. Then stitches are knitted up around the armholes for the sleeves – read KNITTING TIP! The sleeves are worked back and forth until the sleeve cap is finished, then in the round with double pointed needles, top down. The bottom of the armhole is sewn together and the neck is worked to finish. BACK PIECE: Cast on 108-116-124-132-140-156 stitches with circular needle 3.5 mm and Merino Extra Fine. Purl 1 row (= wrong side). The next row is worked as follows from the right side: 1 edge stitch in GARTER STITCH – read description above, * knit 1, purl 1 *, work from *-* until there is 1 stitch left on the row, finish with 1 edge stitch in garter stitch. Continue this rib for approx. 2 cm but adjust so the last row is worked from the right side. Purl 1 row from the wrong side with 1 edge stitch in garter stitch on each side. Change to circular needle size 4.5 mm. Now begin the pattern as follows from the right side: 1 edge stitch in garter stitch, work A.1 over the next 16-20-24-24-28-36 stitches (= 4-5-6-6-7-9 repeats of 4 stitches), A.2 (= 23-23-23-26-26-26 stitches), A.3 (= 28-28-28-30-30-30 stitches), A.4 (= 23-23-23-26-26-26 stitches), A.5 over the next 16-20-24-24-28-36 stitches (= 4-5-6-6-7-9 repeats of 4 stitches) and finish with 1 edge stitch in garter stitch. Continue this pattern. REMEMBER THE KNITTING TENSION! When the piece measures 47-48-49-50-51-52 cm, cast off 1-3-5-7-9-13 stitches at the beginning of the next 2 rows for the armholes = 106-110-114-118-122-130 stitches. Continue the pattern as before but now with 4 edge stitches in garter stitch on each side towards the armholes. When the piece measures 64-66-68-70-72-74 cm, decrease 10 stitches evenly over the middle 44-44-44-48-48-48 stitches on the row – read DECREASE TIP-1 = 96-100-104-108-112-120 stitches left. On the next row (wrong side) cast off the middle 36-36-38-38-40-40 stitches for the neck and each shoulder is finished separately. Continue the pattern and cast off 1 stitch on the next row from the neck = 29-31-32-34-35-39 stitches left on the shoulder. Continue working until the piece measures 65-67-69-71-73-75 cm. Knit 1 row from the right side and knit 1 row from the wrong side. Loosely cast off with knit from the right side. Work the other shoulder in the same way. The back piece measures approx. 66-68-70-72-74-76 cm from the shoulder down. FRONT PIECE: Cast on 108-116-124-132-140-156 stitches with circular needle size 3.5 mm and Merino Extra Fine. Purl 1 row (= wrong side). The next row is worked from the right side as follows: 1 edge stitch in GARTER STITCH – read description above, * knit 1, purl 1 *, work from *-* until there is 1 stitch left on the row, finish with 1 edge stitch in garter stitch. Continue this rib for 2 cm but adjust so the last row is worked from the right side. Purl 1 row from the wrong side with 1 edge stitch in garter stitch on each side. Change to circular needle size 4.5 mm. Now begin the pattern as follows from the right side: 1 edge stitch in garter stitch, work A.1 over the next 16-20-24-24-28-36 stitches (= 4-5-6-6-7-9 repeats of 4 stitches), A.2 (= 23-23-23-26-26-26 stitches), A.3 (= 28-28-28-30-30-30 stitches), A.4 (= 23-23-23-26-26-26 stitches), A.5 over the next 16-20-24-24-28-36 stitches (= 4-5-6-6-7-9 repeats of 4 stitches) and finish with 1 edge stitch in garter stitch. Continue this pattern. When the piece measures 47-48-49-50-51-52 cm, cast off 1-3-5-7-9-13 stitches at the beginning of the next 2 rows for the armholes = 106-110-114-118-122-130 stitches. Continue the pattern as before but now with 4 edge stitches in garter stitch on each side towards the armholes. When the piece measures 57-59-61-62-64-66 cm, decrease 10 stitches evenly over the middle 44-44-44-48-48-48 stitches on the row = 96-100-104-108-112-120 stitches left. On the next row (wrong side) place the middle 20-20-22-22-22-22 stitches on 1 thread for the neck and each shoulder is finished separately. Continue the pattern and cast off stitches at the beginning of each row from the neck as follows: Cast off 2 stitches 3 times and then 1 stitch 3-3-3-3-4-4 times = 29-31-32-34-35-39 stitches left on the shoulder. Continue working until the piece measures 65-67-69-71-73-75 cm. Knit 1 row from the right side and knit 1 row from the wrong side. Loosely cast off with knit from the right side. Work the other shoulder in the same way. ASSEMBLY: Sew the shoulder seams inside the cast-off edge. SLEEVE: Knit up stitches along the armhole on the front and back piece; start in the corner of the armhole on the one side of the piece where stitches were cast off; knit up from the right side 76-80-84-88-92-96 stitches inside the 1 edge stitch in garter stitch with circular needle size 4.5 mm and Merino Extra Fine (do not knit up stitches along the bottom of the armhole) – read KNITTING TIP! Work A.1 back and forth with 1 edge stitch in garter stitch on each side. When the sleeve measures 1-2-3-4-5-7 cm from where you knitted up stitches, insert 1 marker on the row; it marks where the sleeve will be sewn to the bottom of the armhole and the sleeve is measured from this marker! Continue working the sleeve in the round; change to double pointed needles or short circular needle size 4.5 mm. Insert 1 marker thread at the beginning of the round and allow it to follow your work onwards; it will be used when decreasing mid under the sleeve. Continue A.1 in the round over all stitches (= 19-20-21-22-23-24 repeats of 4 stitches). When the sleeve measures 3-2-3-2-3-2 cm from the marker decrease 2 stitches mid under the sleeve - read DECREASE TIP-2. Decrease like this every 3-3-2½-2-2-1½ cm a total of 15-16-17-18-19-20 times = 46-48-50-52-54-56 stitches. Continue working until the sleeve measures 54-53-52-51-50-48 cm from the marker (there is approx. 2 cm left to finished length; you can try the jumper on and work to desired length). Change to double pointed needles size 3.5 mm and work rib (= knit 1 / purl 1) for 2 cm. Loosely cast off with knit. The sleeve measures approx. 57-57-57-57-57-57 cm from where the stitches were knitted up. Work the other sleeve in the same way. ASSEMBLY: Sew the side seams – sew in the outermost loop of the outermost stitch so the seam is flat. Sew the sleeves to the bottom of the armholes, from the marker and in to the corner. NECK: Knit up from the right side (using short circular needle size 3.5 mm) approx. 80 to 94 stitches around the neck – including the stitches on the thread in front. Purl 1 round. Knit 1 round where you increase evenly to adjust to 90-92-94-96-100-102 stitches evenly spaced. Then work rib in the round (= knit 1 / purl 1) for 3 cm. Cast off with knit over knit and purl over purl. |
|||||||||||||||||||||||||
Diagram explanations |
|||||||||||||||||||||||||
|
|||||||||||||||||||||||||
 |
|||||||||||||||||||||||||
 |
|||||||||||||||||||||||||
 |
|||||||||||||||||||||||||
 |
|||||||||||||||||||||||||
Have you finished this pattern?Tag your pictures with #dropspattern #winterdelightsweater or submit them to the #dropsfan gallery. Do you need help with this pattern?You'll find 28 tutorial videos, a Comments/Questions area and more by visiting the pattern on garnstudio.com. © 1982-2026 DROPS Design A/S. We reserve all rights. This document, including all its sub-sections, has copyrights. Read more about what you can do with our patterns at the bottom of each pattern on our site. |
|||||||||||||||||||||||||


With over 40 years in knitting and crochet design, DROPS Design offers one of the most extensive collections of free patterns on the internet - translated to 17 languages. As of today we count 324 catalogues and 12290 patterns translated into English (UK/cm). 12290
We work hard to bring you the best knitting and crochet have to offer, inspiration and advice as well as great quality yarns at incredible prices! Would you like to use our patterns for other than personal use? You can read what you are allowed to do in the Copyright text at the bottom of all our patterns. Happy crafting!
Post a comment to pattern DROPS 208-8
We would love to hear what you have to say about this pattern!
If you want to leave a question, please make sure you select the correct category in the form below, to speed up the answering process. Required fields are marked *.