
Popular categories
Looking for a yarn?


Comments / Questions (82)
![]() LAPeloteFR wrote:
LAPeloteFR wrote:
Hello, love the pattern. could you clarify for the back piece how the shoulders are shaped after the middle decrease and cast off.
11.12.2020 - 03:44DROPS Design answered:
Hi, Once you have bound off the stitches for the neck, you bind off 1 more stitch on the next row from the neck. The shoulder is then worked straight up without further shaping. Happy knitting!
11.12.2020 - 06:56
![]() Annelies Staal wrote:
Annelies Staal wrote:
Hallo, M.b.t. TrueNorth vest; Ik brei met 2 pennen, en weet hoe ik kabels moet breien, nu ik bezig ben met het voorpand snap ik NIET hoe ik de kabels van het voorpand moet breien. Ik begin met de eerste van de 12 steken , zet 6 steken op de kabelnaald maar dan zit de draad nog aan het begin van de steken en kan ik vervolgens de resterende steken niet breien . De gewone kabel van het achterpand is te zien in de video maar de kabel van het voorpand niet. Graag advies. Thanks
30.10.2020 - 17:46DROPS Design answered:
Dag Annelies,
Je zet 6 steken op een kabelnaald en breit inderdaad gewoon verder met de draad die nog aan het begin zit. Je maakt de kabels dus op precies dezelfde manier als normaal, maar nu zit de kabel aan het begin van het werk. Het kan eerst wat verdraaid lijken, maar het trekt wel bij naarmate het werk vordert
03.11.2020 - 13:58
![]() Sharon wrote:
Sharon wrote:
Size medium. At what inches do I start the ribbing? It looks like the instructions say at 16 and 1/8 however the finished sleeve is 15 and a quarter
09.10.2020 - 04:59DROPS Design answered:
Dear Sharon, the 16 and 1/8 apply to size S, in size M you work until sleeve measures 15 and 3/4" then knit 1 row from RS, swticht to needle size 5 mm and work rib = finished sleves measures ca 17". Happy knitting!
09.10.2020 - 08:06
![]() Anne Mongeon wrote:
Anne Mongeon wrote:
Bon matin, je suis habituée à faire des torsades, mais je ne sais pas comment en faire en début de rang, pouvez-vous me l’expliquer ou avez-vous un vidéo l’expliquant? Merci beaucoup!
09.09.2020 - 14:40DROPS Design answered:
Bonjour Mme Mongeon, cette vidéo montre, pour un autre modèle (et une autre torsade) comment tricoter la torsade sur les premières mailles du rang sur l'endroit (pour le devant gauche, ce sera la même chose mais en sens inverse, sur les dernières mailles du rang). Bon tricot!
09.09.2020 - 15:06
![]() Tula Strand wrote:
Tula Strand wrote:
Kan jeg bytte ut Brushed Alpakka silk med to tråder lace?
09.09.2020 - 02:07DROPS Design answered:
Hej Tula, ja det går, du vill dock få en helt annan struktur. Kom ihåg att du måste ha samma stickfasthet som i mönstret för att få storleken som står i måttskissen nederst på mönstret. Lycka till :)
09.09.2020 - 13:51
![]() Karin Sangevie wrote:
Karin Sangevie wrote:
DROPS Design: Modell sk-052 Garngrupp C + B? Kan jag välja garn från grupp A + D (Melody + Flora) och sticka denna modell?
18.08.2020 - 21:08DROPS Design answered:
Hej Karin. Jag tror dessvärre inte det fungerar eftersom stickfastheten för endast Melody är 12 m/ 10 cm och stickfastheten i detta mönster är 14 m/ 10 cm. Mvh DROPS Design
20.08.2020 - 11:02
![]() Anne Mongeon wrote:
Anne Mongeon wrote:
I have a weird question....lol...I want to buy the material I need to do this pattern, why is it that we do not have to buy the same amount for the two colors..... Thank you!
07.08.2020 - 18:36DROPS Design answered:
Dear Mrs Mongeon, both yarns have a different weight and meterage, that's the reason why you don't need same weight nor same numbers of ball, but you will require same length./meterage Happy knitting!
10.08.2020 - 08:42
![]() Adeline wrote:
Adeline wrote:
Bonjour, je souhaite réaliser ce modèle mais sur l'échantillon je n'ai que 8 cm pour 14 mailles, avec une aiguille de 7mm... Êtes vous sûrs des dimensions car 14 mailles cela me parait très peu... les autres clientes ont elles eu ce problème? merci de votre aide.
17.06.2020 - 14:57DROPS Design answered:
Bonjour Adeline, tout le monde tricote de façon différente, c'est la raison pour laquelle les aiguilles ne sont qu'une donnée indicative, pensez à bien utiliser d'autres aiguilles - vous pouvez également laver - sécher votre échantillon (en respectant les consignes des deux laines) et vérifier à nouveau. Plus d'infos sur l'échantillon ici. Bon tricot
17.06.2020 - 17:11
![]() Jo Ann wrote:
Jo Ann wrote:
Hallo könnte ich an diese Jacke eine Kapuze anstricken?
19.05.2020 - 08:10DROPS Design answered:
Liebe Jo Ann, wahrscheinlich, diese Anleitung von Jacken mit Kapuze können Ihnen sicher inspirieren, um dieses Modell so anzupassen. Viel Spaß beim stricken!
19.05.2020 - 08:51
![]() Perruchot wrote:
Perruchot wrote:
Bonjour, C'est encore moi ! J'en suis au COL DROIT. Je ne comprends pas si l'on doit raccourcir sur l'endroit alors que dans la vidéo d'explication, c'est fait sur l'envers. Est-ce la même technique ? Je ne comprends pas non plus où est-ce que je dois raccourcir ? En début de rang ? Ou à la fin ? Et que veux dire : * 2 rangs sur toutes les mailles, 2 rangs au-dessus des 12 premières mailles* ? Je dois raccourcir sur tous les rangs ? Merci d'avance !
13.04.2020 - 19:46DROPS Design answered:
Bonjour Mme Perruchot, vous devez maintenant tricoter des rangs raccourcis pour que la partie extérieure du col (début de rang sur l'endroit pour le devant droit) soit plus haute que la partie du col qui sera cousu le long de l'encolure dos. Vous tricotez les 16 mailles comme avant avec A.3 sur les 15 premières m et 1 m point mousse mais tout en continuant les torsades: 2 rangs sur les 16 m, 2 rangs sur les 12 premières mailles (= les 4 dernières mailles sur l'endroit ne sont pas tricotées). On va ainsi former le col châle. Bon tricot!
14.04.2020 - 13:17
|
|||||||||||||
True North#truenorthjacket |
|||||||||||||
 |
 |
||||||||||||
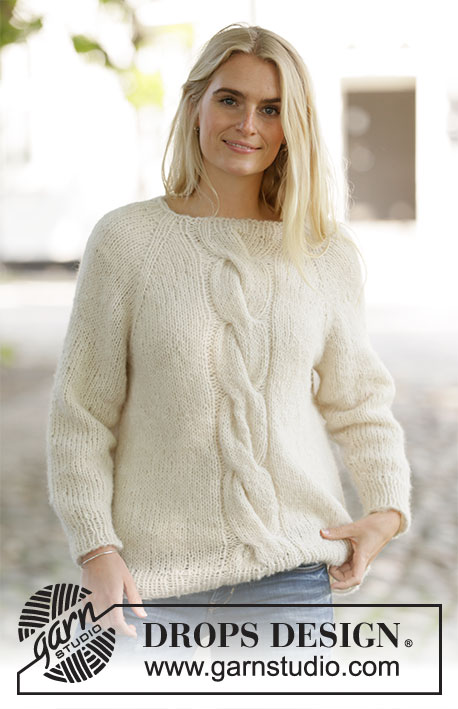
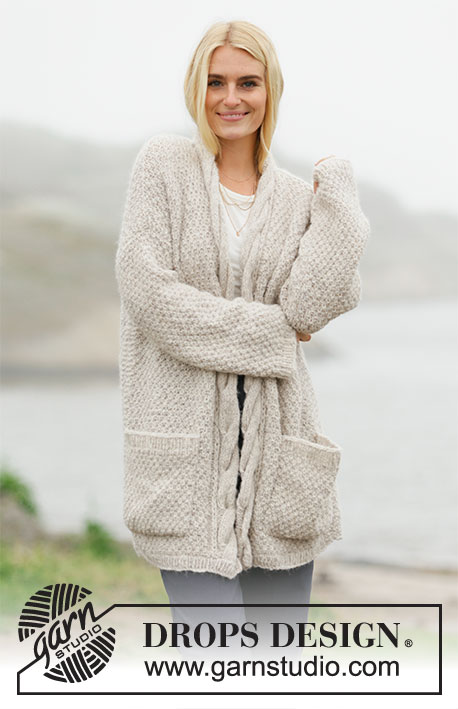
Knitted long jacket in DROPS Sky and DROPS Brushed Alpaca Silk. Knitted with moss stitch, cables and pockets. Size: S - XXXL
DROPS 206-25 |
|||||||||||||
|
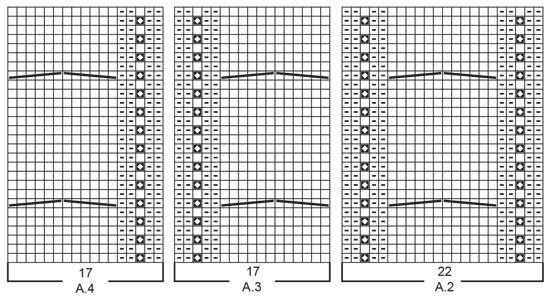
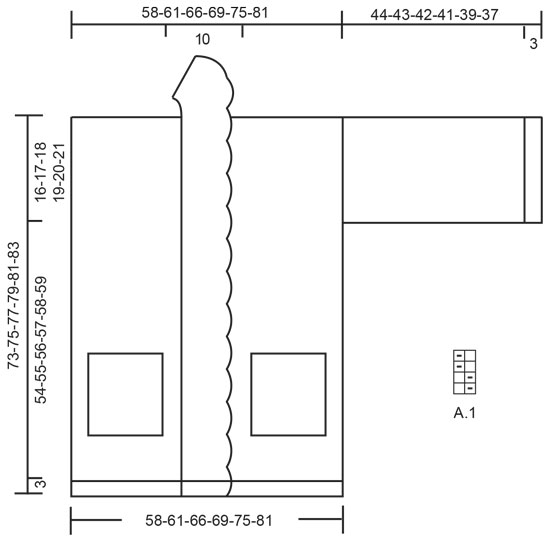
---------------------------------------------------------- EXPLANATION FOR THE PATTERN: ---------------------------------------------------------- GARTER STITCH (back and forth): Knit all rows. 1 ridge vertically = knit 2 rows. PATTERN: See diagrams A.1 to A.4. Diagrams show all rows in pattern seen from the right side! Work jacket in double moss stitch with cable mid back and a cable edge in each side along mid front. Work cable edges mid front over the outermost 12 stitches. To make the cable edge full and rolling do not work any edge stitches at the edge (i.e. work outermost stitch in A.3 and A.4 as a normal stitch from both right side and wrong side). INCREASE/DECREASE TIP (evenly): To calculate how to increase/decrease evenly, use the total number of stitches on row (e.g. 83 stitches), minus edge stitches (e.g. 6 stitches) and divide the remaining stitches by number of increases/decreases to be done (e.g. 5) = 15.4. In this example increase by making 1 yarn over after alternately approx. every 15th and 16th stitch. Do not increase over the 3 edge stiches in each side. On next row work yarn overs twisted to avoid holes. If decreasing knit alternately approx. every 14th and 15th stitch and every 15th and 16th stitch together. DECREASE TIP (applies to sleeves in size L, XL, XXL and XXXL): Decrease 1 stitch after 1 edge stitch in garter stitch as follows: Knit 2 together. Decrease 1 stitch before 1 edge stitch in garter stitch as follows: Work until 3 stitches remain on needle, slip 1 stitch knitwise, knit 1, pass slipped stitch over. ---------------------------------------------------------- START THE PIECE HERE: ---------------------------------------------------------- JACKET - SHORT OVERVIEW OF THE PIECE: Work piece in parts back and forth on circular needle. Work front and back piece bottom up. Sleeve is worked top down. Work pockets separately and sew on when finished. BACK PIECE: Cast on 83-87-95-99-107-115 stitches on circular needle size 5 mm with 1 strand Sky + 1 strand Brushed Alpaca Silk (= 2 strands). Purl 1 row (= wrong side). Work next row as follows from right side: 3 edge stitches in GARTER STITCH - read explanation above - * knit 1, purl 1 *, work from *-* until 4 stitches remain, knit 1 and finish with 3 edge stitches on needle in garter stitch. Continue rib like this until 5 rows rib have been worked in total. Purl 1 row from wrong side (work 3 edge stitches in each side in garter stitch) - AT THE SAME TIME increase 5 stitches evenly on this row - read INCREASE/DECREASE TIP = 88-92-100-104-112-120 stitches. Switch to circular needle size 6 mm. Now work pattern from right side as follows: 3 stitches in garter stitch, work A.1 over the next 30-32-36-38-42-46 stitches (= 15-16-18-19-21-23 repetitions of 2 stitches), work A.2 (= 22 stitches), work A.1 over the next 30-32-36-38-42-46 stitches and finish with 3 stitches in garter stitch. Continue pattern like this. REMEMBER THE KNITTING TENSION! When piece measures 57-58-59-60-61-62 cm, insert 1 marker in each side. Markers indicate armholes. When piece measures 70-72-74-76-78-80 cm, decrease 6 stitches evenly - remember INCREASE/DECREASE TIP) over the middle 12 stitches = 82-86-94-98-106-114 stitches. On next row cast off the middle 12 stitches in all sizes for neck and finish each shoulder separately. Continue pattern and cast off 1 stitch on next row from the neck = 34-36-40-42-46-50 stitches remain on shoulder. Continue A.1 with 1 stitch in garter stitch towards the neck and 3 edge stitches in garter stitch towards the side until piece measures 72-74-76-78-80-82 cm. Knit 1 row from wrong side over all stitches. Loosely cast off by knitting from right side. Back piece measures approx. 73-75-77-79-81-83 cm from shoulder and down. Work the other shoulder the same way. RIGHT FRONT PIECE (when garment is worn): Cast on 47-49-53-55-59-63 stitches on circular needle size 5 mm with 1 strand Sky + 1 strand Brushed Alpaca Silk (= 2 strands). Purl 1 row (= wrong side). Work next row as follows from the right side (i.e. from mid front): * Knit 1, purl 1 *, work from *-* until 3 stitches remain on row and finish with 3 edge stitches in garter stitch towards the side (it is correct that first stitch towards mid front is worked in stocking stitch and not in garter stitch – read PATTERN). Continue rib like this until 5 rows rib have been worked in total. Purl 1 row from wrong side (work 3 edge stitches towards the side in garter stitch) - AT THE SAME TIME increase 3 stitches evenly on this row = 50-52-56-58-62-66 stitches. Switch to circular needle size 6 mm. Now work pattern from right side as follows (= from mid front): Work A.3 (= 17 stitches) – read explanation in PATTERN, work A.1 over the next 30-32-36-38-42-46 stitches, finish with 3 edge stitches in garter stitch towards the side. Continue pattern like this. When piece measures 57-58-59-60-61-62 cm, insert 1 marker in the side. Marker indicates armhole. When piece measures 72-74-76-78-80-82 cm, knit 1 row from wrong side over the first 34-36-40-42-46-50 stitches from the side, then continue pattern as before over the remaining 16 stitches. On next row (right side) work the first 16 stitches as before (= collar), cast off the remaining 34-36-40-42-46-50 stitches by knitting. Cut the yarn. RIGHT COLLAR: = 16 stitches. Continue pattern A.3 over the first 15 stitches as before (from right side) and work 1 edge stitch in garter stitch towards the shoulder, at the same time work short rows. I.e. work from right side and work * 2 rows back and forth over all stitches, 2 rows back and forth over the outermost 12 stitches *, work from *-* until collar measures 6-6-6-7-7-7 cm inside at the most narrow. Knit 1 row from wrong side, knit 1 row from right side and loosely cast off by knitting from wrong side. LEFT FRONT PIECE (when garment is worn): Cast on 47-49-53-55-59-63 stitches on circular needle size 5 mm with 1 strand Sky + 1 strand Brushed Alpaca Silk (= 2 strands). Purl 1 row (= wrong side). Work next row as follows from the right side (= from the side): 3 edge stitches in garter stitch, * purl 1, knit 1 *, work from *-* the rest of row. Continue rib like this until 5 rows rib have been worked in total. Purl 1 row from wrong side (work 3 edge stitches towards the side in garter stitch) - AT THE SAME TIME increase 3 stitches evenly on this row = 50-52-56-58-62-66 stitches. Switch to circular needle size 6 mm. Now work pattern from right side as follows (= from the side): Work 3 edge stitches in garter stitch, work A.1 over the next 30-32-36-38-42-46 stitches, and finish with A.4 towards mid front (= 17 stitches). When piece measures 57-58-59-60-61-62 cm, insert 1 marker in the side. Marker indicates armhole. When piece measures 72-74-76-78-80-82 cm, work next row as follows from wrong side: Continue pattern as before over the first 16 stitches, knit from wrong side over the remaining 34-36-40-42-46-50 stitches. On next row (right side), cast off the first 34-36-40-42-46-50 stitches for shoulder = 16 stitches remain on needle for collar. Continue pattern rest of row as before. LEFT COLLAR: = 16 stitches. Work 1 edge stitch in garter stitch (= towards the shoulder), work the last 15 stitches in A.4 as before (from wrong side), at the same time work short rows. I.e. work from wrong side and work * 2 rows back and forth over all stitches, 2 rows back and forth over the outermost 12 stitches *, work from *-* until collar measures 6-6-6-7-7-7 cm inside at the most narrow. Knit 1 row from wrong side, knit 1 row from right side and loosely cast off by knitting from wrong side. SLEEVE: Sleeves are worked back and forth on circular needle, top down. Cast on 46-50-52-54-58-60 stitches (including 1 edge stitch in each side towards mid front) on circular needle size 6 mm with 1 strand Sky + 1 strand Brushed Alpaca Silk (= 2 strands). Purl 1 row (= wrong side). Then work in the different sizes as follows: Size S, M: Work A.1 with 1 edge stitch in garter stitch in each side. When sleeve measures 41-40 cm in total, continue as explained below. Size L, XL, XXL and XXXL: Work A.1 with 1 edge stitch in garter stitch in each side. When sleeve measures 4 cm, decrease 1 stitch in each side - read DECREASE TIP = 50-52-56-58 stitches. Decrease in size L is now done. In size XL, XXL and XXXL repeat decrease every 4 cm 1-2-2 more times = 50-50-52-54 stitches. When sleeve measures 39-38-36-34 cm in total, continue as explained below. All sizes: Knit 1 row from right side. Switch to circular needle size 5 mm. Work rib (= knit 1/purl 1) with 1 edge stitches in garter stitch in each side. When 5 rows in rib have been worked in total, loosely cast off by knitting from right side. Sleeve measures approx. 44-43-42-41-39-37 cm. Work the other sleeve the same way. ASSEMBLY: Sew shoulder seams inside cast-off edge (2 purled rows should be by each other on top of shoulder). Sew collar together mid back – sew edge to edge to get a flat seam. Sew collar to neckline in the back of neck. Sew side seam on front and back piece from markers and down, sew in outer loops of edge stitches in garter stitch so that the seam is flat. Leave approx. 15 cm for vent in each side. Sew sleeves in body inside 1 edge stitch in garter stitch on body and inside cast-on edge on sleeves. Sew the openings under the sleeves. POCKETS: Work 2 pockets as explained below. Cast on 29 stitches (including 1 edge stitch in each side) on circular needle size 6 mm with 1 strand of each quality (= 2 strands). Purl 1 row (= wrong side). Then work A.1 with 1 edge stitch in garter stitch in each side. When pocket measures 19 cm, knit 1 row from right side over all stitches. Switch to circular needle size 5 mm and work next row from wrong side as follows: 1 edge stitch in garter stitch, * purl 1, knit 1 *, repeat from *-* until 2 stitches remain on needle, purl 1 and finish with 1 edge stitch in garter stitch. Continue rib like this until 5 rows rib have been worked in total. Loosely cast off by knitting from right side. Place 1 pocket on each front piece approx. 6 cm from cast-on edge and 3 cm from the seam edge. Sew pockets on front pieces inside 1 edge stitch in garter stitch on pocket. |
|||||||||||||
Diagram explanations |
|||||||||||||
|
|||||||||||||
 |
|||||||||||||
 |
|||||||||||||
Have you finished this pattern?Tag your pictures with #dropspattern #truenorthjacket or submit them to the #dropsfan gallery. Do you need help with this pattern?You'll find 26 tutorial videos, a Comments/Questions area and more by visiting the pattern on garnstudio.com. © 1982-2026 DROPS Design A/S. We reserve all rights. This document, including all its sub-sections, has copyrights. Read more about what you can do with our patterns at the bottom of each pattern on our site. |
|||||||||||||


With over 40 years in knitting and crochet design, DROPS Design offers one of the most extensive collections of free patterns on the internet - translated to 17 languages. As of today we count 324 catalogues and 12290 patterns translated into English (UK/cm). 12290
We work hard to bring you the best knitting and crochet have to offer, inspiration and advice as well as great quality yarns at incredible prices! Would you like to use our patterns for other than personal use? You can read what you are allowed to do in the Copyright text at the bottom of all our patterns. Happy crafting!
Post a comment to pattern DROPS 206-25
We would love to hear what you have to say about this pattern!
If you want to leave a question, please make sure you select the correct category in the form below, to speed up the answering process. Required fields are marked *.