
Popular categories
Looking for a yarn?


Comments / Questions (82)
![]() Kasia wrote:
Kasia wrote:
Dziękuję!
25.04.2022 - 17:33
![]() Kasia wrote:
Kasia wrote:
Dzień dobry! Mam pytanie dot. rękawa: w opisie (rozm. L) jest napisane, żeby nabrać 52 o. Gdy dł. rękawa wyniesie 4 cm, należy ZAMKNĄĆ oczka. I tu podana jest liczba 56 o. Pytanie: jak po zamknięciu oczek jest ich więcej niż przy nabieraniu? Czego nie zrozumiałam?;) dziękuję!
25.04.2022 - 13:40DROPS Design answered:
Witaj Kasiu, w części 'Rozmiary L, XL, XXL i XXXL' do rozmiaru L odnosi się 1-sza, a nie 3-cia wartość, czyli po zamknięciu 1 o. z każdej strony zostaje 50 oczek. Pozdrawiamy!
25.04.2022 - 16:12
![]() Anna Marie Fedel wrote:
Anna Marie Fedel wrote:
Is it necessary to block this when finished? I need see any blocking instruction on the pattern. I'm almost done , I can't believe it!
08.03.2022 - 22:50DROPS Design answered:
Dear Mrs Fedel, glad to read that you are almost done! Some knitters block some other don't, so that you can block if you like it (follow instructions on the label). Your DROPS store might have more tips for you. Happy knitting!
09.03.2022 - 17:52
![]() Anna Marie Fedel wrote:
Anna Marie Fedel wrote:
Wow , I have to rip this whole back out don't I. So frustrated.
24.02.2022 - 14:08
![]() Anna Fedel wrote:
Anna Fedel wrote:
Hi , I know that the cable starts on the 13th row. And I followed the diagram instruction. (A2)...A3...A4....the graph shows every 28 rows to the second cable....(she told me every 14 rows. And the photo seems like they are closer together throughout the length of the sweater. I've completed the back and I'm not sure I like it. I'm working on the right side right now....is it 14 or 28? Or should I follow what I did in the back...? Way disappointing.
24.02.2022 - 06:24DROPS Design answered:
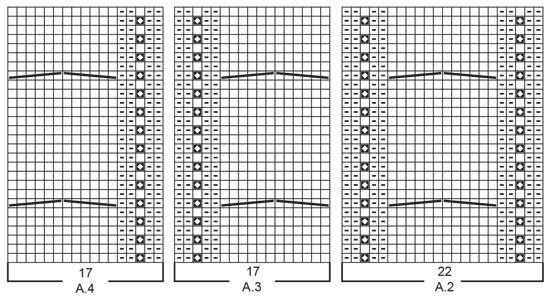
Dear Mrs Fedel, the first cable in A.2,A.3,A.4 is done on the 7th row and there should be 14 rows between each cable in A.2, A.4 and A.4 (remember diagrams shows all rows, both RS and WS rows - read more about diagrams here). Happy knitting!
24.02.2022 - 10:39
![]() Anna Marie Fedel wrote:
Anna Marie Fedel wrote:
O k , I figured out my last question...lol Wanted to tell you after it finally clicked I am very happy with this yarn...love it! Thanks for your help.
17.02.2022 - 05:02
![]() Anna Marie Fedel wrote:
Anna Marie Fedel wrote:
Hi...I'm looking at the back photo of the sweater and Diagram A.2 doesn't look like there are as many cables going up the center.. my diagram on the pattern shows only 2 cables going the whole way up? The photo shows 10 or more... It shows only 2 cable patterns on on both sides also.
17.02.2022 - 02:10DROPS Design answered:
Dear Mrs Fedel, after you have finished A.2 in height the first time, repeat A.2 from the first row, and continue like this repeating the cables on every 14th row until you will decrease evenly in the cable stitches for neck on back piece. Happy knitting!
17.02.2022 - 10:26
![]() Anna Fedel wrote:
Anna Fedel wrote:
So if I'm understanding the diagram A.2 right....every row shown represents a right-side row?
16.02.2022 - 18:06DROPS Design answered:
Hi Anna, Yes, all the rows are shown from the right side, so when you work back from the wrong side you work the diagram from left to right. Happy knitting!
17.02.2022 - 06:49
![]() Anna Marie Fedel wrote:
Anna Marie Fedel wrote:
Hi , as I start this sweater , I used a smaller needle to achieve my gauge. Size US 8 ( US 10 was too big) , as explained might happen. Anyway to start the sweater rib at the bottom , should I still go one size needle smaller than 8 to start the rib at the bottom or stick with the size 8 through the whole sweater. I feel that the sleeves might need the smaller needle at the cuff. Thanks , Anna
15.02.2022 - 17:32DROPS Design answered:
Dear Mrs Fedel, yes correct, you have to adapt the smaller needle size used for the ribbing edge according to the one you need to get correct tension. You can go down 1 size for rib. Happy knitting!
16.02.2022 - 10:48
![]() Béatrice wrote:
Béatrice wrote:
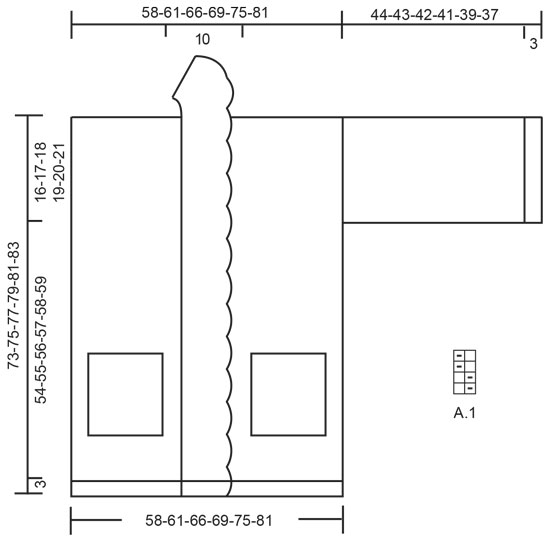
Bonjour Je n'ai pas trouvé le diagramme A1 est il disponible svp?
29.12.2021 - 15:54DROPS Design answered:
Bonjour Beatrice, il est disponible en bas, a droite du dessin schematique de la veste. Bon tricot!
29.12.2021 - 20:39
|
|||||||||||||
True North#truenorthjacket |
|||||||||||||
 |
 |
||||||||||||
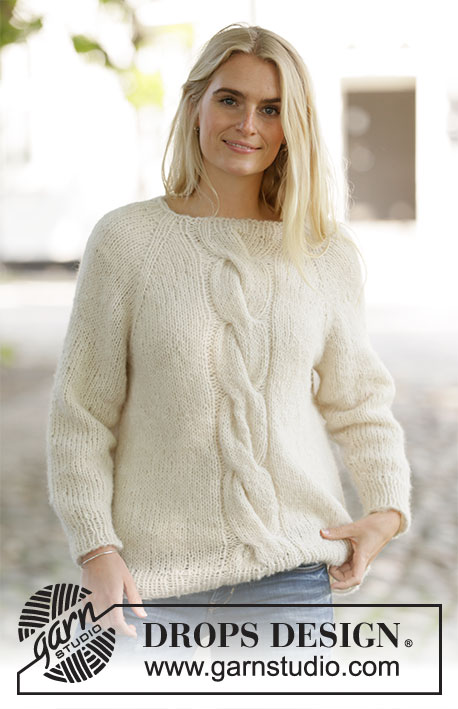
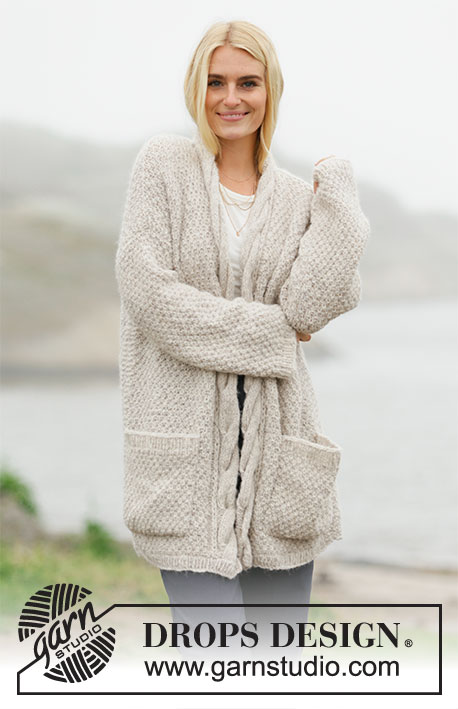
Knitted long jacket in DROPS Sky and DROPS Brushed Alpaca Silk. Knitted with moss stitch, cables and pockets. Size: S - XXXL
DROPS 206-25 |
|||||||||||||
|
---------------------------------------------------------- EXPLANATION FOR THE PATTERN: ---------------------------------------------------------- GARTER STITCH (back and forth): Knit all rows. 1 ridge vertically = knit 2 rows. PATTERN: See diagrams A.1 to A.4. Diagrams show all rows in pattern seen from the right side! Work jacket in double moss stitch with cable mid back and a cable edge in each side along mid front. Work cable edges mid front over the outermost 12 stitches. To make the cable edge full and rolling do not work any edge stitches at the edge (i.e. work outermost stitch in A.3 and A.4 as a normal stitch from both right side and wrong side). INCREASE/DECREASE TIP (evenly): To calculate how to increase/decrease evenly, use the total number of stitches on row (e.g. 83 stitches), minus edge stitches (e.g. 6 stitches) and divide the remaining stitches by number of increases/decreases to be done (e.g. 5) = 15.4. In this example increase by making 1 yarn over after alternately approx. every 15th and 16th stitch. Do not increase over the 3 edge stiches in each side. On next row work yarn overs twisted to avoid holes. If decreasing knit alternately approx. every 14th and 15th stitch and every 15th and 16th stitch together. DECREASE TIP (applies to sleeves in size L, XL, XXL and XXXL): Decrease 1 stitch after 1 edge stitch in garter stitch as follows: Knit 2 together. Decrease 1 stitch before 1 edge stitch in garter stitch as follows: Work until 3 stitches remain on needle, slip 1 stitch knitwise, knit 1, pass slipped stitch over. ---------------------------------------------------------- START THE PIECE HERE: ---------------------------------------------------------- JACKET - SHORT OVERVIEW OF THE PIECE: Work piece in parts back and forth on circular needle. Work front and back piece bottom up. Sleeve is worked top down. Work pockets separately and sew on when finished. BACK PIECE: Cast on 83-87-95-99-107-115 stitches on circular needle size 5 mm with 1 strand Sky + 1 strand Brushed Alpaca Silk (= 2 strands). Purl 1 row (= wrong side). Work next row as follows from right side: 3 edge stitches in GARTER STITCH - read explanation above - * knit 1, purl 1 *, work from *-* until 4 stitches remain, knit 1 and finish with 3 edge stitches on needle in garter stitch. Continue rib like this until 5 rows rib have been worked in total. Purl 1 row from wrong side (work 3 edge stitches in each side in garter stitch) - AT THE SAME TIME increase 5 stitches evenly on this row - read INCREASE/DECREASE TIP = 88-92-100-104-112-120 stitches. Switch to circular needle size 6 mm. Now work pattern from right side as follows: 3 stitches in garter stitch, work A.1 over the next 30-32-36-38-42-46 stitches (= 15-16-18-19-21-23 repetitions of 2 stitches), work A.2 (= 22 stitches), work A.1 over the next 30-32-36-38-42-46 stitches and finish with 3 stitches in garter stitch. Continue pattern like this. REMEMBER THE KNITTING TENSION! When piece measures 57-58-59-60-61-62 cm, insert 1 marker in each side. Markers indicate armholes. When piece measures 70-72-74-76-78-80 cm, decrease 6 stitches evenly - remember INCREASE/DECREASE TIP) over the middle 12 stitches = 82-86-94-98-106-114 stitches. On next row cast off the middle 12 stitches in all sizes for neck and finish each shoulder separately. Continue pattern and cast off 1 stitch on next row from the neck = 34-36-40-42-46-50 stitches remain on shoulder. Continue A.1 with 1 stitch in garter stitch towards the neck and 3 edge stitches in garter stitch towards the side until piece measures 72-74-76-78-80-82 cm. Knit 1 row from wrong side over all stitches. Loosely cast off by knitting from right side. Back piece measures approx. 73-75-77-79-81-83 cm from shoulder and down. Work the other shoulder the same way. RIGHT FRONT PIECE (when garment is worn): Cast on 47-49-53-55-59-63 stitches on circular needle size 5 mm with 1 strand Sky + 1 strand Brushed Alpaca Silk (= 2 strands). Purl 1 row (= wrong side). Work next row as follows from the right side (i.e. from mid front): * Knit 1, purl 1 *, work from *-* until 3 stitches remain on row and finish with 3 edge stitches in garter stitch towards the side (it is correct that first stitch towards mid front is worked in stocking stitch and not in garter stitch – read PATTERN). Continue rib like this until 5 rows rib have been worked in total. Purl 1 row from wrong side (work 3 edge stitches towards the side in garter stitch) - AT THE SAME TIME increase 3 stitches evenly on this row = 50-52-56-58-62-66 stitches. Switch to circular needle size 6 mm. Now work pattern from right side as follows (= from mid front): Work A.3 (= 17 stitches) – read explanation in PATTERN, work A.1 over the next 30-32-36-38-42-46 stitches, finish with 3 edge stitches in garter stitch towards the side. Continue pattern like this. When piece measures 57-58-59-60-61-62 cm, insert 1 marker in the side. Marker indicates armhole. When piece measures 72-74-76-78-80-82 cm, knit 1 row from wrong side over the first 34-36-40-42-46-50 stitches from the side, then continue pattern as before over the remaining 16 stitches. On next row (right side) work the first 16 stitches as before (= collar), cast off the remaining 34-36-40-42-46-50 stitches by knitting. Cut the yarn. RIGHT COLLAR: = 16 stitches. Continue pattern A.3 over the first 15 stitches as before (from right side) and work 1 edge stitch in garter stitch towards the shoulder, at the same time work short rows. I.e. work from right side and work * 2 rows back and forth over all stitches, 2 rows back and forth over the outermost 12 stitches *, work from *-* until collar measures 6-6-6-7-7-7 cm inside at the most narrow. Knit 1 row from wrong side, knit 1 row from right side and loosely cast off by knitting from wrong side. LEFT FRONT PIECE (when garment is worn): Cast on 47-49-53-55-59-63 stitches on circular needle size 5 mm with 1 strand Sky + 1 strand Brushed Alpaca Silk (= 2 strands). Purl 1 row (= wrong side). Work next row as follows from the right side (= from the side): 3 edge stitches in garter stitch, * purl 1, knit 1 *, work from *-* the rest of row. Continue rib like this until 5 rows rib have been worked in total. Purl 1 row from wrong side (work 3 edge stitches towards the side in garter stitch) - AT THE SAME TIME increase 3 stitches evenly on this row = 50-52-56-58-62-66 stitches. Switch to circular needle size 6 mm. Now work pattern from right side as follows (= from the side): Work 3 edge stitches in garter stitch, work A.1 over the next 30-32-36-38-42-46 stitches, and finish with A.4 towards mid front (= 17 stitches). When piece measures 57-58-59-60-61-62 cm, insert 1 marker in the side. Marker indicates armhole. When piece measures 72-74-76-78-80-82 cm, work next row as follows from wrong side: Continue pattern as before over the first 16 stitches, knit from wrong side over the remaining 34-36-40-42-46-50 stitches. On next row (right side), cast off the first 34-36-40-42-46-50 stitches for shoulder = 16 stitches remain on needle for collar. Continue pattern rest of row as before. LEFT COLLAR: = 16 stitches. Work 1 edge stitch in garter stitch (= towards the shoulder), work the last 15 stitches in A.4 as before (from wrong side), at the same time work short rows. I.e. work from wrong side and work * 2 rows back and forth over all stitches, 2 rows back and forth over the outermost 12 stitches *, work from *-* until collar measures 6-6-6-7-7-7 cm inside at the most narrow. Knit 1 row from wrong side, knit 1 row from right side and loosely cast off by knitting from wrong side. SLEEVE: Sleeves are worked back and forth on circular needle, top down. Cast on 46-50-52-54-58-60 stitches (including 1 edge stitch in each side towards mid front) on circular needle size 6 mm with 1 strand Sky + 1 strand Brushed Alpaca Silk (= 2 strands). Purl 1 row (= wrong side). Then work in the different sizes as follows: Size S, M: Work A.1 with 1 edge stitch in garter stitch in each side. When sleeve measures 41-40 cm in total, continue as explained below. Size L, XL, XXL and XXXL: Work A.1 with 1 edge stitch in garter stitch in each side. When sleeve measures 4 cm, decrease 1 stitch in each side - read DECREASE TIP = 50-52-56-58 stitches. Decrease in size L is now done. In size XL, XXL and XXXL repeat decrease every 4 cm 1-2-2 more times = 50-50-52-54 stitches. When sleeve measures 39-38-36-34 cm in total, continue as explained below. All sizes: Knit 1 row from right side. Switch to circular needle size 5 mm. Work rib (= knit 1/purl 1) with 1 edge stitches in garter stitch in each side. When 5 rows in rib have been worked in total, loosely cast off by knitting from right side. Sleeve measures approx. 44-43-42-41-39-37 cm. Work the other sleeve the same way. ASSEMBLY: Sew shoulder seams inside cast-off edge (2 purled rows should be by each other on top of shoulder). Sew collar together mid back – sew edge to edge to get a flat seam. Sew collar to neckline in the back of neck. Sew side seam on front and back piece from markers and down, sew in outer loops of edge stitches in garter stitch so that the seam is flat. Leave approx. 15 cm for vent in each side. Sew sleeves in body inside 1 edge stitch in garter stitch on body and inside cast-on edge on sleeves. Sew the openings under the sleeves. POCKETS: Work 2 pockets as explained below. Cast on 29 stitches (including 1 edge stitch in each side) on circular needle size 6 mm with 1 strand of each quality (= 2 strands). Purl 1 row (= wrong side). Then work A.1 with 1 edge stitch in garter stitch in each side. When pocket measures 19 cm, knit 1 row from right side over all stitches. Switch to circular needle size 5 mm and work next row from wrong side as follows: 1 edge stitch in garter stitch, * purl 1, knit 1 *, repeat from *-* until 2 stitches remain on needle, purl 1 and finish with 1 edge stitch in garter stitch. Continue rib like this until 5 rows rib have been worked in total. Loosely cast off by knitting from right side. Place 1 pocket on each front piece approx. 6 cm from cast-on edge and 3 cm from the seam edge. Sew pockets on front pieces inside 1 edge stitch in garter stitch on pocket. |
|||||||||||||
Diagram explanations |
|||||||||||||
|
|||||||||||||
 |
|||||||||||||
 |
|||||||||||||
Have you finished this pattern?Tag your pictures with #dropspattern #truenorthjacket or submit them to the #dropsfan gallery. Do you need help with this pattern?You'll find 26 tutorial videos, a Comments/Questions area and more by visiting the pattern on garnstudio.com. © 1982-2026 DROPS Design A/S. We reserve all rights. This document, including all its sub-sections, has copyrights. Read more about what you can do with our patterns at the bottom of each pattern on our site. |
|||||||||||||


With over 40 years in knitting and crochet design, DROPS Design offers one of the most extensive collections of free patterns on the internet - translated to 17 languages. As of today we count 324 catalogues and 12290 patterns translated into English (UK/cm). 12290
We work hard to bring you the best knitting and crochet have to offer, inspiration and advice as well as great quality yarns at incredible prices! Would you like to use our patterns for other than personal use? You can read what you are allowed to do in the Copyright text at the bottom of all our patterns. Happy crafting!
Post a comment to pattern DROPS 206-25
We would love to hear what you have to say about this pattern!
If you want to leave a question, please make sure you select the correct category in the form below, to speed up the answering process. Required fields are marked *.