
Popular categories
Looking for a yarn?


Comments / Questions (53)
![]() Helle wrote:
Helle wrote:
Som flere allerede har kommenteret, så går Mønsteret altså IKKE op under ærmerne, når de 6 masker er slået op. Ifølge opskriften skal de glatstrikkede markeringsmasker fra raglanudt tages med til kroppen. De sidder på hver side af de 6 opslåede masker under ærmet. Og så går mønsteret ikke op. Eneste mulighed er at slå et ulige antal masker op under ærmet???
05.11.2025 - 22:02DROPS Design answered:
Hei Helle. Det har vært noen kommentarer ang mønstret og ermet, men ikke mange etter at det juli 2023 kom en rettelse. Mønstret vil ikke stemme 100% hele tiden (pga fellinger). Men det gjør ikke noget at de ikke stemmer midt under ærmet ved indtagningen, de kommer til at stemme igen senere. mvh DROPS Design
17.11.2025 - 17:48
![]() Gabriella wrote:
Gabriella wrote:
Hallo, ich verstehe nicht, wieso am Ende des Rumpfteils vor dem Bündchen 37 Maschen zugenommen werden müssen. Ist das tatsächlich so? Vielen Dank im Voraus und beste Grüße Gabriella Träger
10.08.2025 - 18:50DROPS Design answered:
Liebe Gabriella, das Rippenmuster ist elastischer und zieht sich z.B. im Vergleich zum Muster zusammen. Wenn vor dem Rippenmuster-Rand zugenommen wird, kann man damit vermeiden, dass der Rand deutlich enger wird als das restliche Rumpfteil. Viel Spaß beim Stricken!
11.08.2025 - 08:19
![]() Wendy wrote:
Wendy wrote:
I have created a video tutorial in two parts for this pattern on my youtube channel, @Myknittingteacherwendy. I hope knitters will find it helpful!
11.06.2025 - 00:29
![]() Nanna wrote:
Nanna wrote:
Hej, jeg forstår ikke hvordan jeg strikker struktur mønster på ærmet når jeg strikker rundt. Jeg strikker vrang og ret så det ligner ribstrik hvilket ikke ligner det andet mønster hvad gør jeg forkert .
06.03.2025 - 20:55
![]() Nanna wrote:
Nanna wrote:
Hvordan strikkes mønster under ærme når man begynder at tage 1 maske ind på hver side af mærket?
01.03.2025 - 20:42DROPS Design answered:
Hej Nanna, strik maskerne så de stemmer med mønsteret rundt på ærmet. Det gør ikke noget at de ikke stemmer midt under ærmet ved indtagningen, de kommer til at stemme igen senere :)
06.03.2025 - 14:34
![]() Pamela Mary Howard wrote:
Pamela Mary Howard wrote:
First time reading a DROPS pattern....... I have knitted the first row of A1,A2,A3 and raglan increase of pattern: Please clarify the following instructions..... Work from wrong side as follows: work 5 band stitches in garter, work pattern according to a1,a2,a3 (purl all rows from wrong side in diagram) I purled all stitches on the wrong side but piece does not look right? Thanks
07.11.2024 - 20:09DROPS Design answered:
Dear Mrs Howard, all stitches will be purled from wrong side according to diagrams; you can add marker between each diagram if needed to keep tracking the stitches and how they should be worked. Happy knitting!
08.11.2024 - 07:46
![]() Lone wrote:
Lone wrote:
Har løst problemet, men syntes det er dårligt det ikke står beskrevet i opskriften hvordan man gør
20.10.2024 - 11:09DROPS Design answered:
God fornøjelse :)
22.10.2024 - 15:50
![]() Lone wrote:
Lone wrote:
Hvordan får jeg rigtigt strukturmønster på ærmerne, der står man skal strikke A1, men det giver da bare alm rib, hvordan gør man ?
18.10.2024 - 19:23DROPS Design answered:
Hej Lone, fint at du kom på hvordan man følger diagrammet - God fornøjelse!
22.10.2024 - 15:50
![]() Marisa wrote:
Marisa wrote:
Buonasera, per cortesia potete rivedere le istruzioni sugli aumenti raglan dello sprone? Mi sembra che non siano completi Grazie
05.10.2024 - 23:00DROPS Design answered:
Buonasera Maria, grazie per la segnalazione, abbiamo controllato e sistemato il testo. Buon lavoro!
06.10.2024 - 18:17
![]() Sylvie Macias wrote:
Sylvie Macias wrote:
Bonjour J'ai commencé le point fantaisie du Sky Stripes Jacket et j'obtiens tout simplement des côtes 1/ 1 . Est-ce que je n'ai pas compris le diagramme? Merci
05.03.2024 - 19:43DROPS Design answered:
Bonjour Mme Macias, les côtes que vous devez avoir doivent être des côtes 1 maille jersey, 1 maille point mousse; A.1 = 1 maille jersey endroit; A.2 = 1 maille point mousse, 1 maille jersey endroit; A.3 = 1 maille point mousse. Notez que le point noir se tricote' à l'envers sur l'endroit et à l'envers sur l'envers, on obtient ainsi un point mousse (un peu plus serré que lorsque l'on tricote toujours à l'endroit). Bon tricot!
06.03.2024 - 08:07
|
|||||||
Sky Stripes Jacket#skystripesjacket |
|||||||
 |
 |
||||||
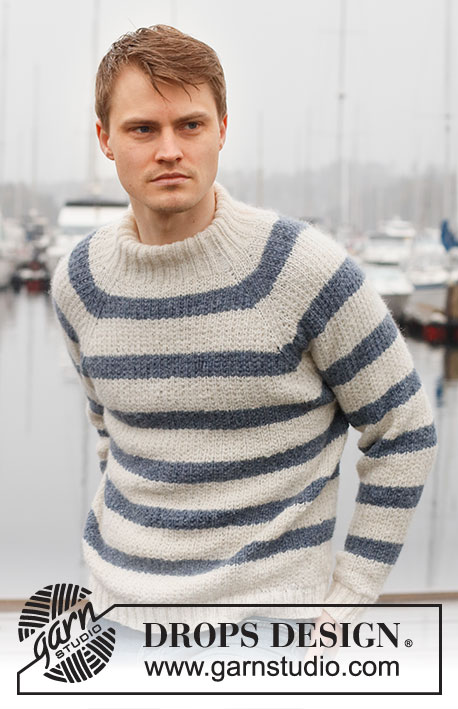
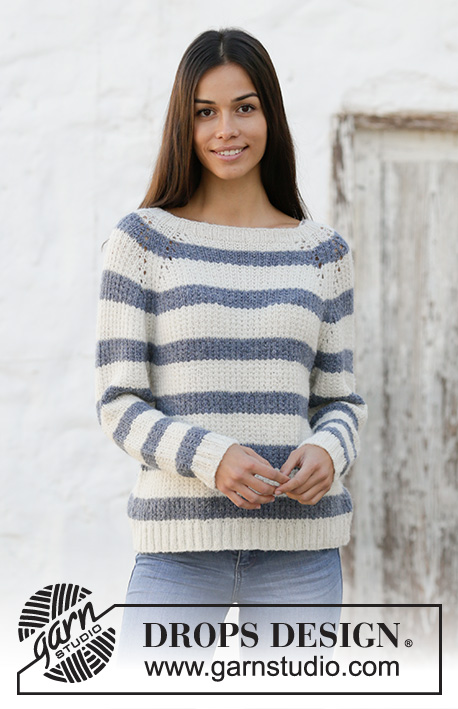
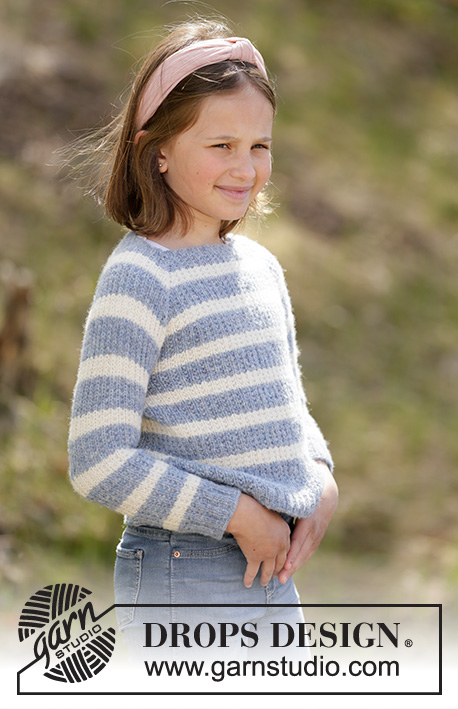
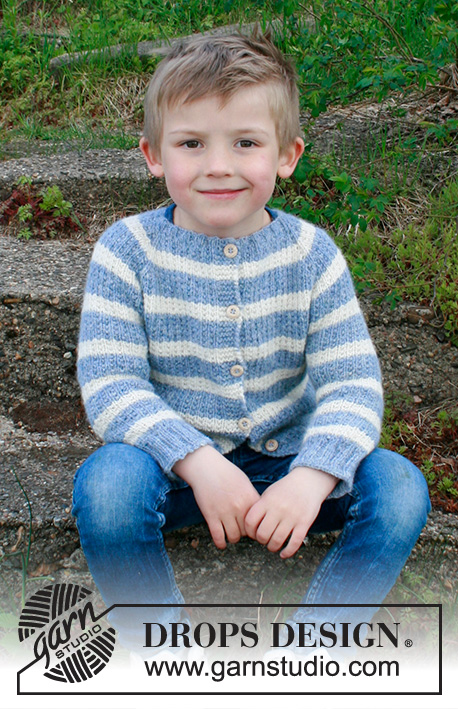
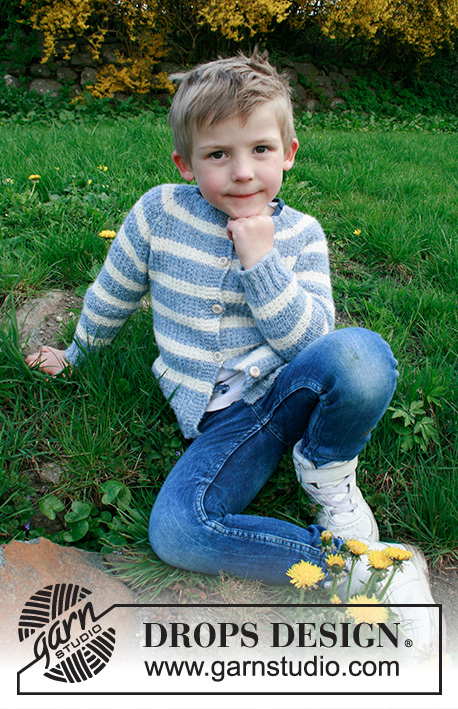
Knitted jacket with stripes for kids in DROPS Sky. Piece is knitted top down with raglan and textured pattern. Size 2-12 years
DROPS Children 34-20 |
|||||||
|
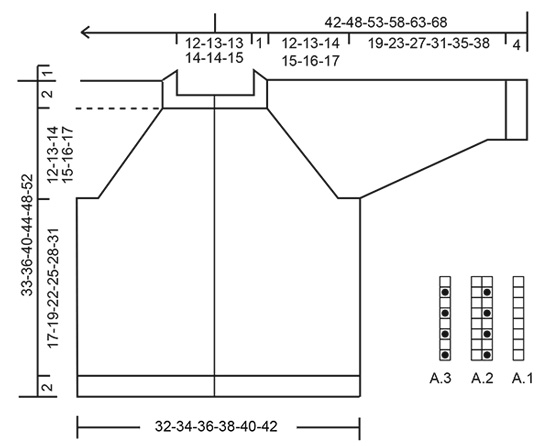
---------------------------------------------------------- EXPLANATION FOR THE PATTERN: ---------------------------------------------------------- GARTER STITCH (back and forth): 1 ridge = knit 2 rows. STRIPES AND PATTERN: Work piece in pattern A.1, A.2 and A.3 – AT THE SAME TIME work stripes as follows: * Work 3 cm light jeans blue (including neck edge), and then 2 cm white * – repeat these colour stripes until 5-5-6-7-8-9 stripes with white have been worked on yoke/body and 6-7-8-9-10-10 stripes white on yoke/sleeve. Then work with light jeans blue until finished measurements. INCREASE TIP (evenly spaced): To calculate how to increase evenly, use the total number of stitches on row (e.g. 141 stitches), minus bands (= 131 stitches) and divide the stitches by number of increases to be done (e.g. 27) = 4.8. In this example increase after approx. every 5th stitch by making 1 yarn over and do not increase over bands. On next row work yarn overs twisted to avoid holes. RAGLAN: Increase on each side of the 4 stitches with markers on every row from right side as follows: Make 1 yarn over, work 1 stitch in stocking stitch (= stitch with marker), make 1 yarn over. On next row purl yarn over twisted to avoid holes. Work the increased stitches in pattern when increasing. DECREASE TIP (applies to sleeves): Decrease 1 stitch on each side of stitch with marker as follows: Work until 2 stitches remain before stitch with marker , slip 1 stitch knitwise, knit 1, pass slipped stitch over stitch worked, knit 1 (marker is in this stitch), knit the next 2 stitches together. BUTTONHOLES: Decrease for buttonholes on right band (when garment is worn). Decrease from right side when 3 stitches remain on row as follows: Make 1 yarn over, knit the next 2 stitches together, knit last stitch. On next row knit yarn over to make holes. Decrease first buttonhole when piece measures approx. 1 cm. Then decrease the next 4-4-5-5-6-6 buttonholes approx. every 6-7-6½-7-7-7½ cm. ---------------------------------------------------------- START THE PIECE HERE: ---------------------------------------------------------- JACKET - SHORT OVERVIEW OF THE PIECE: Yoke and body are worked back and forth, top down. Work sleeves in the round on double pointed needles. YOKE: Cast on 88-92-96-100-104-108 stitches (including 5 band stitches in each side of piece) on circular needle size 3 mm with light jeans blue. Work 5 band stitches in GARTER STITCH – read explanation above, work rib (= knit 2 / purl 2) until 7 stitches remain, knit 2 and 5 band stitches in garter stitch. When piece measures approx. 1 cm, switch to circular needle size 4 mm and decrease for BUTTONHOLES – read explanation above. Knit 1 row from right side while increasing evenly 7-5-7-5-7-5 stitches = 95-97-103-105-111-113 stitches. Knit 1 row from wrong side. Now insert 4 markers for RAGLAN in the piece without working as follows: Insert 1st marker in the 18th-18th-20th-20th-22nd-22nd stitch, insert 2nd marker in the 32nd-32nd-34th-34th-36th-36th stitch, insert 3rd marker in the 64th-66th-70th-72nd-76th-78th stitch, insert 4th marker in the 78th-80th-84th-86th-90th-92nd stitch. then work STRIPES AND PATTERN with 5 band stitches in garter stitch in each side - read explanation above, and read the entire section before continuing. Work as follows from right side: Work 5 band stitches in garter stitch, work A.1 over 1 stitch, work A.2 over the next 10-10-12-12-14-14 stitches, work A.3 over 1 stitch, make 1 yarn over, 1 stitch in stocking stitch, make 1 yarn over (= increase for raglan). Work A.2 over the next 12 stitches, work A.3 over 1 stitch, make 1 yarn over, 1 stitch in stocking stitch, make 1 yarn over (= increase for raglan). Work A.2 over the next 30-32-34-36-38-40 stitches, work A.3 over 1 stitch, make 1 yarn over, 1 stitch in stocking stitch, make 1 yarn over (= increase for raglan). Work A.2 over the next 12 stitches, work A.3 over 1 stitch, make 1 yarn over, 1 stitch in stocking stitch, make 1 yarn over (= increase for raglan). Work A.2 over the next 12-12-14-14-16-16 stitches and 5 band stitches in garter stitch. First increase for raglan is now done (= 8 stitches increased). Work from wrong side as follows: Work 5 band stitches in garter stitch, work pattern according to A.1/A.2/A.3 (purl all rows from wrong side in diagram) until 5 stitches remain, and work 5 band stitches in garter stitch. REMEMBER THE KNITTING TENSION! Continue with stripes and pattern and increases for raglan until you have increased a total of 15-16-17-18-19-20 times = 215-225-239-249-263-273 stitches. Continue with pattern and stripes until piece measures 13-14-15-16-17-18 cm from cast-on edge. On next row divide piece for body and sleeves as follows: Work 5 band stitches in garter stitch, 28-29-32-33-36-37 stitches in pattern as before (= front piece), slip the next 43-45-47-49-51-53 stitches on a stitch holder for sleeve and cast on 6 stitches in the side under sleeve, work 63-67-71-75-79-83 stitches in pattern as before (= back piece), slip the next 43-45-47-49-51-53 stitches on a stitch holder for sleeve and cast on 6 stitches under sleeve, work 28-29-32-33-36-37 stitches in pattern as before and finish with 5 band stitches in garter stitch (= front piece) = 141-147-157-163-173-179 stitches. BODY: Continue with pattern, stripes and band stitches as before. NOTE: When 5-5-6-7-8-9 stripes with white have been worked in total, work the rest of the piece in light jeans blue. When piece measures 17-19-22-25-28-31 cm from division, knit 1 row from right side while increasing 27-33-31-37-39-41 stitches evenly - read INCREASE TIP = 168-180-188-200-212-220 stitches. Switch to circular needle size 3 mm. Work next row from wrong side as follows: Work 5 band stitches in garter stitch, work rib (= knit 2 / purl 2) until 7 stitches remain, purl 2 and 5 band stitches in garter stitch. Cast off by knitting from right side when piece measures 19-21-24-27-30-33 cm from division – use if needed a thicker needle to cast off to avoid a tight edge. Jacket measures approx. 33-36-40-44-48-52 cm, measured from shoulder and down. SLEEVE: Slip the 43-45-47-49-51-53 stitches from stitch holder in one side of piece on double pointed needles size 4 mm and pick up 1 new stitch in each of the 6 stitches cast on under sleeve = 49-51-53-55-57-59 stitches. Insert a marker in the first stitch of the round (mid under sleeve). Work in the round and continue pattern A.1 and stripes as before (the stitch with marker is knitted on every round). When sleeve measures 2 cm from where sleeve was divided from body, decrease 1 stitch on each side of marker (= 2 stitches decreased) - read DECREASE TIP. Decrease like this every 4-4-5-5-7-6 cm 5-6-5-6-5-6 times in total = 39-39-43-43-47-47 stitches. NOTE: When 6-7-8-9-10-10 stripes with white have been worked in total, work the rest of the piece in light jeans blue. Work until piece measures 19-23-27-31-35-38 cm from division. Knit 1 round and decrease 3-3-3-3-3-3 stitches evenly = 36-36-40-40-44-44 stitches. Switch to double pointed needles size 3 mm and work rib with knit 2/purl 2. Cast off by knitting when sleeve measures 23-27-31-35-39-42 cm from division – use if needed a thicker needle to cast off to avoid a tight edge. Work the other sleeve the same way. ASSEMBLY: Sew the buttons on to the left band. |
|||||||
Diagram explanations |
|||||||
|
|||||||
 |
|||||||
Have you finished this pattern?Tag your pictures with #dropspattern #skystripesjacket or submit them to the #dropsfan gallery. Do you need help with this pattern?You'll find 28 tutorial videos, a Comments/Questions area and more by visiting the pattern on garnstudio.com. © 1982-2026 DROPS Design A/S. We reserve all rights. This document, including all its sub-sections, has copyrights. Read more about what you can do with our patterns at the bottom of each pattern on our site. |
|||||||


With over 40 years in knitting and crochet design, DROPS Design offers one of the most extensive collections of free patterns on the internet - translated to 17 languages. As of today we count 324 catalogues and 12291 patterns translated into English (UK/cm). 12291
We work hard to bring you the best knitting and crochet have to offer, inspiration and advice as well as great quality yarns at incredible prices! Would you like to use our patterns for other than personal use? You can read what you are allowed to do in the Copyright text at the bottom of all our patterns. Happy crafting!
Post a comment to pattern DROPS Children 34-20
We would love to hear what you have to say about this pattern!
If you want to leave a question, please make sure you select the correct category in the form below, to speed up the answering process. Required fields are marked *.