
Popular categories
Looking for a yarn?


Comments / Questions (21)
![]() Cheryl Wolthuis wrote:
Cheryl Wolthuis wrote:
I am wondering about a back elevation. The schematic shows the higher back but when I read through the pattern I don't see it mentioned. Thank you, Cheryl
01.03.2025 - 14:03DROPS Design answered:
Dear Cheryl, there is no back elevation; the lower front is due to distribution of the stitches. A.1 will pull the front neck down, so it will look lower. Happy knitting!
02.03.2025 - 19:13
![]() Lynn wrote:
Lynn wrote:
In the directions the pattern says to follow A.3 and A.4 but the pattern only has an A.1 and an A.2. Where do I get A. 3 and A.4?
24.09.2023 - 10:49DROPS Design answered:
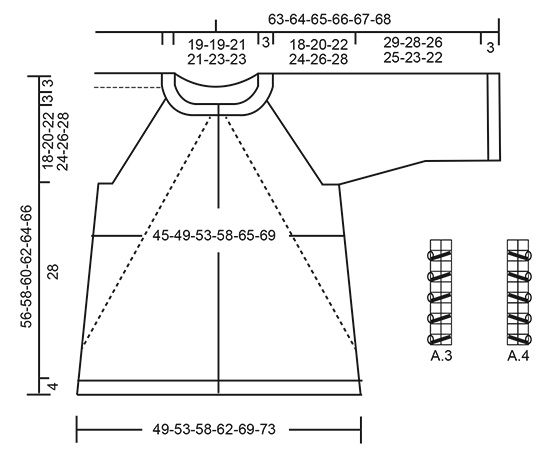
Dear Lynn! Small diagrams A.3 and A.4 are next to the measurements drawing below. Happy knitting!
24.09.2023 - 16:54
![]() Bea Sykes wrote:
Bea Sykes wrote:
Many thanks for your quick reply, clarifying what was an unsolvable problem to me.
01.09.2022 - 13:41
![]() Bea Sykes wrote:
Bea Sykes wrote:
Size medium.Thank you
01.09.2022 - 13:01DROPS Design answered:
Thanks! You will then work as follows: 5 band sts, knit 1, A.1 (= 28 sts), knit 1, (purl 2/knit 2) over the next 8 stitches, purl 2, knit 1, A.1 (= 28 sts), knit 1 (mid stitch on back piece), A.1 (= 28 sts) , knit 1, (purl 2/knit 2) over the next 8 stitches, purl 2, knit 1, A.1 (= 28 sts), knit 1, 5 band stitches = 5+1+28+1+8+2+1+28+1+28+1+8+2+1+28+1+5= 149 sts. Can this help?
01.09.2022 - 13:17
![]() Bea Sykes wrote:
Bea Sykes wrote:
After many attempts to start pattern on neck edge I cannot get the first row correct.I am not a novice knitter being 83 years of age and have knitted most of my life.Previously I have never found a problem with Drops patterns and have muskat and buttons to start.Help.
01.09.2022 - 11:25DROPS Design answered:
Dear Mrs Sykes, maybe you could tell us which size you are making? We can then give you the detail for this size. Thanks for your comprehension.
01.09.2022 - 11:34
![]() Nadette wrote:
Nadette wrote:
Bonjour, je ne trouve pas dans les explications à quel endroit sont tricotées les augmentations -2. Merci de votre réponse
11.03.2022 - 21:52DROPS Design answered:
Bonjour Nadette, vous pourrez les utiliser par exemple à la fin du bas du gilet, lorsque vous devez augmenter 31-35-39-39-43-47 mailles à intervalles réguliers . Bon tricot!
14.03.2022 - 10:05
![]() Petra wrote:
Petra wrote:
Hallo! Zu Beginn des Rumpfes muss ich nach Stilllegung der Maschen für die Ärmel 8 M anschlagen. Muss ich dann in der nächsten Hinreihe von diesen Maschen gleich wieder 2 M abnehmen? Vielen Dank!
16.01.2022 - 13:29DROPS Design answered:
Liebe Petra, genau, bei jeder Hinreihe beim Rumpfteil wird man 2 Maschen unter jede Ärmel abnehmen - siehe ZUNAHMETIPP-1 (gilt für das Rumpfteil):; und dazu vor + nach den Diagrammen zunehmen, damit die Maschenanzahl gleich bleibt). Viel Spaß beim stricken!
17.01.2022 - 09:05
![]() Judy wrote:
Judy wrote:
Is A3 and A4 worked into A2 from the beginning of the yoke
03.11.2021 - 17:15DROPS Design answered:
Dear Judy, A.3 and A.4 are worked on each side of A.2, they are working to keep the eyelets of the raglan increases without increasing (yarn overs will continue but since you decrease 1 st you won't increase anymore). Happy knitting!
04.11.2021 - 06:45
![]() Edwige Bruche wrote:
Edwige Bruche wrote:
Bonjour, dos et devant je voulais savoir le jeté entre A2 ça augmente le nombre de maille ? Du coup quand on a augmenté 31 fois on a trop de mailles ? G du me planter !!! Merciii
24.11.2020 - 21:48DROPS Design answered:
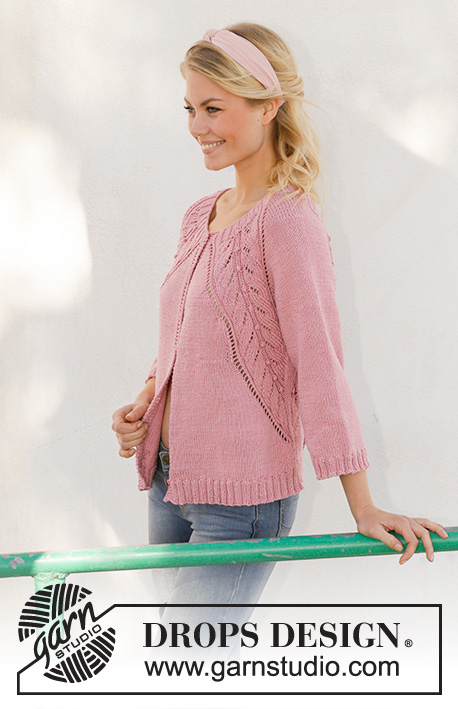
Bonjour Mme Bruche, effectivement, le jeté de avant les A.2 + après les A.2 augmente le nombre de mailles, mais en même temps, au milieu sous les manches, vous diminuez 2 m (= 1 de chaque côté du marqueur), ainsi votre nombre de mailles doit rester le même et le point fantaisie va être décalé vers les côtés et vous n'aurez bientôt plus assez de mailles pour le tricoter - on voit ces diminutions/augmentations sur le côté gauche du gilet sur la 3ème photo. Bon tricot!
25.11.2020 - 07:34
![]() Jutta Gehner wrote:
Jutta Gehner wrote:
Hallo, habe mir gerade die Anleitung durchgelesen. Wird die Jacke ohne verkürzte Reihen gearbeitet? DANKE für eure Antwort. LG Jutta
04.09.2020 - 06:15DROPS Design answered:
Liebe Frau Gehner, ja genau, es werden keine verürzte Reihen gestrickt - dh Halsausschnitt wird vorne und hinten gleich sein. Viel Spaß beim stricken!
04.09.2020 - 08:24
|
|||||||||||||||||||||||||
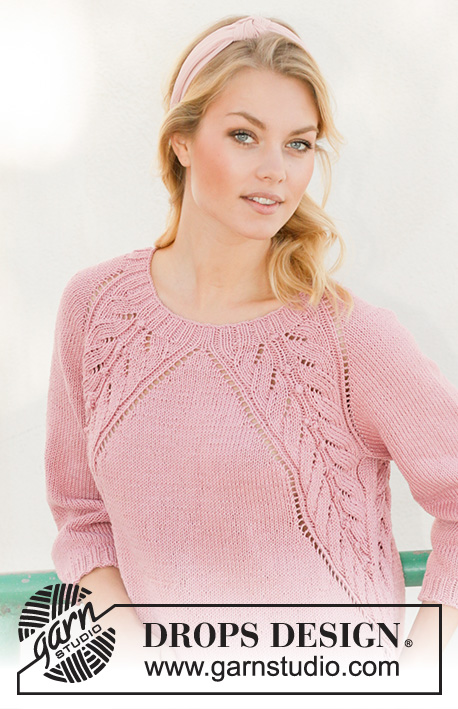
Sweet Heather Jacket#sweetheatherjacket |
|||||||||||||||||||||||||
 |
 |
||||||||||||||||||||||||
Knitted jacket with raglan in DROPS Muskat. Piece is knitted top down with lace pattern. Size: S - XXXL
DROPS 201-19 |
|||||||||||||||||||||||||
|
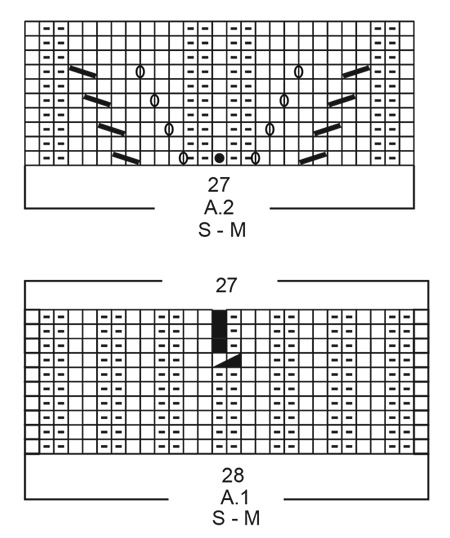
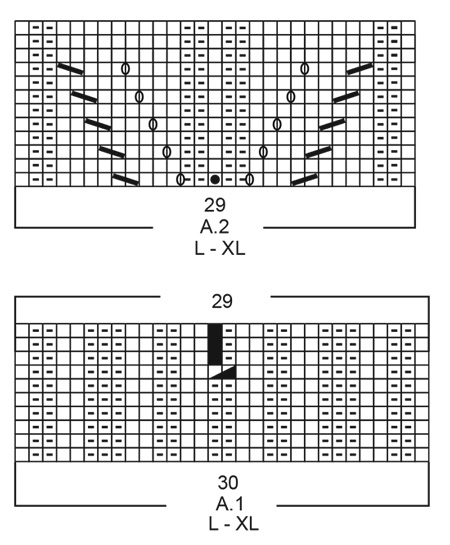
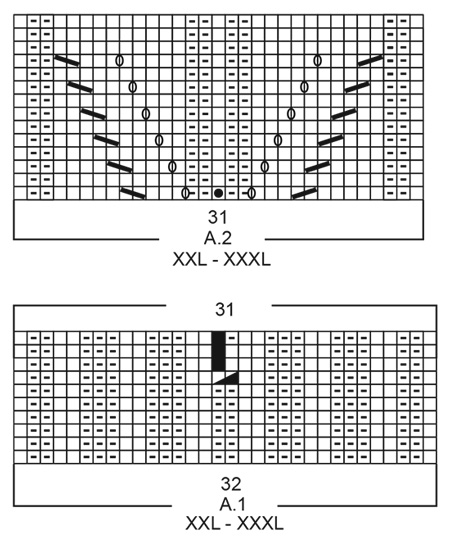
---------------------------------------------------------- EXPLANATION FOR THE PATTERN: ---------------------------------------------------------- GARTER STITCH (back and forth): Knit all rows. 1 ridge vertically = knit 2 rows. PATTERN: See diagrams A.1 to A.4. Choose diagram for your size (applies to A.1 and A.2). Diagrams show all rows in pattern seen from the right side. RAGLAN: All increases are done from the right side. Increase 1 stitch on each side of A.2 (= 8 stitches increased on row): Increase 1 stitch by making 1 yarn over. On next row (wrong side) purl the yarn over to make a hole. Then work the new stitches in stocking stitch. EYELET ROW: Increase for raglan on front pieces and back piece is finished before increase on sleeves. To continue the eyelet row made of increased inside A.2 work a lace pattern (A.3/A.4) down the body inside A.2 as follows: Work A.3 when 2 stitches remain before A.2 on left front piece, and when 2 stitches remain before the last repetition of A.2 on back piece. Work A.4 after the first repetition A.2 on back piece and after A.2 on right front piece. INCREASE TIP-1 (applies to body): All increases are done from the right side. Increase 1 stitch inside A.2 on front pieces and on back piece (= 4 stitches increased on row). On next row (wrong side) purl the yarn over to make a hole. For every increase number of stitches between the 2 repetitions of A.2 on back piece and between A.2 and the 5 band stitches on front pieces increase. INCREASE TIP-2 (evenly): To calculate how to increase evenly, use the total number of stitches on row (e.g. 217 stitches), minus bands (e.g. 10 stitches) and divide the stitches by number of increases to be done (e.g. 31) = 6.7. In this example increase by making 1 yarn over after alternately every 6th and 7th stitch. On next row work yarn overs twisted to avoid holes. DECREASE TIP-1 (applies to sides of body): All decreases are done from the right side! Work until 3 stitches remain before marker thread and knit 2 together, knit 2 (marker thread is between these 2 stitches), slip 1 stitch knitwise, knit 1, pass slipped stitch over stitch worked. Repeat in the other side (= 4 stitches decreased on row). DECREASE TIP-2 (applies to sleeves): Decrease 1 stitch on each side of marker thread as follows: Work until 3 stitches remain before marker thread and knit 2 together, knit 2 (marker thread is between these stitches), slip 1 stitch knitwise, knit 1, pass slipped stitch over stitch worked. BUTTONHOLES: Decrease for buttonholes on right band (when garment is worn). Decrease from right side when 3 stitches remain on row as follows: Make 1 yarn over, knit the next 2 stitches together, knit last stitch. On next row knit yarn over to make holes. Decrease first buttonhole when rib in neck measures approx. 1½-2 cm. Then decrease the next 6, approx. 7½-8-8½-8½-9-9½ cm between each. ---------------------------------------------------------- START THE PIECE HERE: ---------------------------------------------------------- JACKET - SHORT OVERVIEW OF THE PIECE: Worked back and forth on circular needle, top down. Work sleeves in the round on double pointed needles/a short circular needle. NECK EDGE: Cast on 149-149-157-157-165-165 stitches (including 5 band stitches in garter stitch in each side towards mid front) on circular needle size 3 mm with Muskat. Purl 1 row from wrong side, then work rib as follows from right side: 5 band stitches in GARTER STITCH – read explanation above, knit 1, A.1 (choose diagram for your size) over the first 28-28-30-30-32-32 stitches, knit 1, (purl 2/knit 2) over the next 8 stitches, purl 2, knit 1, A.1 over the next 28-28-30-30-32-32 stitches, knit 1, A.1 over the next 28-28-30-30-32-32 stitches, knit 1, (purl 2/knit 2) over the next 8 stitches, purl 2, knit 1, A.1 over the next 28-28-30-30-32-32 stitches, knit 1, 5 band stitches in garter stitches. Continue back and forth like this until A.1 has been worked vertically = 145-145-153-153-161-161 stitches. Remember BUTTONHOLES - read explanation above. YOKE: Switch to circular needle size 4 mm. Now work pattern as follows: 5 band stitches in garter stitch, knit 1, make 1 yarn over, A.2 (choose diagram for your size) over the next 27-27-29-29-31-31 stitches (= left front piece), make 1 yarn over, knit 12, make 1 yarn over (= sleeve), A.2 over the next 27-27-29-29-31-31 stitches, make 1 yarn over, knit 1 (= middle stitch on back piece), make 1 yarn over, A.2 over the next 27-27-29-29-31-31 stitches (= back piece), make 1 yarn over, knit 12, make 1 yarn over (= sleeve), A.2 over the next 27-27-29-29-31-31 stitches, make 1 yarn over, knit 1, 5 band stitches in garter stitch (= right front piece). 8 stitches have been increased for RAGLAN - read explanation above. Continue pattern back and forth like this and increase every other row 20-24-26-30-35-38 times in total = 305-337-361-393-441-465 stitches. REMEMBER THE KNITTING TENSION! Continue with the same increase for raglan on sleeves 4-4-5-3-0-1 more times (= 24-28-31-33-35-39 increases in total on sleeve). On front pieces and back piece now work pattern A.3 and A.4, to continue with a EYELET ROW – read explanation above, on every other row as before without increases. The remaining stitches are worked in pattern as before. When all increases are done there are 321-353-381-405-441-469 stitches on row. Piece measures approx. 21-23-25-27-29-31 cm from cast-on edge and down mid front. Work next row from wrong side as follows: Work the first 53-57-61-65-72-75 stitches (= front piece), slip the next 60-68-74-78-82-90 stitches on a stitch holder (= sleeve), cast on 8-8-10-10-12-14 new stitches on needle (= in the side under sleeves), work the next 95-103-111-119-133-139 stitches (= back piece), slip the next 60-68-74-78-82-90 stitches on a stitch holder (= sleeve), cast on 8-8-10-10-12-14 new stitches on needle (= in the side under sleeves), work the remaining 53-57-61-65-72-75 stitches on needle (= front piece). NOW MEASURE PIECE FROM HERE! BODY: = 217-233-253-269-301-317 stitches. Insert a marker thread in the middle of the new stitches cast-on under the sleeves (= 4-4-5-5-6-7 new stitches on each side of marker thread). Move the marker thread upwards when working. Continue pattern back and forth as before, i.e. work as follows (from right side): 5 band stitches in garter stitch, stocking stitch until A.2, make 1 yarn over, work A.2 over the next 27-27-29-29-31-31 stitches, stocking stitch over the next 8-8-10-10-12-14 stitches and decrease at the same time 1 stitch on each side of marker thread in the side – read DECREASE TIP-1, work A.2 over the next 27-27-29-29-31-31 stitches, make 1 yarn over, stocking stitch until next repetition A.2, make 1 yarn over, work A.2 over the next 27-27-29-29-31-31 stitches, stocking stitch over the next 8-8-10-10-12-14 stitches and decrease at the same time 1 stitch on each side of marker thread – remember DECREASE TIP-1, A.2 over the next 27-27-29-29-31-31 stitches, make 1 yarn over, stocking stitch until 5 stitches remain, 5 band stitches in garter stitch. 1 stitch has been increased inside A.2 on front pieces and back piece – read INCREASE TIP-1 (= 4 stitches increased), and 1 stitch has been decreased on each side of marker thread in each side (= 4 stitches decreased). I.e. number of stitches will be constant. Continue decrease and increase like this on every other row 31-31-34-34-37-38 times in total, until entire pattern has been decreased in the side. When stitches are decreased in the side, work as many stitches of the pattern that fit. I.e. when there is no room to work decrease and yarn over in lace pattern in A.2, work stocking stitch over these stitches. When entire pattern in the side has been decreased, piece measures approx. 22-22-24-24-26-27 cm from division. Now work stocking stitch and 5 band stitches in garter stitch in each side until piece measures 28 cm from division (= approx. 6-6-4-4-2-1 cm with stocking stitch after pattern in the side). Now increase 31-35-39-39-43-47 stitches evenly = 248-268-292-308-344-364 stitches. Switch to circular needle size 3 mm. Work rib as follows: 5 band stitches in garter stitch, (knit 2/purl 2) until 7 stitches remain on row, knit 2, 5 band stitches in garter stitch. When rib measures 4 cm, cast off with knit over knit and purl over purl. Make sure that the cast-off edge is not too tight. Use a larger needle size when casting off. Jacket measures approx. 56-58-60-62-64-66 cm from shoulder and down. SLEEVE: Slip the 60-68-74-78-82-90 stitches from stitch holder in one side of piece back on a short circular needle/double pointed needles size 4 mm and pick in addition up 1 stitch in each of the 8-8-10-10-12-14 new stitches cast on in the side under sleeve = 68-76-84-88-94-104 stitches. Insert a marker thread in the middle of the 8-8-10-10-12-14 new stitches cast-on (= 4-4-5-5-6-7 new stitches on each side of marker thread). Work in stocking stitch in the round. When sleeve measures 4-4-4-3-3-2 cm, decrease 1 stitch on each side of marker thread under sleeves - read DECREASE TIP-2. Decrease like this every 0-4-2-1½-1-1 cm 1-4-7-7-9-12 times in total (only 1 decrease in size S) = 66-68-70-74-76-80 stitches. When sleeve measures 29-28-26-25-23-22 cm, increase 6-8-6-6-8-8 stitches evenly on round = 72-76-76-80-84-88 stitches. Switch to double pointed needles size 3 mm. Work rib (knit 2/purl 2) in the round for 3 cm. Cast off stitches with knit over knit and purl over purl. Make sure that the cast-off edge is not too tight. Use a larger needle size when casting off. Sleeve measures approx. 32-31-29-28-26-25 cm. Work another sleeve the same way. ASSEMBLY: Sew the buttons on to left band. |
|||||||||||||||||||||||||
Diagram explanations |
|||||||||||||||||||||||||
|
|||||||||||||||||||||||||
 |
|||||||||||||||||||||||||
 |
|||||||||||||||||||||||||
 |
|||||||||||||||||||||||||
 |
|||||||||||||||||||||||||
Have you finished this pattern?Tag your pictures with #dropspattern #sweetheatherjacket or submit them to the #dropsfan gallery. Do you need help with this pattern?You'll find 28 tutorial videos, a Comments/Questions area and more by visiting the pattern on garnstudio.com. © 1982-2026 DROPS Design A/S. We reserve all rights. This document, including all its sub-sections, has copyrights. Read more about what you can do with our patterns at the bottom of each pattern on our site. |
|||||||||||||||||||||||||


With over 40 years in knitting and crochet design, DROPS Design offers one of the most extensive collections of free patterns on the internet - translated to 17 languages. As of today we count 324 catalogues and 12290 patterns translated into English (UK/cm). 12290
We work hard to bring you the best knitting and crochet have to offer, inspiration and advice as well as great quality yarns at incredible prices! Would you like to use our patterns for other than personal use? You can read what you are allowed to do in the Copyright text at the bottom of all our patterns. Happy crafting!
Post a comment to pattern DROPS 201-19
We would love to hear what you have to say about this pattern!
If you want to leave a question, please make sure you select the correct category in the form below, to speed up the answering process. Required fields are marked *.