
Popular categories
Looking for a yarn?


Comments / Questions (15)
![]() Harriet wrote:
Harriet wrote:
This pattern doesn't say how much yarn you need for each size!
14.02.2024 - 13:49DROPS Design answered:
Dear Harriet, you will find the requested amount of yarn under the header, ie in Size S for example you will need 350 g DROPS Sky / 50 g a ball = 7 balls. Happy knitting!
14.02.2024 - 16:29
![]() Cecilia wrote:
Cecilia wrote:
No entiendo esto: recoger 1 punto en cada uno de los 10-10-12-12-14-16 puntos montados bajo la manga
04.06.2022 - 01:01DROPS Design answered:
Hola Cecilia. Puedes ver la técnica en el siguiente link: https://www.garnstudio.com/video.php?id=59&lang=es.
04.06.2022 - 16:56
![]() Raquel wrote:
Raquel wrote:
Muchas gracias por vuestro trabajo. He hecho varios proyectos de Drops y estoy muy satisfecha con los resultados. Tengo una duda con este, ¿se puede hacer este patrón con un solo hilo?
03.05.2022 - 09:38DROPS Design answered:
Hola Raquel, si quieres seguir el patrón, tendrías que trabajar con un solo hilo de una lana del grupo D (Melody); para trabajar con un solo hilo de Sky tendrías que recalcular el número de puntos.
05.05.2022 - 21:34
![]() Christine wrote:
Christine wrote:
Bonjour. Je confirme le commentaire de Sandrine sur l'échantillon. J'ai rencontré exactement le même problème, le mien faisait 18 mailles pour 10 cm. Que ce soit avec des aiguilles 7 ou 6 (le numéro n'est pas précisé pour l'échantillon du modèle), il est impossible d'obtenir les 13 mailles pour 10 cm.
28.01.2022 - 16:51
![]() Sandrine wrote:
Sandrine wrote:
Je tiens à signaler que mon échantillon est assez différent de celui annoncé. Je suis à 15 mailles et 20 rangs pour 10 cm. C'est assez inhabituel, j'ai rarement une telle différence. Je tricote donc ce beau modèle que je tiens vraiment à porter, en XXL au lieu de M/L.
15.04.2021 - 10:47
![]() Katarina Elisabeth Nordlund wrote:
Katarina Elisabeth Nordlund wrote:
Hej! Kan jag använda drops karisma till denna kofta??? Mvh Katarina
14.09.2020 - 20:41DROPS Design answered:
Hej Katarina. Karisma tillhör garngrupp B så det ska gå bra att använda det garnet istället ( 2 trådar). Koftan kommer bli tyngre eftersom DROPS Sky är ett lättare garn, bara så du tänker på det. Se bara till att få den stickfasthet som står i mönstret och att beräkna riktig garnåtgång. Mvh DROPS Design
15.09.2020 - 07:32
![]() Catherine wrote:
Catherine wrote:
J'aurais souhaité faire ce modèle en alpaca et en fil simple. Pouvez-vous m'indiquer le nombre de pelotes nécessaires et quelle quantité de mailles dois-je faire pour commencer l'ouvrage ? En vous remerciant
11.03.2020 - 13:04DROPS Design answered:
Bonjour Catherine, ce modèle a été écrit sur la base d'un échantillon de 13 x 15 rangs = 10 x 10 cm; soit avec 2 fils du groupe B (= Sky) soit avec 1 fil du groupe D (plus d'infos sur les alternatives- si vous avez un autre échantillon, il vous faudra entièrement recalculer les explications (cf FAQ. Nous ne sommes malheureusement pas en mesure de pouvoir réécrire chaque modèle pour répondre à chaque demande, mais vous pouvez contacter votre magasin ou un forum tricot; Merci pour votre compréhension. Bon tricot!
11.03.2020 - 13:59
![]() Isabelle wrote:
Isabelle wrote:
Bonjour, merci pour votre réponse. Mais vos explications ne correspondent pas à ce que je peux lire des diagramme : vous dites : A.3 (qui se termine par 1 jeté aux rangs 1 et 3), or sur le diagramme de ce gilet A3 commence par 1 jeté aux rangs 1 et 3. A.4. C’est l.inverse également pour A.2 qui fini par 1 jeté aux rangs 1 et 3. Par ailleurs je ne comprends pas comment se fonts les trous sur chaque devant. Merci.
24.11.2019 - 19:44DROPS Design answered:
Bonjour Isabelle, le 1er rang des diagrammes se tricote sur l'endroit; ainsi on lit A.3 de droite à gauche au 1er rang: ex en taille S-M-L: on tricote 12 m: 2 m end, 1 m env, 3 m end, 1 m env, 3 m end, 1 m env, 1 m end, 1 jeté (= on a maintenant 13 m). Les jetés des manches se font après la m end du début de la manche et avant la m end de la fin de la manche, donc pas dans A.3 ni A.4. Les trous que l'on voit sur la photo sont les augmentations du raglan: côté devant par ex. c'est le jeté au début de A.1/ à la fin de A.1 (devant gauche), et celui après A.2 (qui n'est pas dans le diagramme = augmentation manche). Bon tricot!
25.11.2019 - 10:30
![]() Isabelle wrote:
Isabelle wrote:
Bonjour, j’ai commencé le tricot mais j’ai l’impression qu’il faut lire les indications de chaque diagramme de droite vers la gauche. Est ce bien cela? Ce qui me fait dire cela c’est lorsque je lis qu’il y a « + 1 maille de chaque côté de la maille du milieu dos (A4) » donc le cycle A3 doit se terminer par le jeté puis A4 puis A2 qui commence avec 1 jeté. Est ce que ma lecture est correcte? Merci
11.11.2019 - 19:21DROPS Design answered:
Bonjour Isabelle, les diagrammes se lisent de gauche à droite sur l'endroit et de droite à gauche sur l'envers. Au début du dos on tricote: A.3 (qui se termine par 1 jeté aux rangs 1 et 3), A.4 (= 1 m pendant 4 rangs) et A.2 (qui commence par 1 jeté aux rangs 1 et 3). Bon tricot!
12.11.2019 - 08:21
![]() Dekkers Natalie wrote:
Dekkers Natalie wrote:
Hallo! Ik kom met het proeflapje niet uit ik kom met naaldgrote 8 op 13 steken op 18 rijen voor 10 bij 10 en niet op 15 rijen. Op 7 ook geprobeerd daar word het veels te klein. Vierkante naalden geprobeerd. Heb nog nooit een patroon omgerekend. Heb wel jullie wol gekocht Sky mix maar in kleur nummer 17. Snap er niks van heb gewoon los gebreid.
04.07.2019 - 17:12DROPS Design answered:
Dag Natalie,
Het is natuurlijk het mooist als de stekenverhouding in de hoogte ook klopt, maar het is het belangrijkst dat hij in de breedte klopt. In dit patroon kun je na het breien van de meerderingen voor de raglan doorbreien in textuurpatroon tot je op de juiste lengte bent om het werk te splitsen voor het lijf en de mouwen (zie paragraaf die boven 'LIJF' staat), dus waarschijnlijk zal dit niet een probleem zijn, zolang de stekenverhouding in de breedte maar overeenkomt.
08.07.2019 - 11:11
|
||||||||||
Autumn Spice Cardigan#autumnspicecardigan |
||||||||||
 |
 |
|||||||||
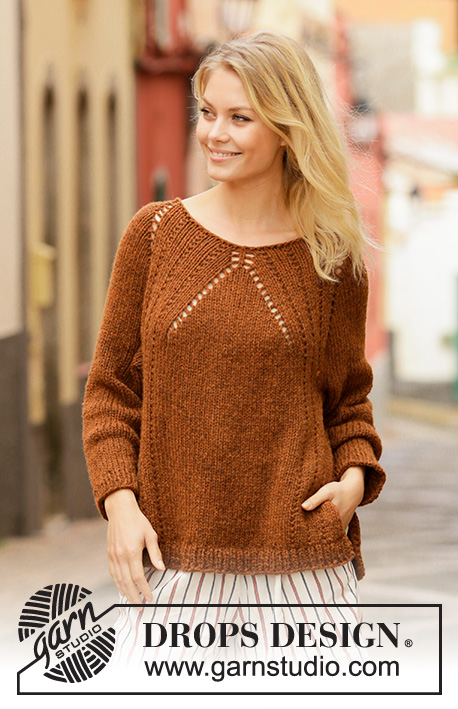
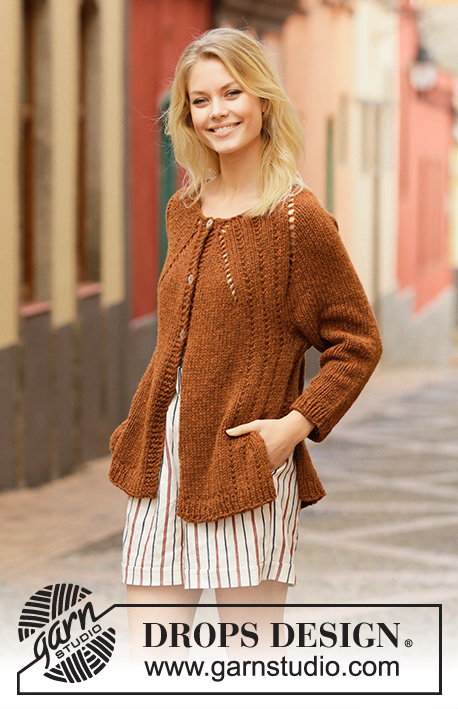
Knitted jacket with raglan in 2 strands DROPS Sky. The piece is worked top down with texture and split in sides. Sizes S - XXXL.
DROPS 202-14 |
||||||||||
|
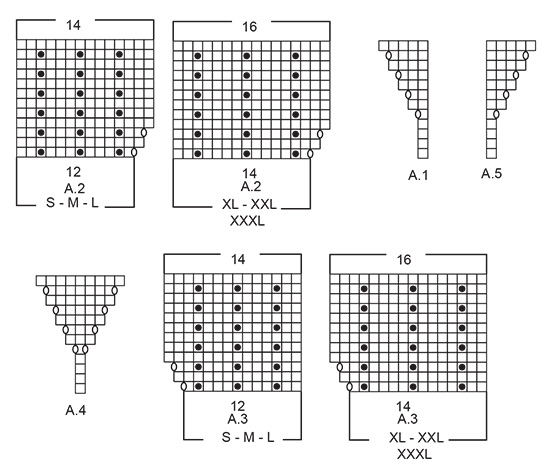
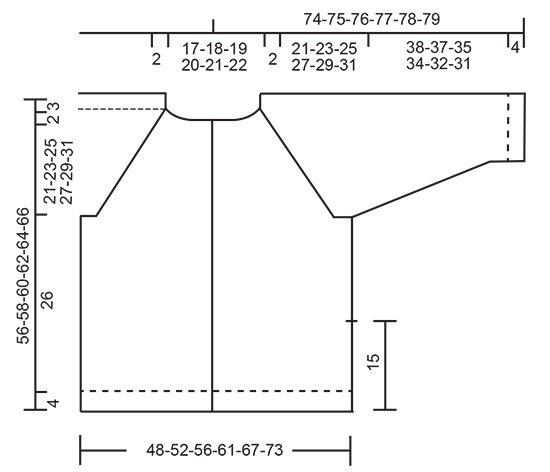
------------------------------------------------------- EXPLANATIONS FOR THE PATTERN: ------------------------------------------------------- RIDGE/GARTER STITCH (worked back and forth): Knit all rows. 1 ridge in height = Knit 2 rows. PATTERN: See diagrams A.1 to A.5. Choose diagram for your size. INCREASE TIP (evenly spaced): To work out how to increase evenly, count the total number of stitches on needle (e.g. 63 stitches), minus garter stitch on each side (e.g. 4 stitches), and divide the remaining stitches by number of increases to be made (e.g. 10) = 5.9. In this example, increase by making 1 yarn over after approx. each 6th stitch. On the next row work the yarn overs twisted to avoid holes. . RAGLAN (for sleeves): All increases are worked from the right side! Increase 1 stitch after/before the marker thread on the sleeves as follows: Work to the first marker thread, knit 1, 1 yarn over, work to 1 stitch before the next marker thread, 1 yarn over, knit 1. Repeat on other sleeve = 4 stitches increased on row. On the next row (wrong side) purl the yarn overs to leave holes. Then work the new stitches in stocking stitch. DECREASE TIP (for sleeves): Decrease 1 stitch on each side of marker thread as follows: Work until there are 3 stitches left before marker thread, knit 2 together, knit 2 (marker thread sits between these 2 stitches), slip 1 stitch as if to knit, knit 1 and pass the slipped stitch over the knitted stitch (= 2 stitches decreased). BUTTONHOLES: Work buttonholes on right band (when garment in worn). Work from the right side when there are 3 stitches left before the edge as follows: Make 1 yarn over, knit 2 together and knit 1. On the next row knit the yarn over to leave a hole. The first buttonhole is worked when the neck measures approx. 1½-2 cm. Then work the other 4-4-5-5-5-5 buttonholes with approx. 10-10-9-9-10-10 cm between each one. ------------------------------------------------------- START THE PIECE HERE: ------------------------------------------------------- JACKET - SHORT OVERVIEW OF THE PIECE: The piece is worked back and forth with circular needle, top down. The sleeves are worked with short circular needle/double pointed needles, top down. JACKET: NECK: Cast on 69-71-75-77-79-81 stitches with circular needle size 6 mm and 2 strands Sky. Work as follows: ROW 1 (wrong side): Knit. ROW 2 (right side): Knit. ROW 3: Work 4 band stitches in GARTER STITCH – read description above, purl until there are 4 stitches left on row, 4 band stitches in garter stitch. Remember BUTTONHOLE! YOKE: Change to circular needle size 7 mm. Work pattern as follows - Remember BUTTONHOLES: 4 band stitches in garter stitch, A.1 over the next stitch, A.2 (choose diagram for your size) over the next 12-12-12-14-14-14 stitches, insert a marker thread here (= left front piece), knit 1, 1 yarn over, knit 3-4-6-3-4-5 stitches, 1 yarn over, knit 1, insert a marker thread here (= sleeve), A.3 (choose diagram for your size) over the next 12-12-12-14-14-14 stitches, A.4 over the next stitch (= mid-stitch at back), A.2 over the next 12-12-12-14-14-14 stitches, insert a marker thread here (= back piece), knit 1, 1 yarn over, knit 3-4-6-3-4-5 , 1 yarn over, knit 1, insert a marker thread here (= sleeve), A.3 over the next 12-12-12-14-14-14 stitches, A.5 over the next stitch, 4 band stitches in garter stitch (= right front piece). You have now increased 1 stitch to RAGLAN – read description above, on each side of the sleeves (= 4 stitches increased), 1 stitch on each side of the mid-stitch (A.4) on the back piece (= 2 stitches increased) and 1 stitch inside A.1/A.5 and the band on the front pieces (= 2 stitches increased) = 77-79-83-85-87-89 stitches. REMEMBER THE KNITTING TENSION! Continue back and forth like this and increase to raglan on the sleeves every 2nd row 14-16-16-19-19-19 more times (a total of 15-17-17-20-20-20 times), AT THE SAME TIME when the diagrams have been completed in height, repeat the last 2 rows 8-10-12-13-16-19 more times (i.e. until there are 25-29-33-35-41-47 stitches in stocking stitch between A.3 and A.2 on the back piece and 13-15-17-18-21-24 stitches stocking stitch between the band and A.2/A.3 on the front pieces = 185-203-215-233-247-261 stitches. Continue with texture over the 14-14-14-16-16-16 stitches in A.2 and A.3, garter stitch over the 4 band stitches on each side towards mid front and stocking stitch over the remaining stitches until the piece measures 23-25-27-29-31-33 cm, measured from the cast-on edge and down mid front. The next row from the wrong side is worked as follows: Work pattern as before over the first 31-33-35-38-41-44 stitches (= right front piece), place the next 35-40-42-45-46-47 stitches on a thread for sleeve, cast on 10-10-12-12-14-16 stitches on the needle (= in side under sleeve), work the next 53-57-61-67-73-79 stitches (= back piece), place the next 35-40-42-45-46-47 stitches on a thread for sleeve, cast on 10-10-12-12-14-16 stitches on the needle (= in side under sleeve) and work the remaining 31-33-35-38-41-44 stitches (= left front piece). THE PIECE IS NOW MEASURED FROM HERE! BODY: = 135-143-155-167-183-199 stitches. Insert a marker thread in the middle of the new stitches cast on under each sleeve (= 5-5-6-6-7-8 new stitches on each side of the marker thread). Work pattern as before over the 14-14-14-16-16-16 stitches in A.2 and A.3, work garter stitch over the middle 4 stitches on each side (i.e. 2 stitches in garter stitch on each side of both marker threads) and 4 band stitches in garter stitch on each side towards mid front as before. The remaining stitches on the row are worked in stocking stitch. When the piece measures 15 cm from the division, place the first and last 36-38-41-44-48-52 stitches on a thread for right and left front pieces = 63-67-73-79-87-95 stitches left on needle. Now finish the front and back pieces separately to give a split in the sides. BACK PIECE: There are now 63-67-73-79-87-95 stitches on the back piece. Work A.2/A.3, stocking stitch and 2 stitches in garter stitch on each side as before. When the piece measures 26 cm from the division, increase 10-10-10-12-14-14 stitches evenly spaced – read INCREASE TIP = 73-77-83-91-101-109 stitches. Change to circular needle size 6 mm and work rib (knit 1, purl 1) with 2 edge stitches in garter stitch on each side. When the rib measures 4 cm cast off with knit over knit and purl over purl. Make sure the cast-off edge is not tight; you can increase a needle size when casting off if this is a problem. The jacket measures approx. 56-58-60-62-64-66 cm from the shoulder down. RIGHT FRONT PIECE: Place the stitches from the thread back on circular needle size 7 mm = 36-38-41-44-48-52 stitches. Work A.3, 4 band stitches in garter stitch, 2 stitches in garter stitch towards the side and stocking stitch over the remaining stitches. When the piece measures 26 cm from the division (adjust to match the back piece) increase 5-5-6-7-7-7 stitches evenly spaced – remember INCREASE TIP = 41-43-47-51-55-59 stitches. Change to circular needle size 6 mm and work rib (knit 1, purl 1) with 4 band stitches in garter stitch on the one side and 2 stitches in garter stitch on the other. When the rib measures 4 cm cast off with knit over knit and purl over purl. Make sure the cast-off edge is not tight; you can increase a needle size when casting off if this is a problem. The jacket measures approx. 56-58-60-62-64-66 cm from the shoulder down. LEFT FRONT PIECE: Work in the same way as right front piece. SLEEVE: Place the 35-40-42-45-46-47 stitches from the thread on the one side of the piece on short circular needle/double pointed needles size 7 mm and knit up 1 stitch in each of the 10-10-12-12-14-16 stitches cast on under the sleeve = 45-50-54-57-60-63 stitches. Insert 1 marker thread in the middle of the new stitches (= 5-5-6-6-7-8 new stitches on each side of the marker thread). Work stocking stitch in the round. When the piece measures 4-4-3-5-4-3 cm from the division decrease 2 stitches mid under sleeve – read DECREASE TIP. Decrease like this every 4-3-3-2-2-2 cm a total of 8-10-11-12-12-13 times = 29-30-32-33-36-37 stitches. Continue working until the sleeve measures 38-37-35-34-32-31 cm from the division (shorter measurements in larger sizes due to wider neck and longer yoke). Knit 1 round where you increase 5-6-6-7-8-9 stitches evenly spaced = 34-36-38-40-44-46 stitches. Change to double pointed needles size 6 mm and work rib (knit 1, purl 1) for 4 cm. Cast off with knit over knit and purl over purl. Make sure the cast-off edge is not tight; you can make 1 yarn over after each 6th stitch at the same time as you cast off (yarn overs cast off as normal stitches). The sleeve measures approx. 42-41-39-38-36-35 cm from the division. Work the other sleeve in the same way. ASSEMBLY: Sew buttons onto left band. |
||||||||||
Diagram explanations |
||||||||||
|
||||||||||
 |
||||||||||
 |
||||||||||
Have you finished this pattern?Tag your pictures with #dropspattern #autumnspicecardigan or submit them to the #dropsfan gallery. Do you need help with this pattern?You'll find 25 tutorial videos, a Comments/Questions area and more by visiting the pattern on garnstudio.com. © 1982-2026 DROPS Design A/S. We reserve all rights. This document, including all its sub-sections, has copyrights. Read more about what you can do with our patterns at the bottom of each pattern on our site. |
||||||||||


With over 40 years in knitting and crochet design, DROPS Design offers one of the most extensive collections of free patterns on the internet - translated to 17 languages. As of today we count 324 catalogues and 12290 patterns translated into English (UK/cm). 12290
We work hard to bring you the best knitting and crochet have to offer, inspiration and advice as well as great quality yarns at incredible prices! Would you like to use our patterns for other than personal use? You can read what you are allowed to do in the Copyright text at the bottom of all our patterns. Happy crafting!
Post a comment to pattern DROPS 202-14
We would love to hear what you have to say about this pattern!
If you want to leave a question, please make sure you select the correct category in the form below, to speed up the answering process. Required fields are marked *.