
Popular categories
Looking for a yarn?


Comments / Questions (174)
![]() Suzie wrote:
Suzie wrote:
Merci et bonne journée
16.09.2021 - 04:04
![]() Suzie wrote:
Suzie wrote:
Bonjour, pourriez-vous m'expliquer çà sert à quoi une réhausse pour l'encolure dos ?
15.09.2021 - 05:14DROPS Design answered:
Bonjour Suzie, volontiers, une réhausse permet de tricoter quelques rangs supplémentaires (en raccourcis) sur la partie dos du pull et ainsi obtenir une hauteur supplémentaire sur la partie dos du pull, l'encolure dos est ainsi plus haute que l'encolure devant. Cette vidéo pourra vous aider à visualiser l'effet. Bon tricot!
15.09.2021 - 07:17
![]() Janet Minns wrote:
Janet Minns wrote:
I have DROPS pattern 195-19. Sizes S-M-L-XL-XXL-XXXL. Can you tell me the finished garment size for these please, before I decide what to make. Thank you
19.05.2021 - 16:08DROPS Design answered:
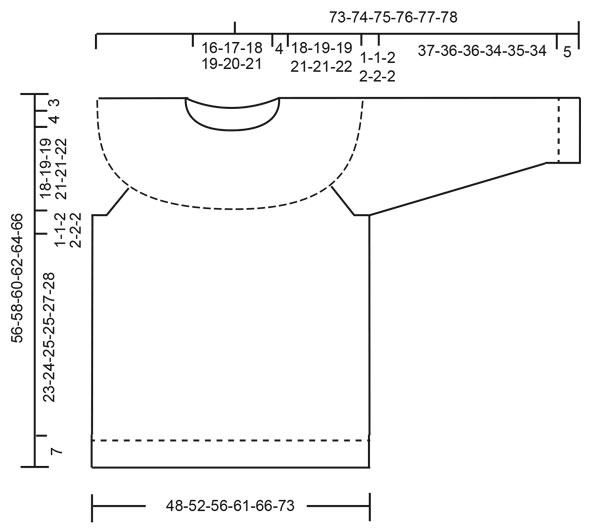
Dear Janet, the sizes of the finished item (in centimeters) can be found on the schematic drawing below the pattern, at the bottom of the diagrams. Happy Knitting!
19.05.2021 - 19:30
![]() Margie wrote:
Margie wrote:
Bonjour, Pourquoi débuter les bords côte avec un certain nombre de mailles et diminuer ensuite pour continuer en jersey ; comment se fait ce calcul.
14.05.2021 - 20:12DROPS Design answered:
Bonjour Margie, il faut davantage de mailles pour la même largeur lorsque l'on tricote en côtes avec des aiguilles plus fines qu'il vous faudra ensuite pour tricoter le jersey avec les aiguilles plus grosses, raison pour laquelle on doit diminuer après les côtes. Bon tricot!
17.05.2021 - 08:39
![]() Emilie Benhaim wrote:
Emilie Benhaim wrote:
Bonjour, Je suis perplexe car le patron indique que le jacquard commence après avoir assemblé les manches et le buste, mais sur la photo, le jacquard a l'air de commencer bien plus bas. Et cela me parait determinant par rapport à la longueur du buste car effectivement 30cm me parait court. Mais si le jacquard tombe sur la poitrine comme sur la photo, 30cm seraient suffisants. Pouvez-vous m'éclairer ? Merci,
14.05.2021 - 16:35DROPS Design answered:
Bonjour Mme Benhaim, le jacquard ne se tricote effectivement que sur l'empiècement, après avoir tricoté quelques tours de diminutions pour le raglan. Si votre échantillon est juste, vous obtiendrez les mesures indiquées dans le schéma. Bon tricot!
17.05.2021 - 08:30
![]() Elle wrote:
Elle wrote:
Hei! Er denne mulig å strikke med drops air?
23.04.2021 - 17:52DROPS Design answered:
Hei Elle, Drops Air er et garn fra gruppe C, så er tykkere. Du må da strikke en prøvelapp og endre antall masker og rad tilsvarende. Ikke så enkelt, men det kan gjøres. Det er lettere å erstatte med et annet garn fra samme gruppen. God fornøyelse!
26.04.2021 - 08:20
![]() Petra Schaller wrote:
Petra Schaller wrote:
So wie ich die Anleitung verstehe, ist der angegebene Schnitt bzw. Zeichnung nicht korrekt. Man nimmt ja über 40 Maschen ab nach dem Rippenmuster oder?
21.02.2021 - 19:40DROPS Design answered:
Liebe Frau Schaller, In die 1. Größe nehmen Sie 40 M nach dem Rippenmuster ab = es sind jetzt 200 M und jetzt stricken Sie mit den grösseren Nadeln glatt rechts. So bekommt man die gewünschte Breite (Umfang), denn man braucht mehr Maschen mit den kleineren Nadeln für das Rippenmuster als mit den grösseren Nadelnd für das glatt rechts. Oder vielleicht misverstehe ich Ihre Frage?
22.02.2021 - 09:09
![]() Eija Bergström wrote:
Eija Bergström wrote:
Hei! Mikä olisi korvaava lanka Drops Karismalle?
16.02.2021 - 10:51DROPS Design answered:
DROPS Karisma kuuluu lankaryhmään B, voit korvata langan millä tahansa tähän lankaryhmään kuuluvalla langalla. Kokeile esim. DROPS Lima- tai DROPS Sky-lankaa.
09.03.2021 - 17:02
![]() Tonia wrote:
Tonia wrote:
Liebes Drops Team, gibt es bei Ihnen Pflegesymbol-Schildchen zum Einnähen für die jeweilige Wolle zu kaufen? Das wäre super, damit man bei mehreren mit unterschiedlicher Wolle gestrickten Pullovern weiß, welcher in die Waschmaschine darf und welcher nicht.
10.02.2021 - 08:14DROPS Design answered:
Liebe Tonia, die Pflegesymbol finden Sie auf die Banderolle, vielleicht kann Ihnen aber Ihr DROPS Laden noch weiterhelfen. Viel Spaß beim stricken!
10.02.2021 - 08:43
![]() Edith wrote:
Edith wrote:
I would like to knit this pattern in Drops Nepal, can i do this by changing the needle size please?
09.02.2021 - 09:43DROPS Design answered:
Dear Edith, your tension would be completely different, the pattern wouldn't match and you should edit to follow your tension to get correct measurements. Read more about altternative yarns here. You can look for an alternative like Lima -same yarn group as Karisma or then for a similar pattern in Nepal (or yarn group C). Happy knitting!
09.02.2021 - 14:42
|
|||||||||||||||||||
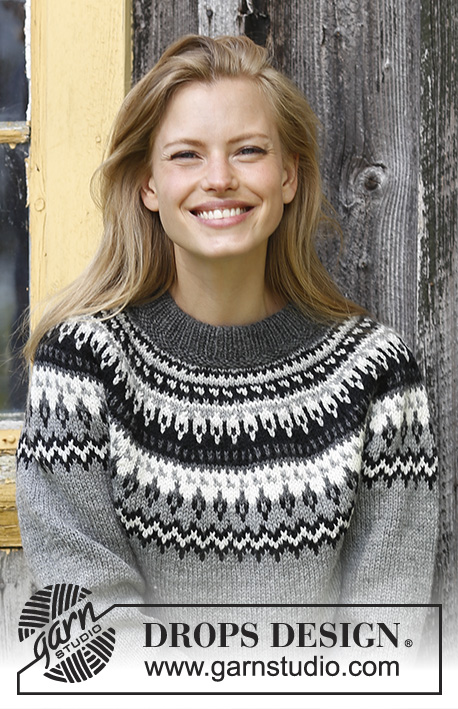
Night Shades#nightshadessweater |
|||||||||||||||||||
 |
 |
||||||||||||||||||
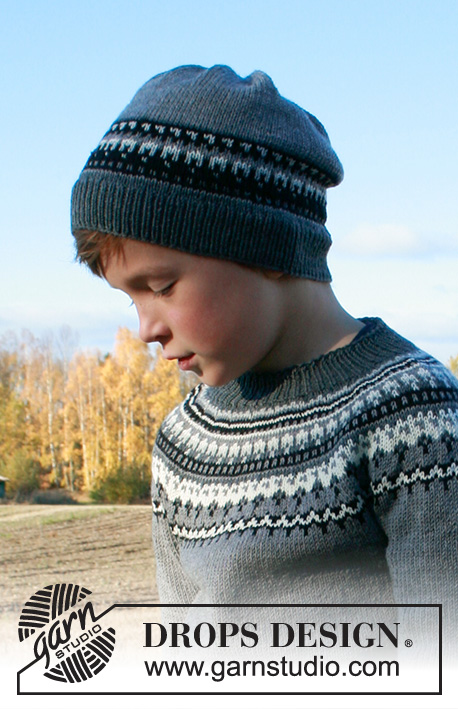
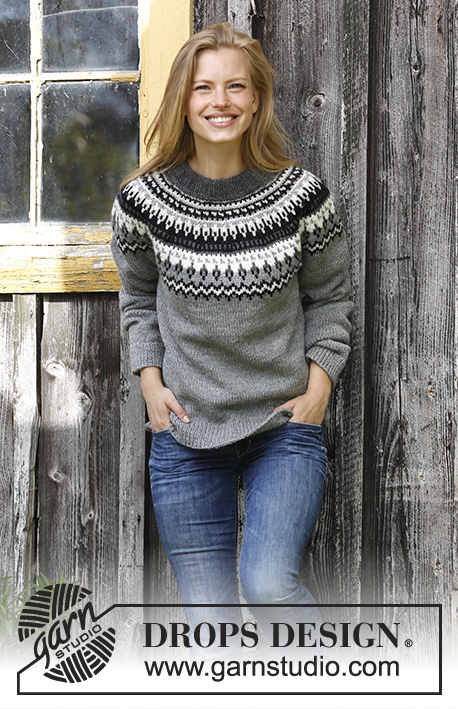
Knitted jumper round yoke in DROPS Karisma. Piece is knitted bottom up with Nordic pattern. Size: S - XXXL
DROPS 195-19 |
|||||||||||||||||||
|
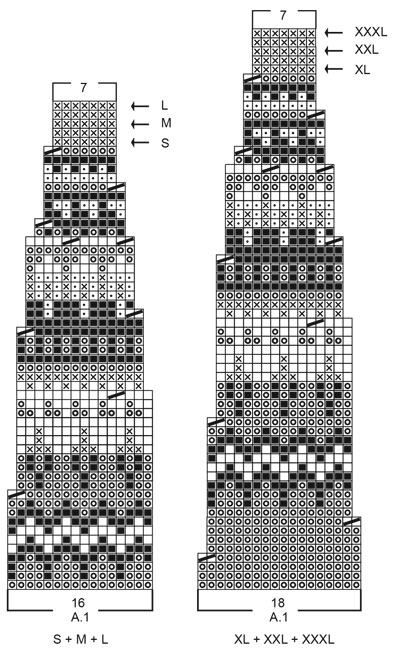
EXPLANATION FOR THE PATTERN: ---------------------------------------------------------- GARTER STITCH (worked in the round): 1 ridge = 2 rounds. Knit 1 round and purl 1 round. PATTERN: Jumper: See diagram A.1. Choose diagram for your size. Work the entire pattern in stocking stitch. KNITTING TIP: To avoid the knitting tension to tighten when working pattern with several colours, it is important not to tighten the strands on back side of piece. Switch to a higher needle number when working pattern if the pattern is somewhat tight. INCREASE TIP (applies to under sleeves): Work until 1 stitch remains before marker, make 1 yarn over, knit 2 (marker is in the middle of these 2 stitches), make 1 yarn over (= 2 stitches increased). On next round knit yarn overs twisted to avoid holes. DECREASE/INCREASE TIP (evenly): To calculate how to decrease/increase evenly, use the total number of stitches on row (e.g. 240 stitches) and divide stitches by number of decreased/increases to be done (e.g. 40) = 6. In this example knit approx. every 5th and 6th stitch together. When increasing make 1 yarn over after every 6th stitch. On next round knit yarn over twisted to avoid holes. RAGLAN: Decrease for raglan on each side of marker in every transition between sleeves and body. Begin 2 stitches before marker, knit 2 together, marker is here, slip 1 stitch knitwise, knit 1, pass slipped stitch over stitch worked (= 2 stitches decreased). ELEVATION IN BACK OF NECK: For better shape work an elevation in the back of neck with dark grey. Insert 1 marker mid back of neck. Knit until 14-15-16-15-16-18 stitches past marker have been worked, turn, tighten yarn and purl 28-30-32-30-32-36 stitches. Turn and knit 42-45-48-45-48-54 stitches, turn, tighten yarn and purl 56-60-64-60-64-72 stitches back. Turn and knit 70-75-80-75-80-90 stitches, turn, tighten yarn and purl 84-90-96-90-96-108 stitches back. Turn piece, tighten yarn and knit until mid back. ---------------------------------------------------------- START THE PIECE HERE: ---------------------------------------------------------- JUMPER - SHORT OVERVIEW OF THE PIECE: Work piece in the round on circular needle, bottom up. Work sleeves in the round on double pointed needles. BODY: Cast on 240-262-282-306-334-366 stitches on circular needle size 3 mm with medium grey. Work rib (knit 1/purl 1) for 7 cm. Knit 1 round while decreasing 40-44-46-50-56-60 stitches evenly - read DECREASE/INCREASE TIP = 200-218-236-256-278-306 stitches. Switch to circular needle size 4 mm. Continue in stocking stitch. Insert 1 marker at the beginning of round and 1 marker after 100-109-118-128-139-153 stitches (= in the sides). REMEMBER THE KNITTING TENSION! When piece measures 30-31-32-32-34-35 cm, cast off 8-8-10-10-12-14 stitches in each side for armholes (i.e. cast off 4-4-5-5-6-7 stitches on each side of both markers) = 92-101-108-118-127-139 stitches remain on front and back piece. Put piece aside and work the sleeves. SLEEVE: Cast on 58-58-64-64-64-72 stitches on double pointed needles size 3 mm with medium grey. Work rib (= knit 1/purl 1) for 5 cm. Knit 1 round while decreasing 10-10-10-10-10-12 stitches evenly = 48-48-54-54-54-60 stitches. Insert 1 marker at beginning of round (= mid under sleeve). Switch to double pointed needles size 4 mm and work in stocking stitch in the round. When piece measures 9-9-9-7-9-8 cm, increase 2 stitches mid under sleeve - read INCREASE TIP. Increase like this every 7th-6th-7th-6th-5th-5th round 12-14-12-14-16-16 times in total = 72-76-78-82-86-92 stitches. When piece measures 42-41-41-39-40-39 cm (NOTE: Shorter measurements in the larger sizes because of wider shoulders), cast off the middle 8-8-10-10-12-14 stitches under sleeve = 64-68-68-72-74-78 stitches remain on needle. Put piece aside and knit another sleeve. YOKE: Slip sleeves on to same circular needle as body where armholes were cast off = 312-338-352-380-402-434 stitches on needle. Insert 1 marker in every transition between sleeves and body = 4 markers. Work stocking stitch with medium grey. AT THE SAME TIME on next round decrease for RAGLAN – see explanation above (= 8 stitches decreased). Decrease like this every other round 2-2-3-3-3-3 times in total = 296-322-328-356-378-410 stitches. After last round with decrease knit 1 round while decreasing 24-34-24-32-36-32 stitches evenly = 272-288-304-324-342-378 stitches remain on needle. Then work pattern according to diagram A.1 (choose diagram for correct size = 17-18-19-18-19-21 repetitions on round). Read KNITTING TIP! Continue pattern like this and decrease as shown in diagram. When A.1 has been worked (finish after a round marked with arrow in diagram for correct size), there are 119-126-133-126-133-147 stitches on needle and piece measures approx. 56-58-60-62-64-66 cm from shoulder and down. For better fit work an elevation at the back of neck so that yoke is somewhat higher on back piece. This elevation can be skipped, to make the neck the same at the front and back - read ELEVATION. NECK EDGE: Knit 1 round with dark grey while decreasing 25-30-35-26-29-39 stitches evenly = 94-96-98-100-104-108 stitches around the neck edge. Switch to a short circular needle size 3 mm. Work 2 ridges in GARTER STITCH - see explanation above, AT THE SAME TIME on last round increase 22-22-24-26-26-26 stitches evenly = 116-118-122-126-130-134 stitches. Then work rib = knit 1/purl 1. When rib measures 8 cm, work 1 ridge in garter stitch. Loosely cast off - make sure that the cast-off edge is not too tight. Fold neck edge double and sew on the inside, ridge against ridge. ASSEMBLY: Sew the openings under the sleeves. |
|||||||||||||||||||
Diagram explanations |
|||||||||||||||||||
|
|||||||||||||||||||
 |
|||||||||||||||||||
 |
|||||||||||||||||||
Have you finished this pattern?Tag your pictures with #dropspattern #nightshadessweater or submit them to the #dropsfan gallery. Do you need help with this pattern?You'll find 31 tutorial videos, a Comments/Questions area and more by visiting the pattern on garnstudio.com. © 1982-2026 DROPS Design A/S. We reserve all rights. This document, including all its sub-sections, has copyrights. Read more about what you can do with our patterns at the bottom of each pattern on our site. |
|||||||||||||||||||


With over 40 years in knitting and crochet design, DROPS Design offers one of the most extensive collections of free patterns on the internet - translated to 17 languages. As of today we count 324 catalogues and 12290 patterns translated into English (UK/cm). 12290
We work hard to bring you the best knitting and crochet have to offer, inspiration and advice as well as great quality yarns at incredible prices! Would you like to use our patterns for other than personal use? You can read what you are allowed to do in the Copyright text at the bottom of all our patterns. Happy crafting!
Post a comment to pattern DROPS 195-19
We would love to hear what you have to say about this pattern!
If you want to leave a question, please make sure you select the correct category in the form below, to speed up the answering process. Required fields are marked *.