
Popular categories
Looking for a yarn?


Comments / Questions (39)
![]() Patrycja wrote:
Patrycja wrote:
Dzień dobry, czy jeżeli użyję do tego wzoru włóczki Kid Silk, używam wtedy tego samego rozmiaru drutów, oraz posługuję się tym samym wzorem (Ilość oczek, cm)? Oczywiście wiem, ze jeżeli zamieniam włóczkę air na kid silk to wtedy biorę 2 nitki tej cieńszej.
19.03.2025 - 15:20DROPS Design answered:
Witaj Patrycjo, najważniejsza będzie próbka, jeżeli będzie zgodna, to możesz bez problemu posłużyć się tym wzorem (liczba oczek, cm, itd.). Jeśli nie, spróbuj zmienić rozmiar drutów, tak aby próbka się zgodziła. Ważna jest również sama struktura dzianiny. Jeśli okaże się, że Ci nie odpowiada, to może warto dodać np. 1 jeszcze jedną dodatkową nitkę Kid-Silka (czyli 3 nitki razem). Pozdrawiamy!
20.03.2025 - 08:15
![]() Ana wrote:
Ana wrote:
Buenos días, en la espalda no me quedan 70 puntos después de disminuir 1 punto a cada lado 5 veces serían 20 los puntos disminuidos y me quedan 60 puntos, menos 4 puntos disminuidos en la sisa me quedan 56 cuando cierro 26 para el cuello me quedan solamente 10 puntos para los hombros, podéis decirme que estoy haciendo mal ? Muchas gracias.
06.02.2021 - 09:37
![]() Venche wrote:
Venche wrote:
Skal det virkelig strikkes vrangbånd på pinne 7 på bol og halskant, mens pinne 4 på ermer ?
25.01.2021 - 11:59DROPS Design answered:
Hei Venche. Ja, det stemmer. Siden det er ballongermer på denne modellen, skal vrangborden på ermene være stramme. mvh DROPS design
27.01.2021 - 16:24
![]() Rosemarie Ambrose wrote:
Rosemarie Ambrose wrote:
I want to make the sweater in a worsted yarn. How do I convert to the proper gauge.? Knitting needle size 6 and 8. Please help if you can. Thank you.
09.01.2021 - 23:02DROPS Design answered:
Dear Mrs Ambrose, we are unfortunately not able to adjust every pattern to every single request - please contact the store where you bought the yarn for any individual assistance; thanks for your comprehension. Happy knitting!
11.01.2021 - 08:53
![]() Kathi wrote:
Kathi wrote:
Hallo, meine Maschenprobe war mit 7mm viel zu klein, daher hab ich mit 8mm noch mal eine gemacht. Nun komme ich in der Breite mit 14 Maschen auf 9cm und in der Höhe mit den angegebenen 17 Reihen auf genau 10cm. Kann ich dann mit der 8mm Nadel Stricken oder soll ich noch eine dickere Nadel versuchen? LG, Kathi
09.01.2021 - 22:35DROPS Design answered:
Liebe Kathi, versuchen Sie zuerst, Ihre Maschenprobe zu waschen und flach liegend trocknen lassen (= genauso wie beim den fertigen Pullover), und prüfen Sie mal wieder die Maschenprobe, sollte es immer zu klein sein, dann versuchen Sie mit dickeren Nadeln - hier lesen Sie mehr über Maschenprobe. Viel Spaß beim stricken!
11.01.2021 - 08:52
![]() Marika VERGINIS wrote:
Marika VERGINIS wrote:
Liebes Drops Team! Ich verstehe in der Anleitung folgenden Part nicht: in dieser Weise alle 6 cm insgesamt 5 x abnehmen... vielen Dank Marika
09.12.2020 - 20:44DROPS Design answered:
Liebe Frau Verginis, bei 8 cm haben Sie 1 Maschen beidseitig abgenommen (= total 2 Maschen bei dieser Reihe). Diese Abnahmen sollen Sie noch 4 Mal in jede 6. cm wiederholen (= 5 Mal insgesamt x 2 Abnahmen = 10 Maschen werden insgesamt abgenommen). Viel Spaß beim stricken!
10.12.2020 - 09:01
![]() Sarah P wrote:
Sarah P wrote:
I want to make the sleeves in English rib but straight without the baloon effect. Can you advice on stitches to Inc/decrease before the English rib a end of English rib to get a straight/normal sleeve right size sleeve ?
03.10.2020 - 15:16DROPS Design answered:
Dar Sarah P, we are unfortunately not able to adjust every pattern to every single request - you can swatch to check the request width and calculate new amount of stitches you needo for the width you would like to have. You can also get helped and inspired from a pattern with sleeves like you like them to be. Happy knitting!
05.10.2020 - 09:24
![]() Dominika wrote:
Dominika wrote:
Hei! Der det står: Når arbeidet måler 35-36-37-38-39-40 cm, felles det av 2-2-4-6-6-8 masker til ermehull på starten av de 2 neste pinnene = 66-69-73-76-84-89 masker. Jeg skjønte ikke helt hvordan dette skal gjøres. Jeg innså nå at jeg har brukt felletips 1 i to omganger slik man skulle gjøre tidligere. Men det er vel feil?
04.08.2020 - 21:15DROPS Design answered:
Hei Dominica, Man skal felle av her (ikke som beskrevet i tips, men som man gjør når man feller av på slutten av stykket). God fornøyelse!
05.08.2020 - 08:09
![]() Lorjelyn Celis wrote:
Lorjelyn Celis wrote:
Ik begrijp het niet hoe je de achterpand in een rondbreinaald moet doen en dan ook nog eens de voorpand apart ook in een rondbreinaald 7mm?
09.07.2020 - 22:59
![]() Weronica wrote:
Weronica wrote:
Jeg er helt ny strikker.. hva betyr 1 maske rille? Skjønner ikke bæra 🤔
28.06.2020 - 19:04DROPS Design answered:
Hei. Det betyr at du strikker den masken ret på retsiden och ret på vrangsiden när du strikker frem og tillbake. Mvh DROPS Design
29.06.2020 - 13:33
|
|
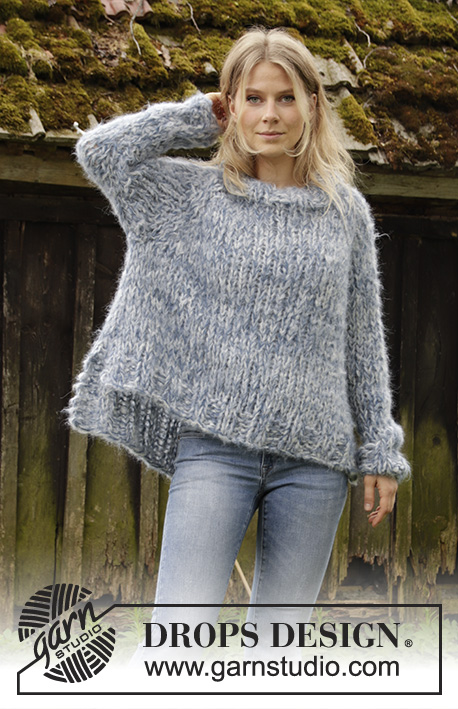
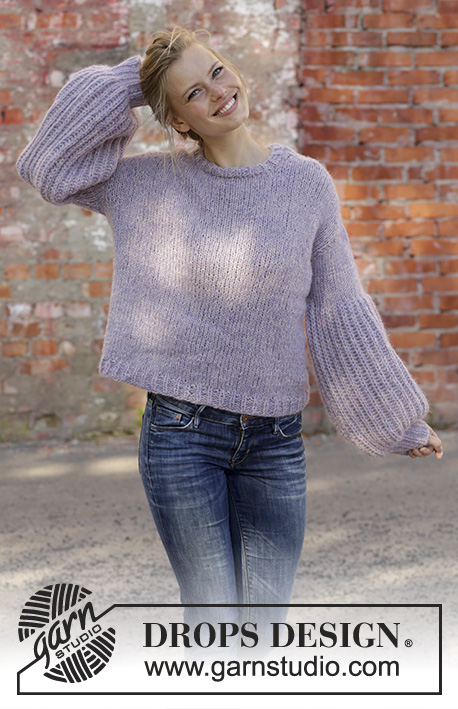
Bewitched#bewitchedsweater |
|
 |
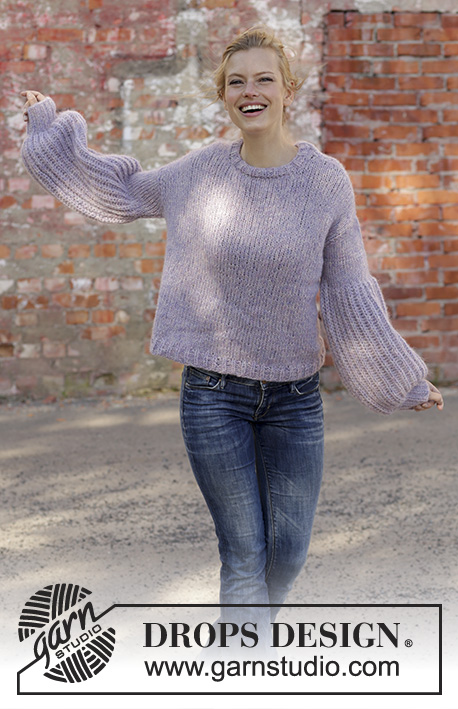 |
Knitted jumper in DROPS Air with English rib. Sizes S - XXXL.
DROPS 194-21 |
|
|
------------------------------------------------------- EXPLANATIONS FOR THE PATTERN: ------------------------------------------------------- RIDGE/GARTER STITCH (worked back and forth): 1 ridge = Knit 2 rows. DECREASE TIP-1 (for sides of front/back piece): All decreases are made from the right side! Work 1 edge stitch in garter stitch, knit 1, slip 1 stitch as if to knit, knit 1, pass the slipped stitch over the knitted stitch (= 1 stitch decreased), knit until there are 4 stitches left, knit 2 together (= 1 stitch decreased), knit 1 and finish with 1 edge stitch in garter stitch. DECREASE TIP-2 (for neck on front piece): Decrease 1 stitch after the 1 stitch as follows: slip 1 stitch as if to knit, knit 1, pass the slipped stitch over the knitted stitch (= 1 stitch decreased). Decrease 1 stitch before the 1 stitch as follows: Work until there are 3 stitches left on the row, knit 2 together (= 1 stitch decreased) and finish with knit 1. INCREASE TIP (evenly spaced): To work out how to increase evenly, count the total number of stitches on the needle (e.g. 44 stitches) and divide by the number of increases to be made (e.g. 11) = 4. In this example, increase by making 1 yarn over after approx. each 4th stitch. On the next round work the yarn overs twisted to avoid holes. ENGLISH RIB: ROW 1: 1 stitch in garter stitch, * knit 1, 1 yarn over, slip 1 stitch as if to purl *, work from *-* until there are 2 stitches left, finish with knit 1 and 1 stitch in garter stitch. ROW 2: 1 stitch in garter stitch, * 1 yarn over, slip 1 stitch as if to purl, knit together the yarn over and the slipped stitch *, work from *-* until there are 2 stitches left, finish with 1 yarn over, slip 1 stitch as if to purl and 1 stitch in garter stitch. ROW 3: 1 stitch in garter stitch, * knit the yarn over and slipped stitch together, 1 yarn over, slip 1 stitch as if to purl *, work from *-* until there are 3 stitches left (including the yarn over), knit the yarn over and slipped stitch together, 1 stitch in garter stitch. Repeat rows 2 and 3 upwards. ------------------------------------------------------- START THE PIECE HERE: ------------------------------------------------------- JUMPER - SHORT OVERVIEW OF THE PIECE: The piece is worked back and forth with circular needle. The front and back pieces are worked separately. The sleeves are worked back and forth with circular needle. The neck is worked in the round with circular needle. BACK PIECE: Cast on 80-83-89-98-104-113 stitches (including 1 edge stitch in each side of the piece) with circular needle size 7 mm and Air. Work rib (= knit 1 / purl 2) with 1 edge stitch in garter stitch in each side of the piece. When the rib measures 4 cm, continue with stocking stitch and 1 edge stitch in garter stitch in each side. REMEMBER THE KNITTING TENSION! When the piece measures 8 cm decrease 1 stitch inside the 2 stitches in each side of the piece – read DECREASE TIP-1. Decrease like this every 6-6-9-6-9-9 cm a total of 5-5-4-5-4-4 times = 70-73-81-88-96-105 stitches. When the piece measures 35-36-37-38-39-40 cm, cast off 2-2-4-6-6-8 stitches for the armholes at the beginning of the next 2 rows = 66-69-73-76-84-89 stitches. Work stocking stitch with 1 edge stitch in garter stitch in each side of the piece. When the piece measures 48-50-52-54-56-58 cm cast off the middle 26-27-29-30-32-33 stitches for neck = 20-21-22-23-26-28 stitches left on each shoulder. Each shoulder is finished separately. Continue with stocking stitch and 1 edge stitch in garter stitch as before until the piece measures 52-54-56-58-60-62 cm from the cast-on edge. Cast off with knit. Work the other shoulder in the same way. FRONT PIECE: Cast on and work as for back piece until the piece measures 42-44-44-46-46-48 cm = 66-69-73-76-84-89 stitches. Now cast off the middle 20-21-23-24-26-27 stitches for neck and each shoulder is finished separately = 23-24-25-26-29-31 stitches left on each shoulder. On the next row from the right side decrease 1 stitch inside 1 stitch for neck – read DECREASE TIP-2! Decrease like this every 2nd row a total of 3 times = 20-21-22-23-26-28 stitches. Work stocking stitch with 1 edge stitch in garter stitch as before until the piece measures 52-54-56-58-60-62 cm from the cast-on edge. Cast off with knit. Work the other shoulder in the same way. SLEEVE: The sleeve is worked back and forth with circular needle. Cast on 44-47-47-50-50-53 stitches (including 1 edge stitch in each side of the piece) with circular needle size 4 mm and Air. Work rib (= knit 1, purl 2) with 1 edge stitch in garter stitch in each side of the piece. When the rib measures 7 cm, adjust so that the next row is from the right side, work 1 more row of rib but, AT THE SAME TIME increase 11-12-12-13-13-14 stitches evenly on row – read INCREASE TIP = 55-59-59-63-63-67 stitches. Purl 1 row from the wrong side with 1 edge stitch in garter stitch in each side. Change to circular needle size 7 mm and work ENGLISH RIB – read description above. Continue until the piece measures 39 cm. Now continue with stocking stitch and 1 edge stitch in garter stitch in each side AT THE SAME TIME as on the first row you decrease 5-7-4-5-2-3 stitches evenly on row = 50-52-55-58-61-64 stitches. Cast off when the sleeve measures 51-51-51-50-49-48 cm. Work the other sleeve in the same way. ASSEMBLY: Sew shoulder seams in outermost loop of outermost stitch. Sew in the sleeves, inside the 1 edge stitch. Sew sleeve and side seams inside the 1 edge stitch. NECK: Knit up approx. 63 to 84 stitches with circular needle size 7 mm (make sure the number of stitches is divisible by 3). Work rib (= knit 1, purl 2) in the round over all stitches for 2 cm. Then cast off with knit over knit and purl over purl. |
|
 |
|
Have you finished this pattern?Tag your pictures with #dropspattern #bewitchedsweater or submit them to the #dropsfan gallery. Do you need help with this pattern?You'll find 27 tutorial videos, a Comments/Questions area and more by visiting the pattern on garnstudio.com. © 1982-2026 DROPS Design A/S. We reserve all rights. This document, including all its sub-sections, has copyrights. Read more about what you can do with our patterns at the bottom of each pattern on our site. |
|


With over 40 years in knitting and crochet design, DROPS Design offers one of the most extensive collections of free patterns on the internet - translated to 17 languages. As of today we count 324 catalogues and 12290 patterns translated into English (UK/cm). 12290
We work hard to bring you the best knitting and crochet have to offer, inspiration and advice as well as great quality yarns at incredible prices! Would you like to use our patterns for other than personal use? You can read what you are allowed to do in the Copyright text at the bottom of all our patterns. Happy crafting!
Post a comment to pattern DROPS 194-21
We would love to hear what you have to say about this pattern!
If you want to leave a question, please make sure you select the correct category in the form below, to speed up the answering process. Required fields are marked *.