
Popular categories
Looking for a yarn?


Comments / Questions (8)
![]() Judy wrote:
Judy wrote:
On my screen above the diagrams the symbol for the instruction =between 2 stitches make 1 yarn over....that makes the hole there is a blue question mark not a symbol I am fairly certain that the question mark should be '0' in a rectangle is this correct?. Sorry it is difficult to explain it is the 3rd = sign above the diagrams
07.06.2019 - 14:32DROPS Design answered:
Dear Judy, try to refresh you screen, there shouldn't any blue question mark anywhere (we are not using blue in our patterns). The 6th and 7th symbols (from the top) are both yarn overs, but the 6th one will be worked as usual so that it makes a hole, and the 7th symbol will be worked twisted on next row (it shouldn't make a hole) - see both ways to work a yarn over here. Hope it helps! Happy knitting!
07.06.2019 - 14:51
![]() Judy wrote:
Judy wrote:
In the diagram key there is a blue question mark, however it isn't used in the diagram. Should it be the uncoloured oval shape?
07.06.2019 - 10:46DROPS Design answered:
Dear Judy, not sure what you mean exactly, last symbol = arrow for knitting direction shows in the measurement chart that jumper will be worked top down. Did you mean something else?
07.06.2019 - 12:54
![]() Crocus wrote:
Crocus wrote:
Bonjour,Modèle en air. Malheureusement, j\'ai du certainement trop serrer le rang de montage d\'encolure (j\'ai aussi fait la réhausse) et du coup, le tricot frise en peu au niveau du motif (trop d\'ampleur). Je pense que si le rang de montage était moins serré, cela donnerait de la souplesse au reste. Puis-je et comment défaire ce fameux rang et le retricoter?Merci pour votre réponse.
25.11.2018 - 14:30DROPS Design answered:
Bonjour Crocus, vous pouvez défaire l'ouvrage dès le début en utilisant cette technique pour reprendre les mailles de l'encolure et ajustez l'encolure comme vous le souhaitez. Bon tricot!
26.11.2018 - 09:37
![]() Sandy Slichter wrote:
Sandy Slichter wrote:
How much yarn do I need for this pattern in size large? I have chosen the Nepal yarn and the color, the pattern doesn't tell me how much I need to order.
18.10.2018 - 23:51DROPS Design answered:
Dear Mrs Schlichter, you will find amount of yarn under the header, ie 750 g in size L / 50 g a ball Nepal = 15 balls are required in size L. Happy knitting!
19.10.2018 - 08:40
![]() Irena wrote:
Irena wrote:
Piękny! Przytulność i elegancja w jednym! Koniecznie do zrobienia :)
21.07.2018 - 08:27
![]() Aurore wrote:
Aurore wrote:
Ce modèle est tout à fait ravissant, tant en gilet qu'en tunique, j'aime beaucoup. D'autres modèles me plaisent énormément dans votre collection d'hiver, j'ai hâte de pouvoir en réaliser pour moi ou mes filles. Merci d'avance à vous et aux créatrices.
03.07.2018 - 13:02
![]() Uschi wrote:
Uschi wrote:
Sehr schön; Rundpassen sitzen immer so gut
13.06.2018 - 17:14
![]() Uschi wrote:
Uschi wrote:
Der ist besonders apart
07.06.2018 - 16:51
|
|||||||||||||||||||||||||
Cinnamon Flower#cinnamonflowersweater |
|||||||||||||||||||||||||
 |
 |
||||||||||||||||||||||||
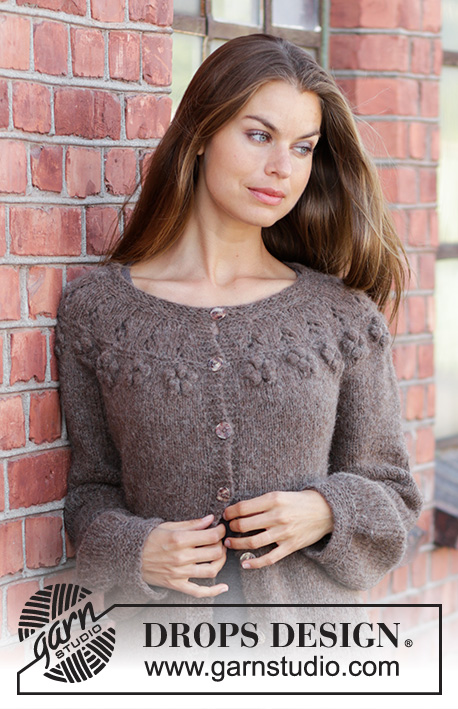
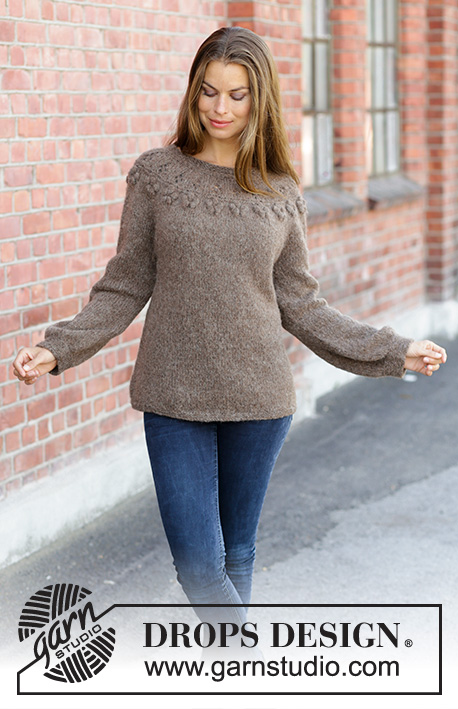
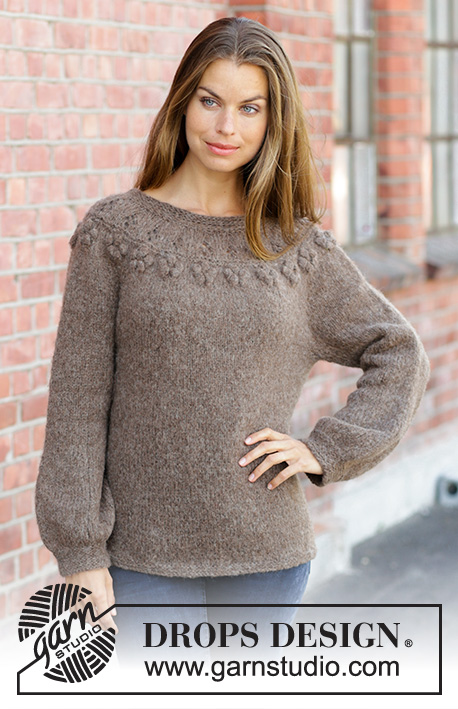
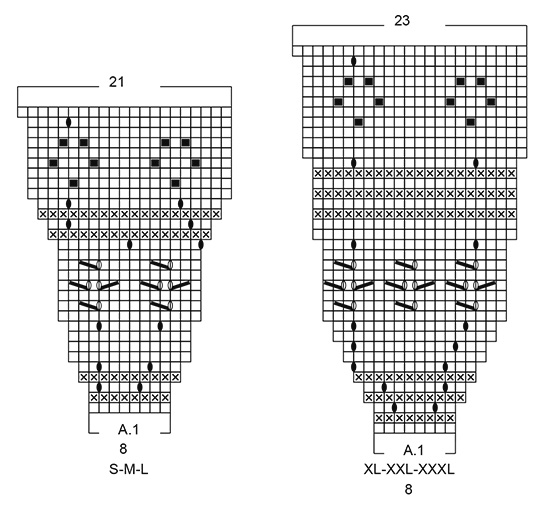
Knitted jumper with round yoke in DROPS Nepal or Air. Piece is knitted top down with lace pattern and bobbles. Size: S - XXXL
DROPS 197-6 |
|||||||||||||||||||||||||
|
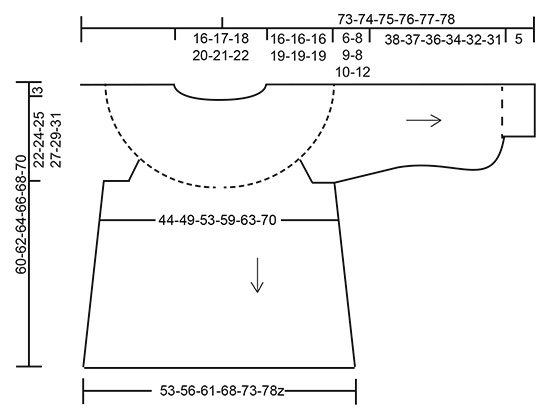
EXPLANATION FOR THE PATTERN: ---------------------------------------------------------- GARTER STITCH (worked in the round): 1 ridge = 2 rounds. Knit 1 round and purl 1 round. ELEVATION (applies to back of neck): Work the elevation in garter stitch. Insert 1 marker thread at beginning of round = approx. mid back. Begin from right side and knit 7-8-8-9-9-10 stitches past marker thread, turn, tighten yarn and knit 14-16-16-18-18-20 stitches. Turn, tighten yarn and knit 21-24-24-27-27-30, turn, tighten yarn and knit 28-32-32-36-36-40. Turn, tighten yarn and knit 35-40-40-45-45-50, turn, tighten yarn and knit 42-48-48-54-54-60. Turn and knit until marker. PATTERN: See diagram A.1. Choose diagram for your size. INCREASE TIP -1 (applies to even distribution): To calculate how to increase evenly, use the total number of stitches on row (e.g. 74 stitches) and divide stitches by number of increases to be done (e.g. 6) = 12.33. In this example increase after approx. every 12th stitch by making 1 yarn over. On next round work yarn overs twisted to avoid holes. INCREASE TIP-2 (applies to raglan): Work until 2 stitches remain before marker, 1 yarn over (= 1 stitch increased), knit 4 (marker is in the middle of these stitches), 1 yarn over (= 1 stitch increased). On next round work yarn over twisted to avoid holes. Then work the new stitches in stocking stitch. INCREASE TIP-3 (applies to sides of body): Work until 2 stitches remain before marker, 1 yarn over, knit 4 (marker is in the middle of these stitches), 1 yarn over. On next round work yarn over twisted to avoid holes. Then work the new stitches in stocking stitch. DECREASE TIP (applies to mid under sleeve): Begin 3 stitches before marker, knit 2 together, knit 2 (marker is between these 2 stitches), slip 1 stitch knitwise, knit 1, pass slipped stitch over stitch worked (= 2 stitches decreased). ---------------------------------------------------------- START THE PIECE HERE: ---------------------------------------------------------- JUMPER - SHORT OVERVIEW OF THE PIECE: Worked top down. Work yoke in the round on circular needle down until piece is divided for body and sleeve, finish each part separately. Continue body in the round on circular needle. Work sleeves in the round on double pointed needles. YOKE: Cast on 70-74-76-82-84-90 stitches on circular needle size 4.5 mm with Nepal or Air. Work ridges in GARTER STITCH - read explanation above, for 1½ cm. Knit 1 round and increase 2-6-4-6-4-6 stitches evenly - read INCREASE TIP-1 = 72-80-80-88-88-96 stitches. Purl 1 round. Switch to circular needle size 5.5 mm. For better fit work an elevation at the back of neck so that yoke is somewhat higher on back piece. This elevation can be skipped, to make the neck the same at the front and back - read ELEVATION. Round starts mid back. Work A.1 (= 8 stitches) 9-10-10-11-11-12 times in total in width. REMEMBER THE KNITTING TENSION! When A.1 has been worked 1 time vertically, there are 189-210-210-253-253-276 stitches on needle. Piece measures approx. 16-16-16-19-19-19 cm from cast-on edge on the shortest. Now insert 4 markers in the piece as follows: Knit 29-31-31-38-39-44 stitches, insert 1 marker (= half back piece), knit 38-43-43-50-48-50 stitches, insert 1 marker (= sleeve), knit 56-62-62-76-78-87 stitches, insert 1 marker (= front piece), knit 38-43-43-50-48-50 stitches, insert 1 marker (= sleeve) and finish by knitting 28-31-31-39-40-45 stitches (= half back piece). Knit 2 rounds. On next round increase 1 stitch on each side of each marker – read INCREASE TIP-2 (= 8 stitches increased in total). Increase like this every other round 3-4-6-4-5-6 times in total = 213-242-258-285-293-324 stitches. Continue with stocking stitch until yoke measures 22-24-25-27-29-31 cm from cast-on edge on the shortest. Now divide the piece for sleeves and body as follows: Knit 32-35-37-42-44-50 (= half back piece), slip the next 44-51-55-58-58-62 stitches on a stitch holder for sleeve and cast on 8-8-10-10-12-12 stitches under sleeve, knit 62-70-74-84-88-99 (= front piece), slip the next 44-51-55-58-58-62 stitches on a stitch holder for sleeve and cast on 8-8-10-10-12-12 stitches under sleeve and finish with knit 31-35-37-43-45-51 (= half back piece) = 141-156-168-189-201-224 stitches. BODY: Insert 1 marker in the middle of the 8-8-10-10-12-12 stitches under each sleeve. Work in stocking stitch. When body measures 3 cm from where body was divided for sleeves, increase 1 stitch on each side of every marker - read INCREASE TIP-3 (= 4 stitches increased in total). Increase like this every 4-4½-4-4-3½-4½ cm 7-6-7-7-8-6 times in total = 169-180-196-217-233-248 stitches. When piece measures 33-33-34-34-34-34 cm from where body was divide from sleeves, switch to circular needle size 4.5 mm and work in garter stitch over all stitches. Cast off by knitting when piece measures 35-35-36-36-36-36 cm from where body was divided from sleeves. SLEEVE: Slip the 44-51-55-58-58-62 stitches from stitch holder in one side of piece on double pointed needles size 5.5 mm and pick up 1 stitch in each of the 8-8-10-10-12-12 stitches under sleeve = 52-59-65-68-70-74 stitches. Insert 1 marker in the middle of the 8-8-10-10-12-12 stitches. Work in stocking stitch in the round. When sleeve measures 3 cm from where sleeve was divided from body, decrease 1 stitch on each side of marker - read DECREASE TIP. Decrease like this every 10-3-3-3-5-5 cm 2-4-4-4-3-3 times in total = 48-51-57-60-64-68 stitches. When sleeve measures 22-21-20-19-17-16 cm from where sleeve was divided from body, increase 8 stitches as follows: Knit 6-6-7-7-8-8, 1 yarn over, * knit 6-6-7-7-8-8, 1 yarn over *, work from *-* 7 times in total and finish with knit 0-3-1-4-0-4 = 56-59-65-68-72-76 stitches. Knit yarn overs twisted on next round to avoid holes. When sleeve measures 24-23-22-21-19-18 cm from where sleeve was divided from body, increase as follows: Knit 7-7-8-8-9-9, 1 yarn over, * knit 7-7-8-8-9-9, 1 yarn over *, work from *-* 7 times in total and finish with knit 0-3-1-4-0-4 = 64-67-73-76-80-84 stitches. When sleeve measures 38-37-36-34-32-31 cm from where sleeve was divided from body, decrease 26-29-33-34-36-40 stitches evenly = 38-38-40-42-44-44 stitches. Switch to double pointed needle size 4.5 mm and work in garter stitch for 5 cm. Sleeve measures 43-42-41-39-37-36 cm from where sleeve was divided from body. Cast off by knitting. Work the other sleeve the same way. |
|||||||||||||||||||||||||
Diagram explanations |
|||||||||||||||||||||||||
|
|||||||||||||||||||||||||
 |
|||||||||||||||||||||||||
 |
|||||||||||||||||||||||||
Have you finished this pattern?Tag your pictures with #dropspattern #cinnamonflowersweater or submit them to the #dropsfan gallery. Do you need help with this pattern?You'll find 30 tutorial videos, a Comments/Questions area and more by visiting the pattern on garnstudio.com. © 1982-2026 DROPS Design A/S. We reserve all rights. This document, including all its sub-sections, has copyrights. Read more about what you can do with our patterns at the bottom of each pattern on our site. |
|||||||||||||||||||||||||


With over 40 years in knitting and crochet design, DROPS Design offers one of the most extensive collections of free patterns on the internet - translated to 17 languages. As of today we count 324 catalogues and 12290 patterns translated into English (UK/cm). 12290
We work hard to bring you the best knitting and crochet have to offer, inspiration and advice as well as great quality yarns at incredible prices! Would you like to use our patterns for other than personal use? You can read what you are allowed to do in the Copyright text at the bottom of all our patterns. Happy crafting!
Post a comment to pattern DROPS 197-6
We would love to hear what you have to say about this pattern!
If you want to leave a question, please make sure you select the correct category in the form below, to speed up the answering process. Required fields are marked *.