
Popular categories
Looking for a yarn?


Comments / Questions (121)
![]() Simone Schmitt wrote:
Simone Schmitt wrote:
Ich strecke das Kleid in Größe 80/86. Im Text steht dass die Muster jeweils in Hin und Rückreihen angegeben sind. In der Legende ist dann erklärt, dass die weißen Kästchen in Hinr. rechts Rückr. links gestrickt werden und die Kreuze i Hinr. links und Rückr. rechts. Was ist also richtig? Wie sollen dann die Musterreihen zurück gestrickt werden? Danke für Ihre Hilfe!
20.07.2025 - 00:35DROPS Design answered:
Liebe Frau Schmitt, alle Reihen sind im Diagram gezeichnet, das Kleid wird zuerst in Runden gestrickt, so lesen Sie alle Reihen rechts nach links = alle sind Hinreihen, dann wird man die Arbeit teilen und in Hin- und Rückreihen fertigstricken, so lesen Sie die Hinreihen immer rechts nach links aber dann die Rückreihen links nach rechts. Viel Spaß beim Stricken!
24.07.2025 - 15:52
![]() Erb wrote:
Erb wrote:
Es ist ein super schönes Kleidchen. Sehr gut beschreiben und es machte riesig Spaß zu stricken
11.04.2025 - 11:02
![]() Kiki wrote:
Kiki wrote:
Volgens mij staat er in de Nederlandse versie van het patroon een fout; bij achterkant, linker schouder staat dat er 3 minderingen gedaan moeten worden, maar dan zou de telling van 8 steken niet meer kloppen. Deze mindering wordt ook niet genoemd in de Engelse versie van het patroon.
26.01.2025 - 22:05
![]() Paskale Fabre wrote:
Paskale Fabre wrote:
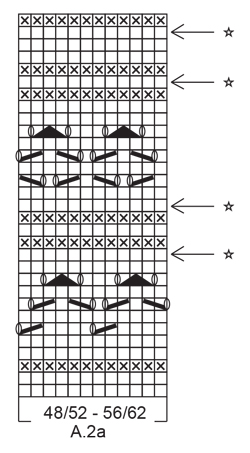
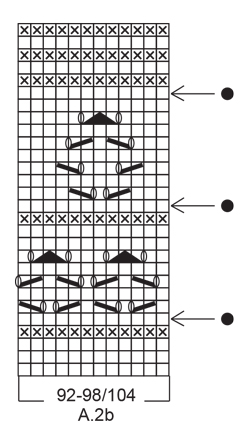
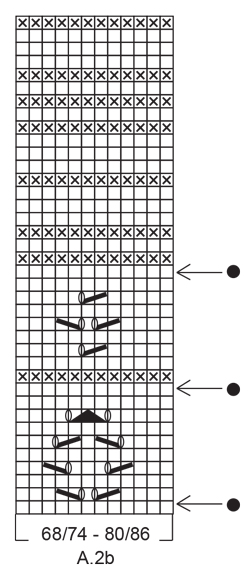
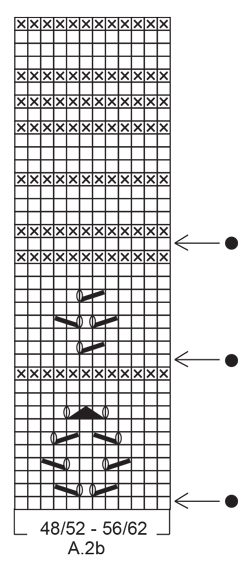
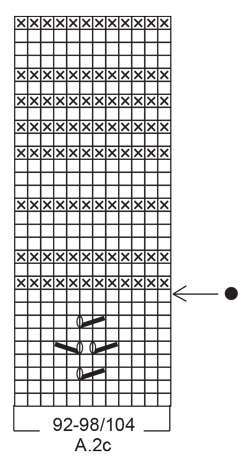
Bonjour, je ne comprends pas le A2. J’imagine qu’il faut tricoter le A2a puis le A2b mais dans ce cas il manque un morceau, à savoir les motifs en forme de chevrons au milieu de la robe. Je tricote dans la taille 56/62. Pouvez-vous m’éclairer à ce sujet s’il vous plaît? Merci beaucoup
23.01.2025 - 14:53DROPS Design answered:
Bonjour Mme Fabre, effectivement, pour tricoter A.2, vous commencez par A.2a et tricotez ensuite A.2b (lisez les diagrammes de haut en bas, l'un après l'autre), les chevrons ajourés sont dans la 1ère partie de A.2a. Bon tricot!
24.01.2025 - 07:47
![]() Gila Kreuter wrote:
Gila Kreuter wrote:
Hallo liebes Drops Team, vielen Dank für die vielen tollen Anleitungen und die wunderbare Wolle! Ich stricke das Kleid in Größe 98/104 mit der original Wolle und Nadeln Nr 3, die Breite stimmt mit dem Diagramm überein, aber ich habe bei 35 cm Höhe schon das 4. Knäuel Wolle anfangen müssen (zum Glück hatte ich eins mehr bestellt!) Vielleicht können Sie die Materialangaben nochmal überprüfen. Liebe Grüße, Gila Kreuter
16.01.2025 - 11:14
![]() Ornella wrote:
Ornella wrote:
Salve, sto lavorando la taglia 56/62, dopo aver eseguito i primi 12 passaggi del motivo A2b e fatte le 12 diminuzioni, il secondo motivo non è allineato al primo, come devo procedere?
10.12.2024 - 10:44
![]() Delia wrote:
Delia wrote:
Scusate, ho trovato da sola risposta al quesito precedente...stavo sbagliando tutto! Disfo e rifaccio! Grazie per i vostri modelli, uno più bello dell'altro!
27.10.2024 - 16:18
![]() Delia wrote:
Delia wrote:
Buonasera. Se il primo giro del diagramma A.2a è a diritto mi trovo a fare il motivo traforato (per la taglia 92) e le diminuzioni nei giri pari (a rovescio) a differenza di ciò che si fa in A.1. Ma è giusto così o è stato aggiunto un giro in più nel diagramma per sbaglio (il giro 4 secondo me)? Grazie per la risposta
24.10.2024 - 19:18DROPS Design answered:
Buonasera Delia, con la lavorazione in tondo non c'è diritto e rovescio del lavoro, è come se si lavorasse sempre sul diritto. Buon lavoro!
27.10.2024 - 23:57
![]() Cécile wrote:
Cécile wrote:
Bonjour Je ne comprends pas au moment des emmanchures, il est écrit tricoter 9 m au pt mousse (ok) puis tricoter en point fantaisie/au pt mousse comme avant. Que signifie tricoter au pt fantaisie /pt mousse? Merci
25.06.2024 - 17:29DROPS Design answered:
Bonjour Cécile, le point fantaisie correspond aux diagrammes A.1 et A.2, autrement dit, lorsque vous tricotez la bordure des emmanchures au point mousse, tricotez les autres mailles comme avant, en suivant A.2. Bon tricot!
26.06.2024 - 07:38
![]() Victori wrote:
Victori wrote:
Jeg forstår ikke oppskriften helt. Jeg er på bakstykket og skal felle av til hals. Det står i oppskriften at jeg skal gjøre det samme som forstykket. Men det er jo forskjellige fellingstall på fram og bakre til hals og skuldre. Skal jeg felle av 4 ganger på fram og bare 2 bak for at fellingstallet og riktig antall masker til skuldre skal bli riktig? Jeg holder på med størrelse 1/3 mnd.
12.05.2024 - 10:18DROPS Design answered:
Hei Victori, Du strikker bakstykket først (før forstykket), og feller av riktig antall masker for din størrelse i midten av raden, når arbeidet er riktig lengden. Forstykket er strikket til en annen lengde og med annerledes antall masker felt til halsen. God fornøyelse!
13.05.2024 - 06:43
|
|||||||||||||||||||||||||
Serafina#serafinadress |
|||||||||||||||||||||||||
 |
 |
||||||||||||||||||||||||
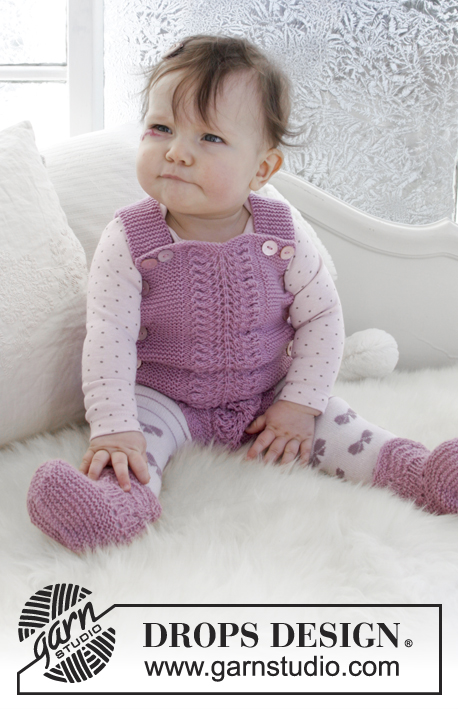
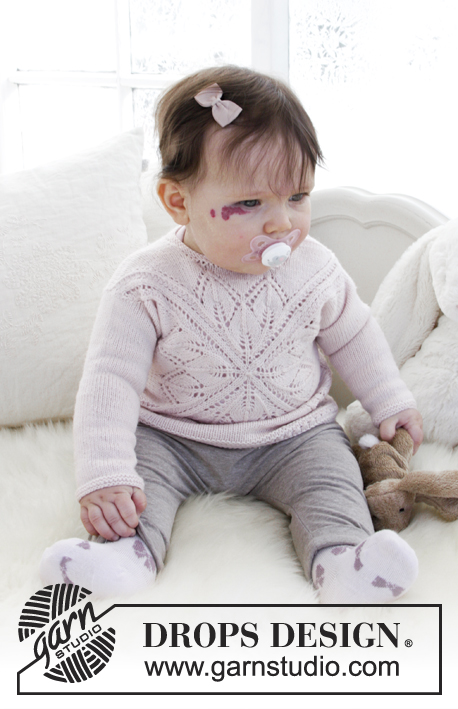
Knitted dress with lace pattern and garter stitch for baby. Size 0 - 4 years Piece is knitted in DROPS Alpaca.
DROPS Baby 31-17 |
|||||||||||||||||||||||||
|
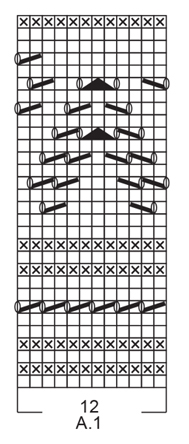
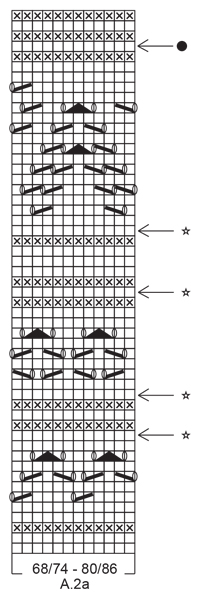
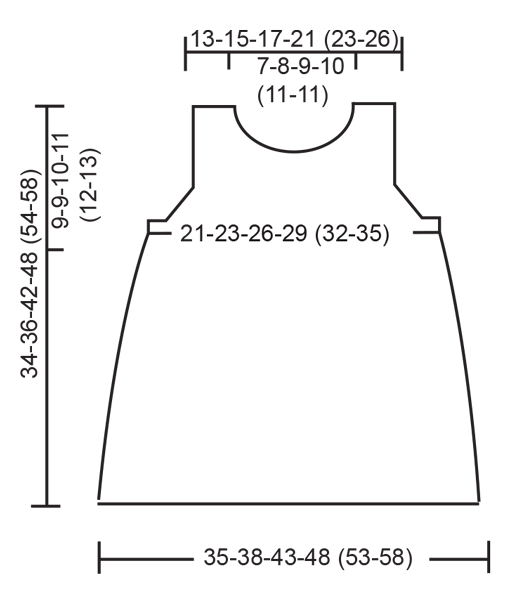
INFORMATION FOR PATTERN: GARTER STITCH (worked in the round): 1 ridge = 2 rounds. Knit 1 round and purl 1 round. GARTER STITCH (back and forth): 1 ridge = knit 2 rows. PATTERN: See diagrams A.1 and A.2 (first A.2a, then A.2b and A.2c). Choose diagram for your size. Diagrams show all rows in pattern seen from the right side. DECREASE TIP-1 (applies evenly spaced decrease): To calculate how to decrease evenly, use the total number of stitches on row (e.g. 168 stitches) and divide stitches by number of decreases to be done (e.g. 6) = 28. In this example work approx. every 27th and 28th stitch together. DECREASE TIP-2 (applies to armholes): Decrease inside 3 edge stitches in garter stitch. All decreases are done from the right side. Decrease before 3 edge stitches as follows: Knit 2 together. Decrease after 3 edge stitches as follows: Slip 1 stitch knitwise, knit 1, pass slipped stitch over stitch worked. ---------------------------------------------------------- DRESS: Worked in the round on circular needle up to armhole, then work front and back piece back and forth separately. Neck edge is worked back and forth on needle. BODY: Cast on 168-180-204-228 (252-276) stitches on circular needle size 3 mm with Alpaca. Insert 1 marker at beginning of round and 1 marker after 84-90-102-114 (126-138) stitches, markers indicates side of garment. Then work A.1 (= 12 stitches) over all stitches (= 14-15-17-19 (21-23) times in width). REMEMBER THE KNITTING TENSION! When A.1 has been worked 1 time vertically, piece measures approx. 8 cm. Then work A.2 (= 12 stitches) over all stitches (= 14-15-17-19 (21-23) times in width). On rounds marked with arrow decrease stitches evenly - read DECREASE TIP-1. For every time 12 stitches are decreased in total, work 1 repetition less of A.2 in width. When all decreases are done, there are 108-120-132-156 (156-180) stitches on needle (= 54-60-66-78 (78-90) stitches on each side of marker). READ ALL OF THE FOLLOWING SECTION BEFORE CONTINUING! WORK PATTERN WHILE AT THE SAME TIME DECREASING FOR ARMHOLE THE SIDE AS FOLLOWS: PATTERN: Continue with pattern. When A.2 has been worked vertically, continue in GARTER STITCH - see explanation above. Piece measures approx. 27-27-33-33 (39-39) cm. ARMHOLE: When piece measures 24-26-31-36 (41-44) cm, continue as follows: Work 9 stitches in garter stitch, work pattern/garter stitch as before, but decrease 4-4-4-8 (2-6) stitches evenly until 9 stitches remain before next marker, work 18 stitches in garter stitch, work pattern/garter stitch as before, but decrease 4-4-4-8 (2-6) stitches evenly until 9 stitches remain on round, finish with 9 stitches in garter stitch = 100-112-124-140 (152-168) stitches in total (= 50-56-62-70 (76-84) stitches on each side of markers). Continue like this until piece measures 25-27-32-37 (42-45) cm. Now cast off stitches for armhole as follows: Cast off the first 6 stitches, work 3 stitches in garter stitch, work pattern until 9 stitches remain before next marker, work 3 stitches in garter stitch, cast off the next 12 stitches, work 3 stitches in garter stitch, work pattern as before until 9 stitches remain, work 3 stitches in garter stitch and cast off the last 6 stitches. Now finish front and back piece separately. BACK PIECE: Now work back and forth. = 38-44-50-58 (64-72) stitches. Continue with pattern and 3 stitches in garter stitch in each side of piece. Then decrease 1 stitch for armhole inside 3 stitches in garter stitch in each side of piece - read DECREASE TIP-2! Decrease like this on every other row 3-4-5-4 (4-5) times in total = 32-36-40-50 (56-62) stitches. When piece measures 32-34-40-46 (52-56) cm, cast off the middle 16-18-22-24 (26-26) stitches for neck = 8-9-9-13 (15-18) stitches on each shoulder. Now finish each shoulder separately. LEFT SHOULDER: Continue in stocking stitch with 3 stitches in garter stitch out towards armhole as before until piece measures 34-36-42-48 (54-58) cm in total. Cast off by purling from wrong side. This shoulder is sewn together with left shoulder on front piece later. RIGHT SHOULDER: Continue in stocking stitch with 3 stitches in garter stitch out towards armhole as before until piece measures 34-36-42-48 (54-58) cm in total. Cast off by knitting from wrong side. On this shoulder sew on buttons later. FRONT PIECE: Work as on back piece until piece measures 30-32-37-42 (48-51) cm. Now cast off the middle 10-12-16-16 (18-18) stitches for neck = 11-12-12-17 (19-22) stitches on each shoulder. Now finish each shoulder separately. RIGHT SHOULDER: Cast off 1 stitch on every row from neck 3-3-3-4 (4-4) times in total = 8-9-9-13 (15-18) stitches. When piece measures 32-34-40-46 (52-56) cm, work in stocking stitch with 3 stitches in garter stitch out towards armhole. When piece measures 34-36-42-48 (54-58) cm, decrease for 2 buttonholes from right side as follows: Knit 1-1-1-2 (3-3), knit 2 together, make 1 yarn over (= 1 buttonhole), knit 2-2-2-4 (5-8), knit 2 together, make 1 yarn over (= 1 buttonhole), finish with 1-2-2-3 (3-3) stitches in garter stitch. Cast off by knitting on next row from wrong side. LEFT SHOULDER: Cast off 1 stitch on every row from neck 3-3-3-4 (4-4) times in total = 8-9-9-13 (15-18) stitches. Continue in stocking stitch with 3 stitches in garter stitch out towards armhole as before until piece measures 34-36-42-48 (54-58) cm in total. Cast off by purling from wrong side. This shoulder is sewn together with left shoulder on back piece later. ASSEMBLY: Sew buttons on to right shoulder on back piece. Sew left shoulder together with grafting/kitchener stitches. NECK EDGE: Worked back and forth. Begin at right shoulder on back piece and pick up 46-70 stitches around the neck from right side. Knit 3 rows, cast off by knitting, make sure to avoid a tight cast-off edge, cast off with 1 larger needle size if needed. |
|||||||||||||||||||||||||
Diagram explanations |
|||||||||||||||||||||||||
|
|||||||||||||||||||||||||
 |
|||||||||||||||||||||||||
 |
|||||||||||||||||||||||||
 |
|||||||||||||||||||||||||
 |
|||||||||||||||||||||||||
 |
|||||||||||||||||||||||||
 |
|||||||||||||||||||||||||
 |
|||||||||||||||||||||||||
 |
|||||||||||||||||||||||||
 |
|||||||||||||||||||||||||
Have you finished this pattern?Tag your pictures with #dropspattern #serafinadress or submit them to the #dropsfan gallery. Do you need help with this pattern?You'll find 28 tutorial videos, a Comments/Questions area and more by visiting the pattern on garnstudio.com. © 1982-2026 DROPS Design A/S. We reserve all rights. This document, including all its sub-sections, has copyrights. Read more about what you can do with our patterns at the bottom of each pattern on our site. |
|||||||||||||||||||||||||


With over 40 years in knitting and crochet design, DROPS Design offers one of the most extensive collections of free patterns on the internet - translated to 17 languages. As of today we count 324 catalogues and 12290 patterns translated into English (UK/cm). 12290
We work hard to bring you the best knitting and crochet have to offer, inspiration and advice as well as great quality yarns at incredible prices! Would you like to use our patterns for other than personal use? You can read what you are allowed to do in the Copyright text at the bottom of all our patterns. Happy crafting!
Post a comment to pattern DROPS Baby 31-17
We would love to hear what you have to say about this pattern!
If you want to leave a question, please make sure you select the correct category in the form below, to speed up the answering process. Required fields are marked *.