
Popular categories
Looking for a yarn?


Comments / Questions (116)
![]() Beatriz wrote:
Beatriz wrote:
Bonjour, après avoir fini les rangs raccourcis et recommence au milieu du dos, il faut faire un tour avant de recommencer les augmentations, qui correspond au rang 12 (envers) de A2, n’est-ce pas? Merci!
02.10.2021 - 10:08DROPS Design answered:
Bonjour Beatriz, après avoir tricoté le rang 13 des rangs raccourcis, vous avez tricoté 11 rangs de A.2 et vous coupez le fil. Vous reprenez ensuite les tours à partir du milieu dos et continuez comme avant mais en rond cette fois, en reprenant A.2 à partir du rang 12 (= sur l'endroit car vous tricotez maintenant en rond). Bon tricot!
04.10.2021 - 07:54
![]() Ewa wrote:
Ewa wrote:
"przerobić oczko przekręcone w miejscu narzutu na lewo, aby uniknąć dziur – przerobić na prawo 21 pierwszych dodanych oczek, a na lewo pozostałe oczka" - czyli te dodane oczka, a dokładnie 21 tych oczek, przerobić na prawo i będą niejako zaliczały się do przodu lub do tyłu, a kolejne już będą wchodziły do ściegu ażurowego na rękawach? Bardzo dziękuję za odpowiedzi!
16.09.2021 - 13:41DROPS Design answered:
Dokładnie tak będzie. Pozdrawiamy!
16.09.2021 - 16:15
![]() Ewa wrote:
Ewa wrote:
Dzień dobry, nie mogę rozgryźć, jak ma być przerabiane zaokrąglenie rękawów .. od rzędu oznaczonego strzałką w schemacie A.2 dodawać po jednym oczku za dwoma lewymi oczkami czy przed nimi?
16.09.2021 - 11:31DROPS Design answered:
Witaj Ewo, dodajesz po 1 oczku przed i za schematem A.2, czyli przed schematem A.2 to będzie przed 2 oczkami lewymi, a za schematem A.2 będzie to za 2 oczkami lewymi. Pozdrawiamy!
16.09.2021 - 12:51
![]() Nicola wrote:
Nicola wrote:
Da ich den Pullover optisch mag, habe ich mir die Arbeit gemacht und die Charts alle auf DIN A3 gedruckt und jeden Schritt der Anleitung einzuzeichnen. Die Mühe hat sich wirklich gelohnt, aber ich muss sagen, dass die Anleitung selbst nicht wirklich so geschrieben ist, dass man den Pulli so runterstricken kann und Anfänger werden sicherlich die Haare raufen - trotzdem wühle ich mich bis zum Ende durch. Die Größen scheinen zu stimmen. Bin kurz vor Beginn der Ärmel. Habe 1x alles geribbelt.
04.08.2021 - 15:52
![]() Ewa wrote:
Ewa wrote:
Ten sweterek dziergam niestety z innej włóczki. Ale uważam, że instrukcje na stronie Dropsa są bardzo dobre, wzory piękne, dzięki Dropsowi nauczyłam się dziergać i z włóczkami też jestem na bieżąco, mam wydziergane co najmniej cztery swetry, skarpetki i czapki z waszych włóczek i powoli dochodzę do perfekcji, w czytaniu przepisów też. Dziękuję :)
30.01.2021 - 11:37
![]() Ewa wrote:
Ewa wrote:
Chyba już wiem jak dodawać oczka na ramionach po zakończeniu rzędów skróconych. Chodzi o ten akapit: DODAWANIE OCZEK NA TYLE (= między markerami 4 i 1): Dodawać w sumie 2-3-5-7-8-10 razy 2 oczka co 2 okrążenia i 9-11-12-14-16-18 razy 1 oczko co 2 okrążenia. DODAWANIE OCZEK NA PRZODZIE (= między markerami 2 i 3): Dodawać w sumie 6-7-9-11-12-14 razy 2 oczka co 2 okrążenia i 5-7-8-10-12-14 razy 1 oczko co 2 okrążenia.
29.01.2021 - 13:34DROPS Design answered:
Dokładnie tak :)
29.01.2021 - 18:05
![]() Ewa wrote:
Ewa wrote:
Po ile oczek dodawać na ramionach po zakończeniu przerabiania rzędów skróconych (wtedy dodawać należy po 2 oczka z każdej strony każdego ramienia- 8 oczek w co drugim rzędzie). Nie mogę znaleźć informacji czy dodawać po jednym oczku czy dalej po dwa. Bardzo dziękuję za odpowiedź.
29.01.2021 - 13:10DROPS Design answered:
Widzę Ewo, że sobie już doskonale poradziłaś. Można się pogubić z tym dodawaniem oczek, sama robiłam ten sweterek z przyjaciółką na zmianę. Ale wart był zachodu. Umieść zdjęcie gotowego swetra w galerii dropsfan na naszej stronie, albo na naszej grupie na facebooku DROPS Workshop. Pozdrawiamy!
29.01.2021 - 18:05
![]() Antonella Gorza wrote:
Antonella Gorza wrote:
Grazie per precedente risposta e suggerimento. Non mi è ancora chiaro come si integrano aumento punti spalle e aumento arrotondamento spalla. Sembrano indicazioni separate. Leggo” aumenti spalle -diversi dav e dietro ma per un tot di 14 volte (34 p dietro 42 dietro) Allo stesso tempo sul giro con freccia in A2, quindi prima che gli aumenti per la manica siano finiti- iniziare arrotondamento maniche...” ma allora abbandono il conteggio aumenti maniche? E dove metto le maglie a rovescio?
13.01.2021 - 22:04DROPS Design answered:
Buonasera Antonella, deve lavorare contemporaneamente gli aumenti per a spalla e per le maniche, come indicato nei suggerimenti e all'altezza della freccia inizi gli aumenti per le maniche. Le conviene scriversi i vari giri in modo da visualizzare meglio gli aumenti. Buon lavoro!
13.01.2021 - 22:38
![]() Antonella Gorza wrote:
Antonella Gorza wrote:
Sto realizzando il maglione mod 178-16. Sono bloccata al punto in cui inizio aumenti per arrotondamento maniche. Dove li aumento rispetto allo schema A1? Dopo aver aumentato 21 punti per le maniche? Potete chiamarmi al +393396197076?
13.01.2021 - 18:18DROPS Design answered:
Buonasera Antonella, gli aumenti per l'arrotondamento della manica vanno lavorati a entrambi i lati del diagramma A.2 come indicato nel suggerimento all'inizio del lavoro. Faccia attenzione però a NON divulgare MAI il suo numero di cellulare su internet o sui social media. Buon lavoro!
13.01.2021 - 20:20
![]() Jeanette Leander Payberg wrote:
Jeanette Leander Payberg wrote:
Jeg skal strikke 60 masker, sætte 85 i str xl på hjælpe pind, strikke 120 masker og sætte 85 masker på hjælpepind. Jeg starter ærmekuppel med 13 masker som a2 også viser. Så tager jeg 4*2 masker ud som er = 8 masker det vil sige så har jeg 21 masker så tages der ud på hver anden omgang 21 gange =21*2=42+21=63, som godt nok ikke er det jeg har, men jeg har 61 masker
26.10.2020 - 18:30
|
||||||||||||||||||||||
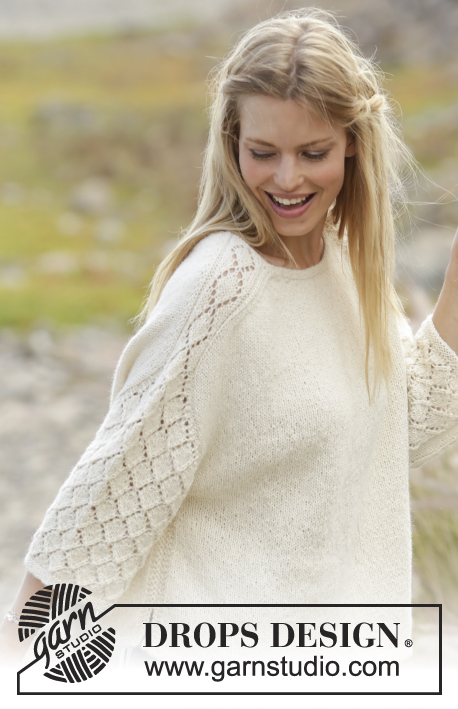
Vanilla Kiss#vanillakisssweater |
||||||||||||||||||||||
 |
 |
|||||||||||||||||||||
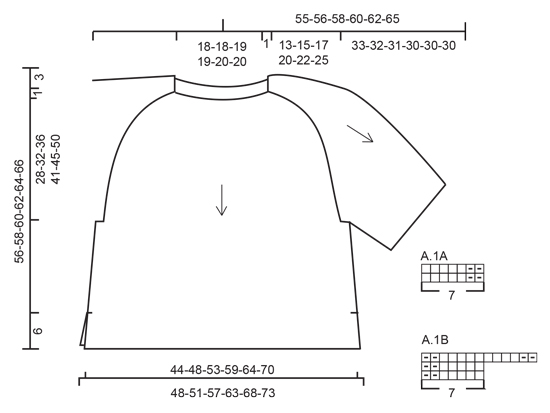
Jumper with lace pattern on shoulders and sleeves, knitted top down in DROPS Puna or Sky. Size: S - XXXL
DROPS 178-16 |
||||||||||||||||||||||
|
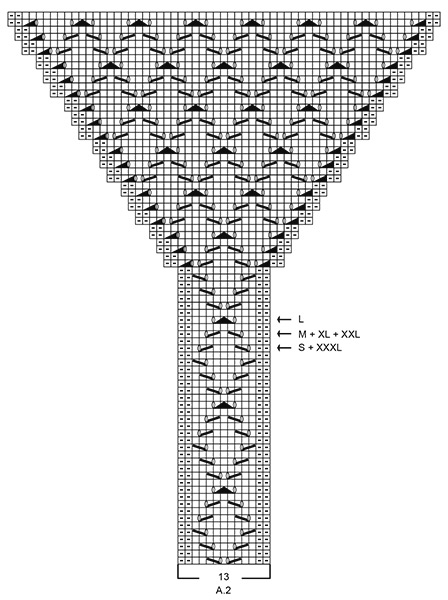
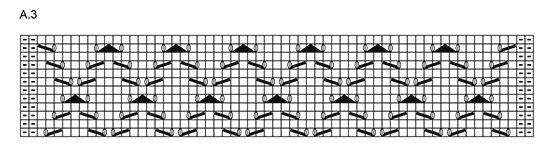
RIDGE/GARTER STITCH (worked in the round): 1 ridge = 2 rounds. Knit 1 round and purl 1 round. RIDGE/GARTER STITCH (worked back and forth): 1 ridge = Knit 2 rows. PATTERN: See diagrams A.1 to A.3. The diagrams show all rows in pattern seen from the right side. SHOULDER: NOTE: All increases worked from right side! On next row work yarn overs twisted to avoid holes. Increase 2 stitches as follows: INCREASE 2 STITCHES BEFORE MARKERS 1 AND 3: Start 3 stitches before marker, 1 yarn over, knit 2, 1 yarn over, knit 1, (= 2 stitches increased). INCREASE 2 STITCHES AFTER MARKERS 2 AND 4: Knit 1, 1 yarn over, knit 2, 1 yarn over (= 2 stitches increased). Increase 1 stitch as follows: INCREASE 1 STITCH BEFORE MARKERS 1 AND 3: Start 1 stitch before marker, 1 yarn over, knit 1 (= 1 stitch increased). INCREASE 1 STITCH AFTER MARKERS 2 AND 4: Knit 1, 1 yarn over (= 1 stitch increased). SLEEVE CAP: Increase 1 stitch by making 1 yarn over (make sure the yarn over is not too loose). On next round: work yarn over twisted to avoid holes – knit the first 21 stitches increased, purl the remaining stitches. next round purl yarn over twisted to avoid a hole – all increased stitches on sleeve cap are purled. INCREASE TIP (for sides of front and back pieces): Increase on inside of the 4 outermost stitches in each side (i.e. 3 edge stitches in garter stitch + 1 stitch in stocking stitch). Increase 1 stitch by making 1 yarn over, on next row work yarn over twisted to avoid a hole (the increased stitch is worked in stocking stitch). DECREASE TIP (for mid under sleeve): Start 3 stitches before marker mid under sleeve, purl 2 together, knit 2 (the marker sits in the middle of these 2 stitches), purl 2 together (= 2 stitches decreased). ---------------------------------------------------------- JUMPER The piece is worked in the round with circular needle, top down, as far as below the sleeves. Then the front and back pieces are worked separately back and forth. The sleeves are worked in the round. The photo deviates somewhat from pattern regarding increases in sleeve caps (A.2) – the fit has been improved. YOKE: Cast on 102-102-106-106-110-110 stitches with short circular needle size 3 mm and Puna. The round starts mid back. Insert a marker here which will follow your work onwards. Work 2 RIDGES in the round – see description above. Insert 4 new markers in the piece as follows (without working the stitches): Insert marker 1 after the first 19-19-20-20-21-21 stitches (= ½ back piece), marker 2 after the next 13 stitches (= shoulder/sleeve), marker 3 after the next 38-38-40-40-42-42 stitches (= front piece), marker 4 after the next 13 stitches (= shoulder/sleeve), there are now 19-19-20-20-21-21 stitches left after the last marker (= ½ back piece). Change to circular needle size 4 mm. Now work short rows over the stitches in the neck for a better fit, AT THE SAME TIME as you increase stitches to shoulder and work pattern on shoulders/sleeves (= 13 stitches) as follows: ROW 1 (from right side): Knit until 3 stitches before the marker 1, increase 2 stitches to SHOULDER – see description above, work A.1A (= 7 stitches), turn piece and tighten strand. ROW 2 (from wrong side): Work A.1A, purl as far as marker 4, A.1B (= 7 stitches –you read the diagram from left to right when working from the wrong side), turn the piece and tighten strand. ROW 3: Work A.1B, increase 2 stitches to shoulder, knit to 3 stitches before marker 1 and increase 2 stitches to shoulder, work A.2 (= 13 stitches), marker 2 is here, turn the piece and tighten strand. ROW 4: Work A.2, purl to marker 4, work A.2 – start on row 2 in the diagram, marker 3 is here, turn the piece and tighten strand. ROW 5: Work A.2, increase 2 stitches to shoulder, knit to 3 stitches before marker 1, increase 2 stitches to shoulder, continue A.2 and increase 2 stitches to shoulder on front piece, (i.e. you work as follows after marker 2: Knit 1, 1 yarn over, knit 2, 1 yarn over), knit 1, (= 4 stitches + 2 yarn overs on front piece), turn the piece and tighten strand. ROW 6: Purl to marker 2 (= purl 6 stitches on front piece), continue A.2, purl to marker 4, continue A.2, purl 4 stitches on front piece (= 4 stitches past marker 3) turn the piece and tighten strand. REMEMBER THE KNITTING TENSION! ROW 7: Knit 1, increase 2 stitches to shoulder (= 4 stitches + 2 yarn overs on front piece), continue A.2, increase 2 stitches to shoulder, knit to 3 stitches before marker 1, increase 2 stitches to shoulder, continue A.2, increase 2 stitches to shoulder on front piece and knit over 2 more stitches than on previous row on front piece (= 8 stitches + 2 yarn overs on front piece), turn the piece and tighten the strand. ROW 8: Purl to marker 2 (= 10 purled stitches on front piece), continue A.2, purl to marker 4, continue A.2 and purl over 2 stitches more than on the previous row on front piece (= 8 stitches on front piece), turn the piece and tighten strand. ROW 9: Knit to 3 stitches before the marker, increase 2 stitches to shoulder (= 8 knitted stitches + 2 yarn overs on front piece), continue A.2, increase 2 stitches to shoulder, knit to 3 stitches before marker 1, increase 2 stitches to shoulder, continue A.2, increase 2 stitches to shoulder on front piece, Knit over 2 stitches more than on the previous row on front piece (= 12 stitches + 2 yarn overs on front piece), turn piece and tighten strand. ROW 10: Purl to marker 2 (= 14 purled stitches on front piece), continue A.2, purl to marker 4, continue A.2 and purl over 2 stitches more than on previous row on front piece (= 12 stitches on front piece), turn the piece and tighten strand. ROW 11: Knit to 3 stitches before the marker, increase 2 stitches to shoulder (= 12 knitted stitches + 2 yarn overs on front piece), continue A.2, increase 2 stitches to shoulder, knit to 3 stitches before marker 1, increase 2 stitches to shoulder, continue A.2, increase 2 stitches to shoulder on front piece, knit over 2 more stitches than on the previous row on front piece (= 16 stitches + 2 yarn overs on front piece), turn the piece and tighten strand. ROW 12: Purl to marker 2 (= 18 purled stitches on front piece), continue A.2, purl to marker 4, continue A.2 and purl over 2 stitches more than on previous row on front piece (= 16 stitches on front piece), turn piece and tighten strand. ROW 13: Knit to 3 stitches before marker, increase 2 stitches to shoulder (= 18 stitches before next marker), continue A.2, increase 2 stitches to shoulder, knit to mid back (= start of the round). Continue with pattern but without increasing as far as marker 2. Now you have worked 11 rows of A.2. Cut the strand. You have now increased 2 stitches to shoulder in each side of the front piece 4 times and 2 stitches to shoulder in each side of the back piece 6 times = 142-142-146-146-150-150 stitches (= 54-54-56-56-58-58 stitches on front piece and 62-62-64-64-66-66 stitches on back piece). The short rows are now finished and you continue in the round with circular needle. Start at marker mid back. On the next round continue the increases to shoulder (= work the increased stitches on front and back piece in stocking stitch) and work A.2 as before, AT THE SAME TIME on round with arrow in A.2 (i.e. before the increases to shoulder are finished) start the increases to sleeve cap (= work the first 21 increased stitches knit. AT THE SAME TIME work the new stitches into A.2 as A.2 expands outwards). When A.2 has been completed in height, repeat A.3 over A.2 to finished length. Increase to shoulder and to sleeve cap as described below: INCREASE TO SHOULDER AS FOLLOWS: NOTE: You increase differently on front and back pieces and, on the rounds after increases, the yarn overs are knitted twisted to avoid holes - Remember SHOULDER! INCREASE ON BACK PIECE (= between markers 4 and 1): Increase 2 stitches every 2nd round a total of 2-3-5-7-8-10 times, then increase 1 stitch every 2nd round a total of 9-11-12-14-16-18 times. INCREASE ON FRONT PIECE (= between markers 2 and 3): Increase 2 stitches every 2nd round a total of 6-7-9-11-12-14 times, then increase 1 stitch every 2nd round a total of 5-7-8-10-12-14 times. After all increases to shoulder there are 88-96-108-120-130-142 stitches on both front and back pieces. INCREASE TO SLEEVE CAP AS FOLLOWS: On the round with an arrow in diagram A.2 start increasing to SLEEVE CAP – see description above. Increase 1 stitch on each side of A.2 on every shoulder/sleeve (= 4 stitches increased on round). Increase in this way every round a total of 1-4-6-4-4-2 times and then every 2nd round a total of 25-26-28-32-34-38 times. There should always be at least 2 purled stitches on each side of the lace pattern A.2 on sleeves. (These purl stitches are included in the diagram). A.2 expands outwards as diagram is worked, so that more and more stitches are included in the lace pattern. When all increases to sleeve cap are finished, there are 65-73-81-85-89-93 stitches on each sleeve. After all increases to shoulder and sleeve cap there are 306-338-378-410-438-470 stitches on the needle and piece measures 31-33-35-37-38-41 cm (measured from shoulder down). There are now 4-8-12-14-16-18 purled stitches on each side of the lace pattern (including the 2 stitches in each side of A.2/A.3). The next round is worked as follows: Work 44-48-54-60-65-71 stitches stocking stitch (= ½ back piece), place the next 65-73-81-85-89-93 stitches on 1 thread (= sleeve), cast on 4 new stitches on needle (= in side under sleeve), work 88-96-108-120-130-142 stitches stocking stitch (= front piece), place the next 65-73-81-85-89-93 stitches on 1 thread (= sleeve), cast on 4 new stitches on needle (= in side under sleeve) and work the remaining 44-48-54-60-65-71 stitches in stocking stitch (= ½ back piece). BODY: = 184-200-224-248-268-292 stitches. THE PIECE IS NOW MEASURED FROM HERE! Now divide the piece in the middle of the 4 new stitches under each sleeve and the front and back pieces are worked separately, back and forth on circular needle to finished length. BACK PIECE: = 92-100-112-124-134-146 stitches. Work stocking stitch with 3 edge stitches in GARTER STITCH – see description above, in each side. When piece measures 3 cm from the division, increase 1 stitch in each side – read INCREASE TIP (= 2 stitches increased). Increase in this way every 14th-14th-14th-14th-14th-14th row a total of 4 times in each side = 100-108-120-132-142-154 stitches. When piece measures 24-24-24-24-25-24 cm from the division, change to circular needle size 3 mm. Work 3 ridges, change back to circular needle size 4 mm and loosely cast off. The jumper measures approx. 56-58-60-62-64-66 cm from top of shoulder down. FRONT PIECE: = 92-100-112-124-134-146 stitches. Work in the same way as the back piece. SLEEVE: Place the 65-73-81-85-89-93 stitches from the thread in one side of the piece onto short circular needle/double pointed needles size 4 mm and, in addition, knit up 1 stitch in each of the 4 stitches cast on under the sleeve = 69-77-85-89-93-97 stitches on needle. Insert 1 marker in the middle of the 4 new stitches mid under sleeve and allow the marker to follow your work onwards. Continue A.3 as before, knit 1 stitch on each side of the marker mid under sleeve and purl the remaining stitches on the round. When piece measures 3 cm from the division, decrease 2 stitches mid under sleeve – read DECREASE TIP. Repeat the decrease when piece measures 8-8-7-7-6-6 cm = 65-73-81-85-89-93 stitches. Continue working until piece measures 14-12-11-11-11-12 cm from the division. Change to double pointed needles size 3 mm. Work 3 ridges over all stitches, change back to double pointed needles size 4 mm and cast off. Work the other sleeve in the same way. ASSEMBLY: Sew side seams in outermost loop of outermost stitch so that the seam is flat, but stop when there is 6 cm left in each side (= split). |
||||||||||||||||||||||
Diagram explanations |
||||||||||||||||||||||
|
||||||||||||||||||||||
 |
||||||||||||||||||||||
 |
||||||||||||||||||||||
 |
||||||||||||||||||||||
Have you finished this pattern?Tag your pictures with #dropspattern #vanillakisssweater or submit them to the #dropsfan gallery. Do you need help with this pattern?You'll find 34 tutorial videos, a Comments/Questions area and more by visiting the pattern on garnstudio.com. © 1982-2026 DROPS Design A/S. We reserve all rights. This document, including all its sub-sections, has copyrights. Read more about what you can do with our patterns at the bottom of each pattern on our site. |
||||||||||||||||||||||


With over 40 years in knitting and crochet design, DROPS Design offers one of the most extensive collections of free patterns on the internet - translated to 17 languages. As of today we count 324 catalogues and 12290 patterns translated into English (UK/cm). 12290
We work hard to bring you the best knitting and crochet have to offer, inspiration and advice as well as great quality yarns at incredible prices! Would you like to use our patterns for other than personal use? You can read what you are allowed to do in the Copyright text at the bottom of all our patterns. Happy crafting!
Post a comment to pattern DROPS 178-16
We would love to hear what you have to say about this pattern!
If you want to leave a question, please make sure you select the correct category in the form below, to speed up the answering process. Required fields are marked *.