
Popular categories
Looking for a yarn?


Comments / Questions (26)
![]() Sonja wrote:
Sonja wrote:
Hej! Sitter här med min mamma som förtvivlat grubblar över A.2 och A.3 . Jag tycker inte heller att det är tydligt hur det går till med avmaskningen och att få rätt maskantal. Hon får alltid en maska för mycket eftersom det är så lätt att maska av två maskor och sedan sticka 4 räta efter man har lyft över andra maskan för avmaskningen - och då blir det ju en maska för mycket. Hade gärna sätt en tydligare beskrivning i diagrammet.
29.07.2017 - 19:49
![]() Cecilel wrote:
Cecilel wrote:
The instructions on the back peice is not making sense to me. the first row is a purl (wrong side) the next is A.3 for 10 stitiches stockinette the 10 stitches A.2 (right side) The next row from right side decrease 1 stitch......in reality this is NOT the right side but the wrong side row according to the instructions so I am very confused.
05.03.2017 - 21:18DROPS Design answered:
Dear Cecilel, when working 1st row on back piece from WS, work A.3 from 2nd row in diagram (= K4, P2, K2, P2 (= 10 sts)), then A.2 from 2nd row in diagram (= P2, K2, P2, knit 2 sts in next st, K2 tog, 1 double YO, knit 2 sts in 1 st). Happy knitting!
06.03.2017 - 10:09
![]() Anne N Granum wrote:
Anne N Granum wrote:
Hei. Jeg strikker Amandine strikket topp m hullmønster. Har kommet frem til der man deler til bak og fremstykke. Det står at man skal starte med A3 på andre pinne i mønstret .... fra venstre, ok, men da kommer de maskene man skal felle (kryssene i diagram) utenfor arbeidet. Kan jo ikke felle innenfor A3 eller A2 ??? Hjelp meg...
01.03.2017 - 14:37DROPS Design answered:
Hej Anna. Nej, du tager jo ud i anden pind (paa vrangen) ved at lave de ekstra masker, saa naar du kommer til fjerde pind (vrangen), saa starter du hver gentagelse af A.3 med at lukke 2 masker af og du har det samme antal m per gentagelse som i förste p.
01.03.2017 - 16:13
![]() Rita wrote:
Rita wrote:
Das Model Amandine wird fälschlich beschrieben als von oben nach unten gestricktes Top....
25.01.2017 - 01:07DROPS Design answered:
Liebe Rita, Danke für den Nachricht, Korrektur wird bald gemacht. Viel Spaß beim stricken!
25.01.2017 - 09:19
![]() Dagmar wrote:
Dagmar wrote:
Wunderschön!! Freue mich auf`s nacharbeiten!!!!
17.01.2017 - 17:11
![]() Gesine wrote:
Gesine wrote:
Ein wunderschönes klassisches Modell, das durch Passe- und Saumabschlussmuster no ch einen rmantischen Pfiff bekommt!
31.12.2016 - 12:45
|
||||||||||||||||||||||||||||
Amandine#amandinetop |
||||||||||||||||||||||||||||
|
|
||||||||||||||||||||||||||||
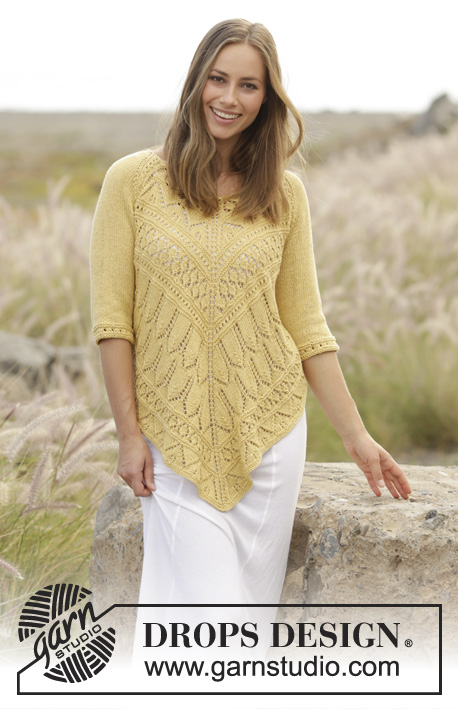
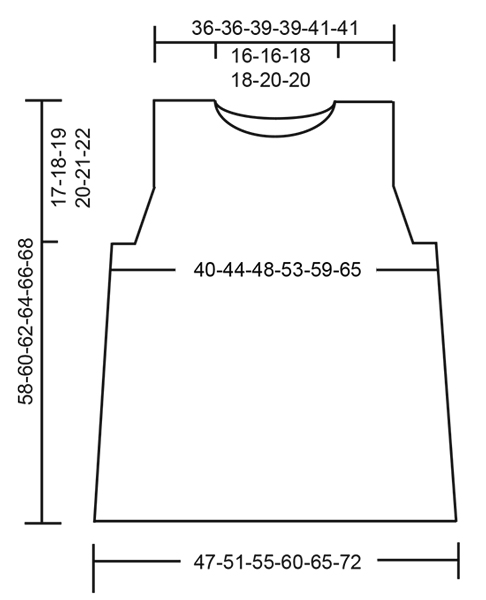
Knitted top with lace pattern and lace edge, worked bottom up in DROPS Cotton Merino. Size: S - XXXL
DROPS 176-12 |
||||||||||||||||||||||||||||
|
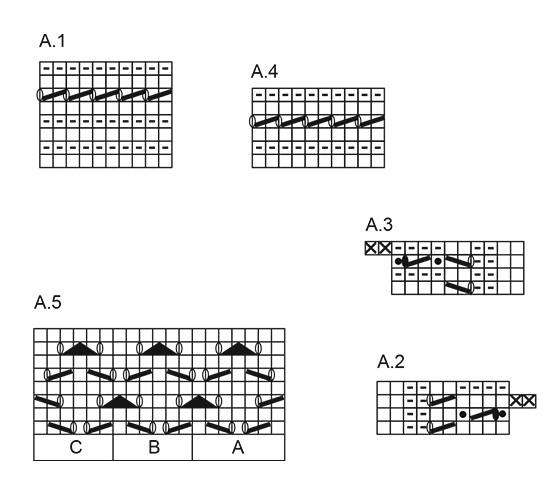
GARTER STITCH (worked in the round): 1 ridge = 2 rounds. Knit 1 round and purl 1 round. PATTERN: See diagrams A.1 to A.5. Diagrams show all rows/rounds in pattern seen from the right side. DECREASE TIP-1: Begin 3 stitches before marker, slip 1 stitch knitwise, knit 1, pass slipped stitch over stitch worked, knit 2 (marker is in the middle of these stitches), knit 2 together. DECREASE TIP-2: Decrease inside A.2/A.3 in each side. All decreases are done from the right side. Decrease as follows before A.3: Begin 1 stitch before A.3: Knit last stitch in stocking stitch and first stitch in A.3 together. Decrease as follows after A.2: Slip last stitch in A.2 knitwise, knit next stitch, pass slipped stitch over stitch worked. ---------------------------------------------------------- TOP: Worked in the round on circular needle up to armhole, then work front and back piece back and forth separately. Cast on 198-214-230-250-274-302 stitches on circular needle size 4 mm with Cotton Merino. Work pattern A.1. When A.1 has been worked 1 time vertically, continue in stocking stitch. Insert 1 marker in each side; 1 at the beginning of round and 1 after 99-107-115-125-137-151 stitches (= sides). When piece measures 6 cm, decrease 1 stitch on each side of markers in the side (= 4 stitches decreased) - READ DECREASE TIP-1! Decrease every 5-5-5½-5½-6-6 cm 7 times in total = 170-186-202-222-246-274 stitches. When piece measures 40-41-42-43-44-45 cm, work ridges in GARTER STITCH - see explanation above, over 12-16-16-24-28-40 stitches in each side (= 6-8-8-12-14-20 stitches on each side of each marker), continue the remaining stitches in stocking stitch. When 2 ridges have been worked in the side, work next round as follows: Cast off the first 2-4-4-8-10-16 stitches, knit 81-85-93-95-103-105 stitches, cast off the next 4-8-8-16-20-32 stitches, knit 81-85-93-95-103-105 stitches and cast off the last 2-4-4-8-10-16 stitches. Now finish front and back piece back and forth separately. BACK PIECE: = 81-85-93-95-103-105 stitches. Continue as follows, purl first row from wrong side: A.3, begin on 2nd row in pattern (from the left side in diagram) (= 10 stitches), work in stocking stitch until 10 stitches remain and finish with A.2, begin on 2nd row in pattern (from the left side in diagram) (= 10 stitches). On next row from right side decrease 1 stitch in each side, decrease inside A.2 and A.3 - SEE DECREASE TIP-2. Decrease on every other row (every row from right side) 3-5-6-7-8-9 times in total = 75-75-81-81-87-87 stitches. When piece measures 44-46-47-49-50-52 cm (decreases are now done), continue as follows from right side: A.2, A.4 until 11 stitches remain, finish with 1 stitch in stocking stitch and A.3. When A.4 has been worked 1 time vertically, continue as follows from right side: A.2, A.5 A (= 7 stitches), A.5 B over the next 42-42-48-48-54-54 stitches, A.5 C (= 6 stitches), finish with A.3. Continue this pattern until piece measures 56-58-60-62-64-66 cm, cast off the middle 31-31-35-35-39-39 stitches. Finish each shoulder separately. On next row decrease 1 stitch from the neck = 21-21-22-22-23-23 stitches remain on each shoulder. NOTE: Work stitches that do not fit the pattern towards the neck in stocking stitch when decreasing. Cast off when piece measures 58-60-62-64-66-68 cm. FRONT PIECE: = 81-85-93-95-103-105 stitches. Work as back piece until piece measures 52-54-56-57-59-61 cm = 75-75-81-81-87-87 stitches. Now slip the middle 25-25-29-29-33-33 stitches on a stitch holder and finish each shoulder separately. Continue to cast off for neck at beginning of every row from neck as follows: Cast off 2 stitches 1 time and 1 stitch 2 times = 21-21-22-22-23-23 stitches remain for shoulder - NOTE: Work stitches that do not fit the pattern towards the neck in stocking stitch when decreasing. Continue pattern as before. Cast off when piece measures 58-60-62-64-66-68 cm. Repeat on the other shoulder. ASSEMBLY: Sew the shoulder seem, sew edge to edge in outermost stitch to avoid a thick seem. NECK EDGE: Pick up approx. 80 to 100 stitches around the neck (including stitches on stitch holder) on a short circular needle size 4 mm. Work 2 ridges in GARTER STITCH, then cast off by knitting. |
||||||||||||||||||||||||||||
Diagram explanations |
||||||||||||||||||||||||||||
|
||||||||||||||||||||||||||||
 |
||||||||||||||||||||||||||||
 |
||||||||||||||||||||||||||||
Have you finished this pattern?Tag your pictures with #dropspattern #amandinetop or submit them to the #dropsfan gallery. Do you need help with this pattern?You'll find 30 tutorial videos, a Comments/Questions area and more by visiting the pattern on garnstudio.com. © 1982-2026 DROPS Design A/S. We reserve all rights. This document, including all its sub-sections, has copyrights. Read more about what you can do with our patterns at the bottom of each pattern on our site. |
||||||||||||||||||||||||||||


With over 40 years in knitting and crochet design, DROPS Design offers one of the most extensive collections of free patterns on the internet - translated to 17 languages. As of today we count 324 catalogues and 12290 patterns translated into English (UK/cm). 12290
We work hard to bring you the best knitting and crochet have to offer, inspiration and advice as well as great quality yarns at incredible prices! Would you like to use our patterns for other than personal use? You can read what you are allowed to do in the Copyright text at the bottom of all our patterns. Happy crafting!
Post a comment to pattern DROPS 176-12
We would love to hear what you have to say about this pattern!
If you want to leave a question, please make sure you select the correct category in the form below, to speed up the answering process. Required fields are marked *.