
Popular categories
Looking for a yarn?


Comments / Questions (26)
![]() Simone wrote:
Simone wrote:
Ich habe eine Frage zum Rückenteil : Nach der Rückreihe folgt ja die Hinreihe mit 1 Masche abnehmen , kommt dann A2 dann alle Maschen rechts bis 10 Maschen übrig sind und dann A3? Also die Frage ist ob zwischen den Mustern die Maschen rechts gestrickt werden in der hinreihe und diese dann links in der Rückreihe ? Ich hoffe ich hab es verständlich ausgedrückt . Danke für eine kurze Antwort damit ich das Top zuende Stricken kann . Simone
24.04.2026 - 16:31DROPS Design answered:
Liebe Simone, zwischen A.2 und A.3 werden die Maschen glattrechts gestrickt, dh rechts bei den Hinreihen und links bei den Rückreihen Viel Spaß beim Stricken!
27.04.2026 - 07:27
![]() Diane wrote:
Diane wrote:
Bonjour, j’espère bien que quelqu’un pourra me répondre, je suis mal prise. Je commence le dos, j’ai fait le 1re rang à l’envers sur l’envers, le 2e comme mentionné A3 (10m), jersey, A2(10m). Je suis rendue au 3e rang sur l’envers, pourriez-vous m’indiquer comment svp? Je ne comprends vraiment pas quoi faire. J’apprécierais grandement de l’aide afin de terminer mon tricot. Merci
11.07.2025 - 21:23DROPS Design answered:
Bonjour Diane, tricotez le 1er rang sur l'envers comme suit: A.3, en commençant par le 2ème rang du diagramme (lire le diagramme de gauche à droite) (= 10 mailles), tricoter en jersey envers jusqu'à ce qu'il reste 10 mailles et terminer par A.2, en commençant par le 2ème rang du diagramme (lire le diagramme de gauche à droite) (= 10 mailles). Regardez aussi la video ICI. Bon tricot!
14.07.2025 - 08:25
![]() Marylin Estrada wrote:
Marylin Estrada wrote:
No entiendo esta parte: finaliza el tejido 41 cm y luego dice tejer surcos sobre 16 puntos en cada lado, esa parte no la entiendo. Es dos surcos debajo del hombro o a lo largo de la pieza en horizontal ?.. los bind off son debajo del hombro?
23.10.2024 - 22:12DROPS Design answered:
Hola Marylin, trabajas 2 pliegues (= 1 vuelta de derecho/1 vuelta de revés 2 veces) sobre los 8 puntos a cada lado de cada marcapuntos, mientras el resto de la labor se trabaja en punto jersey. Es decir, trabajar una vuelta de derecho, en la siguiente vuelta trabajar los 8 puntos a cada lado de cada marcapuntos de revés y el resto de puntos de derecho. Repetir estas 2 vueltas 1 vez más. Después cierras para las sisas como se indica: 4 pts a cada lado de cada marcapuntos.
27.10.2024 - 18:36
![]() Marianne Langmark Villumsen wrote:
Marianne Langmark Villumsen wrote:
Hej Findes denne opskrift hvor mønster og indtagninger er tekstet og ikke diagram har det lidt svært når der er så mange diagrammer og indtagninger at forholde sig til :). Kan ikke lige overskue det, bedre hvis der for hver pind stå hvad der skal gøres.
25.09.2024 - 12:00DROPS Design answered:
Hei Marianne. Det har vi dessverre ikke. Kun det du ser på nettsiden. mvh DROPS Design
30.09.2024 - 13:36
![]() Carin Horovitz wrote:
Carin Horovitz wrote:
Nu undrar jag om jag gör rätt. Det står att man ska sticka A3 i början av det aviga varvet och avsluta med A2. Ska man sen när man börjar på nästa varv som är räta maskor fortsätta med A 2 men raden över och sen avsluta med A3 på det varvet. Det framgår inte riktigt. Känns lite ologiskt. Vore bra med en tydligare förklaring.
08.08.2024 - 22:11DROPS Design answered:
Hej Carin, ja det stemmer, næste varv starter du fra retsiden med 3:e rad i A.2 (fra høre side) og samme med A.3 når du kommer til den anden side :)
14.08.2024 - 15:30
![]() Carin Horovitz wrote:
Carin Horovitz wrote:
Nu har jag hittat en video som visar svaret på förra frågan men då fastnar jag på nästa varv i stället. Ska man fortsätta sticka A2 då? I så fall ser jag inte hur man ska kunna sticka två tillsammans när man kommer fram till maskan som ökades på förra varvet.
05.08.2024 - 12:10DROPS Design answered:
Hej igen Carin, er det en symbolforklaring du er usikker på? Eller så skriv hvad vi skriver i mønsteret, så vi ved hvad du henviser til :)
06.08.2024 - 14:50
![]() Carin Horovitz wrote:
Carin Horovitz wrote:
Jag förstår inte vad som menas med att ”sticka två rätmaskor i en maska (från rätsidan och från avigsidan)”? Kan ni förklara?
05.08.2024 - 11:16DROPS Design answered:
Hej Carin, vi finder ikke i mønsteret hvor det står "sticka två rätmaskor...... "
06.08.2024 - 14:48
![]() Marianne Langmark Villumsen wrote:
Marianne Langmark Villumsen wrote:
Når man har delt i bagstykke og forstykke og ligefør man skal begynde på mønster A.3 står der at 1. pind strikkes fra vrangen og mønster A.3 skal skal startes på 2. pind fra venstre den kan jeg ikke lige greje.
01.02.2024 - 14:38DROPS Design answered:
Hei Marianne. Når du starter på bakstykket og skal strikke etter diagram A.3 starter du fra vrangen og du starter på 2. pinne i diagrammet (fra venstre side i diagrammet). Altså: strikk 4 masker rett, 2 masker vrang, 2 masker rett og 2 masker vrang. mvh DROPS Design
12.02.2024 - 09:00
![]() Froufrou wrote:
Froufrou wrote:
Bonjour, Dans le diagramme A1 : Je ne comprends pas les deux premier rangs. Rang 1 : que faut il faire ? Rang 2 : que faut il faire ? Est ce du point mousse ? Merci
26.09.2022 - 11:58DROPS Design answered:
Bonjour Froufrou, suivez attentivement les indications de la légende, quand vous tricotez A.1 en rond, procédez ainsi: 1er rang: à l'endroit, 2ème rang: à l'envers, 3ème rang à l'endr, 4ème rang à l'envers, 5ème rang à l'endroit, 6ème rang (2 m ens à l'end, 1 jeté) tout le tour, 7ème rang: à l'end et 9ème rang à l'envers. Bon tricot!
26.09.2022 - 17:17
![]() Marion wrote:
Marion wrote:
Hallo, ich habe eine Frage beim Stricken des Musters A. 5. Es soll A5A und dann über 42 Maschen A5B gestrickt werden. In der dritten Reihe geht das Muster jedoch auch in A5A und A5C über(1Masche abheben, 2 zusammen stricken und abgehobene Masche über die zusammengestrickten ziehen). Wie sollen die 5. und 6. Masche bei dem Ende des ersten Mal A5B und die erste Masche ab der zweiten Wiederholung von A5B gestrickt werden?
25.10.2021 - 21:47DROPS Design answered:
Liebe Marion, wenn Sie in der 3. Reihe A.5B stets wiederholen, ergibt sich automatisch die doppelte Abnahme (abheben, zusammenstricken, überziehen). Sie stricken diese doppelte Abnahme also mustergemäß so lang, bis A.5C gestrickt werden muss, also gegen Ende der Reihe vor A.3. Viel Spaß beim Weiterstricken!
28.10.2021 - 10:15
|
||||||||||||||||||||||||||||
Amandine#amandinetop |
||||||||||||||||||||||||||||
|
|
||||||||||||||||||||||||||||
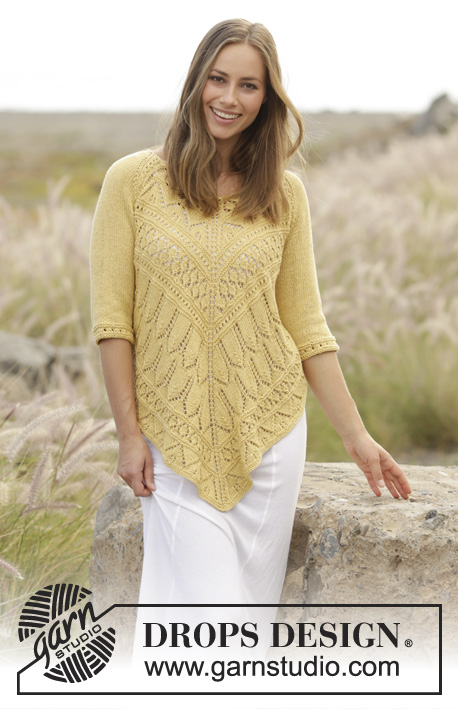
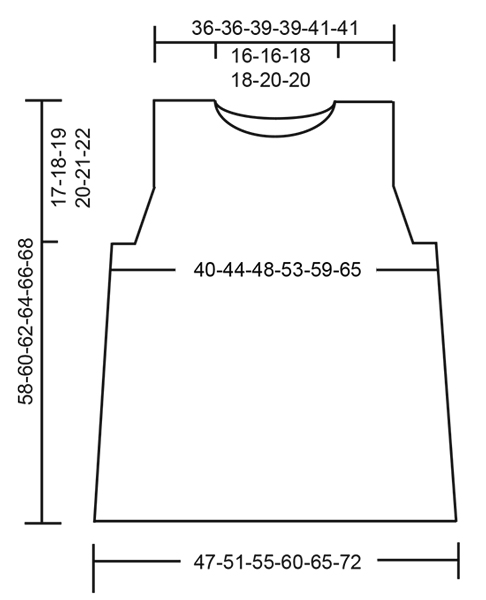
Knitted top with lace pattern and lace edge, worked bottom up in DROPS Cotton Merino. Size: S - XXXL
DROPS 176-12 |
||||||||||||||||||||||||||||
|
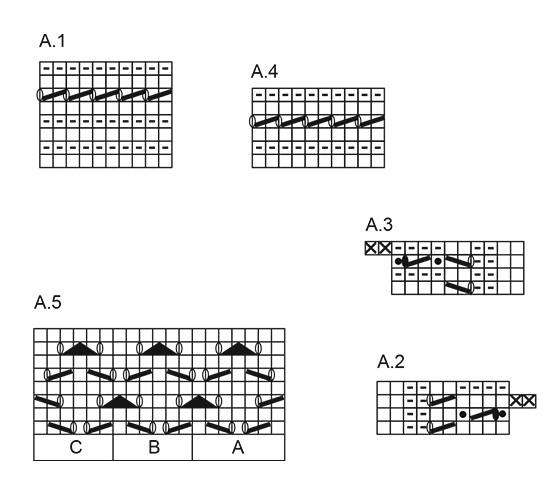
GARTER STITCH (worked in the round): 1 ridge = 2 rounds. Knit 1 round and purl 1 round. PATTERN: See diagrams A.1 to A.5. Diagrams show all rows/rounds in pattern seen from the right side. DECREASE TIP-1: Begin 3 stitches before marker, slip 1 stitch knitwise, knit 1, pass slipped stitch over stitch worked, knit 2 (marker is in the middle of these stitches), knit 2 together. DECREASE TIP-2: Decrease inside A.2/A.3 in each side. All decreases are done from the right side. Decrease as follows before A.3: Begin 1 stitch before A.3: Knit last stitch in stocking stitch and first stitch in A.3 together. Decrease as follows after A.2: Slip last stitch in A.2 knitwise, knit next stitch, pass slipped stitch over stitch worked. ---------------------------------------------------------- TOP: Worked in the round on circular needle up to armhole, then work front and back piece back and forth separately. Cast on 198-214-230-250-274-302 stitches on circular needle size 4 mm with Cotton Merino. Work pattern A.1. When A.1 has been worked 1 time vertically, continue in stocking stitch. Insert 1 marker in each side; 1 at the beginning of round and 1 after 99-107-115-125-137-151 stitches (= sides). When piece measures 6 cm, decrease 1 stitch on each side of markers in the side (= 4 stitches decreased) - READ DECREASE TIP-1! Decrease every 5-5-5½-5½-6-6 cm 7 times in total = 170-186-202-222-246-274 stitches. When piece measures 40-41-42-43-44-45 cm, work ridges in GARTER STITCH - see explanation above, over 12-16-16-24-28-40 stitches in each side (= 6-8-8-12-14-20 stitches on each side of each marker), continue the remaining stitches in stocking stitch. When 2 ridges have been worked in the side, work next round as follows: Cast off the first 2-4-4-8-10-16 stitches, knit 81-85-93-95-103-105 stitches, cast off the next 4-8-8-16-20-32 stitches, knit 81-85-93-95-103-105 stitches and cast off the last 2-4-4-8-10-16 stitches. Now finish front and back piece back and forth separately. BACK PIECE: = 81-85-93-95-103-105 stitches. Continue as follows, purl first row from wrong side: A.3, begin on 2nd row in pattern (from the left side in diagram) (= 10 stitches), work in stocking stitch until 10 stitches remain and finish with A.2, begin on 2nd row in pattern (from the left side in diagram) (= 10 stitches). On next row from right side decrease 1 stitch in each side, decrease inside A.2 and A.3 - SEE DECREASE TIP-2. Decrease on every other row (every row from right side) 3-5-6-7-8-9 times in total = 75-75-81-81-87-87 stitches. When piece measures 44-46-47-49-50-52 cm (decreases are now done), continue as follows from right side: A.2, A.4 until 11 stitches remain, finish with 1 stitch in stocking stitch and A.3. When A.4 has been worked 1 time vertically, continue as follows from right side: A.2, A.5 A (= 7 stitches), A.5 B over the next 42-42-48-48-54-54 stitches, A.5 C (= 6 stitches), finish with A.3. Continue this pattern until piece measures 56-58-60-62-64-66 cm, cast off the middle 31-31-35-35-39-39 stitches. Finish each shoulder separately. On next row decrease 1 stitch from the neck = 21-21-22-22-23-23 stitches remain on each shoulder. NOTE: Work stitches that do not fit the pattern towards the neck in stocking stitch when decreasing. Cast off when piece measures 58-60-62-64-66-68 cm. FRONT PIECE: = 81-85-93-95-103-105 stitches. Work as back piece until piece measures 52-54-56-57-59-61 cm = 75-75-81-81-87-87 stitches. Now slip the middle 25-25-29-29-33-33 stitches on a stitch holder and finish each shoulder separately. Continue to cast off for neck at beginning of every row from neck as follows: Cast off 2 stitches 1 time and 1 stitch 2 times = 21-21-22-22-23-23 stitches remain for shoulder - NOTE: Work stitches that do not fit the pattern towards the neck in stocking stitch when decreasing. Continue pattern as before. Cast off when piece measures 58-60-62-64-66-68 cm. Repeat on the other shoulder. ASSEMBLY: Sew the shoulder seem, sew edge to edge in outermost stitch to avoid a thick seem. NECK EDGE: Pick up approx. 80 to 100 stitches around the neck (including stitches on stitch holder) on a short circular needle size 4 mm. Work 2 ridges in GARTER STITCH, then cast off by knitting. |
||||||||||||||||||||||||||||
Diagram explanations |
||||||||||||||||||||||||||||
|
||||||||||||||||||||||||||||
 |
||||||||||||||||||||||||||||
 |
||||||||||||||||||||||||||||
Have you finished this pattern?Tag your pictures with #dropspattern #amandinetop or submit them to the #dropsfan gallery. Do you need help with this pattern?You'll find 30 tutorial videos, a Comments/Questions area and more by visiting the pattern on garnstudio.com. © 1982-2026 DROPS Design A/S. We reserve all rights. This document, including all its sub-sections, has copyrights. Read more about what you can do with our patterns at the bottom of each pattern on our site. |
||||||||||||||||||||||||||||


With over 40 years in knitting and crochet design, DROPS Design offers one of the most extensive collections of free patterns on the internet - translated to 17 languages. As of today we count 324 catalogues and 12290 patterns translated into English (UK/cm). 12290
We work hard to bring you the best knitting and crochet have to offer, inspiration and advice as well as great quality yarns at incredible prices! Would you like to use our patterns for other than personal use? You can read what you are allowed to do in the Copyright text at the bottom of all our patterns. Happy crafting!
Post a comment to pattern DROPS 176-12
We would love to hear what you have to say about this pattern!
If you want to leave a question, please make sure you select the correct category in the form below, to speed up the answering process. Required fields are marked *.