
Popular categories
Looking for a yarn?


Comments / Questions (134)
![]() Floriana wrote:
Floriana wrote:
Buongiorno. Non mi torna il conteggio delle maglie delle maniche. Taglia xxl. Parto da 21 maglie, se devo fare 18 aumenti le maglie che aggiungo sono 36. 36+21=57. Per arrivare a 61 mancano 4 maglie quindi dovrei fare 20 aumenti e non 18. Dove sbaglio? Grazie per la vostra risposta.
07.04.2026 - 14:56DROPS Design answered:
Buonasera Floriana, le 4 maglie mancanti sono le 2 maglie del raglan a ogni lato di ogni manica. Buon lavoro!
26.04.2026 - 22:45
![]() Marie Hansen wrote:
Marie Hansen wrote:
Hej. Jeg strikker str. M og skal begynde på mønster. Jeg har 53 masker på ærmet og skal strikke A1 6 gange +første maske i A1, det giver 49 m, hvad skal jeg gøre med de sidste 4 m? Jeg går ud fra A2 skal strikkes i raglan-maskerne?
26.02.2026 - 10:15DROPS Design answered:
Hei Marie. Strikk A.2 (=2 masker) + strikk A.1 6 ganger (= 8 masker x 6 = 48 masker) + første maske i A.1 (=1 maske) + A.2 (=2 masker) = 2+48+1+2=53 masker (=ermet og 2 raglanlinjer). Strikk A.1 10 ganger = 8 masker x 10 ganger = 80 masker + første maske i A.1 (=1 maske) = 81 masker. Strikk A.2 (=2 masker) + strikk A.1 6 ganger (= 8 masker x 6 = 48 masker) + første maske i A.1 (=1 maske) + A.2 (=2 masker) = 2+48+1+2=53 masker (=ermet og 2 raglanlinjer). Strikk A.1 10 ganger = 8 masker x 10 ganger = 80 masker + første maske i A.1 (=1 maske) = 81 masker = 53+81+53+81= 268 masker. mvh DROPS Design
16.03.2026 - 14:17
![]() Mariette Ackermans wrote:
Mariette Ackermans wrote:
Ik brei maat M en heb nu 268 steken na meerderen en moet nu beginnen met het patroon. Ik moet beginnen met A2. is dit vanaf midden achter? daarna 6 keer A1 waarbij dan staat "brei de eerste st in A1. Wat wordt daar mee bedoeld?
12.02.2026 - 20:56DROPS Design answered:
Dag Mariette,
Je begint in de overgang tussen de mouw en het pand. Je moet inderdaad de eerste steek in A.1 breien zodat het patroon symmetrisch op de mouw/het pand komt. Voordat je 6 keer A.1 breit, brei je eerst ook weer alleen de eerste steek in A.1, Als het goed is, is dit steeds bij de raglanlijn.
15.02.2026 - 14:42
![]() Alida Ringnalda wrote:
Alida Ringnalda wrote:
Ik brei maat L - aan het einde van de raglan moeten er 300 steken staan en vervolgens begin je met patroon. Echter als ik het patroon volg en tel kom ik uit op 296 steken, vraag me af of het patroon klopt.
26.01.2026 - 08:36DROPS Design answered:
Dag Alinda,
A.2 (= 2 st), A.1 (= 8 st) 7 keer (= 56 steken) in totaal, brei de eerste st in A.1 (= 1 steek)(zodat het patroon gelijk is aan beide zijkanten), A.2 (= 2 st), A.1 11 keer in totaal (= 88 steken), brei de eerste st in A.1 (= 1 steek), A.2 (=2 steken), A.1 7 keer in totaal (= 56 steken), brei de eerste st in A.1 (= 1 steek), A.2 (= 2 steken), A.1 11 keer in totaal (= 88 steken), brei de eerste st in A.1 (= 1 steek). Totaal: 300 steken.
28.01.2026 - 17:05
![]() Annick wrote:
Annick wrote:
Bonjour, pour les augmentations des manches vous dites 17 fois tous les deux tours , ça fait 34 augmentations plus les 23 initiales ça fait 57 et non 61 comme vous le dites.dois je ajouter 4 augmentations pour faire 61 ? Merci de votre réponse
20.01.2026 - 00:29DROPS Design answered:
Bonjour Annick, vous avez augmenté 2 fois pour les manches lors des rangs raccourcis de la réhausse + 17 fois tous les 2 tours = 19 fois au total; 21 m pour la manche + 1 m raglan de chaque côté + (19x2 augmentations) = 61 m pour chaque manche. Bon tricot!
20.01.2026 - 10:44
![]() Annick wrote:
Annick wrote:
Bonjour, pour les augmentations du dos et devant, si j''augmente tous les tours, je suis obligé de faire mon jeté juste après ma taille torse du retour du rang précédent. Je ne comprends pas . Il faudrait'mieux faire les augmentations tous les 2 rangs.merci de votre réponse
17.01.2026 - 19:13DROPS Design answered:
Bonjour Annick, il faut d'abord augmenter tous les tours pour le raglan dos/devant (pour avoir le bon nombre de mailles et les bonnes dimensions), autrement dit, dès le 2ème tour tricotez ainsi: tricotez jusqu'au marqueur (tricotez le jeté du tour précédent torse), faites 1 jeté, tricotez la maille avec le marqueur, faites 1 jeté (tricotez le jeté du tour précédent torse). Bon tricot!
19.01.2026 - 09:18
![]() Rachel wrote:
Rachel wrote:
Bonjour, après avoir séparé les manches, il est indiqué de mesurer à partir d'ici, puis de terminer le motif A.1. puis poursuivre en bleu foncé. Ensuite à 4cm, commencer les diminutions. Mais doit-on diminuer après avoir réalisé le motif (donc 4cm après le motif) ou 4cm après la séparation des manches ? Ce n'est pas très clair. Merci !
12.01.2026 - 22:56DROPS Design answered:
Bonjour Rachel, vous commencez à diminuer pour les côtés du pull à 4 cm après la division, autrement dit, tricotez les mailles du dos et du devant pendant 4 cm après avoir mis les mailles des manches en attente, et commencez à diminuer. Bon tricot!
14.01.2026 - 09:58
![]() Stella Alvarez Arenas wrote:
Stella Alvarez Arenas wrote:
Bei den Raglanzunahmen für die Ärmel müssten doch insgesamt 20x Maschen zugenommen werden, wenn man von 21 Maschen pro Ärmel auf 61 kommen sollte. Oder liege ich falsch?
14.11.2025 - 13:57DROPS Design answered:
Liebe Frau Alvarez Arenas, in den 61 Maschen sind die 2 Maschen vom Raglan damit gerechnet, so 21 Maschen + 2 Maschen beidseitig + 18Mal 2 Maschen zugenommen = 61 Maschen. Viel Spaß beim Stricken!
14.11.2025 - 16:22
![]() Johanne Francoeur wrote:
Johanne Francoeur wrote:
Bonjour, je suis présentement bloquée sur ce modèle, sur le début du diagramme, en continuant le raglan manches, il est indiqué tric 7X A2 (donc 14 m bleues ?) ensuite les 8 m de A1 et 1 m de A1 etc. Mais je vois que ça forme des lignes bleues alors que ça devrait être les pointes du triangle sur la photo du modèle ? Aussi je me demande, comme je commence le tour avec le raglan, je fais le raglan en bleu ? Là j’avoue que je suis un peu mélangée… Merci de me répondre.
22.09.2025 - 19:54DROPS Design answered:
Bonjour Mme Francoeur, les mailles de A.2 ne sont tricotées qu'une seule fois en largeur et 4 fois au total car ce sont les mailles des raglans, c'est A.1 que vous allez répéter, 7 fois dans les taille 2 à 6soit 56 mailles du motif A.1. Les mailles des raglans se tricotent en suivant les rayures indiquées dans le diagramme. Bon tricot!
24.09.2025 - 08:22
![]() Bettina wrote:
Bettina wrote:
Jeg er ved at strikke Drops nr. U-765 til min søn. Jeg skal nu til mønsteret. I opskriften står der: A2 - A1x7 - 1.m A1 (2+56+1 =59) Men ovenover er der taget ud til 61 m. på ærmet!?!? Hvor skal jeg starte for at det kommer til at passe? Eller hvad gør jeg med de to sidste masker? Håber i kan hjælpe 🙏
02.06.2025 - 14:55DROPS Design answered:
Hej Bettina, hvilken størrelse strikker du og hvor mange masker har du totalt, så skal vi se om det stemmer :)
03.06.2025 - 07:53
|
|||||||||||||
Ólafur |
|||||||||||||
|
|
|||||||||||||
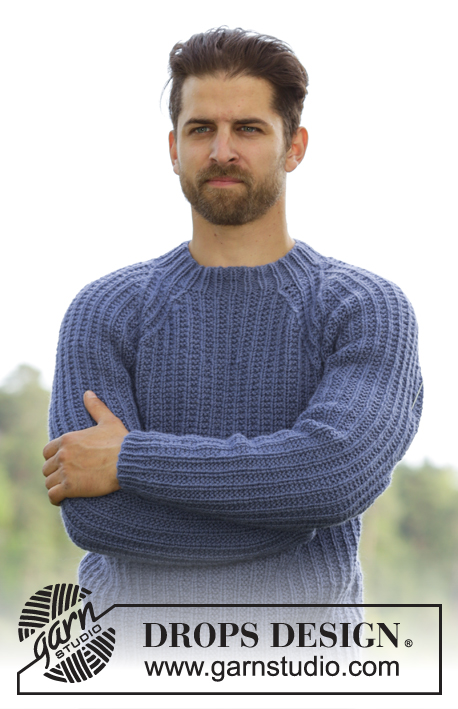
Men's knitted jumper in DROPS Karisma or DROPS Merino Extra Fine, with raglan and Norwegian pattern. Worked top down. Size: S - XXXL.
DROPS Extra 0-1146 |
|||||||||||||
|
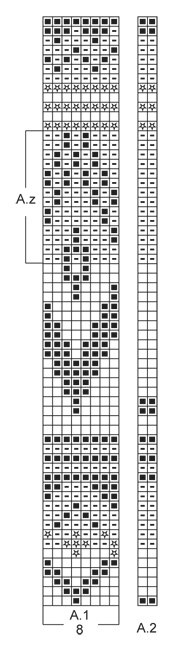
See diagrams A.1 to A.3. The diagrams are worked in stocking st. INCREASE TIP: Increase with YO, knit YO twisted over on next round to avoid holes. DECREASE TIP: Dec 1 st before marker as follows: Work until 2 sts remain before marker, slip 1 st as if to K, K 1, psso. Dec 1 st after marker as follows: K 2 tog. ---------------------------------------------------------- JUMPER: Worked in the round on circular needle, top down. Cast on 86-90-94-100-104-108 sts on circular needle size 3 mm with off white. K 1 round. Switch to dark grey blue Karisma / dark blue Merino Extra Fine. Then work in stocking st. Switch to off white and circular needle size 4 mm when piece measures 6 cm. Work 1 round in stocking st. On next round, inc 26-30-34-34-44-52 sts evenly = 112-120-128-134-148-160 sts. On next round work as follows from mid back: K 16-18-18-19-24-27, insert 1st marker, K 2, insert 2nd marker, K 16-16-20-21-19-19, insert 3rd marker, K 2 (= sleeve), insert 4th marker, K 39-43-43-45-53-59, insert 5th marker (= front piece), K 2, insert 6th marker, K 16-16-20-21-19-19, insert 7th marker, K 2 (= sleeve), insert 8th marker, K 17-19-19-20-25-28. READ ALL OF THE FOLLOWING SECTION BEFORE CONTINUING! Work an elevation at the back of neck from mid back AT THE SAME TIME inc for raglan. ELEVATION: K 8 sts past marker, turn, tighten yarn and P 16 sts back, turn, tighten yarn and K 24 sts, turn, continue to work 8 sts more in stocking st for every turn until a total of 80 sts have been worked after last turn. RAGLAN: Inc for raglan on every row from RS as follows: Inc 1 st before 1st and 7th marker and 1 st after 2nd and 8th marker. There are 6-6-6-6-4-4 sts inc in total on back piece and 3-3-3-2-2-2 sts on each sleeve. When elevation has been worked, there are 124-132-140-144-156-168 sts on needle. Fasten off. Now work in the round from 1st marker. Work next round as follows: (1st marker), K 2 (2nd marker), K 19-19-23-23-21-21, (3rd marker), K 2, (= sleeve), (4th marker), K 39-43-43-45-53-59 (= front piece), (5th marker), K 2, (6th marker), K 19-19-23-23-21-21, (7th marker), K 2, (8th marker) (= sleeve), K 39-43-43-45-53-59 (= back piece). On next round beg inc for raglan. NOTE: Inc differently on body and sleeves. REMEMBER THE KNITTING TENSION RAGLAN BODY: Inc before 1st and 5th marker and after 4th and 8th marker as follows - READ INCREASE TIP: Inc every round 4-8-12-10-8-10 times, then every other round 13-11-11-12-14-13 times. There are 73-81-89-89-97-105 sts on front and back piece. RAGLAN SLEEVE: Inc after 2nd and 6th marker and before 3rd and 7th marker as follows: Inc every other round 15-15-17-17-18-18 times in total = 53-53-61-61-61-61 sts on each sleeve. After inc for raglan, there are 252-268-300-300-316-332 sts in total. Then work pattern as follows: A.2 (= 2 sts), A.1 (= 8 sts) 6-6-7-7-7-7 times in total, work first st in A.1 (to make it the same in both sides), A.2, A.1 9-10-11-11-12-13 times in total, work first st in A.1, A.2, A.1 6-6-7-7-7-7 times in total, work first st in A.1, A.2, A.1 9-10-11-11-12-13 times in total, work first st in A.1. Continue with pattern like this AT THE SAME TIME continue to inc for raglan as follows: RAGLAN: NOTE: Inc differently on body and sleeves. Work the inc sts in the pattern A.1. RAGLAN BODY: Inc before 1st and 5th marker and after 4th and 8th marker as follows: Inc every other round 8-6-11-14-15-18 times, then every 4th round 1-3-0-0-0-0 times. There are 91-99-111-117-127-141 sts on front and back piece. RAGLAN SLEEVE: Inc after 2nd and 6th marker and before 3rd and 7th marker as follows: Inc every other round 0-0-0-0-1-2 times, every 4th round 5-6-1-1-7-8 times and every 6th round 0-0-3-4-0-0 times. There are 63-65-69-71-77-81 sts for each sleeve. When all inc are done there are 308-328-360-376-408-444 sts on needle. Continue with pattern as before. Work next round as follows: Slip the first 63-65-69-71-77-81 sts on a stitch holder for sleeve, cast on 8-8-8-10-10-10 sts under sleeve (insert a marker in the middle of the new sts), work 91-99-111-117-127-141 sts, slip the next 63-65-69-71-77-81 sts on a stitch holder for sleeve, cast on 8-8-8-10-10-10 sts under sleeve (insert a marker in the middle of the new sts), work 91-99-111-117-127-141 sts = 198-214-238-254-274-302 sts. Work the 8-8-8-10-10-10 new sts under each sleeve in pattern, i.e. pattern is reversed at the markers in the side. NOW MEASURE PIECE FROM HERE! BODY: Continue with A.1 until it has been worked 1 time vertically, then continue piece with dark grey blue Karisma / dark blue Merino Extra Fine. When piece measures 4 cm, dec 1 st on each side of markers in the side - READ DECREASE TIP (= 4 sts dec). Repeat dec every 14-30-10-14-10-14 cm 2-1-3-2-3-2 more times = 186-206-222-242-258-290 sts. When piece measures 39-40-41-41-41-41 cm (approx. 7 cm remain in total on body), K 1 round while AT THE SAME TIME dec 0-2-0-2-0-2 sts evenly = 186-204-222-240-258-288 sts. Then work A.3 (= 6 sts) 31-34-37-40-43-48 times in total in width. When A.3 has been worked 1 time vertically, continue with dark grey blue / dark blue Merino Extra Fine. On next round, dec 9-6-3-6-9-6 sts evenly = 177-198-219-234-249-282 sts. Switch to circular needle size 3 mm. Work rib = K 1/P 2. When rib measures 4 cm, K 1 round. Cast off. SLEEVE: Worked in the round on double pointed needles. Slip the 63-65-69-71-77-81 sts from stitch holder back on double pointed needles size 4 mm. Cast on 8-8-8-10-10-10 new sts under sleeve, insert 1 marker in the middle of the new sts = 71-73-77-81-87-91 sts. NOW MEASURE PIECE FROM HERE! Continue with A.1 over all sts. Work the 8-8-8-10-10-10 new sts and sts from A.2 in pattern A.1, i.e. pattern is reversed at the marker. When A.1 has been work to A.z, skip A.z on sleeve and continue on first row after A.z. When piece measures 4 cm, dec 1 st on each side of marker. Repeat dec every 5½-5½-4½-4-3-2½ cm 7-7-8-9-11-12 more times = 55-57-59-61-63-65 sts. When piece measures 47-47-46-45-44-42 cm, dec 1-3-5-1-3-5 sts evenly = 54-54-54-60-60-60 sts. Approx. 7 cm remain until total length of sleeve. Work A.3 9-9-9-10-10-10 times in total in width. When A.3 has been worked 1 time vertically, continue with dark grey blue Karisma / dark blue Merino Extra Fine. K 1 round. Switch to double pointed needles size 3 mm and work rib = K 1/P 2. Cast off when piece measures 54-54-53-52-51-49 cm (shorter measurements in the larger sizes because of wider shoulders). Work the other sleeve the same way. ASSEMBLY: Sew the openings under the sleeves. Fold neckband double to wrong side and stitch in place loosely. |
|||||||||||||
Diagram explanations |
|||||||||||||
|
|||||||||||||
 |
|||||||||||||
 |
|||||||||||||
Have you finished this pattern?Tag your pictures with #dropspattern or submit them to the #dropsfan gallery. Do you need help with this pattern?You'll find 28 tutorial videos, a Comments/Questions area and more by visiting the pattern on garnstudio.com. © 1982-2026 DROPS Design A/S. We reserve all rights. This document, including all its sub-sections, has copyrights. Read more about what you can do with our patterns at the bottom of each pattern on our site. |
|||||||||||||


With over 40 years in knitting and crochet design, DROPS Design offers one of the most extensive collections of free patterns on the internet - translated to 17 languages. As of today we count 324 catalogues and 12290 patterns translated into English (UK/cm). 12290
We work hard to bring you the best knitting and crochet have to offer, inspiration and advice as well as great quality yarns at incredible prices! Would you like to use our patterns for other than personal use? You can read what you are allowed to do in the Copyright text at the bottom of all our patterns. Happy crafting!
Post a comment to pattern DROPS Extra 0-1146
We would love to hear what you have to say about this pattern!
If you want to leave a question, please make sure you select the correct category in the form below, to speed up the answering process. Required fields are marked *.