
Popular categories
Looking for a yarn?


Comments / Questions (60)
![]() Ann Lauridsen wrote:
Ann Lauridsen wrote:
Forstår ikke de sorte pletter i a6 med flere. De står der bliver -1, i mit bliver der +1
25.12.2014 - 20:23DROPS Design answered:
Hei Ann. Hvad mener du med -1? Jeg kan ikke forstaa dit spörgsmaal?
15.01.2015 - 16:47
![]() Joan Steensen wrote:
Joan Steensen wrote:
Jeg har skrevet til jer med et spørgsmål og kan altså ikke komme videre vil i ikke være søde og svare
19.11.2014 - 10:24DROPS Design answered:
Hej Joan. Vi skal svare saa hurtigt vi kan. I travle perioder kan det desvaerre vare lidt laengere, saa hvis du ikke kan vente, kan du ogsaa spörge i din DROPS butik.
19.11.2014 - 10:49
![]() Joan Steensen wrote:
Joan Steensen wrote:
Jeg har et spørgsmål til ryggen jeg har lavet den første sæt af A1og skal nu igang med anden Der står 3m glat A5, 1 r og A 1 videre som før til 7 tilbage så er det jeg ikke forstår 2 p ret 1 r,A2 3m glat det kan jeg ikke få til at passe hjælp tak
17.11.2014 - 09:56DROPS Design answered:
Hej Joan. Du skal slutte af med (de 7 masker) 1 m i retstrik (dvs, den skal strikkes ret paa alle pinde), 1 r (bliver vrang paa vrangen = glatstrik), A.2 og 3 masker glat = 7 masker. Jeg skal sörge for at faa det rettet til.
19.11.2014 - 15:09
![]() Petra Coy wrote:
Petra Coy wrote:
Which way are u reading the patterns, in my case the A1 pattern. Bottom to top, left to right etc? Pls let me know. Pls include RSVP and WS. Txs so much
05.10.2014 - 00:00DROPS Design answered:
Dear Mrs Coy, you will find here all information to how to read diagrams. Happy knitting!
06.10.2014 - 09:10
![]() Petra Coy wrote:
Petra Coy wrote:
Hello! I am so excited to knit this piece though I got stuck right at beginning. How do I read the A1 pattern? On RS from right to left side and also from bottom to top? What about WS? Please let me know.....
04.10.2014 - 19:16
![]() Lorella wrote:
Lorella wrote:
E' molto bella! Ha quando le spiegazioni?
10.07.2014 - 19:35Lisete Hartmann wrote:
Lindíssimo! A-do-rei!
25.06.2014 - 18:10
![]() Gabriele wrote:
Gabriele wrote:
Diese Jacke ist wunderschön. Eine erste Vorfreude auf den kommenden Winter!
20.06.2014 - 23:09
![]() Gisela wrote:
Gisela wrote:
Tramhaftejacke,werdeichnacharbeiten
19.06.2014 - 17:06
![]() Serpin wrote:
Serpin wrote:
J'adore! Ca donne envie de tricoter tout de suite!
18.06.2014 - 11:26
|
||||||||||||||||||||||
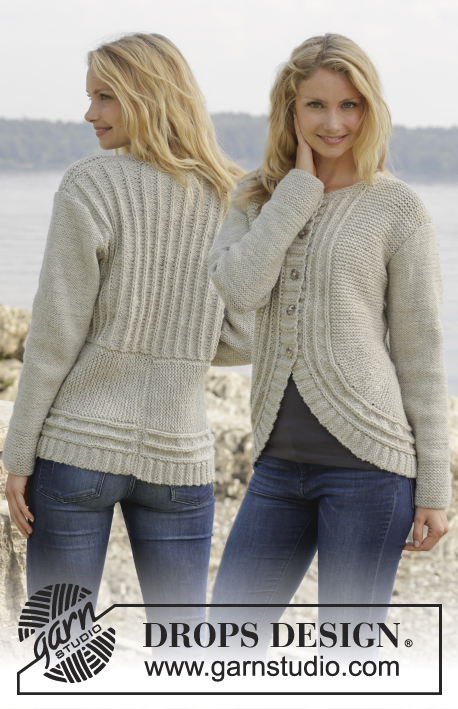
Ripple Tide#rippletidecardigan |
||||||||||||||||||||||
 |
 |
|||||||||||||||||||||
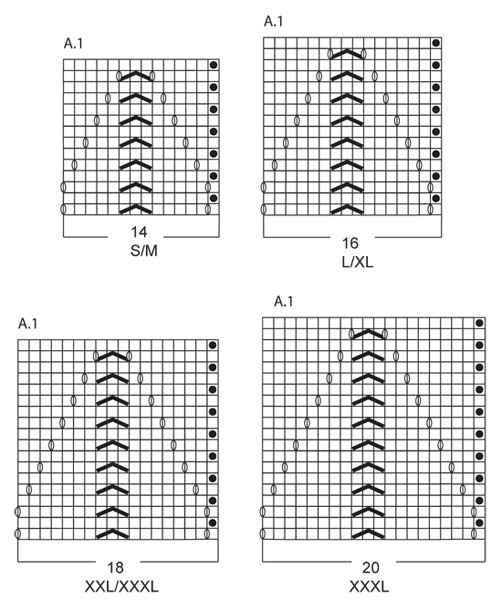
Knitted DROPS jacket in garter st with lace pattern and shawl collar in ”Nepal”. Size: S - XXXL.
DROPS 157-40 |
||||||||||||||||||||||
|
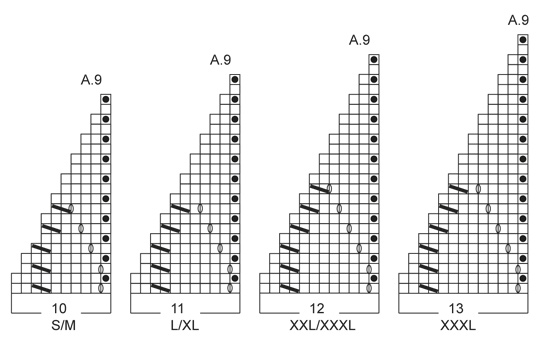
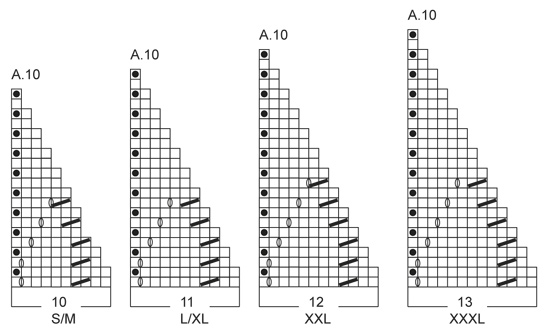
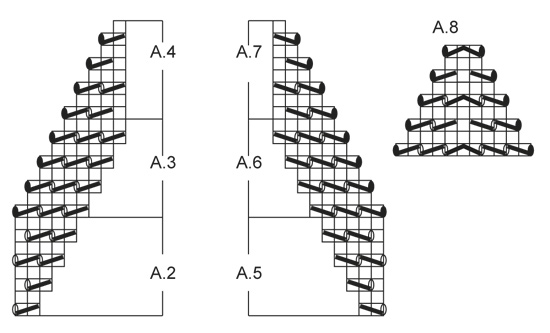
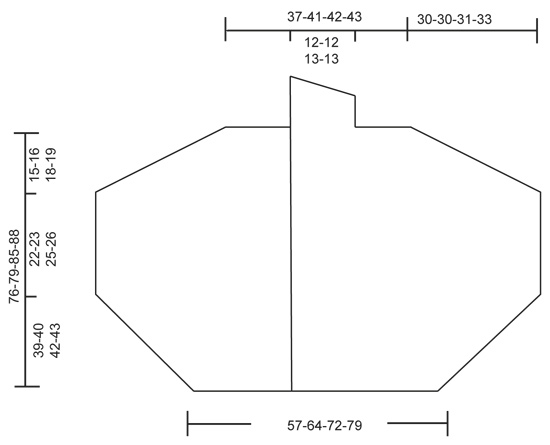
GARTER ST (back and forth on needle): K all rows. 1 ridge = 2 rows K. PATTERN: See diagrams A.1-A.10. See diagrams for correct size. The diagrams show all rows in pattern seen from RS. Diagrams A.3 and A.6 do not fit vertically when repeated but eyelet rows are continued diagonally upwards as before. DIAGRAM A.1. A.1 is repeated differently vertically. When there are 2 sts between first YO (towards A.3/A.6) in A.1 and A.3/A.6, stop repetition of A.1 vertically. I.e. seen from RS A.1 is repeated towards mid front and mid back 6 times in total vertically. Middle A.1 is repeated 4 times in total vertically. A.1 towards the side is repeated 2 times in total vertically. Then work as follows: When A.1 does not fit no of sts, i.e. after repetitions explained above, work A.9 over A.1 on right front piece and right side of back piece (= 3 repetitions of A.1) and A.10 over A.1 on left front piece and left side of back piece (= 3 repetitions of A.1). PATTERN 1: Row 1: K from RS. Row 2: P from WS. Repeat 1st and 2nd row 4 more times (= 10 rows). Row 11: K from RS. Row 12: K from WS. Row 13: K from RS. Row 14: P from WS. Row 15: P from RS. Row 16: P from WS. Repeat row 1 to 16. BUTTONHOLES: Dec from RS for 6 buttonholes on right band. 1 BUTTONHOLE = work 3 sts from mid front, make 1 YO, K the next 2 tog. On next row K the YO. Dec for buttonholes when piece measures: SIZE S/M: 10, 18, 30, 38, 50 and 58 cm. SIZE L/XL: 12, 20, 32, 40, 52 and 60 cm. SIZE XXL: 14, 22, 35, 43, 56 and 64 cm. SIZE XXXL: 13, 22, 35, 44, 57 and 66 cm. ---------------------------------------------------------- BACK PIECE: Worked back and forth on circular needle. Cast on 91-103-115-127 sts on circular needle size 5.5 mm with Nepal. Work 2 ridges in GARTER ST - see explanation above. Then work as follows from RS: 3 sts in stocking st, A.1 (= 14-16-18-20 sts) 6 times in total – READ PATTERN, 1 st in garter st, 3 sts in stocking st. Continue the pattern like this. REMEMBER THE KNITTING TENSION! When piece measures 3 cm, inc 1 st in each side of piece inside 3 sts in stocking st. Repeat inc every 4th-4th-6th-6th row 2 more times = 97-109-121-133 sts. Work inc sts in stocking st. READ ALL OF THE FOLLOWING SECTION BEFORE CONTINUING – WORK PATTERN AND INC AT THE SAME TIME. PATTERN: When A.1 has been worked 1 time vertically, work the first 2 rows of A.1, then work as follows from RS: 3 sts in stocking st, A.5, K 1 and A.1 as before until 7 sts remain, 1 st in garter st, K 1, A.2, 3 sts in stocking st. Diagrams A.2/A.5 are displaced 1 st towards mid back on every row from RS, i.e. work 1 st less of A.1 on every other row - see DIAGRAM A.1. When A.2 and A.5 have been worked 1 time vertically, continue displacement with A.3 and A.6. Work the twisted YOs in A.3/A.6 in to PATTERN 1 – see explanation above. INCREASE: All inc are done from RS. Inc 1 st in each side of piece inside 3 sts in stocking st as follows: Inc 1 st every 4th row 6-9-13-16 times, then 1 st every other row 19-13-6-0 times = 147-153-159-165 sts. Work the inc sts in to pattern 1. When all inc are done, cast on 4 new sts in each side of piece for sleeve at end of the next 2 rows = 155-161-167-173 sts. Piece measures approx. 39-40-42-43 cm. Work the new sts in garter st. Continue with pattern as before. READ ALL OF THE FOLLOWING SECTION BEFORE CONTINUING – WORK PATTERN AND DEC AT THE SAME TIME. PATTERN: When 1 st remains between lace rows A.3 and A.6, work A.8 over A.3, A.6 and the 1 st between them. When A.8 has been worked 1 time vertically, piece measures approx. 57-64-70-77 cm. Now continue piece in pattern 1. DECREASE: When piece measures 61-63-67-69 cm, work the 4 sts in garter st, then slip them on 1 stitch holder, work the rest of row, repeat on next row = 147-153-159-165 sts. Then slip sts on 1 stitch holder for diagonal shoulder as follows: Work the first 4 sts, then slip them on 1 stitch holder, work the rest of row. Repeat in each side of piece on every row 6-5-4-4 more times, then work the first 2 sts, then slip them on a stitch holder, work the rest of row. Repeat in each side of piece on every row 7-9-12-13 more times = 48-48-50-52 sts on the thread for each shoulder and 59-65-67-69 sts on needle. AT THE SAME TIME when piece measures 74-77-83-85 cm, cast off the middle 17-17-19-19 sts and finish each shoulder separately. On next row from neck cast off 1 st for neck. When all cast offs are done, 20-23-23-24 sts remain on needle for each shoulder. Piece measures approx. 76-79-85-88 cm. Cut the yarn. SHOULDER/SLEEVE: Slip all sts from stitch holder back on needle = 68-71-73-76 sts. Now inc to avoid a tight shoulder, from RS as follows: K 20-23-25-28, * 1 YO, K 6 *, repeat from *-* the rest of row 76-79-81-84 sts. K 1 row from WS, K YOs twisted. Work 1 ridge. Loosely cast off. Work the other shoulder the same way but reversed. RIGHT FRONT PIECE: Worked back and forth on circular needle. Cast on 52-58-64-70 sts (incl 6 band sts) on circular needle size 5.5 mm with Nepal. Work 2 ridges. Then work as follows from RS: 6 band sts in garter st, A.1 3 times in total, 1 st in garter st, 3 sts in stocking st. Work band sts in garter st until finished measurements. Continue the pattern like this. When piece measures 3 cm, inc 1 st in the side of piece at the end of row from RS inside 3 sts in stocking st. Repeat inc every 4th-4th-6th-6th row 2 more times = 55-61-67-73 sts. Work inc sts in stocking st. READ ALL OF THE FOLLOWING SECTION BEFORE CONTINUING – WORK PATTERN AND INC AT THE SAME TIME. PATTERN: When A.1 has been worked 1 time vertically, work the first 2 rows of A.1, then work as follows from RS: 6 band sts in garter st, A.1 as before until 7 sts remain, 1 st in garter st, K 1, A.2, 3 sts in stocking st. Diagram A.2 is displaced 1 st towards mid front on every row from RS, i.e. work 1 st less of A.1 on every other row - see DIAGRAM A.1. When A.2 has been worked 1 time vertically, continue displacement with A.3. Work the twisted YOs in A.3 in to pattern 1. Remember BUTTONHOLES - see explanation above. INCREASE: All inc are done from RS. Inc 1 st in the side of piece inside 3 sts in stocking st as follows: Inc 1 st every 4th row 6-9-13-16 times, then 1 st every other row 19-13-6-0 times = 80-83-86-89 sts. Work the inc sts in to pattern 1. When all inc are done, cast on 4 new sts in the side for sleeve at the end of next row from RS = 84-87-90-93 sts. Piece measures approx. 39-40-42-43 cm. Work the new sts in garter st. Continue with pattern as before. READ ALL OF THE FOLLOWING SECTION BEFORE CONTINUING – WORK PATTERN AND DEC AT THE SAME TIME. PATTERN: When A.3 meets band sts, work A.4 over A.3. When A.4 has been worked 1 time vertically, piece measures approx. 57-64-70-77 cm. Now continue piece in pattern 1 and garter st. DECREASE: When piece measures 61-63-67-69 cm, adjust so that next row is from WS and work as follows: Work the first 4 sts in garter st in the side, then slip them on a stitch holder, work the rest of row = 80-83-86-89 sts. On next row from WS, slip sts on 1 stitch holder for diagonal shoulder as follows: Work the first 4 sts, then slip them on 1 stitch holder, work the rest of row. Repeat on every row from WS 6-5-4-4 more times, then work the first 2 sts, then slip them on a stitch holder, work the rest of row. Repeat on every row from WS 7-9-12-13 more times = 48-48-50-52 sts on stitch holder and 36-39-40-41 sts on needle. Cut the yarn. SHOULDER/SLEEVE: Slip all sts from stitch holder back on needle = 84-87-90-93 sts. Now inc to avoid a tight shoulder, from RS as follows: K 36-39-42-45, * 1 YO, K 6 *, repeat from *-* the rest of row. K 1 row from WS, K YOs twisted = 92-95-98-101 sts. Work 1 ridge. Then loosely cast off 76-79-81-84 sts towards the side = 16-16-17-17 sts remain for shawl collar. SHAWL COLLAR: Work from mid front: * 2 rows over all sts, work 2 rows over the first 12-12-13-13 sts *, repeat from *-* until piece measures 8-8-9-9 cm measured closest to the shoulder. Cast off. LEFT FRONT PIECE: Work as right front piece but reversed. Work A.5-A.7 instead of A.2-A.4. Do not dec for buttonholes. When all inc are done, cast on 4 new sts in the side for sleeve at the end of row from WS. Work shoulder/sleeve from RS as follows: * K 6, 1 YO *, repeat from *-* until 36-39-42-45 sts remain, finish with K 36-39-42-45. ASSEMBLY: Sew side seams in outer loops of edge sts up to and including the 4 inc sts in garter st. Sew shoulder seams in outer loops of edge sts from and with the 4 inc sts in garter st up to shawl collar. Sew shawl collar tog mid back and sew it to the neckline. Sew the buttons on to the left band. |
||||||||||||||||||||||
Diagram explanations |
||||||||||||||||||||||
|
||||||||||||||||||||||
 |
||||||||||||||||||||||
 |
||||||||||||||||||||||
 |
||||||||||||||||||||||
 |
||||||||||||||||||||||
 |
||||||||||||||||||||||
Have you finished this pattern?Tag your pictures with #dropspattern #rippletidecardigan or submit them to the #dropsfan gallery. Do you need help with this pattern?You'll find 29 tutorial videos, a Comments/Questions area and more by visiting the pattern on garnstudio.com. © 1982-2026 DROPS Design A/S. We reserve all rights. This document, including all its sub-sections, has copyrights. Read more about what you can do with our patterns at the bottom of each pattern on our site. |
||||||||||||||||||||||


With over 40 years in knitting and crochet design, DROPS Design offers one of the most extensive collections of free patterns on the internet - translated to 17 languages. As of today we count 324 catalogues and 12290 patterns translated into English (UK/cm). 12290
We work hard to bring you the best knitting and crochet have to offer, inspiration and advice as well as great quality yarns at incredible prices! Would you like to use our patterns for other than personal use? You can read what you are allowed to do in the Copyright text at the bottom of all our patterns. Happy crafting!
Post a comment to pattern DROPS 157-40
We would love to hear what you have to say about this pattern!
If you want to leave a question, please make sure you select the correct category in the form below, to speed up the answering process. Required fields are marked *.