
Popular categories
Looking for a yarn?


Comments / Questions (60)
![]() E. De Groot wrote:
E. De Groot wrote:
Kunt u nog reageren op mijn vraag van 4-10-2015? Alvast bedankt.
18.10.2015 - 11:46DROPS Design answered:
Beste. Ik heb de vraag neergelegd bij mijn collega's bij Design om zeker te zijn. Ik kan helaas niet zeggen hoe lang het duurt
19.10.2015 - 16:04
![]() Leverrier wrote:
Leverrier wrote:
Bonjour, pouvez vous me donner plus de précisions pour le col : nombre de mailles, sont elles montées sur l'ouvrage ? merci d'avance pour votre réponse. salutations.Thérèse.
13.10.2015 - 11:27DROPS Design answered:
Bonjour Mme Leverrier, le col se tricote sur les 16-17 m (cf taille) à la fin des devants, après les épaules/manches. Il se tricote en rangs raccourcis (plus de rangs sur les mailles de l'extérieur du col) jusqu'à 8-9 cm. On assemble ensuite les 2 cols entre eux (celui du devant droit et celui du devant gauche) et on le coud ensuite à l'encolure dos. Bon tricot!
13.10.2015 - 13:21
![]() E. De Groot wrote:
E. De Groot wrote:
Ik wil jullie graag bedanken voor het handhaven van deze site. Er staan prachtige patronen op met duidelijke uitleg. Ook de opmerkingen bij een patroon werken vaak heel verhelderend. Het heeft mij al vele plezierige uren gegeven en mijn dochter hele leuke kleding. Nogmaals: Bedankt.
04.10.2015 - 10:17
![]() E. De Groot wrote:
E. De Groot wrote:
Bij het voorpand staat dat ik alle steken van de hulpnaald weer op moet nemen = 87 steken. Dan moet ik 7 steken meerderen om een strakke naad te voorkomen. Vervolgens staat er afhechten 48 st, dan blijven er 16 over voor de halskraag. Maar 87 + 7 minus 48 is 46 steken. Ik heb er dus 30 teveel. Wat doe ik fout?
04.10.2015 - 10:14DROPS Design answered:
Beste. Het patroon was inderdaad fout. Het is nu aangepast. Excuses voor de lange wachttijd!!!
12.10.2016 - 15:34Anna wrote:
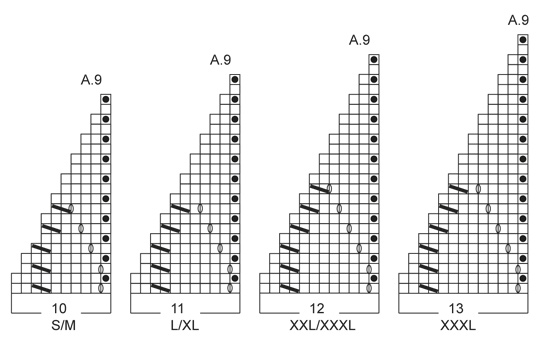
On the photo it looks like there is no line of garter stitch in A9/A10 immediately next to the K2tog of A3/A2ff. It also seems like A9/A10 should be knit on the opposite sides as indicated in the pattern. Also, it looks like there are only 2lines of K2tog/YO but by following the pattern I end up with 2 continuous lines plus sections with 3 lines. Please help me!
21.09.2015 - 08:09DROPS Design answered:
Dear Anna, A.9 should be worked on right side of back piece (= at beg of row) and A.9 on left side of back piece (= at the end of row), the sts at beg & end of row will be worked instead in A.5/A.2. Diagrams A.5/A.2 will displace towards mid-back, you will then have not enough sts to work a full repeat in A.1, that's why these will be replaced with A.9/A.10. Happy knitting!
21.09.2015 - 11:07Anna wrote:
This is a beautiful pattern but I can't get past the second vertical repetition of A1. How and where and when to start A9&A10 and how the whole A2/A3 ends up looking like the close up photo above. Please, could you include a complete chart or at least a chart of the first two and a half repetitions of A1 (with the side charts)? I've started over many times. Each time, the result doesn't look like the close up photo of the pattern.
21.09.2015 - 08:06DROPS Design answered:
Dear Anna, you start working A.9 and A.10 on each side instead of A.1 when there are 2 sts between first yo (towards A.3/A.6) in A.1, ie when displacing A.1 working A.2/A.5 you will then have not sts enough to work a whole repeat in A.1 in width, work then A.9/A.10. Happy knitting!
21.09.2015 - 11:03
![]() Hanne wrote:
Hanne wrote:
Tak for svar! Men, jeg er på den igen. Jeg blev nødt til at trævle op, fordi jeg endte med ALT for mange masker, så: - Der skal 1 m. ud på hver 4. pind i alt ti gange? - Hvad skal der ske med A1, efterhånden som det bliver mindre; lige pludselig starter man jo der hvor de tre masker skal strikkes sammen, men har kun to. Skal de to så strikkes ret sammen? Jeg er i gang med at strikke den i S/M. På forhånd tak, og god søndag!
24.05.2015 - 13:50DROPS Design answered:
Hej Hanne, du tager 1 m ud indenfor 3 kantm først 3 gange, så på hver 4.p 6 gange og sidst på hver 2.p 19 gange. God fornøjelse!
25.05.2015 - 09:43
![]() Annita wrote:
Annita wrote:
Hej, Jeg har strikket 2 rapporter i højden og kan overhovedet ikke finde ud af at få A9 og A10 til at passe ind det bliver helt forkert hjæææælp elsker denne jakke og vil så gerne videre i en fart. Tak for nogle dejlige opskrifter Ser frem til at høre fra jer Hilsen Annita
13.04.2015 - 18:34DROPS Design answered:
Hej Annita. Kan du fortaelle mig hvilken str du laver og hvad der praecis gaar galt. Vi har ogsaa et önske paa at faa lavet en video paa disse to mönstre, saa det bliver tydeligt.
23.04.2015 - 14:17
![]() Hanne wrote:
Hanne wrote:
Hej, jeg er lige blevet færdig med første gang A1, og er nået hertil: Når A.1 er strikket 1 gang i højden, strikkes de 2 første p af A.. Jeg kan desværre ikke få det til at passe, hverken i mit hoved eller praktisk. Men der er tilsyneladende også syv m. for meget. Grunden til det ikke giver mening i mit hoved: der er 97 m., så man kan lave mønstret seks gange. Så er der 13 m tilbage, hvoraf de seks skal strikkes som glatstrik. Jeg håber ikke det er et alt for dumt spørgsmål :)
26.03.2015 - 20:34DROPS Design answered:
Hej Hanne, Du strikker de første 2 pinde A.1 over de andre, de nye masker du har taget ud i hver side strikkes i glatstrik. God fornøjelse!
18.05.2015 - 10:09Sylvia María Castillo wrote:
Me encanta el patrón pero no logro seguir las instrucciones. Por ejemplo estoy teniendo problemas en la página 3/11 tanto en las instrucciones de la espalda como en la sección siguiente cuando habla del punto musgo.
20.01.2015 - 15:41DROPS Design answered:
Hola Sylvia! Para poder ayudarte tendrías que concretarme donde está el problema o los problemas.
24.01.2015 - 12:32
|
||||||||||||||||||||||
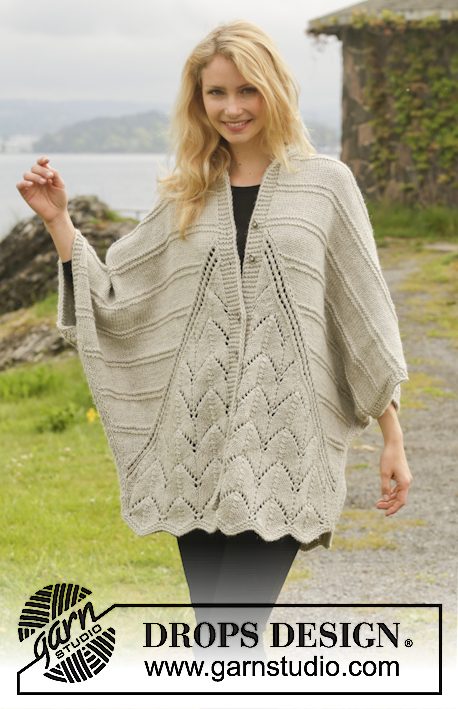
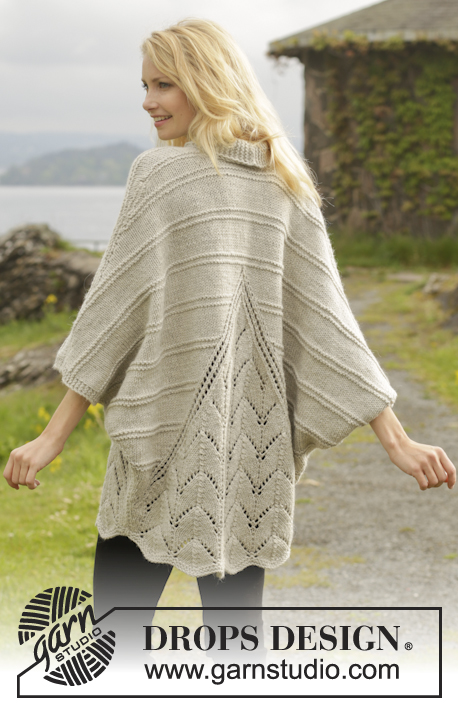
Ripple Tide#rippletidecardigan |
||||||||||||||||||||||
 |
 |
|||||||||||||||||||||
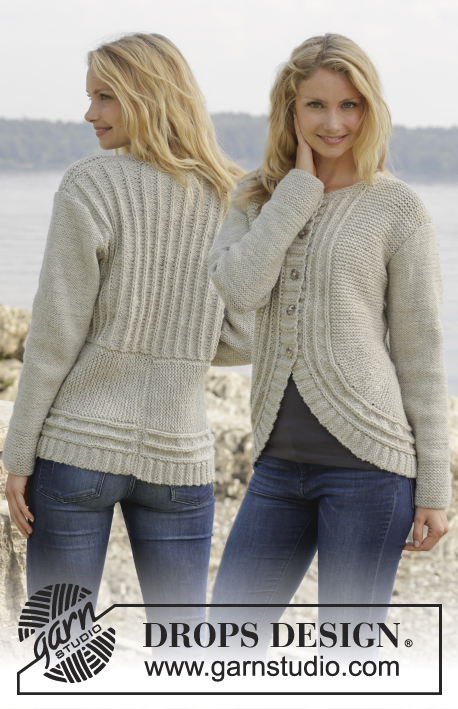
Knitted DROPS jacket in garter st with lace pattern and shawl collar in ”Nepal”. Size: S - XXXL.
DROPS 157-40 |
||||||||||||||||||||||
|
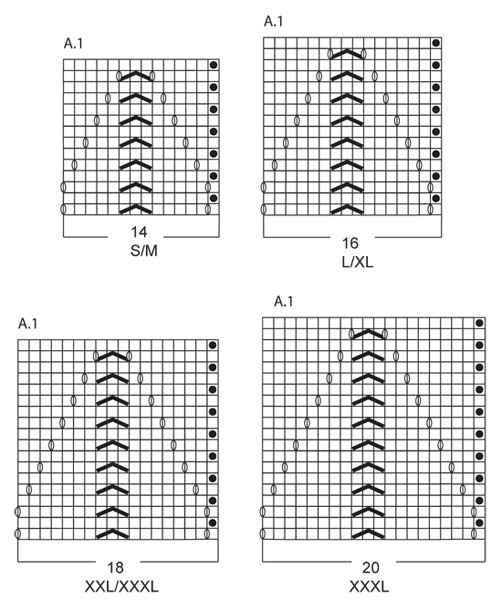
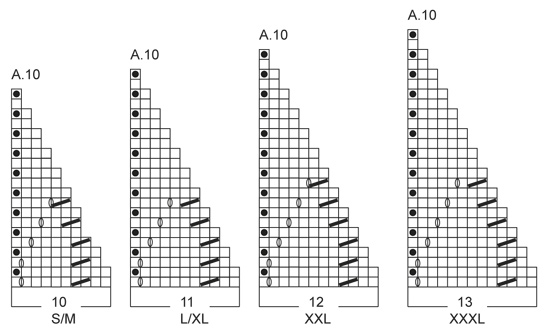
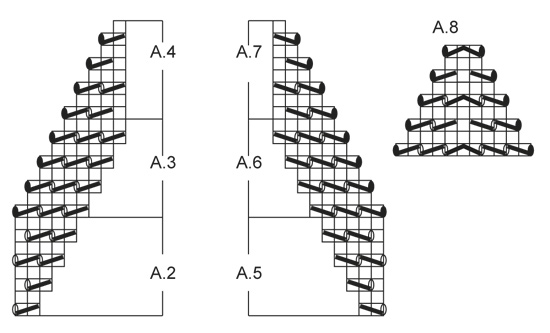
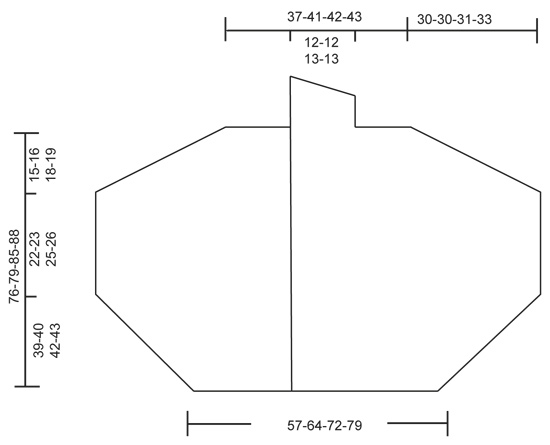
GARTER ST (back and forth on needle): K all rows. 1 ridge = 2 rows K. PATTERN: See diagrams A.1-A.10. See diagrams for correct size. The diagrams show all rows in pattern seen from RS. Diagrams A.3 and A.6 do not fit vertically when repeated but eyelet rows are continued diagonally upwards as before. DIAGRAM A.1. A.1 is repeated differently vertically. When there are 2 sts between first YO (towards A.3/A.6) in A.1 and A.3/A.6, stop repetition of A.1 vertically. I.e. seen from RS A.1 is repeated towards mid front and mid back 6 times in total vertically. Middle A.1 is repeated 4 times in total vertically. A.1 towards the side is repeated 2 times in total vertically. Then work as follows: When A.1 does not fit no of sts, i.e. after repetitions explained above, work A.9 over A.1 on right front piece and right side of back piece (= 3 repetitions of A.1) and A.10 over A.1 on left front piece and left side of back piece (= 3 repetitions of A.1). PATTERN 1: Row 1: K from RS. Row 2: P from WS. Repeat 1st and 2nd row 4 more times (= 10 rows). Row 11: K from RS. Row 12: K from WS. Row 13: K from RS. Row 14: P from WS. Row 15: P from RS. Row 16: P from WS. Repeat row 1 to 16. BUTTONHOLES: Dec from RS for 6 buttonholes on right band. 1 BUTTONHOLE = work 3 sts from mid front, make 1 YO, K the next 2 tog. On next row K the YO. Dec for buttonholes when piece measures: SIZE S/M: 10, 18, 30, 38, 50 and 58 cm. SIZE L/XL: 12, 20, 32, 40, 52 and 60 cm. SIZE XXL: 14, 22, 35, 43, 56 and 64 cm. SIZE XXXL: 13, 22, 35, 44, 57 and 66 cm. ---------------------------------------------------------- BACK PIECE: Worked back and forth on circular needle. Cast on 91-103-115-127 sts on circular needle size 5.5 mm with Nepal. Work 2 ridges in GARTER ST - see explanation above. Then work as follows from RS: 3 sts in stocking st, A.1 (= 14-16-18-20 sts) 6 times in total – READ PATTERN, 1 st in garter st, 3 sts in stocking st. Continue the pattern like this. REMEMBER THE KNITTING TENSION! When piece measures 3 cm, inc 1 st in each side of piece inside 3 sts in stocking st. Repeat inc every 4th-4th-6th-6th row 2 more times = 97-109-121-133 sts. Work inc sts in stocking st. READ ALL OF THE FOLLOWING SECTION BEFORE CONTINUING – WORK PATTERN AND INC AT THE SAME TIME. PATTERN: When A.1 has been worked 1 time vertically, work the first 2 rows of A.1, then work as follows from RS: 3 sts in stocking st, A.5, K 1 and A.1 as before until 7 sts remain, 1 st in garter st, K 1, A.2, 3 sts in stocking st. Diagrams A.2/A.5 are displaced 1 st towards mid back on every row from RS, i.e. work 1 st less of A.1 on every other row - see DIAGRAM A.1. When A.2 and A.5 have been worked 1 time vertically, continue displacement with A.3 and A.6. Work the twisted YOs in A.3/A.6 in to PATTERN 1 – see explanation above. INCREASE: All inc are done from RS. Inc 1 st in each side of piece inside 3 sts in stocking st as follows: Inc 1 st every 4th row 6-9-13-16 times, then 1 st every other row 19-13-6-0 times = 147-153-159-165 sts. Work the inc sts in to pattern 1. When all inc are done, cast on 4 new sts in each side of piece for sleeve at end of the next 2 rows = 155-161-167-173 sts. Piece measures approx. 39-40-42-43 cm. Work the new sts in garter st. Continue with pattern as before. READ ALL OF THE FOLLOWING SECTION BEFORE CONTINUING – WORK PATTERN AND DEC AT THE SAME TIME. PATTERN: When 1 st remains between lace rows A.3 and A.6, work A.8 over A.3, A.6 and the 1 st between them. When A.8 has been worked 1 time vertically, piece measures approx. 57-64-70-77 cm. Now continue piece in pattern 1. DECREASE: When piece measures 61-63-67-69 cm, work the 4 sts in garter st, then slip them on 1 stitch holder, work the rest of row, repeat on next row = 147-153-159-165 sts. Then slip sts on 1 stitch holder for diagonal shoulder as follows: Work the first 4 sts, then slip them on 1 stitch holder, work the rest of row. Repeat in each side of piece on every row 6-5-4-4 more times, then work the first 2 sts, then slip them on a stitch holder, work the rest of row. Repeat in each side of piece on every row 7-9-12-13 more times = 48-48-50-52 sts on the thread for each shoulder and 59-65-67-69 sts on needle. AT THE SAME TIME when piece measures 74-77-83-85 cm, cast off the middle 17-17-19-19 sts and finish each shoulder separately. On next row from neck cast off 1 st for neck. When all cast offs are done, 20-23-23-24 sts remain on needle for each shoulder. Piece measures approx. 76-79-85-88 cm. Cut the yarn. SHOULDER/SLEEVE: Slip all sts from stitch holder back on needle = 68-71-73-76 sts. Now inc to avoid a tight shoulder, from RS as follows: K 20-23-25-28, * 1 YO, K 6 *, repeat from *-* the rest of row 76-79-81-84 sts. K 1 row from WS, K YOs twisted. Work 1 ridge. Loosely cast off. Work the other shoulder the same way but reversed. RIGHT FRONT PIECE: Worked back and forth on circular needle. Cast on 52-58-64-70 sts (incl 6 band sts) on circular needle size 5.5 mm with Nepal. Work 2 ridges. Then work as follows from RS: 6 band sts in garter st, A.1 3 times in total, 1 st in garter st, 3 sts in stocking st. Work band sts in garter st until finished measurements. Continue the pattern like this. When piece measures 3 cm, inc 1 st in the side of piece at the end of row from RS inside 3 sts in stocking st. Repeat inc every 4th-4th-6th-6th row 2 more times = 55-61-67-73 sts. Work inc sts in stocking st. READ ALL OF THE FOLLOWING SECTION BEFORE CONTINUING – WORK PATTERN AND INC AT THE SAME TIME. PATTERN: When A.1 has been worked 1 time vertically, work the first 2 rows of A.1, then work as follows from RS: 6 band sts in garter st, A.1 as before until 7 sts remain, 1 st in garter st, K 1, A.2, 3 sts in stocking st. Diagram A.2 is displaced 1 st towards mid front on every row from RS, i.e. work 1 st less of A.1 on every other row - see DIAGRAM A.1. When A.2 has been worked 1 time vertically, continue displacement with A.3. Work the twisted YOs in A.3 in to pattern 1. Remember BUTTONHOLES - see explanation above. INCREASE: All inc are done from RS. Inc 1 st in the side of piece inside 3 sts in stocking st as follows: Inc 1 st every 4th row 6-9-13-16 times, then 1 st every other row 19-13-6-0 times = 80-83-86-89 sts. Work the inc sts in to pattern 1. When all inc are done, cast on 4 new sts in the side for sleeve at the end of next row from RS = 84-87-90-93 sts. Piece measures approx. 39-40-42-43 cm. Work the new sts in garter st. Continue with pattern as before. READ ALL OF THE FOLLOWING SECTION BEFORE CONTINUING – WORK PATTERN AND DEC AT THE SAME TIME. PATTERN: When A.3 meets band sts, work A.4 over A.3. When A.4 has been worked 1 time vertically, piece measures approx. 57-64-70-77 cm. Now continue piece in pattern 1 and garter st. DECREASE: When piece measures 61-63-67-69 cm, adjust so that next row is from WS and work as follows: Work the first 4 sts in garter st in the side, then slip them on a stitch holder, work the rest of row = 80-83-86-89 sts. On next row from WS, slip sts on 1 stitch holder for diagonal shoulder as follows: Work the first 4 sts, then slip them on 1 stitch holder, work the rest of row. Repeat on every row from WS 6-5-4-4 more times, then work the first 2 sts, then slip them on a stitch holder, work the rest of row. Repeat on every row from WS 7-9-12-13 more times = 48-48-50-52 sts on stitch holder and 36-39-40-41 sts on needle. Cut the yarn. SHOULDER/SLEEVE: Slip all sts from stitch holder back on needle = 84-87-90-93 sts. Now inc to avoid a tight shoulder, from RS as follows: K 36-39-42-45, * 1 YO, K 6 *, repeat from *-* the rest of row. K 1 row from WS, K YOs twisted = 92-95-98-101 sts. Work 1 ridge. Then loosely cast off 76-79-81-84 sts towards the side = 16-16-17-17 sts remain for shawl collar. SHAWL COLLAR: Work from mid front: * 2 rows over all sts, work 2 rows over the first 12-12-13-13 sts *, repeat from *-* until piece measures 8-8-9-9 cm measured closest to the shoulder. Cast off. LEFT FRONT PIECE: Work as right front piece but reversed. Work A.5-A.7 instead of A.2-A.4. Do not dec for buttonholes. When all inc are done, cast on 4 new sts in the side for sleeve at the end of row from WS. Work shoulder/sleeve from RS as follows: * K 6, 1 YO *, repeat from *-* until 36-39-42-45 sts remain, finish with K 36-39-42-45. ASSEMBLY: Sew side seams in outer loops of edge sts up to and including the 4 inc sts in garter st. Sew shoulder seams in outer loops of edge sts from and with the 4 inc sts in garter st up to shawl collar. Sew shawl collar tog mid back and sew it to the neckline. Sew the buttons on to the left band. |
||||||||||||||||||||||
Diagram explanations |
||||||||||||||||||||||
|
||||||||||||||||||||||
 |
||||||||||||||||||||||
 |
||||||||||||||||||||||
 |
||||||||||||||||||||||
 |
||||||||||||||||||||||
 |
||||||||||||||||||||||
Have you finished this pattern?Tag your pictures with #dropspattern #rippletidecardigan or submit them to the #dropsfan gallery. Do you need help with this pattern?You'll find 29 tutorial videos, a Comments/Questions area and more by visiting the pattern on garnstudio.com. © 1982-2026 DROPS Design A/S. We reserve all rights. This document, including all its sub-sections, has copyrights. Read more about what you can do with our patterns at the bottom of each pattern on our site. |
||||||||||||||||||||||


With over 40 years in knitting and crochet design, DROPS Design offers one of the most extensive collections of free patterns on the internet - translated to 17 languages. As of today we count 324 catalogues and 12290 patterns translated into English (UK/cm). 12290
We work hard to bring you the best knitting and crochet have to offer, inspiration and advice as well as great quality yarns at incredible prices! Would you like to use our patterns for other than personal use? You can read what you are allowed to do in the Copyright text at the bottom of all our patterns. Happy crafting!
Post a comment to pattern DROPS 157-40
We would love to hear what you have to say about this pattern!
If you want to leave a question, please make sure you select the correct category in the form below, to speed up the answering process. Required fields are marked *.