
Popular categories
Looking for a yarn?


Comments / Questions (47)
![]() Nedaa wrote:
Nedaa wrote:
Hello there, I want to thank you for this very beautiful pattern, you can't imagine how I fell in love with it. I just have one question, At the point of working for the heel (work until the piece measures 26 cm, Keep the first 10 sts on the needle. The sts for heel should be 9 (2K + A.3 (7 sts)) not 10 as we Dec 3 times before A.3 and after A.5, I'm I right or did I miss something here?
05.02.2024 - 15:55DROPS Design answered:
Dear Nedaa, in first size you decrease only 2 times: after 14 cm and after 20 cm, so that 3 sts before A.3 remain at the beg of the round. Happy knitting!
06.02.2024 - 08:05
![]() Emily wrote:
Emily wrote:
About the chart: With the three stitch cable how do I know when to purl and when to knit the single stitch? Most patterns have different symbols for these, why not yours?
05.02.2023 - 17:14DROPS Design answered:
Dear Emily, whether you k1 or p1 will depend on the moss stitch that you are working in the cable; if you knit 1 in the first row, in the next row you will purl 1. Happy knitting!
05.02.2023 - 23:45
![]() Kana wrote:
Kana wrote:
Hello, What does “finished measurement” mean? Thanks.
08.06.2022 - 04:02DROPS Design answered:
Dear Kana, this means until you decrease or cast off the stitches. Happy knitting!
08.06.2022 - 08:08
![]() Kana wrote:
Kana wrote:
Hi, I’m Japanese and some words I don’t understand… What does “finished measurements”mean? Thanks.
08.06.2022 - 03:59
![]() Ines Weber wrote:
Ines Weber wrote:
Hallo zusammen, stricke die Socken in Größe 38/40. Habe die Fersenabnahme beendet. Muss ich das Auffassen der 10 M aus der Fersenwand mit dem Beginn der unteren Fußmitte verbinden oder eine zusätzliche Reihe mit der Musterfolge rechte M aufnehmen , A.2, A.e, A.4, rechte M aufnehmen einfügen? Herzliche Grüße und vielen Dank!
07.09.2021 - 18:25DROPS Design answered:
Liebe Frau Weber, nach der Fersenabnahmen, fassen Sie 10 M aus der linken Seite vom Fersenwand + stricken Sie die 24 stillgelegten Maschen + fassen Sie 10 M aus der rechten Seite vom Fersenrand. Nun 6 M stricken, die Runden beginnen dann hier und so wird es gestrickt: 15 M re, Mark, Fuß: 1 M li, A.2, A.e, A.4, 1 M li, 15 M re. Gleichzeitig wird 1 m vor der 1. Markierung und 1 M nach der 2. Markierung abgenommen. Kann das Ihnen helfen?
08.09.2021 - 07:31
![]() Teetje wrote:
Teetje wrote:
Hallo, das Zopfmuster kommt bei mir zustande, aber dieses "Rautenmuster" auf der Vorderseite der Socke bleibt immer flach. Vielleicht verstehe ich das Muster aber auch nicht richtig... Können Sie mir helfen?
05.09.2021 - 20:57DROPS Design answered:
Liebe Frau Teetje, um dieses "Rautenmuster" zu stricken, werden Sie am anfang A.1 zuerst weniger linken Maschen stricken (3. Symbol dann 4. Symbol, so haben Sie immer mehr Maschen (Perlmuster) zwischen den beiden Zöpften, dann vergrössert sich die Maschenanzahl von linken Maschen wieder um der 2. Tei von "rauten" zu stricken, usw, dh durch die Zöpfen von 3. und 4. Symbol sollen Sie die Zöpfe so bilden. Hoffentlich kann es Ihnen helfen. Viel Spaß beim stricken!
06.09.2021 - 07:57
![]() Ines Weber wrote:
Ines Weber wrote:
Hallo zusammen, habe den Schaft beendet und möchte mit der Fersenwand beginnen. Bin stricktechnisch mittig zwischen Nadel 4 und 1 angekommenen. Um in der nächsten Hinrunde beidseitig durch Herausstricken je eine M zuzunehmen, muss ich Nadel 4 zurückstricken, um den Anfang für die Hinrunde zu finden oder doch das Muster von Nadel 1 arbeiten, dann die M in der Rückrunde stricken, wie sie erscheinen , um danach mit der Zunahme zu beginnen? Viele Grüße aus Thüringen 🙋♀️
31.08.2021 - 23:47DROPS Design answered:
Liebe Frau Weber, bei der 1. Reihe der Fersen, stricken Sie ersten 10-11-12 M (siehe Größe), 1 Maschen anschlagen (Randmasche), wenden Sie, und stricken Sie 20-22-24 Maschen und schlagen 1 Masche an = jetzt haben Sie 22-24-26 Maschen für die Ferse, alle andere Maschen stilllegen und 5.5 cm wie beschrieben stricken. (Bei den Hinreihen Maschen wie im Diagram stricken). Viel Spaß beim stricken!
01.09.2021 - 07:18
![]() Elodie Diongre wrote:
Elodie Diongre wrote:
Bonjour, Je suis en train de commencer le 1er chausson, mais je bloque un peu sur le diagramme, vu que l'on tricote en rond, on est toujours sur l'endroit du travail. Et de ce fait, je ne comprend pas la légende du diagramme... Pouvez vous m'aider ? Merci
25.07.2021 - 16:37DROPS Design answered:
Bonjour Mme Diongre, les diagrammes se tricotent en rond sauf pour le talon où on va en tricoter certains en rangs - en rond, lisez toujours le diagramme de droite à gauche, comme les mailles doivent se présenter (= ex. le carré vide = à l'endroit, le point noir = à l'envers). Bon tricot!
26.07.2021 - 09:04
![]() Louisa wrote:
Louisa wrote:
Hallo! Würdet ihr empfehlen, die Socken am Ende zu behandeln (also Bügeln oder Spannen) oder ist das bei Drops Nepal keine gute Idee? Liebe Grüße!
12.12.2020 - 15:13DROPS Design answered:
Liebe Louisa, Sie können die Socken einfach waschen und flach trocknen lassen - folgen Sie die Pflegehinweise bei der Banderolle (siehe auch Farbarkarte online) und hier lesen Sie noch mehr - Ihr DROPS Laden hat sicher auch noch mehr Tipps für Sie :)
14.12.2020 - 08:15
![]() Gabrielle wrote:
Gabrielle wrote:
Bonjour, C'est la première fois que je tricote des chaussettes, et que je dois relever des mailles. Je ne suis pas sûre de où relever les mailles... Est ce que je relève les 10 mailles à intervalle régulier sur toute la longueur du talon, ou du côté des 24 mailles arrêtées ou du côté des 12 mailles restant après les diminutions du talon ? Merci
11.09.2020 - 10:01DROPS Design answered:
Bonjour Gabrielle, cette vidéo montre comment tricoter les diminutions du talon, puis, comment, (time code 5:47) on tricote les mailles du talon en relevant x mailles (= 10 dans ce modèle) le long du côté gauche du talon, on tricote les mailles en attente (24 ici en taille 38/40) et on relève x mailles (10 dans ce modèle) le long du côté droit du talon. Bon tricot!
11.09.2020 - 13:29
|
||||||||||||||||||||||
Walk With Me#walkwithmesocks |
||||||||||||||||||||||
|
|
||||||||||||||||||||||
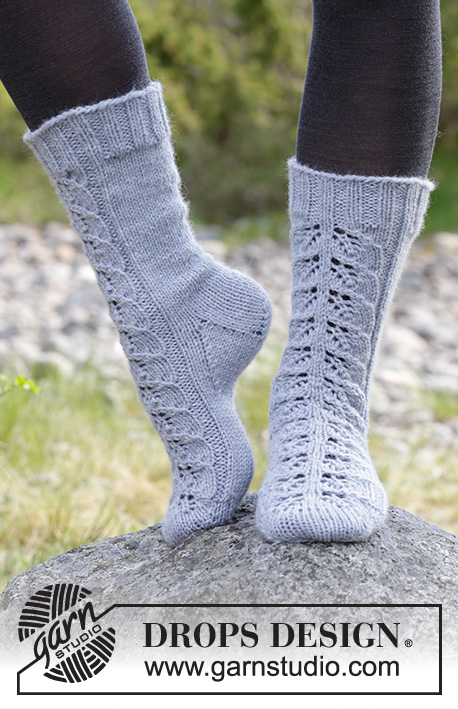
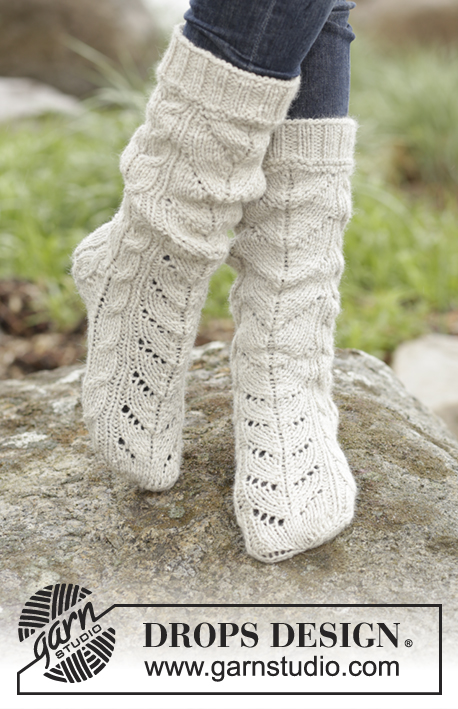
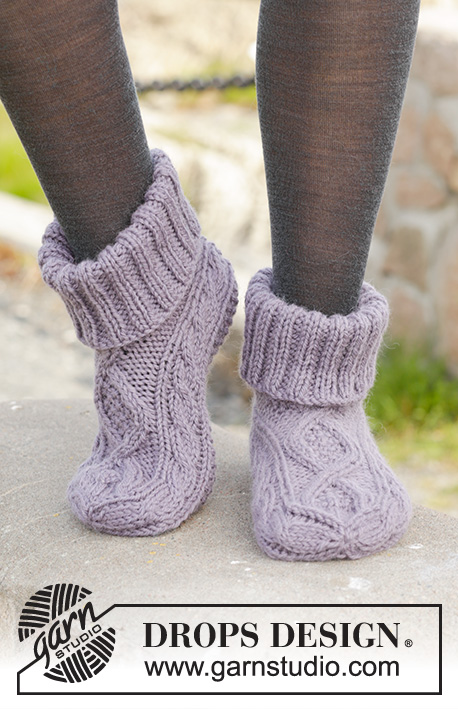
Knitted DROPS socks with cables in "Nepal". Size 35-43
DROPS 156-51 |
||||||||||||||||||||||
|
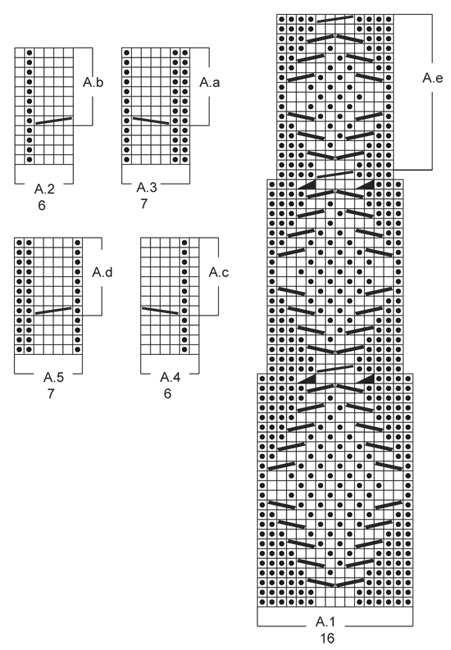
PATTERN: See diagrams A.1-A.5. The diagrams show the pattern seen from RS. DECREASE TIP: Dec 1 st before marker/A.3 as follows: K 2 tog. Dec 1 st after marker/A.5 as follows: K 2 twisted tog. HEEL DECREASE: Row 1 (= RS): Work until 7-7-8 sts remain, slip next st as if to K, K 1, psso, turn piece. Row 2 (= WS): Work until 7-7-8 sts remain, slip next st as if to P, P 1, psso, turn piece. Row 3 (= RS): Work until 6-6-7 sts remain, slip next st as if to K, K 1, psso, turn piece. Row 4 (= WS): Work until 6-6-7 sts remain, slip next st as if to P, P 1, psso, turn piece. Continue dec like this with 1 st less before each dec until there are 10-12-12 sts on needle. ---------------------------------------------------------- SOCK: Worked in the round on double pointed needles from mid back. Cast on 60-64-68 sts on double pointed needles size 4.5 mm with Nepal. K 1 round. Then work rib = K 2/P 2 until piece measures 4 cm. REMEMBER THE KNITTING TENSION! * P 1 round, K 1 round*, repeat from *-* 1 more time, AT THE SAME TIME dec 8 sts evenly on last round = 52-56-60 sts. Switch to double pointed needles size 5 mm. Then K 5-7-9, A.3 (= 7 sts) – see explanation above, A.2 (= 6 sts), A.1 (= 16 sts), A.4 (= 6 sts), A.5 (= 7 sts), finish with K 5-7-9. Continue pattern like this. When A.2 to A.5 have been worked 1 time vertically, repeat A.a to A.d until finished measurements. When A.1 has been worked 1 time vertically, work A.e until finished measurements. Continue this pattern AT THE SAME TIME dec – READ DECREASE TIP above - in the different sizes: Size 35/37: When piece measures 14 and 20 cm, dec 1 st before A.3 and 1 st after A.5 = 44 sts after all dec. NOTE: Dec 4 sts in A.1 - see diagram. Size 38/40: When piece measures 7, 16 and 21 cm, dec 1 st before A.3 and 1 st after A.5 = 46 sts after all dec. NOTE: Dec 4 sts in A.1 - see diagram. Size 41/43: When piece measures 7, 16, 21 and 26 cm, dec 1 st before A.3 and 1 st after A.5 = 48 sts after all dec. NOTE: Dec 4 sts in A.1 - see diagram. Work until piece measures 26-27-28 cm. Now keep the first 10-11-12 sts on needle (i.e. 3-4-5 K sts and A.3), slip the next 24 sts on 1 stitch holder (= mid on top of foot) and keep the last 10-11-12 sts on needle (i.e. A.5 and 3-4-5 K sts) = 20-22-24 sts for heel. Now work piece back and forth. On next row from RS, inc 1 st in each side of piece by working 2 sts in first and last st = 22-24-26 sts. P 1, A.3, stocking st and A.5 and finish with P 1 back and forth over heel sts for 5½ cm. Insert 1 marker and measure the piece from here. Adjust to finish the pattern nicely. Now work in stocking st over all sts and dec for heel - READ HEEL DECREASE. After heel dec, pick up 10-10-11 sts on each side of heel and slip the 24 sts from stitch holder back on needle = 54-56-58 sts. K 5-6-6 (= mid under foot) = beg of round. Then work as follows while AT THE SAME TIME inserting 2 markers in piece: K 14-15-16, insert 1 marker, P 1, A.2, A.e, A.4, P 1, insert 2nd marker, K 14-15-16. Continue the pattern like this AT THE SAME TIME dec 1 st before 1st marker and 1 st after 2nd marker on every round 9 times in total = 36-38-40 sts (= 10-12-14 sts in stocking st under foot). Work until piece measures 19-21-23 cm from marker on heel (= 3 cm remain). Now work in stocking st over sts in A.e, adjust to finish with 1 half repetition of A.e vertically, or beg stocking st earlier. Continue A.2 and A.4 until finished measurements. Insert 4 markers in the piece as follows: K 5-6-7, insert 1st marker, P 1, work A.2 AT THE SAME TIME insert 2nd marker between 5th and 6th st, K sts over foot (= 14 sts), A.4 AT THE SAME TIME insert 3rd marker between 1st and 2nd st, P 1, insert 4th marker, finish with K 5-6-7 (= 14 sts on top of foot, 10-12-14 sts under foot and 6 sts in each side). Now dec for toe on next round as follows: Dec 1 st after 2nd marker on top of foot and 1 st before 3rd marker on top of foot, repeat dec every round 2-1-0 times in total – remember DECREASE TIP = 10-12-14 sts on top of foot and 10-12-14 sts under foot (= 32-36-40 sts in total). On next round, dec as follows: Dec 1 st before 1st and 3rd marker and 1 st after 2nd and 4th marker (= 4 dec in total). Repeat dec every round 4-5-6 times in total AT THE SAME TIME on last dec work cable sts in A.2 and A.4 as follows: K 2 twisted tog, K 2 tog. After all dec there are 12 sts on needle. Cut the yarn and pull it through the remaining sts, tighten tog and fasten. |
||||||||||||||||||||||
Diagram explanations |
||||||||||||||||||||||
|
||||||||||||||||||||||
 |
||||||||||||||||||||||
Have you finished this pattern?Tag your pictures with #dropspattern #walkwithmesocks or submit them to the #dropsfan gallery. Do you need help with this pattern?You'll find 23 tutorial videos, a Comments/Questions area and more by visiting the pattern on garnstudio.com. © 1982-2026 DROPS Design A/S. We reserve all rights. This document, including all its sub-sections, has copyrights. Read more about what you can do with our patterns at the bottom of each pattern on our site. |
||||||||||||||||||||||


With over 40 years in knitting and crochet design, DROPS Design offers one of the most extensive collections of free patterns on the internet - translated to 17 languages. As of today we count 324 catalogues and 12290 patterns translated into English (UK/cm). 12290
We work hard to bring you the best knitting and crochet have to offer, inspiration and advice as well as great quality yarns at incredible prices! Would you like to use our patterns for other than personal use? You can read what you are allowed to do in the Copyright text at the bottom of all our patterns. Happy crafting!
Post a comment to pattern DROPS 156-51
We would love to hear what you have to say about this pattern!
If you want to leave a question, please make sure you select the correct category in the form below, to speed up the answering process. Required fields are marked *.