
Popular categories
Looking for a yarn?


Comments / Questions (130)
![]() Stine wrote:
Stine wrote:
Hei, når det står at det skal felles masker til hals, skal de da bare strikkes sammen eller felles av som man gjør når man skal avslutte et arbeid?
08.05.2014 - 13:28DROPS Design answered:
Hei Stine, när du först feller 2 masker så felles de genom att strikke 2 så lyfte den 1. over den 2. osv. Men när du deretter feller 1 m, så kan du velge at strikke de förste 2 m sammen så blir det ikke hack der :)
09.05.2014 - 18:35
![]() Kari wrote:
Kari wrote:
Hei! på monteringen skal hetten kun fstes v
01.05.2014 - 16:56
![]() Mariella Engman wrote:
Mariella Engman wrote:
Hittade ett fel i detta mönster. När man har stickat enl OK: så när man är färdig med alla minskningar och avm för raglan och halsringn, så har man 92 m kvar inte 52 m som det står i mönsteret. Har räknat om och om igen och kommer fram till det.
26.02.2014 - 14:37DROPS Design answered:
Nej det är inte fel. Du har 144 m. Sätter 4 markörer. Maskar av 1 m på varje sida om de 4 markörerna = 8 m minskas. Du upprepar minskningen totalt 10 ggr, alltså minus 80 maskor. Så minskar du totalt 6 m på var sida av halsen = minus 12 m. 144-80-12 = 52.
01.03.2014 - 01:00
![]() Nanna-Lill wrote:
Nanna-Lill wrote:
Hei, Skal denne dressen strikkes med dobbelt garn? Siden pinne 4,5 skal brukes? Så ser dressen så tykk ut. Håper på snart svar.
23.02.2014 - 22:10DROPS Design answered:
Hei Nanna-Lill. Nej, der er kun strikket med 1 traad.
28.02.2014 - 16:54
![]() Marie-Louise Löfgren wrote:
Marie-Louise Löfgren wrote:
Tack så mycket för snabbt svar! Menar ni med framkanten resåren där knapparna kommer? Förstår jag rätt i att man skall börja ta upp maskor för huvan där resåren för knapparna slutar? Tack på förhand!
16.02.2014 - 14:30DROPS Design answered:
Ja du stickar inte upp m över framkanten, men strax efter. Lycka till!
08.05.2014 - 10:28
![]() Marie-Louise Löfgren wrote:
Marie-Louise Löfgren wrote:
Hur gör man justeringen av maskantalet för huvan efter att man plockat upp maskorna runt halsringningen? Skall det avmaskas jämnt eller från båda sidorna? Visst är det också så att man skall plocka upp maskor för huvan från framkanten? Tacksam för svar!
14.02.2014 - 22:35DROPS Design answered:
Hej Mari-Louise, du justerar/minskar genom att sticka ihop maskorna 2 och 2 jämnt fördelat över varvet. Du ska inte plocka upp maskor till huvan över framkanterna. Det görs en kant lite senare :)
15.02.2014 - 01:41
![]() Joyce Bassin wrote:
Joyce Bassin wrote:
I have been enjoying this project until I got to the Yoke neck decreases. If I decrease 2 stitches on each side 3 times I will end up decreasing part of the raglan.Am I misreading this?
11.12.2013 - 22:53DROPS Design answered:
Dear Mrs Bassin, in first size, you start front piece with 17 sts, you dec 1 st 10 times for raglan (on front pieces) + 2 sts 3 times for neck = 1 st remain on front piece when all dec are done. Happy knitting!
12.12.2013 - 09:03
![]() Camilla Harms Ødeby wrote:
Camilla Harms Ødeby wrote:
Jeg har et spm om bærestk. Når jeg skal sette en merketråd på overgangene mellom bolen og ermene = 4 merketråder, er dette inkludert merketråden fra da jeg strikket ermet? Jeg får ikke fellinga til raglan til å stemme hvis jeg skal sette på 4 merketråder :/
23.11.2013 - 11:20DROPS Design answered:
Nej du sætter 4 nye mærketråde midt i overgangene mellem ærmerne og rygstykket og mellem ærmerne og forstykket.
27.11.2013 - 10:36
![]() Ute wrote:
Ute wrote:
Danke jetzt habe ich meinen Denkfehler gefunden
05.10.2013 - 07:53
![]() Ute Dolina wrote:
Ute Dolina wrote:
Ich habe bei der Rundpasse Probleme. es sind 160 Maschen und ich soll bei jeder Markierung 1 M abnehmen und das ganze 11 mal so sind das 44 Maschen. gleichzeitig ab der 6 Abnahme für die Passe am Anfang jeder Reihe gegen die vordere mitte abk 2 M 3ma und danach 1M 2x, wie komme ich von 160 M dabei auf 56 M. Wo ist mein Fehler. Wenn ich bei den Markierungen abneheme und dann anschießend am Anfang
02.10.2013 - 19:51DROPS Design answered:
Liebe Uta, ich weiss nicht, welche Stelle Sie falsch interpretiert haben, die Maschenzahl nämlich geht auf: 160-88-12-4= 56 M.
04.10.2013 - 07:17
|
|
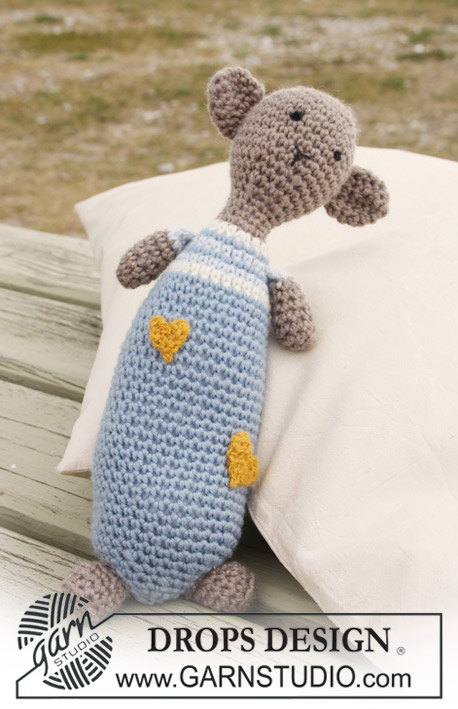
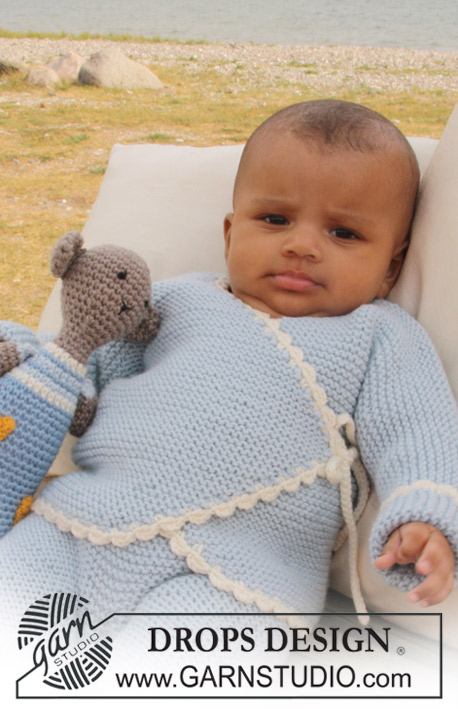
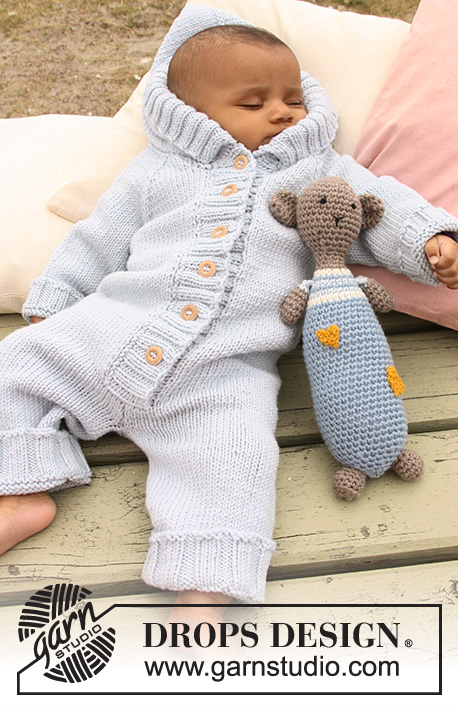
Little Blue Dream#littlebluedreamoverall |
|
 |
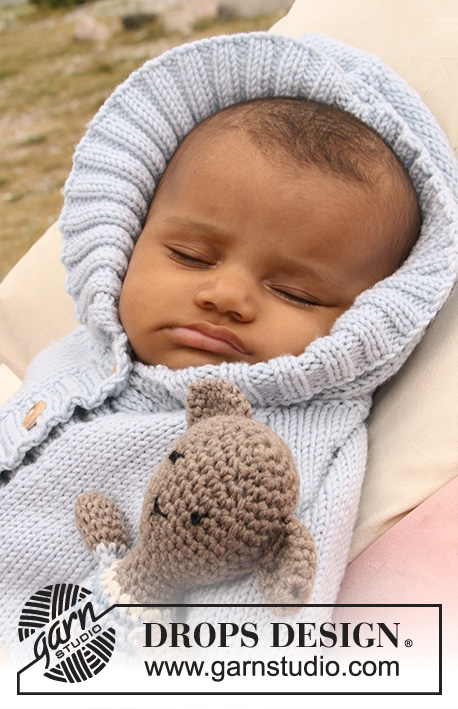 |
Set of knitted jumpsuit with raglan and crochet teddy bear for baby and children in DROPS Merino Extra Fine
DROPS Baby 20-23 |
|
|
JUMPSUIT: GARTER ST (back and forth on needle): K all rows. DECREASING TIP: Make all dec from RS. Dec as follows before marker: K2 tog. Dec as follows after marker: slip 1 st as if to K, K1, psso. -------------------------------------------------------- LEG: Worked in the round. Cast on 48-54-60 (66-72) sts on double pointed needles size 3.5 mm with Merino Extra Fine. Insert a marker at beg of round = inside of leg. K 1 round and continue in rib K3/ P3. When rib measures 4-4-4 (5-5) cm K 1 round, AT THE SAME TIME dec 6 sts evenly = 42-48-54 (60-66) sts. Change to double pointed needles size 4.5 mm. P 1 round and continue in stocking st. When piece measures 6-6-6 (7-7) cm inc 1 st each side of marker, and repeat the inc on every 3-4-5 (5-7) cm a total of 4 times = 50-56-62 (68-74) sts. When piece measures 16-20-23 (25-32) cm divide piece at inside of leg and complete piece back and forth on needle (to make it easier to slip sts on circular needle later on). Cast on 1 edge st each side = 52-58-64 (70-76) sts. When piece measures 18-22-25 (29-34) cm cast off 1 edge st each side. Put piece aside and knit the other leg in the same way. BODY PIECE: Slip legs on the same circular needle size 4.5 mm = 100-112-124 (136-148) sts. Continue back and forth from mid front as follows (first row = RS): Cast off 4 sts, K remaining sts on row. Turn piece, cast off 4 sts and P remaining sts on row = 92-104-116 (128-140) sts. Continue in stocking st back and forth on all sts. When piece measures 37-45-53 (58-65) cm work next row as follows (from RS): 17-20-23 (26-29) stocking sts (= right front piece), cast of 8 sts for armhole, work 42-48-54 (60-66) stocking sts (= back piece), cast off 8 sts for armhole, work 17-20-23 (26-29) stocking sts (= left front piece). Put piece aside and knit the sleeves. SLEEVE: Worked in the round. Cast on 36-42-42 (48-48) sts on double pointed needles size 3.5 mm with Merino Extra Fine. K 1 round and continue in rib K3/P3. When piece measures approx 3 cm K 1 round, AT THE SAME TIME dec 6-10-8 (12-10) sts evenly = 30-32-34 (36-38) sts. Change to double pointed needles size 4.5 mm and P 1 round. Insert a marker at beg of round = mid under sleeve. Continue in stocking st. AT THE SAME TIME when piece measures 5 cm inc 1 st each side of marker mid under sleeve, and repeat the inc on every 5-5-6 (6-6) round a total of 6-6-7 (8-9) times = 42-44-48 (52-56) sts. When piece measures 17-18-21 (24-28) cm cast off 8 sts mid under sleeve (4 sts each side of marker) = 34-36-40 (44-48) sts. Put piece aside and knit the other sleeve. YOKE: Slip sleeves on the same circular needle as body piece where cast off for armhole = 144-160-180 (200-220) sts. Insert a marker in all transitions between body piece and sleeves = 4 markers. Work stocking st back and forth on all sts. AT THE SAME TIME on 3rd row dec 1 st each side of all markers for raglan - see DECREASING TIP! Repeat the dec on every other row (= every row from RS) a total of 10-11-12 (13-15) times. AT THE SAME TIME when you have dec 7-6-6 (6-7) times for raglan cast off for neck at the beg of every row each side: 2 sts 3-3-4 (5-5) times and then 1 st 0-2-2 (2-3) times. After all dec for raglan and neck are complete there are 52-56-64 (72-74) sts left on needle and piece measures approx 45-53-62 (68-77) cm. Cast off all sts. FRONT BAND: Pick up 63-75-91 (95-103) sts along right front piece from bottom edge towards the neck on circular needle size 3.5 mm with Merino Extra Fine. K 1 row from WS, K 1 row from RS and continue in rib as follows (from WS): 1 garter st, * P2, K2 *, repeat from *-* and finish with P2. When rib measures 2 cm make buttonholes on next row from RS as follows: rib on the first 10-10-2 (6-2) sts, * P2 tog, 1 YO, 10 sts rib * repeat from *-* a total of 4-5-7 (7-8) times, finish with P2 tog, 1 YO, K2, 1 garter st. Continue in rib until front band measures 4 cm, cast off with K over K and P over P. Repeat on left front piece – do not make buttonholes. HOOD: Pick up approx 60 to 100 sts (do not pick up on front bands) round neck on circular needle size 4.5 mm. K 1 row from WS, AT THE SAME TIME adjust no of sts to 44-48-52 (56-60) sts. Work 4 rows garter st. Then K 1 row from RS, AT THE SAME TIME inc 24 sts evenly = 68-72-76 (80-84) sts. Continue in stocking st with 1 garter st each side towards mid front until hood measures 21-23-25 (27-28) cm, cast off. Fold hood double and sew tog at the top, sew edge to edge to avoid a chunky seam. Pick up 112-124-136 (144-152) sts round opening of hood on circular needle size 3.5 mm. K 1 row from WS, K 1 row from RS and continue in rib as follows (from WS): 1 edge st, * P2, K2 *, repeat from *-* on the next 108-120-132 (140-148) sts and finish with P2 and 1 edge st. Work rib for 8 cm, cast off with K over K and P over P. ASSEMBLY: Sew openings under sleeves and sew seam on the inside of leg inside 1 edge st. Sew left front band to the bottom of body piece. Sew buttons to left front band. Sew the first 4 cm from hood to the top edge of front band each side. Fold the other 4 cm towards RS and fasten with a few sts. -------------------------------------------------------- TEDDY: TEDDY: CROCHET INFO: Replace first dc on round with 1 ch and finish each round with 1 sl st in first dc from beg of round. CROCHET DC TOG: Crochet 2 dc tog to 1 dc as follows: Insert hook in first st, pick up thread, insert hook in next st, pick up thread, make 1 YO and pull thread through all 3 sts on hook. --------------------------------------------------------- --------------------------------------------------------- HEAD AND BODY: Beg at the top of head and after the head crochet the body. Then crochet ears, arms, and the hearts, which are sewn on afterwards. HEAD: SEE CROCHET INFO! Crochet 4 ch with crochet hook size 4 mm with light brown mix and form a ring with 1 sl st in first ch. ROUND 1: Crochet 6 dc in ring. ROUND 2: 2 dc in each dc = 12 dc. ROUND 3: * 1 dc in first dc, 2 dc in next dc *, repeat from *-* = 18 dc. ROUND 4: * 1 dc in each of the first 2 dc, 2 dc in next dc *, repeat from *-* = 24 dc. ROUND 5: * 1 dc in each of the first 3 dc, 2 dc in next dc *, repeat from *-* = 30 dc. ROUND 6-11: Crochet 1 dc in each dc = 30 dc. ROUND 12: * 1 dc in each of the first 3 dc, then crochet the next 2 dc tog (see above) *, repeat from *-* = 24 dc. ROUND 13: Crochet 1 dc in each dc = 24 dc. ROUND 14: * 1 dc in each of the first 2 dc, then crochet the next 2 dc tog *, repeat from *-* = 18 dc. ROUND 15: * 1 dc in first dc, then crochet the next 2 dc tog *, repeat from *-* = 12 dc. Now fill the head with cotton wool and continue in the round for body without cutting the thread. ROUND 16-18: Crochet 1 dc in each dc = 12 dc. ROUND 19: * 1 dc in each of the first 2 dc, 2 dc in next dc *, repeat from *-* = 16 dc. Change to off-white. ROUND 20: * 1 dc in each of the first 3 dc, 2 dc in next dc *, repeat from *-* = 20 dc. Change to light grey/blue. ROUND 21: Crochet 1 dc in each dc = 20 dc. Change to light grey/green. ROUND 22: * 1 dc in each of the first 4 dc, 2 dc in next dc *, repeat from *-* = 24 dc. Change to light grey/blue. ROUND 23: Crochet 1 dc in each dc = 24 dc. Change to light grey/green. ROUND 24: * 1 dc in each of the first 3 dc, 2 dc in next dc *, repeat from *-* = 30 dc. Change to off-white. ROUND 25: Crochet 1 dc in each dc = 30 dc. Change to light grey blue and crochet the rest of the body as follows: ROUND 26-29: Crochet 1 dc in each dc = 30 dc. ROUND 30: * 1 dc in each of the first 9 dc, 2 dc in next dc *, repeat from *-* = 33 dc. ROUND 31-39: Crochet 1 dc in each dc = 33 dc. ROUND 40: * 1 dc in each of the first 10 dc, 2 dc in next dc *, repeat from *-* = 36 dc. ROUND 41-46: Crochet 1 dc in each dc = 36 dc. ROUND 47: * 1 dc in each of the first 10 dc, then crochet the next 2 dc tog *, repeat from *-* = 33 dc. ROUND 48: Crochet 1 dc in each dc = 33 dc. ROUND 49: * 1 dc in each of the first 9 dc, then crochet the next 2 dc tog *, repeat from *-* = 30 dc. ROUND 50: * 1 dc in each of the first 3 dc, then crochet the next 2 dc tog *, repeat from *-* = 24 dc. ROUND 51: Crochet 1 dc in each dc = 24 dc. ROUND 52: * 1 dc in each of the first 2 dc, then crochet the next 2 dc tog *, repeat from *-* = 18 dc. ROUND 53: Crochet 1 dc in each dc = 18 dc. ROUND 54: * 1 dc in first dc, then crochet the next 2 dc tog *, repeat from *-* = 12 dc. ROUND 55: Crochet 2 dc tog all the way round = 6 dc. Fill the body with cotton wool, cut the thread, pull thread through remaining sts, tighten and fasten. LEGS: Crochet 4 ch with crochet hook size 4 mm with light brown mix and form a ring with 1 sl st in first ch. ROUND 1: Crochet 8 dc in ring. ROUND 2: * 1 dc in first dc, 2 dc in next dc *, repeat from *-*= 12 dc. ROUND 3: Crochet 1 dc in each dc = 12 dc – NOTE: Crochet in back loop of st. ROUND 4: Crochet 1 dc in each dc = 12 dc – NOTE: Crochet through both loops again. ROUND 5: Crochet 1 dc in each dc, at the same time crochet 2 dc tog at the beg and at the end of round = 10 dc. ROUND 6: Crochet 1 dc in each dc, at the same time crochet tog 5th and 6th dc and crochet tog 7th and 8th dc on round = 8 dc. Cut the thread. Crochet 1 more leg in the same way. Fill the legs with cotton wool and sew the legs to bottom of body. ARMS: Crochet 4 ch with crochet hook size 4 mm with light brown mix and form a ring with 1 sl st in first ch. ROUND 1: Crochet 4 dc in ring. ROUND 2: Crochet 2 dc in each dc = 8 dc. ROUND 3-6: Crochet 1 dc in each dc = 8 dc. Change to light grey/green. ROUND 7: Crochet 1 dc in each dc = 8 dc Fill the arm with cotton wool, place piece flat and crochet 1 dc in each dc through both layers = 4 dc. Cut the thread. Crochet 1 more arm in the same way and sew arms to the side of body at the top. EARS: Crochet 4 ch with crochet hook size 4 mm with light brown mix and form a ring with 1 sl st in first ch. ROUND 1: Crochet 6 dc in ring. ROUND 2: * 1 dc in first dc, 2 dc in next dc *, repeat from *-* = 9 dc. ROUND 3: * 1 dc in each of the first 2 dc, 2 dc in next dc *, repeat from *-* = 12 dc. ROUND 4-6: Crochet 1 dc in each dc = 12 dc. Place piece flat and crochet 1 dc in each dc through both layers = 6 dc, turn piece and crochet 2 dc tog across the row = 3 dc. Cut the thread and sew ear to the top of head to the side. Crochet 1 more ear and attach to the opposite side of head. SMALL HEART: Crochet 2 ch with crochet hook size 3 mm with guacamole (try to find a yellow section of the yarn) and crochet 3 dc in first ch, turn piece. Crochet 1 ch, then 1 dc in each st = 5 dc (includes ch at beg and end of row), turn piece. Crochet 3 ch, 1 tr in first ch, 1 dc in middle of heart, 3 ch, 1 tr in first ch, 1 sl st in ch from beg of previous row. Cut the thread and sew the heart to the front of teddy. LARGE HEART: Crochet 2 ch with crochet hook size 3 mm with guacamole (try to find a yellow section of the yarn) and crochet 3 dc in first ch, turn piece. Crochet 1 ch, then 1 dc in each st = 5 dc (includes ch at beg and end of row), turn piece. Crochet 1 ch, then 1 dc in each st = 6 dc (includes ch at beg of row), turn piece. Crochet 4 ch, 1 tr in first ch, 1 dc in the middle of heart, 4 ch,1 tr in first ch, 1 sl st in ch from beg of previous row. Cut the thread and sew the heart to the front of teddy. Crochet 1 more heart and sew to the back of teddy. Embroider eyes and mouth at the front of teddy with black. |
|
 |
|
Have you finished this pattern?Tag your pictures with #dropspattern #littlebluedreamoverall or submit them to the #dropsfan gallery. Do you need help with this pattern?You'll find 25 tutorial videos, a Comments/Questions area and more by visiting the pattern on garnstudio.com. © 1982-2026 DROPS Design A/S. We reserve all rights. This document, including all its sub-sections, has copyrights. Read more about what you can do with our patterns at the bottom of each pattern on our site. |
|


With over 40 years in knitting and crochet design, DROPS Design offers one of the most extensive collections of free patterns on the internet - translated to 17 languages. As of today we count 324 catalogues and 12290 patterns translated into English (UK/cm). 12290
We work hard to bring you the best knitting and crochet have to offer, inspiration and advice as well as great quality yarns at incredible prices! Would you like to use our patterns for other than personal use? You can read what you are allowed to do in the Copyright text at the bottom of all our patterns. Happy crafting!
Post a comment to pattern DROPS Baby 20-23
We would love to hear what you have to say about this pattern!
If you want to leave a question, please make sure you select the correct category in the form below, to speed up the answering process. Required fields are marked *.