
Popular categories
Looking for a yarn?


Comments / Questions (11)
![]() Charlotte Houde wrote:
Charlotte Houde wrote:
J'aimerais avoir plus d'informations sur les pointes . vous dites d,augmenter 2xts les 4 rangs et 3x ts les2 rangs et rabattre en même temps exact
03.12.2014 - 02:00DROPS Design answered:
Bonjour Mme Houde, c'est exact, on rabat les mailles de chaque côté (au début et à la fin de chaque rang pour chacune des pointes), et en même temps, on augmente de chaque côté du marqueur (au milieu de la pointe) pour créer une longueur supplémentaire (= la pointe). Bon tricot!
03.12.2014 - 10:03
|
|
Harley |
|
|
|
|
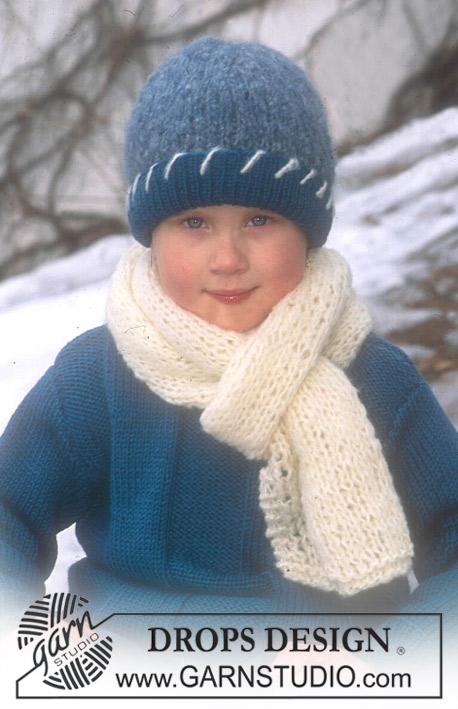
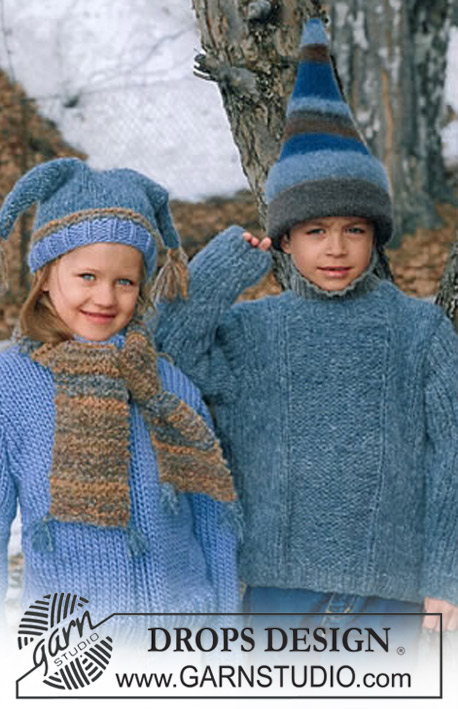
Jumper, hat and scarf in Snow and Highlander
DROPS Children 12-6 |
|
|
JUMPER Knitting tension: 10 sts x 14 rows on needles size 9mm in stocking sts = 10 x 10 cm. Rib: *K1, P2*, repeat from *-*. Front piece: When only one number is mentioned this applies to all sizes. Cast on 35-35-41 (41-47-47) sts (incl 1 edge st each side) on needle size 8 mm with Snow. Knit Rib as follows (1st row = right side): 1 edge st, P1, *K1, P2*, repeat from *-* until there are 3 sts left, K1, P1, 1 edge st. Continue like this until Rib measures 6 cm. Change to needle size 9mm and continue in stocking sts, but knit the 5 middle sts as follows: P2, K1, P2 (as in Rib) until finished measurements. At the same time, on the first row after the Rib inc 1 st on each side of the middle 5 sts in size 5/6, 9/10 and 13/14 (do not inc in the other sizes) = 35-37-41 (43-47-49) sts. Remember your knitting tension! When piece measures 8-8-9 (9-10-10) cm inc 1 st each side and repeat the inc when piece measures 16-17-18 (19-20-21) cm = 39-41-45 (47-51-53) sts. When piece measures 22-24-26 (28-30-32) cm cast off for armhole each side on every other row as follows: 3 sts 1 time, 2 sts 0-0-1 (1-1-2) times and 1 st 1-2-1 (2-3-2) times = 31-31-33 (33-35-35) sts. When piece measures 31-34-37 (39-42-45) cm put the middle 5-5-7 (7-9-9) sts on thread for neck. Now dec to shape the neckline on every other row as follows: 2 sts 1 times and 1 st 2 times = 9 sts left on each shoulder. Cast off when piece measures 37-40-43 (46-49-52) cm. Back piece: Cast on and knit as front piece, but after the Rib knit stocking sts over all sts until finished measurements. Inc on first row after the Rib and at sides as for front piece. Cast off for armhole as described for front piece and continue until piece measures 35-38-41 (44-47-50) cm. Now cast off the middle 11-12-13 (13-15-15) sts for neck. On next row dec 1 st on neckline = 9 sts left on each shoulder. Cast off when piece measures 37-40-43 (46-49-52) cm. Sleeves: Cast on 23-23-23 (26-26-26) sts (incl 1 edge st each side) on needle size 8 mm with Snow and knit 6 cm Rib with 1 edge st each side in garter sts. Change to needle size 9mm and continue in stocking sts. At the same time after the Rib, inc 1 st each side on every 5.5-5-4.5 (6.5-6-5.5) cm a total of 4-5-6 (5-6-7) times = 31-33-35 (36-38-40) sts. When sleeve measures 25-29-31 (35-38-43) cm, dec for sleeve cap each side on every other row as follows: 3 sts 1 time and 2 sts each side until sleeve measures 29-34-37 (42-46-52) cm. Now cast off 3 sts each side 1 time and cast off remaining sts on next row. Sleeve measures approx 30-35-38 (43-47-53) cm. Assembly: Sew right shoulder seam. Neck: Pick up approx 36 to 45 sts (divisible by 3 and incl sts on thread) round the neck on needle size 8mm and Snow. Knit 5-5-6 (5-6-7) cm Rib – make sure there’s K1 mid front so that the Rib on neck follows the pattern on front piece. Cast off in Rib. Sew left shoulder seam and continue along the neck – sew the neck in the outer loop of the outermost st in order the seam doesn’t become to heavy. Sew in sleeves. Sew sleeve and side seams within 1 edge st. HAT: Knitting tension: 10 sts x 16 rows on needles size 8mm with Highlander in garter sts = 10 x 10 cm. Garter sts (on circular needle): 1st row: Knit, 2nd row: purl. Rib: *K1, P2*, repeat from *-* Hat: Cast on 45-51-57 sts on small circular needle size 8mm with Snow. Knit 4-4-5 cm Rib. Change to beige-mix Highlander and knit 4 rounds garter sts decreasing 3 sts evenly of first round = 42-48-54 sts. Now change to turquoise Highlander and stocking sts until finished measurements. When piece measures 17-19-21 cm insert a marking thread each side (= 21-24-27 sts between marking threads). Knit next round as follows from 1st marking thread: 10-11-12 sts, cast off 1-2-3 sts (= mid front), 20-22-24 sts, cast off 1-2-3 sts (mid back), 10-11-12 sts. Now finish each top separately. 1st top: Continue in stocking sts whilst inc and cast off for top as follows: Inc on each side of marking thread: 1 st on every 4th row 2 times and 1 st on every other row 3 times. At the same time cast off 2 sts each side on every other row a total of 6 times. Cast off remaining sts. 2nd top: Knit as 1st top. Sew the hat tog at the top. The hat measures approx 24-26-28 cm. Tassels: Attach a tassel to each top. 1 tassel = 12 threads of beige-mix Snow each measuring 16cm. Fold the threads double SCARF: Knitting tension: 8 sts x 18 rows on needles size 10mm with Highlander in garter sts = 10 x 10 cm. Garter sts (back and forth on needle): Knit all rows Loosely cast on 11-13-15 sts on needle size 10mm with beige-mix and knit garter sts until scarf measures approx 85-100-110 c. Cast off loosely. Tassels: Attach a turquoise tassel in each corner. 1 tassel = 4 threads measuring 10 cm each. Fold the threads double and pull loop through the first st in corner, pull ends through loop. |
|
 |
|
Have you finished this pattern?Tag your pictures with #dropspattern or submit them to the #dropsfan gallery. Do you need help with this pattern?You'll find 21 tutorial videos, a Comments/Questions area and more by visiting the pattern on garnstudio.com. © 1982-2026 DROPS Design A/S. We reserve all rights. This document, including all its sub-sections, has copyrights. Read more about what you can do with our patterns at the bottom of each pattern on our site. |


With over 40 years in knitting and crochet design, DROPS Design offers one of the most extensive collections of free patterns on the internet - translated to 17 languages. As of today we count 324 catalogues and 12290 patterns translated into English (UK/cm). 12290
We work hard to bring you the best knitting and crochet have to offer, inspiration and advice as well as great quality yarns at incredible prices! Would you like to use our patterns for other than personal use? You can read what you are allowed to do in the Copyright text at the bottom of all our patterns. Happy crafting!
Post a comment to pattern DROPS Children 12-6
We would love to hear what you have to say about this pattern!
If you want to leave a question, please make sure you select the correct category in the form below, to speed up the answering process. Required fields are marked *.