
Popular categories
Looking for a yarn?


Comments / Questions (15)
![]() Brigitte wrote:
Brigitte wrote:
Hello, j'ai fini entièrement la veste malheureusement je me suis trompée de grosseur d'aiguille (ma mauvaise habitude d ne pas bien lire les explications) donc la veste était trop petite. Donc j'ai tout détricoté. Là je fais des échantillons avec du 4.5 et du 5 mais même avec du 5 je ne parviens pas a obtenir les 18 mailles pour 10 cm. j'obtiens 21 ou 22 mailles. Je ne pense pas que l'aiguille 6 serait valable car le tricot serait trop lâche. Help me please. Brigitte.
06.04.2026 - 18:56DROPS Design answered:
Bonjour Brigitte, pour avoir les bonnes mesures finales, vous devez avoir le bon échantillon, il vous faut donc ici 18 m = 10 cm, quelle que soit la taille des aiguilles dont vous ayez besoin (on ne tricote pas toutes de la même façon). Toutefois, vous pouvez essayer avec des aiguilles plus petites et "bloquer" votre échantillon (respectez bien les consignes d'entretien de la laine) pour vérifier si après blocage vous obtenez les bonnes mesures. Retrouvez ici plus d'infos sur la tension. Bon tricot!
08.04.2026 - 12:30
![]() Brigitte wrote:
Brigitte wrote:
Merci beaucoup, je vais essayer de mettre en application toutes vos explications. Bonne journées.
17.02.2026 - 16:46
![]() Brigitte wrote:
Brigitte wrote:
Hello, je suis bloquée au niveau "division dos devant etc." Je suis arrivée à mes 322 mailles et mes 24 cm, mais je ne comprends pas les indications de la division. Voici le schéma de mon travail. Ais-je fais des erreurs quelque part? merci d'avance 52+17+31+17+90+17+31+17+52
15.02.2026 - 10:44DROPS Design answered:
Bonjour Brigitte, il semble que votre répartition des mailles n'est pas tout à fait juste, vous devez avoir: 41+17+52+17+68+17+52+17+41=322. Vous avez augmenté 29 fois pour le dos et les devants et 18 m pour les manches; soit pour les devants: 7 m de bordure + (5+1+6+22 m jersey) =41 m + les 17 m de A.2 = 58 m pour les devants; pour le dos vous aviez 10 m + 2x29=68+2 x 17 m de A.2 = 102 et pour les manches vous aviez 16 m + 2x18 = 52 m. Bon tricot!
17.02.2026 - 14:30
![]() Viktorija wrote:
Viktorija wrote:
I am knitting size XL and placing my markers after 20 30 26 30 as per pattern and then says 20 remaining but looks like 24 remaining. Not adding up to 130 total as per previous stage
03.02.2026 - 16:39DROPS Design answered:
Hi Viktorija, You insert the markers into a stitch (not between stitches), so first marker in the 21st stitch, then count 30 more and insert the next marker in the 52nd stitch, etc. Regards, Drops Team.
05.02.2026 - 06:51
![]() Eva Andersson wrote:
Eva Andersson wrote:
Hej, jag saknar beskrivning på fram- och bakstycket efter delning till ärmarna. Det står att man ska byta till rundsticka 3 och sticka resår men det är ju alldeles för tidigt då arbetet inte kan vara färdigt på längden. Hur långt till ska jag sticka efter delningen?
05.09.2025 - 06:44DROPS Design answered:
Hej Eva. Det står förklarat under FRAM- OCH BAKSTYCKE: "Sticka slätstickning, framkant och A.2 som tidigare tills arbetet mäter 48-50-51-52-53-55 cm från markören mitt fram." Mvh DROPS Design
05.09.2025 - 07:17
![]() Anna wrote:
Anna wrote:
Jag vill sticka denna kofta men byta garn till Drops Baby Merino, men jag är osäker på garnmängden. Drops kid silk (enligt mönster) är 25g/nystan, 210 m Drops Baby Merino, är 50g/nystan, 175 m De är samma garngrupp (A), behöver jag då bara ta hänsyn till antal meter när jag beräknar garnåtgång? Ex. Kid silk stl. M=225 g = 9 nystan = 1890 m -> Drops Baby Merino = 1890/175 = 10,8, så 11 nystan? //Anna
06.05.2025 - 10:18DROPS Design answered:
Hei Anna. 11 nøster stemmer :) Du kan også bruke vår garnkalkulator (du finner linken - Bruk vår garnkalkulator her - til høyre for bildet / eller under bildet). Fyll inn DROPS Kid-Silk - 225 gram - 1 tråder, og klikke på Finn alternativ. Du får da opp 5 alternativ, blant annet DROPS baby Merion - 515 gram/11 nøster. mvh DROPS Design
12.05.2025 - 08:59
![]() Lisbeth wrote:
Lisbeth wrote:
Jeg kan ikke få det til at passe … der står at man skal stoppe udtagning når man har 190 masker på pinden. Men senere står der at man skal sætte 52(ærmer masker) men jeg har kun 36. Hvis man skal bruge 52 m x2 = 104 så er der jo kun 86 masker tilbage til ryg og forstyr… er det meningen? Jeg savner nogle flere maske tal til ærme,ryg og forstyr… jeg er begynder strikker.
16.02.2025 - 09:50DROPS Design answered:
Hej Lisbeth, du fortsætter udtagningen ifølge de 4 pinde vi beskriver i opskriften, så du får ialt 322 masker. Først nu deler du til ryg & forstykke og ærmer :)
18.02.2025 - 11:29
![]() Lisbeth wrote:
Lisbeth wrote:
Hej igen Nu er jeg nået ved/til delingen, af ærme,for og bag styk…. Skal der deles midt i snoningen eller hører hele snoningen til for stykket og til bagstykket? De bedste hilsner Lisbeth
15.02.2025 - 17:22DROPS Design answered:
Hej Lisbeth, hvilken størrelse strikker du? Vi skriver hvor mange masker som skal være med på for og bagstykke og det er ikke sikkert at der deles midt i snoningen.
18.02.2025 - 11:25
![]() Lisbeth wrote:
Lisbeth wrote:
Hej Jeg undre mig over inddeling i starten, hvor man skal sætte et mærke ved 17 m. -26-20-26-17m=106masker men man har 110 hvad med de 4 masker der er for meget? De bedste hilsner Lisbeth
06.02.2025 - 08:49DROPS Design answered:
Hej Lisbeth, du sætter mærkerne i en maske, så de 4 masker med mærker skal også tælles med :)
12.02.2025 - 11:12
![]() Ulrika wrote:
Ulrika wrote:
Hej! Jag håller på och stickar denna i strl L men har ev problem med stickfastheten. Har precis gjort färdigt alla raglanökningar men arbetet mäter ca 21 cm från markören (26 från vikkanten, ca 29 totalt) , inte 26 cm från markören som det ska enligt mönstret. Är det någon idé att sticka vidare utan ökningar tills arbetet mäter 26 från markören eller är det bara att repa upp allt och välja större stickor?
12.01.2025 - 22:42DROPS Design answered:
Hej Ulrika, ja om du har rätt mått i bredden, så kan du fortsätta utan ökningar tills du har rätt mått i höjden :)
14.01.2025 - 14:37
|
|||||||||||||||||||||||||||||||
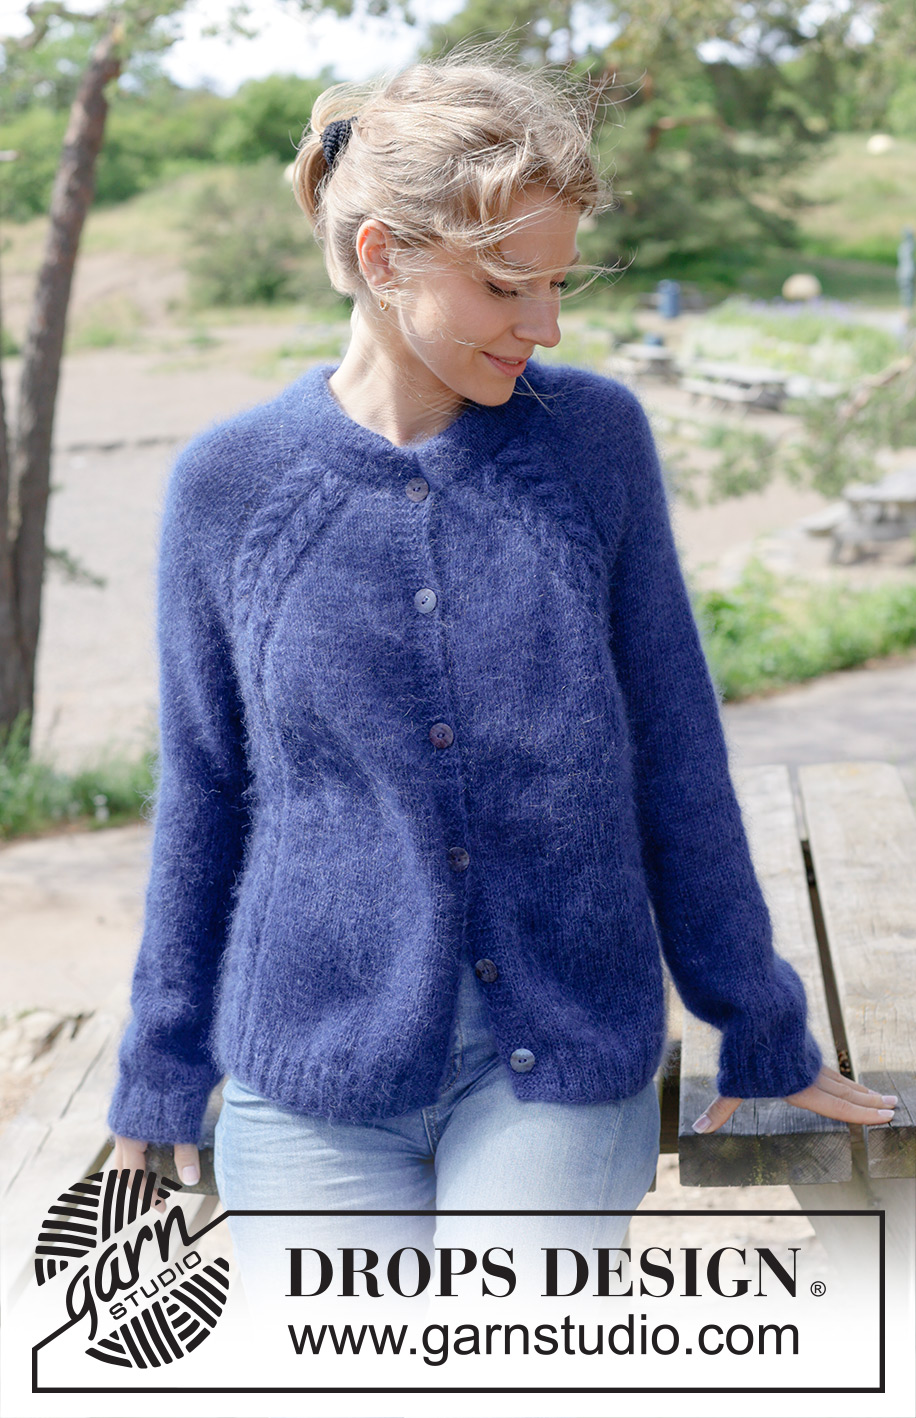
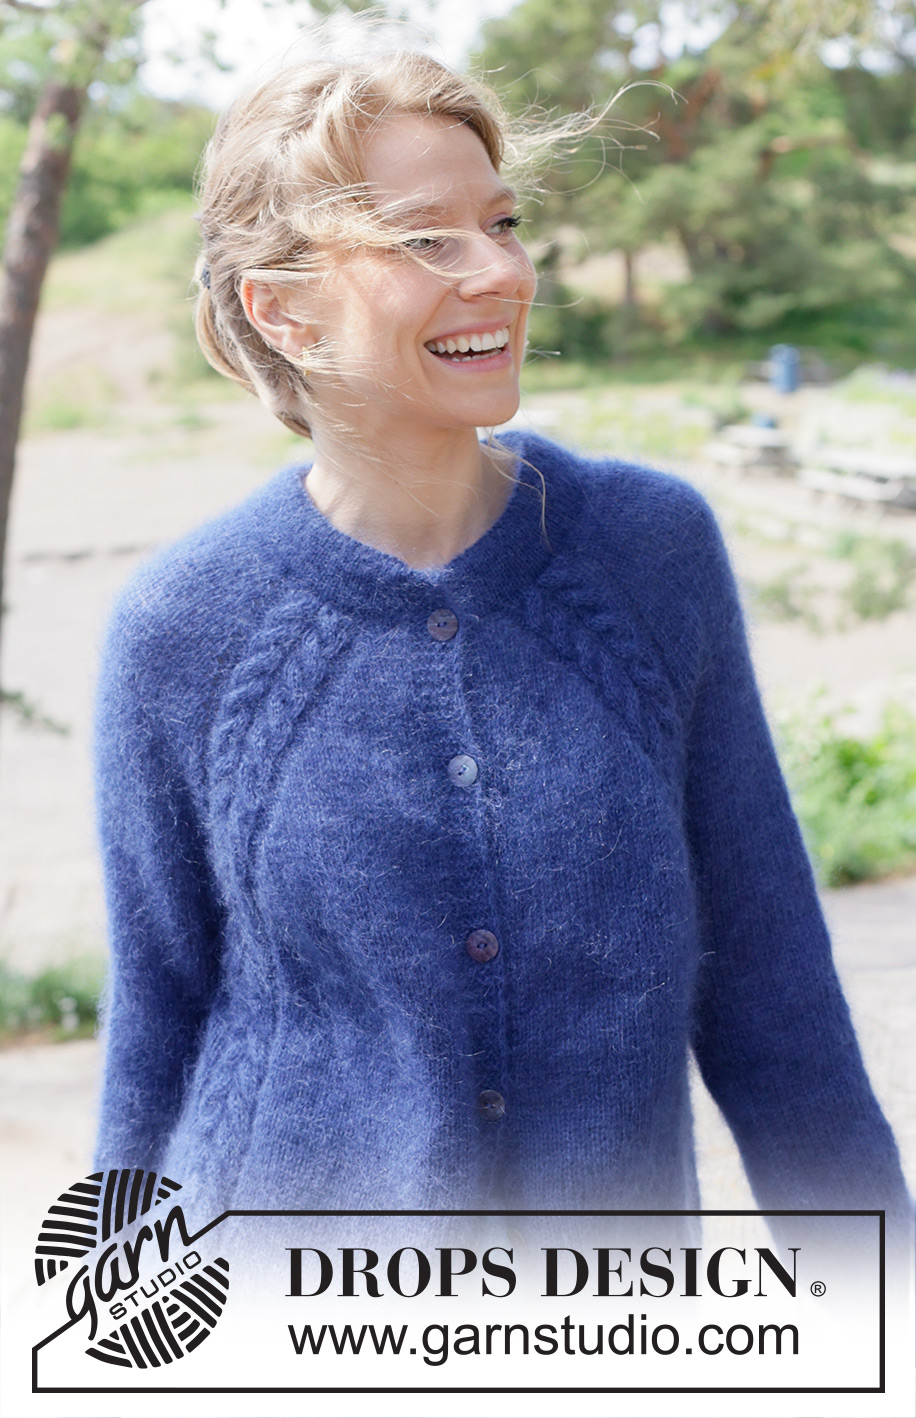
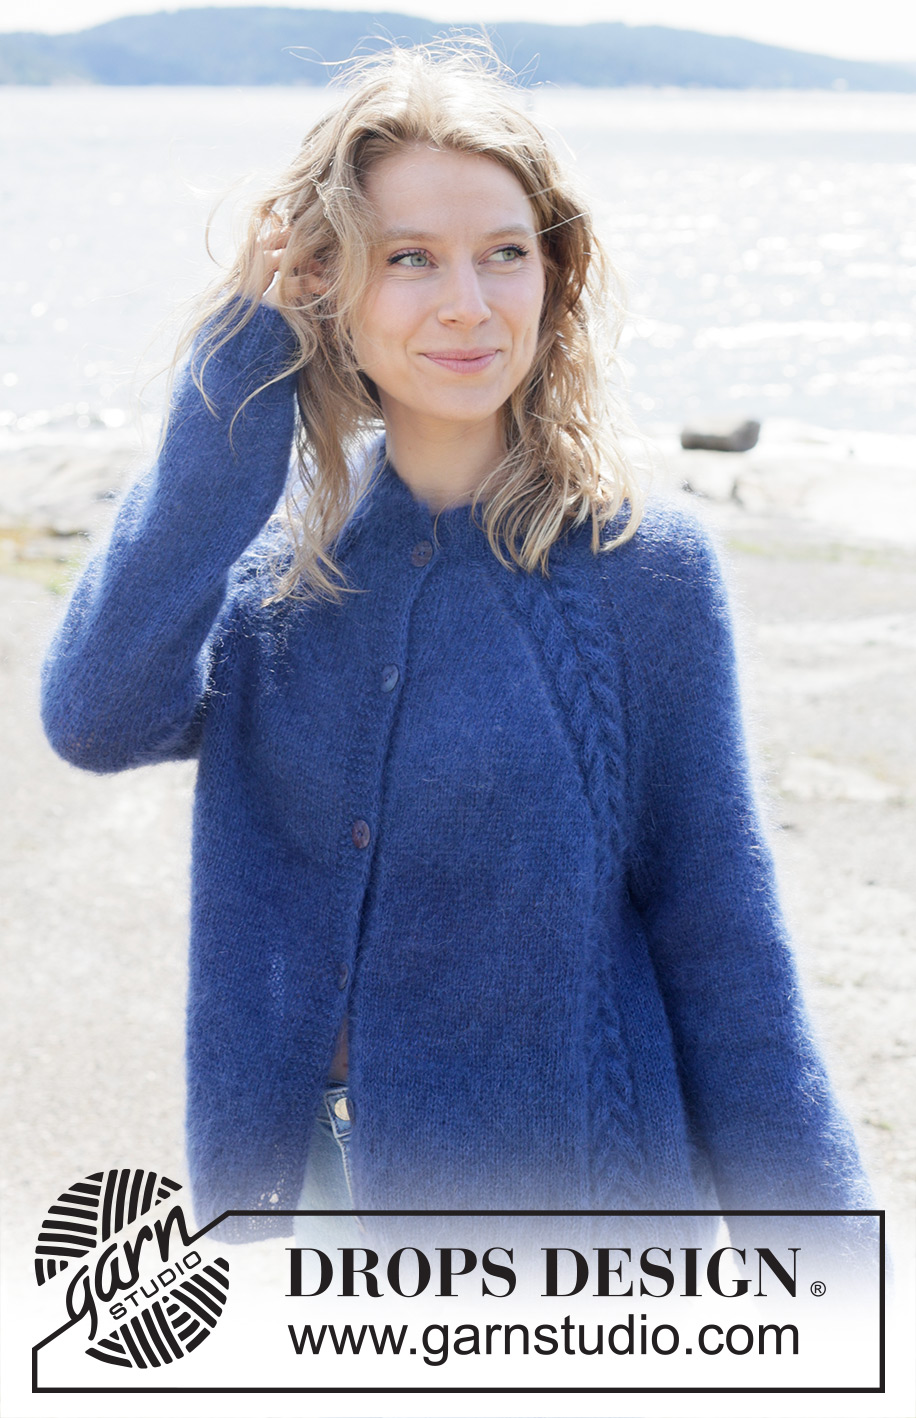
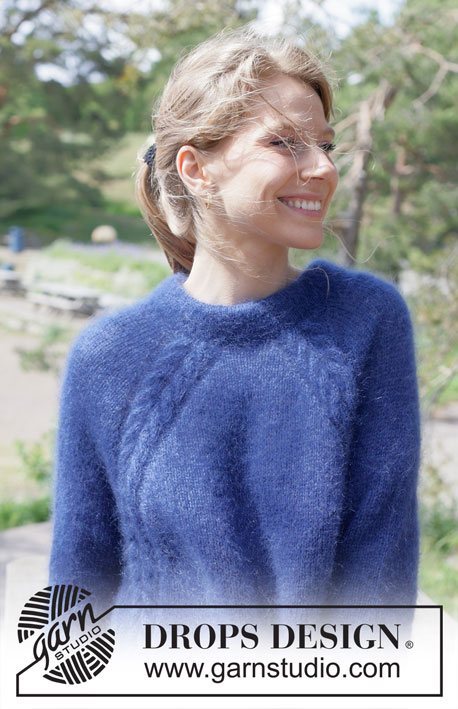
Sea Feather Cardigan#seafeathercardigan |
|||||||||||||||||||||||||||||||
 |
 |
||||||||||||||||||||||||||||||
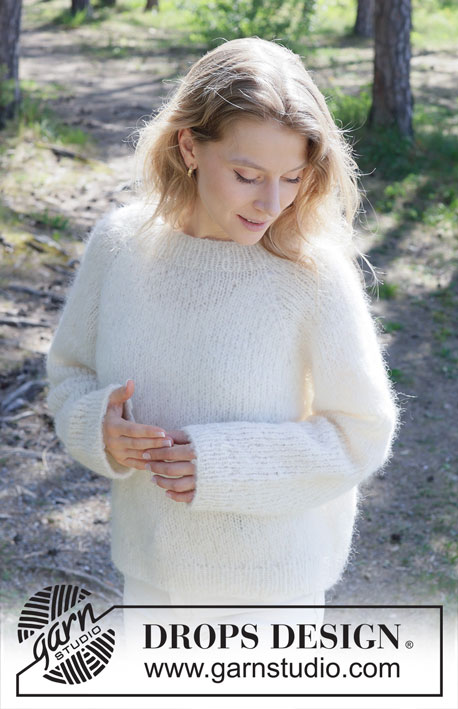
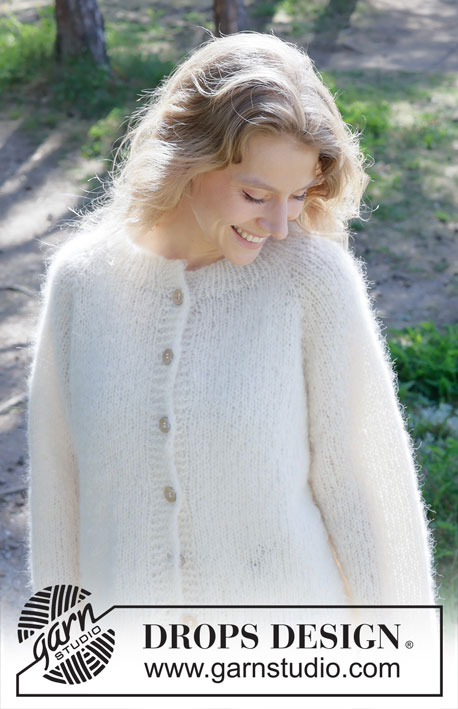
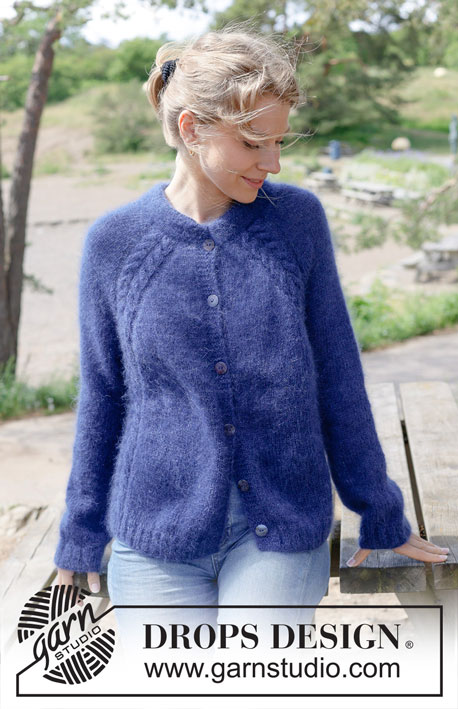
Knitted jacket in 2 strands DROPS Kid-Silk. Piece is knitted top down with raglan, cables, double neck edge and i-cord. Size: S - XXXL
DROPS 254-6 |
|||||||||||||||||||||||||||||||
|
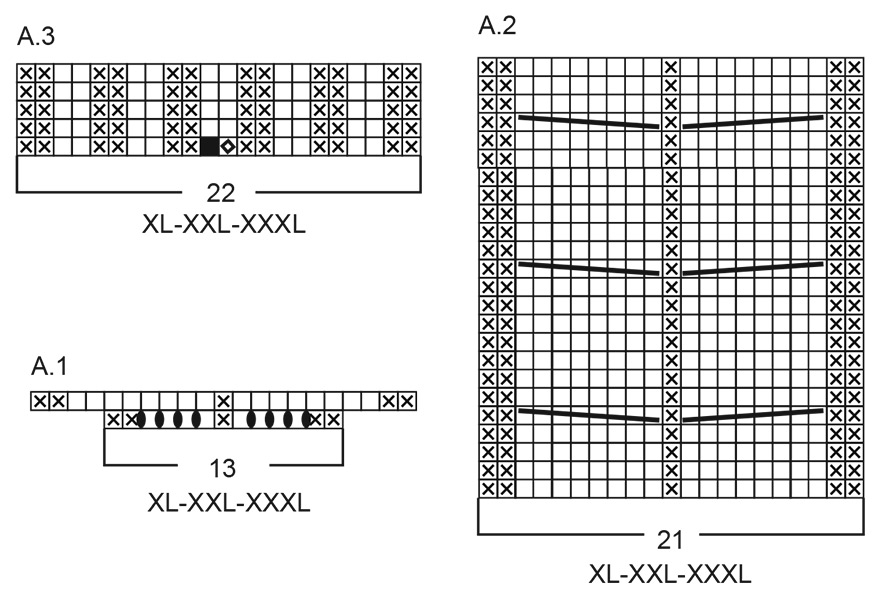
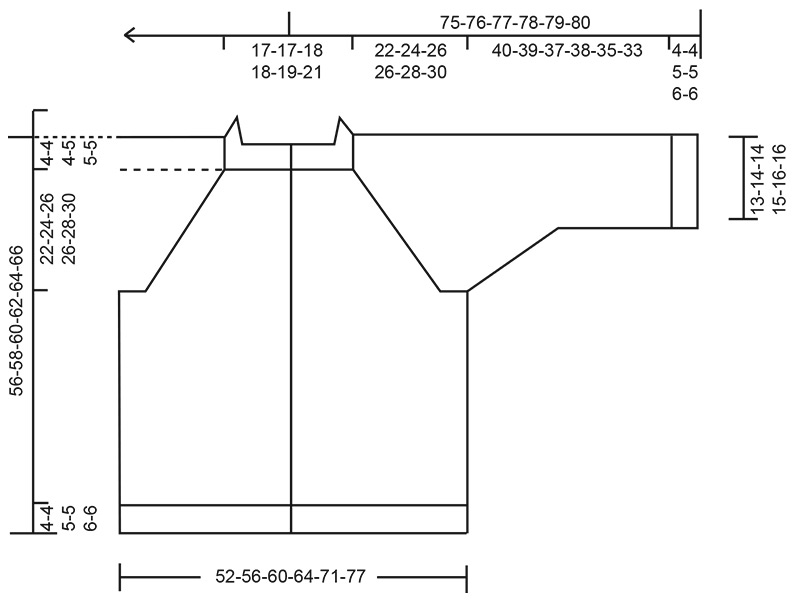
---------------------------------------------------------- EXPLANATION FOR THE PATTERN: ---------------------------------------------------------- GARTER STITCH (when working back and forth): Knit on all rows, i.e. knit from right side and knit from wrong side. 1 ridge vertically = knit 2 rows. BAND WITH I-CORD: BEGINNING OF ROW: Work band as follows: Slip 1 stitch purlwise with strand in front of piece, knit 1 and work 5 stitches in garter stitch. END OF ROW: Work band as follows: Work until 7 stitches remain on row, work 5 stitches in garter stitch, slip 1 stitch purlwise with strand in front of piece, knit 1. Work the same way both from right side and wrong side. BUTTONHOLES: Decrease for buttonholes on right band (when garment is worn). Decrease from right side when 5 stitches remain on row as follows: ROW 1 (= right side): Make 1 yarn over, knit 2 together, knit 1, slip 1 stitch purlwise with strand in front of piece, knit 1. ROW 2 (= wrong side): Work band as before and knit yarn over to make a buttonhole. Decrease for first buttonhole on first row from right side after neck edge has been worked. Then decrease the next 5-5-6-6-6-6 buttonholes, approx. 9½-10-8½-8½-9-9 cm apart. Place bottom buttonhole in the transition between stocking stitch and rib. PATTERN: See diagrams A.1 to A.3. Choose diagram for correct size. Diagrams show all rows in pattern seen from the right side. RAGLAN: Increase 1 stitch by making 1 yarn over, on next row work yarns over as explained below: BEFORE A.1/A.2: Purl yarn overs in back loop of stitches to avoid holes. Then work the new stitches in stocking stitch. AFTER A.1/A.2: Slip stitch off left needle and put it back on left needle but the opposite way (insert left needle in from behind when slipping it back on needle). Purl yarn overs in front loop of stitches to avoid holes. Then work the new stitches in stocking stitch. INCREASE TIP: Increase 1 stitch by making 1 yarn over, on next row work yarn over twisted to avoid holes. DECREASE TIP: Decrease 1 stitch on each side of marker thread as follows: Work until 3 stitches remain before marker thread and knit 2 together, knit 2 (marker thread is in the middle of these 2 stitches), slip 1 stitch knitwise, knit 1, pass slipped stitch over stitch worked (= 2 stitches decreased). ---------------------------------------------------------- START THE PIECE HERE: ---------------------------------------------------------- JACKET - SHORT OVERVIEW OF THE PIECE: In this pattern needles of different length have been used, begin with fitting length for number of stitches and switch as needed. Work neck edge and yoke back and forth on circular needle from mid front, work top down. When yoke is done, divide piece for body and sleeves. Work body downwards back and forth on circular needle while putting the sleeves aside. Then work sleeves downwards in the round on needle. Fold the neck edge double against the wrong side and fasten. If 0 is given for the chosen size, it means that you skip the information until next information. NECK EDGE: Cast on 98-98-102-110-114-118 stitches on circular needle size 4.5 mm with 2 strands DROPS Kid-Silk. Switch to circular needle size 3 mm (cast on on a larger needle to get an elastic cast-on edge). Purl 1 row from wrong side. Then work in stocking stitch with 1 stitch in GARTER STITCH in each side - read explanation above. Work until neck edge measures 3-3-3-4-4-4 cm and next row is worked from wrong side. At the end of each of the next 2 rows cast on 6 stitches for band = 110-110-114-122-126-130 stitches on needle. Knit 1 row from wrong side (= folding edge) but work the outermost 7 stitches in each side as BAND WITH I-CORD - read explanation above. Neck edge measures approx. 4-4-4-5-5-5 cm (= approx. height of neck edge when it is folded double). Then work in stocking stitch and band until neck edge measures 8-8-8-10-10-10 cm from cast on edge AT THE SAME TIME increase 0-0-0-8-12-16 stitches evenly of last row= 110-110-114-130-138-146 stitches - finish with a row from wrong side. Insert 1 marker on the inside of band in one side of piece, measure piece from this marker. YOKE: Switch to circular needle size 4.5 mm and insert 4 markers in piece without working the stitches, insert markers in a stitch, and markers should later fit middle stitch in A.1 and A.2. Count 17-17-18-20-22-24 stitches (= front piece), insert 1 marker in next stitch, count 26-26-26-30-30-30 stitches (= sleeve), insert 1 marker in next stitch, count 20-20-22-26-30-34 stitches (= back piece), insert 1 marker in next stitch, count 26-26-26-30-30-30 stitches (= sleeve), insert 1 marker in next stitch. 17-17-18-20-22-24 stitches remain on row after last marker (= front piece). Now work PATTERN and increase for RAGLAN - read explanation above and work as follows: ROW 1 (= right side): 7 stitches band as before, 5-5-6-7-9-11 stitches in stocking stitch, increase 1 stitch for raglan, work A.1, increase 1 stitch for raglan, work 16-16-16-18-18-18 stitches in stocking stitch, increase 1 stitch for raglan, work A.1, increase 1 stitch for raglan, work 10-10-12-14-18-22 stitches in stocking stitch, increase 1 stitch for raglan, work A.1, increase 1 stitch for raglan, work 16-16-16-18-18-18 stitch in stocking stitch, increase 1 stitch for raglan, work A.1, increase 1 stitch for raglan, work 5-5-6-7-9-11 stitches in stocking stitch and 7 stitches band as before – remember BUTTONHOLES – read explanation above (= 8 stitches increased for raglan and 24-24-24-32-32-32 stitches increased in A.1) = 142-142-146-170-178-186 stitches. ROW 2 (= wrong side): Work in stocking stitch, band and pattern as before, work the new stitches in stocking stitch (remember to twist yarn overs as explained above). ROW 3 (= right side): Work in stocking stitch and band as before, work A.2 over stitches in A.1 and increase for raglan as follows: Increase 1 stitch before and after every A.2 (= 8 stitches increased). ROW 4 (= wrong side): Work in stocking stitch, band and pattern as before, work the new stitches in stocking stitch (remember to twist yarn overs). Continue A.2 and work 3rd and 4th ROW 5-6-8-12-11-9 times (= 10-12-16-24-22-18 rows worked) = 182-190-210-266-266-258 stitches on needle. Remember to follow the knitting tension! Then work and increase as follows: ROW 1 (= right side): Work in stocking stitch, band and pattern as before and increase 1 stitch before and after every A.2 (= 8 stitches increased). ROW 2 (= wrong side): Work in stocking stitch, band and pattern as before, work the new stitches in stocking stitch. ROW 3 (= right side): Work in stocking stitch, band and pattern as before and increase 1 stitch before 1st repetition of A.2, after 2nd repetition of A.2, before 3rd repetition of A.2 and after 4th repetition of A.2, i.e. increase only on front pieces and back piece, do not increase on sleeves (= 4 stitches increased). ROW 4 (= wrong side): Work in stocking stitch, band and pattern as before, work the new stitches in stocking stitch. Work 1st to 4th ROW 10-11-11-9-11-13 times (= 40-44-44-36-44-52 rows worked). All increases for raglan are now done, you have increased 26-29-31-31-34-36 times in total have been done on front pieces and back piece and 16-18-20-22-23-23 times on sleeve = 302-322-342-374-398-414 stitches on needle and piece measures approx. 22-24-26-26-28-30 cm from marker mid front. Now divide yoke for body and sleeves. DIVIDING FOR BODY AND SLEEVES: AT THE SAME TIME as next row is worked divide yoke for body and sleeves as follows: Work 55-58-61-66-71-75 stitches as before (= front piece), slip the next 48-52-56-62-64-64 stitches on a stitch holder for sleeve, cast on 10-10-12-14-16-18 new stitches on row (= in the side mid under sleeve), work 96-102-108-118-128-136 stitches as before (= back piece), slip the next 48-52-56-62-64-64 stitches on a stitch holder for sleeve, cast on 10-10-12-14-16-18 new stitches on row (= in the side mid under sleeve) and work the last 55-58-61-66-71-75 stitches as before (= front piece). Finish body and sleeves separately. BODY: = 226-238-254-278-302-322 stitches. Work stocking stitch, band and A.2 as before until piece measures 48-50-51-52-53-55 cm from marker mid front. Work 1 row from wrong side while increasing stitches evenly – read INCREASE TIP and increase as follows: Increase 7-4-5-8-7-7 stitches on each front piece (between band and A.2), increase 0-0-2-0-2-0 stitches evenly in each side (between every A.2 in each side) and increase 12-10-12-14-16-16 stitches evenly on back piece (between every A.2 on back piece) = 252-256-280-308-336-352 stitches. Switch to circular needle size 3 mm and work rib as follows – work first row from right side: 7 stitches band as before, * knit 2, purl 2 *, work from *-* until 2 stitches remain before A.2, knit 2, work A.3 over stitches in A.2, * knit 2, purl 2 *, work from *-* over the next 8-8-12-12-16-16 stitches, knit 2, work A.3 over stitches in A.2, * knit 2, purl 2 *, work from *-* until 2 stitches remain before A.2, knit 2, work A.3 over stitches in A.2, * knit 2, purl 2 *, work from *-* over the next 8-8-12-12-16-16 stitches, knit 2, work A.3 over stitches in A.2, * knit 2, purl 2 *, work from *-* until 2 stitches remain before band, knit 2, 7 stitches band as before = 256-260-284-312-340-356 stitches. Work rib like this for 4-4-5-5-6-6 cm. Loosely cast off. Jacket measures 52-54-56-57-59-61 cm from marker mid front and approx. 56-58-60-62-64-66 cm from the top of shoulder. SLEEVES: Slip 48-52-56-62-64-64 sleeve stitches from one thread on to circular needle size 4.5 mm and pick in addition up 1 stitch in each of the 10-10-12-14-16-18 stitches cast on under sleeve = 58-62-68-76-80-82 stitches. Insert 1 marker thread in the middle of the 10-10-12-14-16-18 new stitches under sleeve - round begins at the marker thread. Work in stocking stitch in the round on needle - AT THE SAME TIME when sleeve measures 1 cm from division, decrease mid under sleeve – read DECREASE TIP and decrease as follows: Decrease 2 stitches total 1-1-2-4-6-6 times on every other round, then decrease 2 stitches every 2½-2½-2-1½-1-1 cm 4-5-6-7-6-6 times in total = 48-50-52-54-56-58 stitches. Work until sleeve measures 40-39-37-38-35-33 cm from division. Switch to double pointed needles size 3 mm and work rib (= knit 2/purl 2) while AT THE SAME TIME increasing 8-10-8-10-8-10 stitches evenly on 1st round = 56-60-60-64-64-68 stitches. When rib measures 4-4-5-5-6-6 cm cast off somewhat loosely. Sleeve measures approx. 44-43-42-43-41-39 cm from division. ASSEMBLY: Fold edge at the top of neck down on the inside of garment. Fasten edge to get a double neck edge. To avoid a tight neck edge that sticks out it is important to keep the seam elastic. Sew opening towards mid front together on bands with neat little stitches. Sew the buttons on to the left band. |
|||||||||||||||||||||||||||||||
Diagram explanations |
|||||||||||||||||||||||||||||||
|
|||||||||||||||||||||||||||||||
 |
|||||||||||||||||||||||||||||||
 |
|||||||||||||||||||||||||||||||
 |
|||||||||||||||||||||||||||||||
Have you finished this pattern?Tag your pictures with #dropspattern #seafeathercardigan or submit them to the #dropsfan gallery. Do you need help with this pattern?You'll find 37 tutorial videos, a Comments/Questions area and more by visiting the pattern on garnstudio.com. © 1982-2026 DROPS Design A/S. We reserve all rights. This document, including all its sub-sections, has copyrights. Read more about what you can do with our patterns at the bottom of each pattern on our site. |
|||||||||||||||||||||||||||||||


With over 40 years in knitting and crochet design, DROPS Design offers one of the most extensive collections of free patterns on the internet - translated to 17 languages. As of today we count 324 catalogues and 12290 patterns translated into English (UK/cm). 12290
We work hard to bring you the best knitting and crochet have to offer, inspiration and advice as well as great quality yarns at incredible prices! Would you like to use our patterns for other than personal use? You can read what you are allowed to do in the Copyright text at the bottom of all our patterns. Happy crafting!
Post a comment to pattern DROPS 254-6
We would love to hear what you have to say about this pattern!
If you want to leave a question, please make sure you select the correct category in the form below, to speed up the answering process. Required fields are marked *.