
Popular categories
Looking for a yarn?


Comments / Questions (69)
![]() Joy wrote:
Joy wrote:
I'm struggling to follow the diagram. Do you have written instructions instead? I've just finished the neck and divided the work to start the raglan section. T
14.04.2026 - 15:54DROPS Design answered:
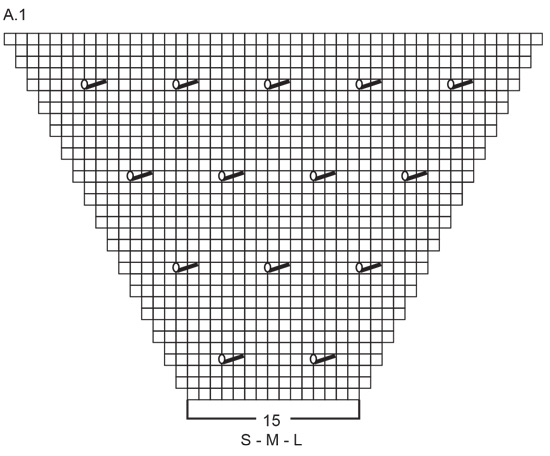
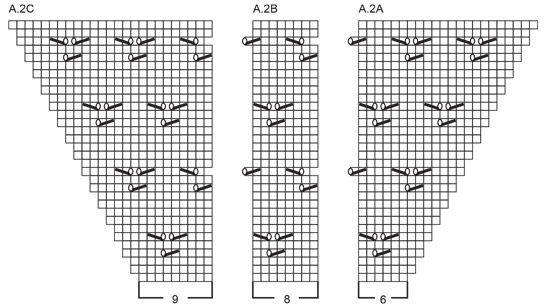
Dear Joy, we only have diagram for this pattern, but you will get help reading diagrams here. After neck insert markers as explained then work diagram A.1 over sleeves and over front and back pieces work first A.2A, then repeat A.2B and finish with A.2B; the stitches with the markers are knitted. You will increase first on each side of each marker and then increase alternately 4 sts (front and back pieces only) and 8 sts (as before). Happy knitting!
15.04.2026 - 07:39
![]() Marie Christine wrote:
Marie Christine wrote:
Is het in de toekomst mogelijk om dit patroon als vest/gilet te krijgen ? Ik vind het een super prachtig model maar truien gaan me, spijtig genoeg, minder goed. ik maak van de gelegenheid gebruik om jullie hartelijk te bedanken voor al de gratis patronen !
30.01.2026 - 14:39
![]() Anke Kitzel wrote:
Anke Kitzel wrote:
Hallo, kann man dieses Model auch ohne Seitenschlitze stricken? Von der Seite gesehen steht der Pullover sehr ab. Vielleicht würde das ohne Seitenschlitze besser aussehen...
24.01.2026 - 18:49DROPS Design answered:
Liebe Anke, Sie können die Seitenschlitze auch weglassen, dann verzichten Sie einfach auf die Teilung und stricken rundum im Rippenmuster (achten Sie darauf, dass das Rippenmuster in Ihrer Maschenzahl aufgeht). Viel Spaß beim Stricken!
25.01.2026 - 11:34
![]() Ana wrote:
Ana wrote:
Hello, Do you have a scheme on how to repeat the pattern after dividing body and sleeves?
17.01.2026 - 10:30DROPS Design answered:
Dear Ana, just make sure the pattern continue as before, you can get help from the previous diagrams to make sure the lace pattern will be worked as before. Happy knitting!
19.01.2026 - 08:26
![]() Mari wrote:
Mari wrote:
Greeting I'm knitting size M. After finishing the first section of the yoke (16 raglan increases --> 224st total) I started alternating the increases (every 2nd round increase only front/back and every 4th round increase both sleeves and front/back). I did one repetition so far. So I'm now at the point where I have to knit the holes (yarn overs) in the sleeve and I have 49 sts in the sleeve, how should I divide the stitches to make the holes? Is there an additional scheme?
30.12.2025 - 00:19DROPS Design answered:
Hi Mari, = 224 sts. Now increase for raglan on the front and back pieces every 2nd round but only increase on the sleeves every 4th round (= alternately 4 and 8 increased stitches). Increase like this a total of 8 times on the front and back pieces (4 times on the sleeves). After the last increase there are 272 stitches (yoke measures approx. 22 cm from the marker-thread on the neck). Continue working without further increases until the yoke measures 22 cm from the marker-thread (if there is 22 cm now, work 1 or 2 additional rounds to avoid dividing sweater where there are holes). Happy knitting!
30.12.2025 - 08:35
![]() Libellule wrote:
Libellule wrote:
How can you knit this sweater with 350grams of yarn? Is this the correct weight for the size Medium to Large?
28.08.2025 - 14:55DROPS Design answered:
Dear Libellule, DROPS Air is a very light thread; it has the "thickness" of a group C yarn but it's hollow inside. So each ball of yarn has more yardage than other yarns from the same group. Each ball of 50g carries 150m of yarn, so if you have 7 balls of DROPS Air you have more than 1000m of yarn, which is enough for working this garment. Happy knitting!
31.08.2025 - 22:27
![]() Margaretha wrote:
Margaretha wrote:
Hello dear helper, when I count the stitches end place the 4 markers, I have 4 stitches left at the end??? I knit size L: 96 st before rachlan, markers at 15, 31, 15, 31 (= 92 st) what do I do with those? Should the markers be at 16, 32,16,32? Thanks!
19.08.2025 - 08:46DROPS Design answered:
Dear Margaretha, the trick is that we don't count the marked stitches, or rather, we count them separately (these are the 4 that you have "left over"). So we place the markers as follows: 15 + 1 (marker) + 31 + 1 (marker) + 15 + 1 (marker) + 31 + 1 (marker) = 96. Happy knitting!
19.08.2025 - 12:44
![]() Michelle wrote:
Michelle wrote:
Hejsa, jeg strikker sweateren i str. s, men der er noget som jeg ikke forstår😅 Start på mønster og reglan: Jeg tog en ud ved venstre side af 4. mærke og strikkede så 15m og tog 1 ud på begge sider af mærke 1. Så står der at jeg skal strikke A.2A og A.2B to gang i alt (28m) + strikke A.2C (+9m) inden jeg skal tage 1 ud på hver side af mærke 2. Men efter jeg har strikket A.2A og A.2B to gange har jeg kun 3m inden jeg skal tage ud til raglan. Hvad skal jeg gøre?
16.08.2025 - 21:04DROPS Design answered:
Hei Michell. Du har 96 masker. Når du starter omgangen med raglanøkningene er du ved 4. merke. Strikk 1 maske, øk (= 1 maske + 1 økning). Strikk A.1 (= 15 masker), kast før 1. merke, strikk masken med 1. merke, kast (=1 maske + 2 økninger). Strikk A.2A, strikk A.2B totalt 2 ganger, strikk A.2C (= 31 masker). Kast før 2. merke, strikk masken med 2. merke, kast (=1 maske + 2 økninger). Strikk A.1 (=15 masker). Kast før 3. merke, strikk masken med 3. merke, kast (=1 maske + 2 økninger). Strikk A.2A, strikk A.2B totalt 2 ganger, strikk A.2C (= 31 masker). Kast 1 maske før 4. maske (=1 økning). Du skal nå ha 96 masker på pinnen + 8 økninger. mvh DROPS Design
15.09.2025 - 11:18
![]() Michelle wrote:
Michelle wrote:
Hejsa, jeg strikker sweateren i str. s, men der er noget som jeg ikke forstår😅 Start på mønster og reglan: Jeg tog en ud ved venstre side af 4. mærke og strikkede så 15m og tog 1 ud på begge sider af mærke 1. Så står der at jeg skal strikke A.2A og A.2B to gang i alt (28m) + strikke A.2C (+9m) inden jeg skal tage 1 ud på hver side af mærke 2. Men efter jeg har strikket A.2A og A.2B to gange har jeg kun 3m inden jeg skal tage ud til raglan. Hvad skal jeg gøre?
16.08.2025 - 21:03
![]() Margaretha wrote:
Margaretha wrote:
Met welke naald dikte moet ik nu het proeflapje breien? Voor dit patroon worden twee verschillende diktes gebruikt. Ik weet niet met welke van de twee ik nu het proeflapje moet breien. Ik gok met 3 1/2, omdat hier het grootste deel van de trui mee gebreid wordt. Op de bol staat echter voor 5 mm naald.
30.07.2025 - 09:08DROPS Design answered:
Dag Margaretha,
Het proeflapje brei je met naald 5 mm. Naald 3,5 wordt alleen gebruikt voor de halsrand en de boorden.
30.07.2025 - 20:02
|
|||||||||||||
Spring Snowflake#springsnowflakesweater |
|||||||||||||
 |
 |
||||||||||||
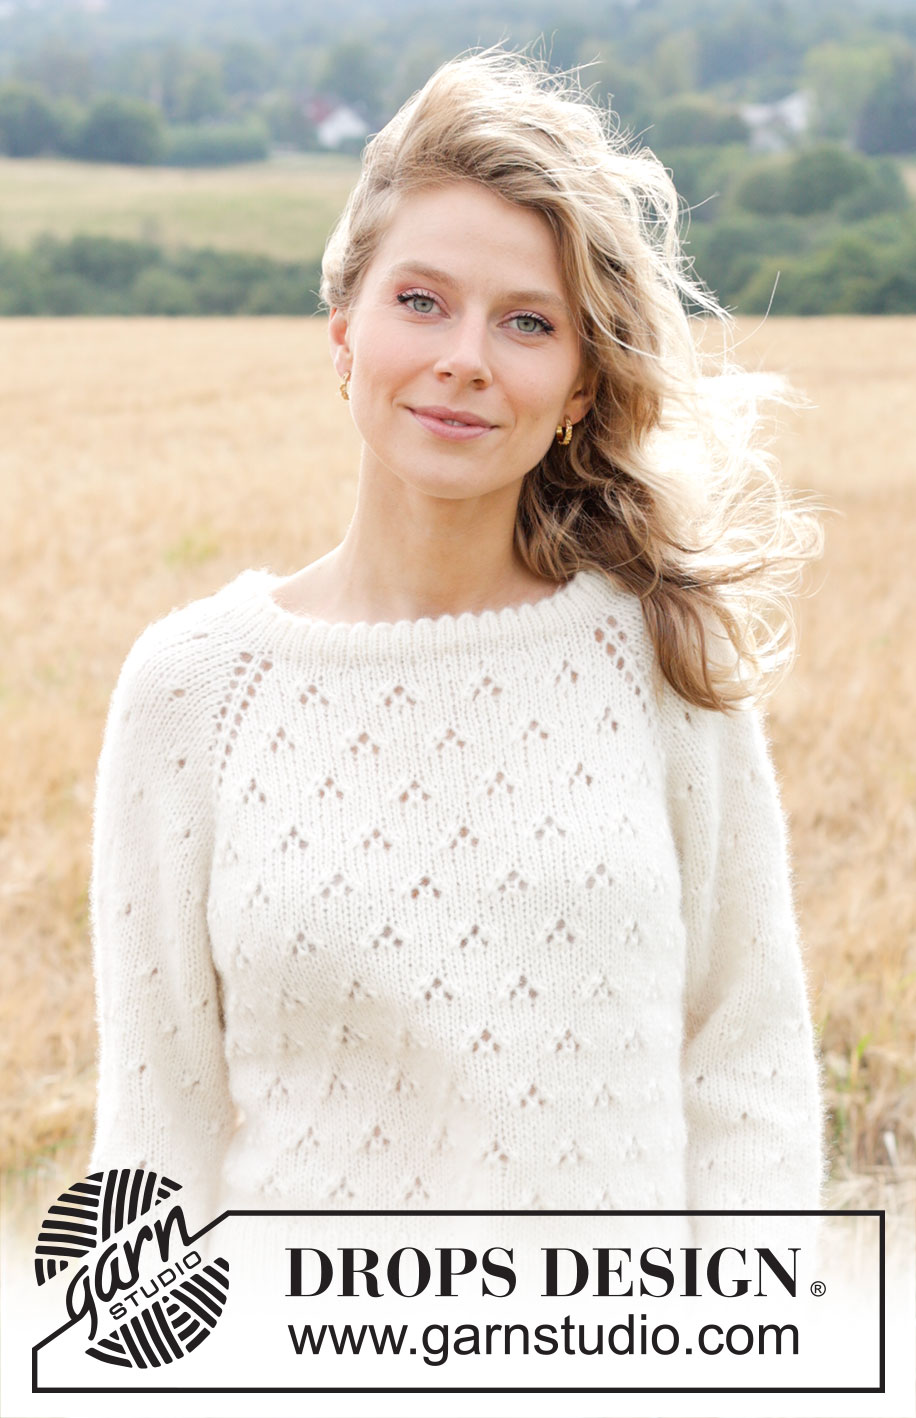
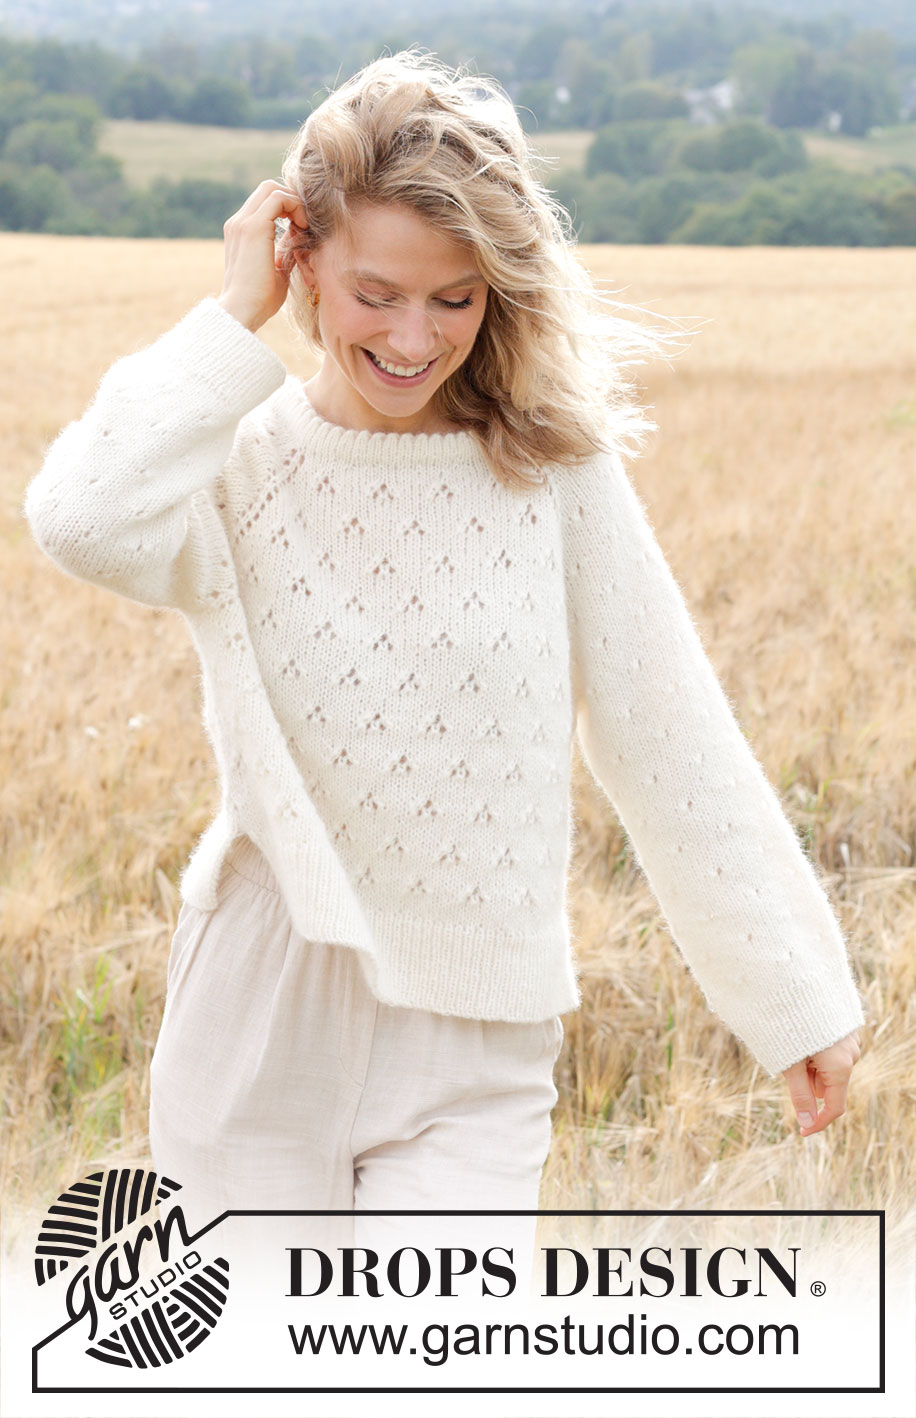
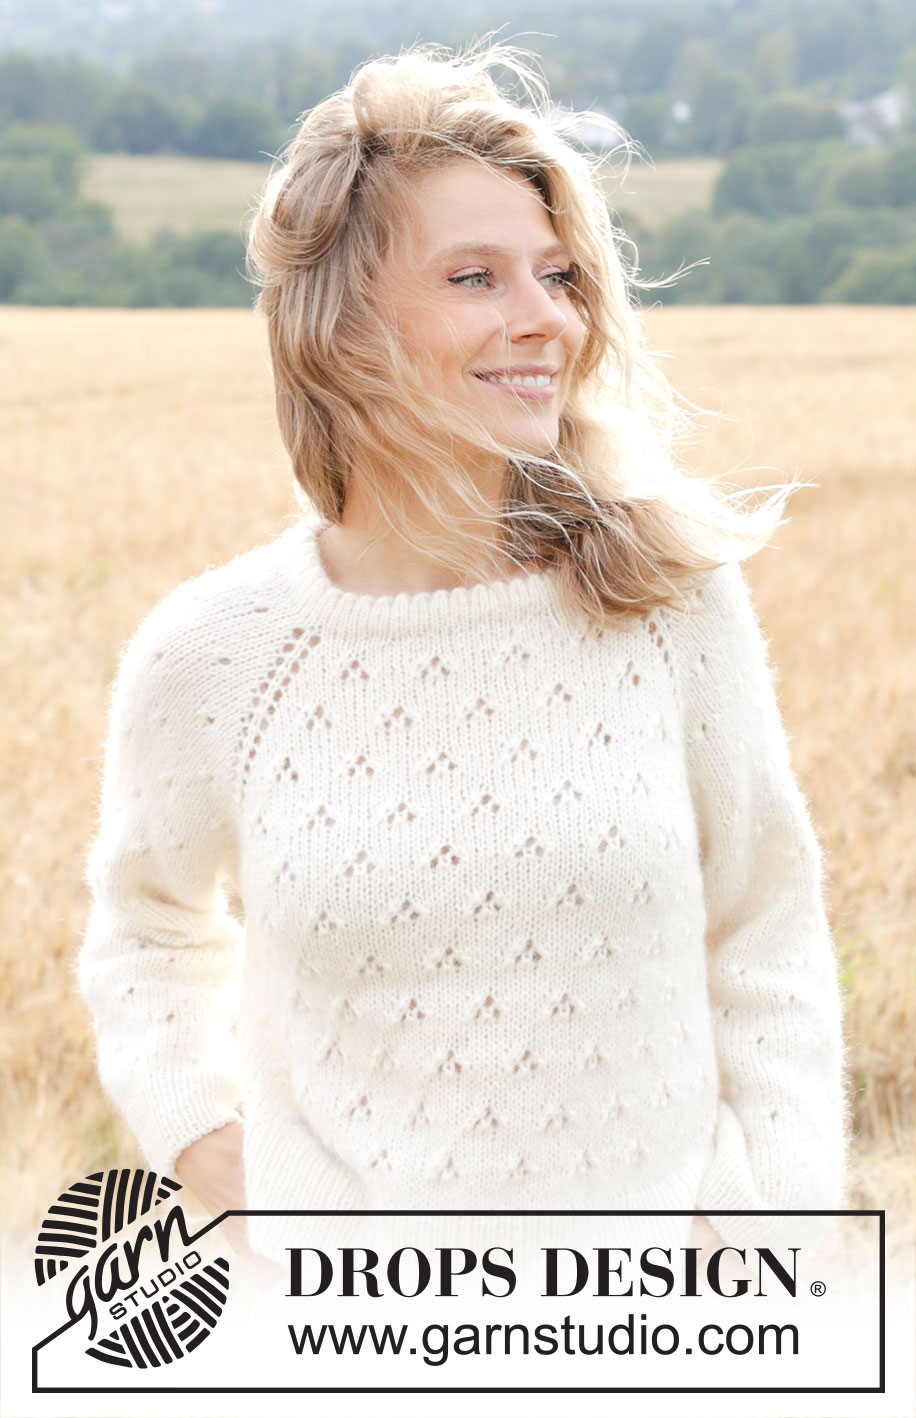
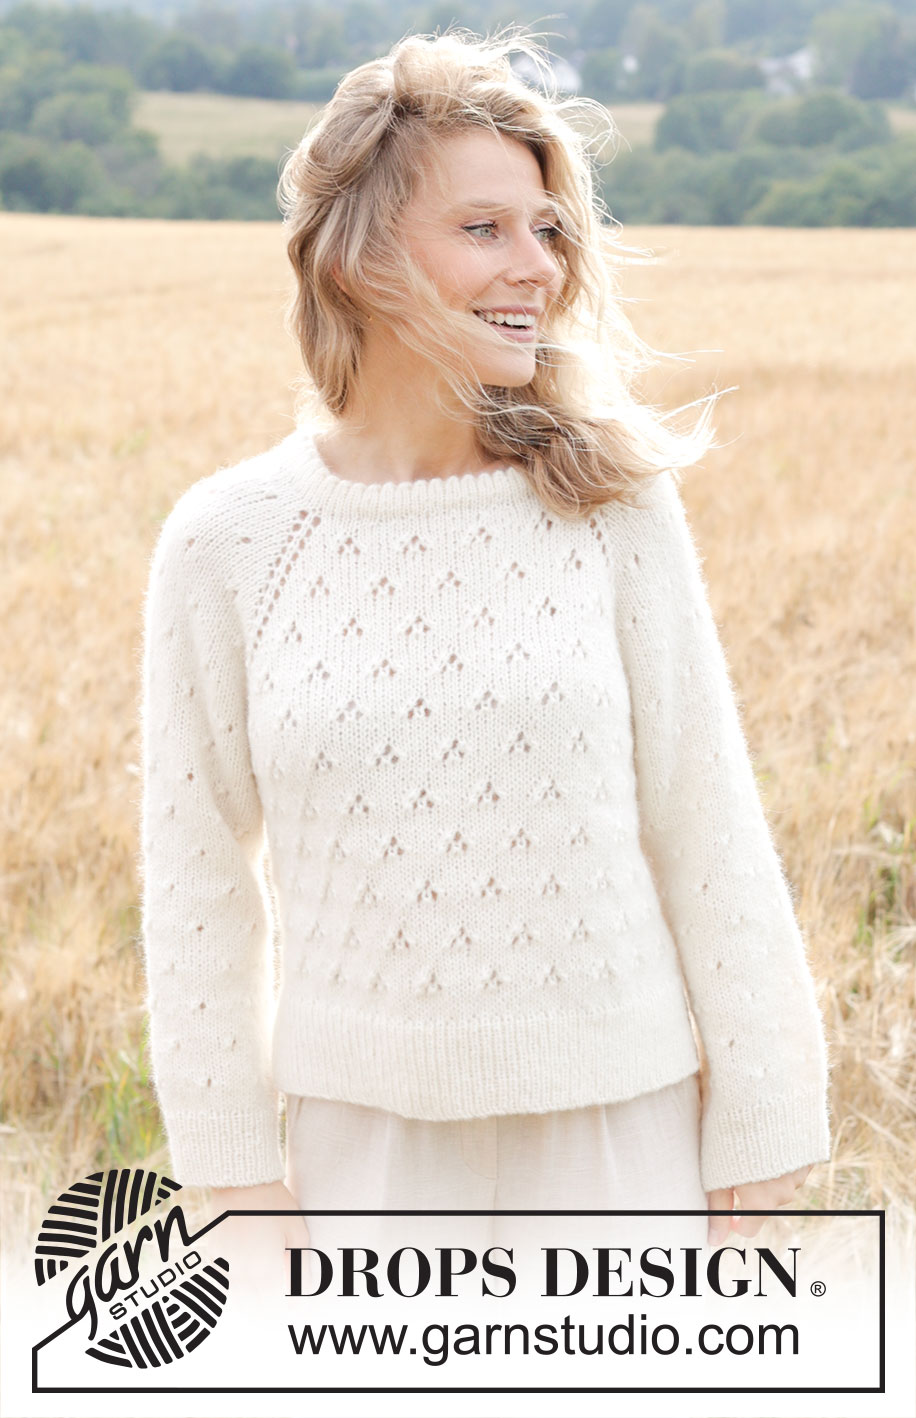
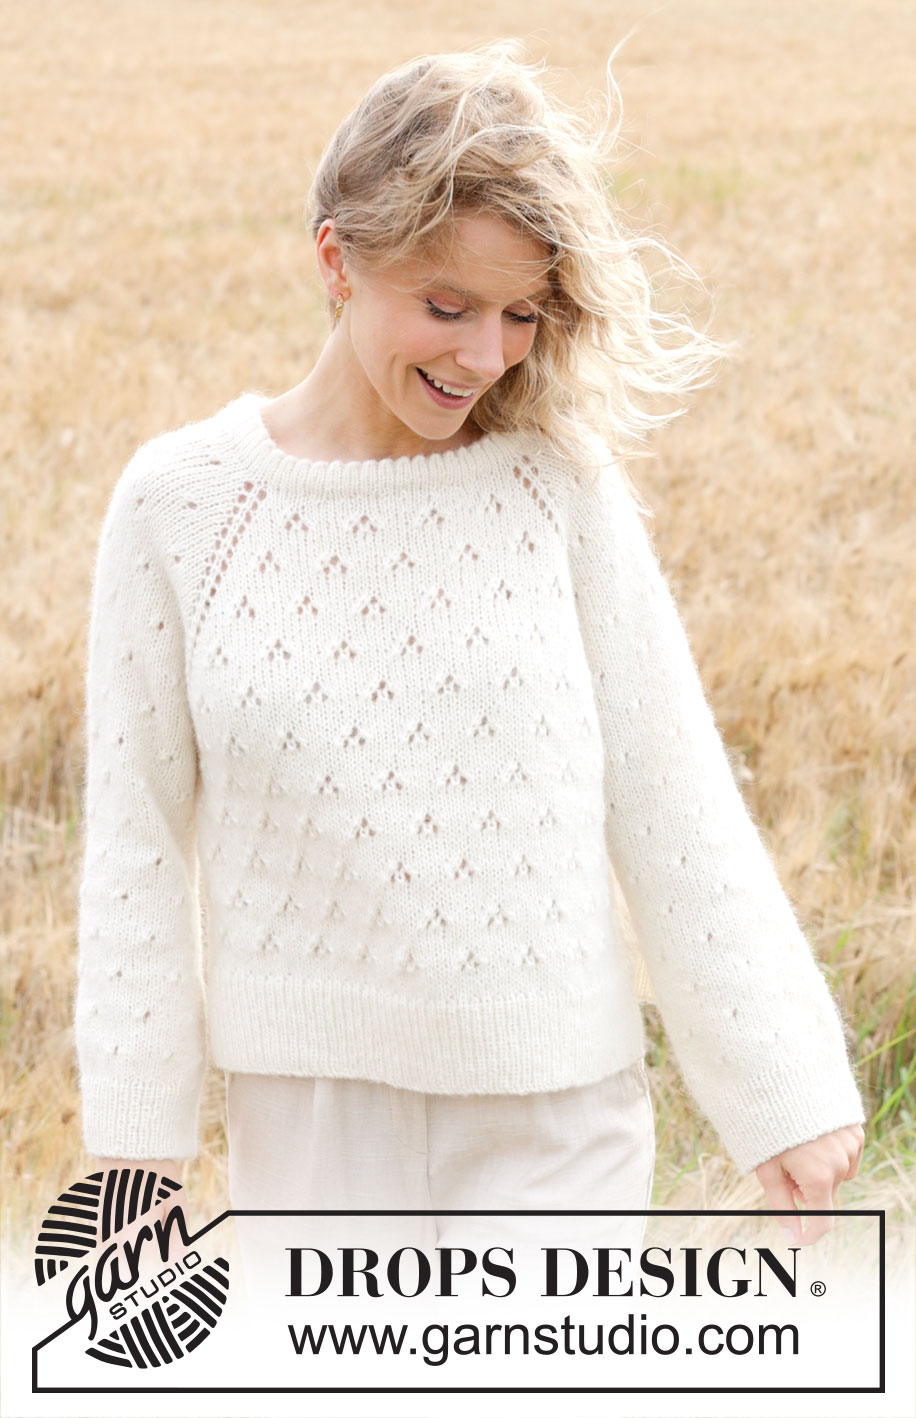
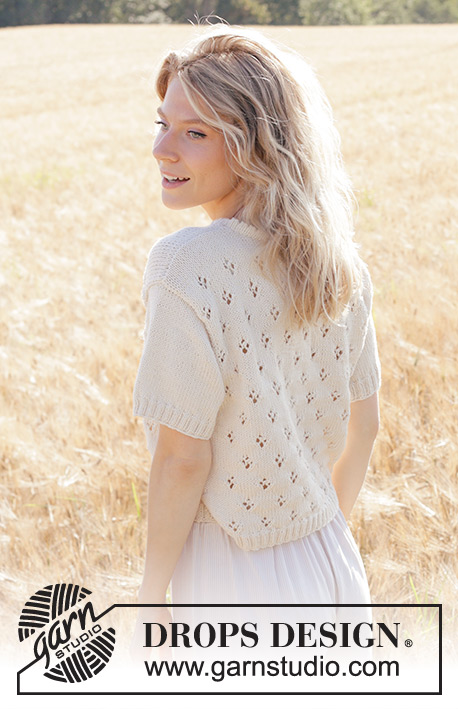
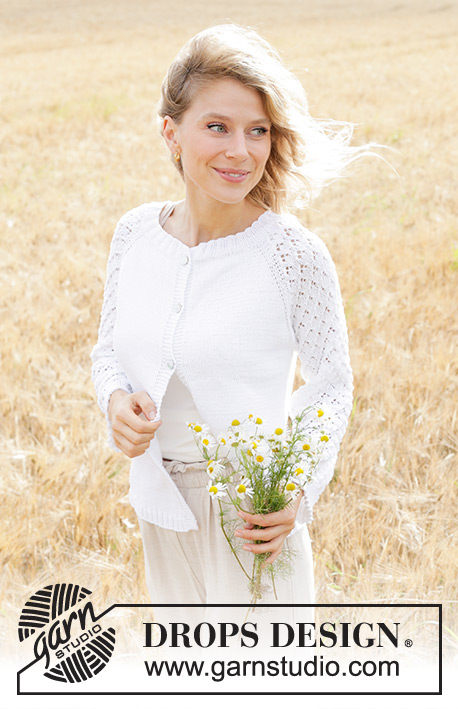
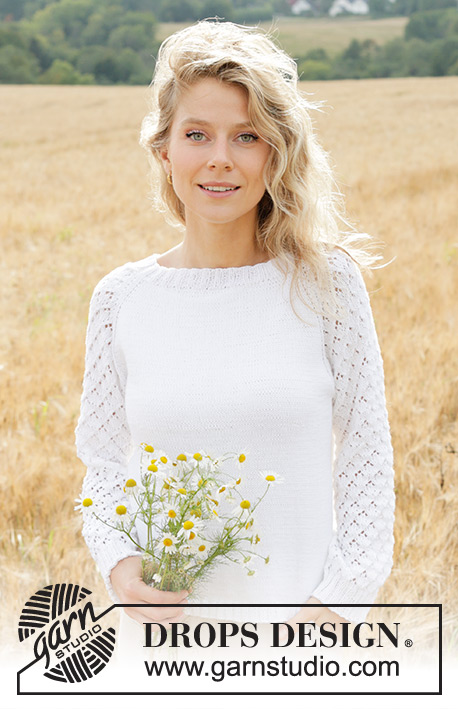
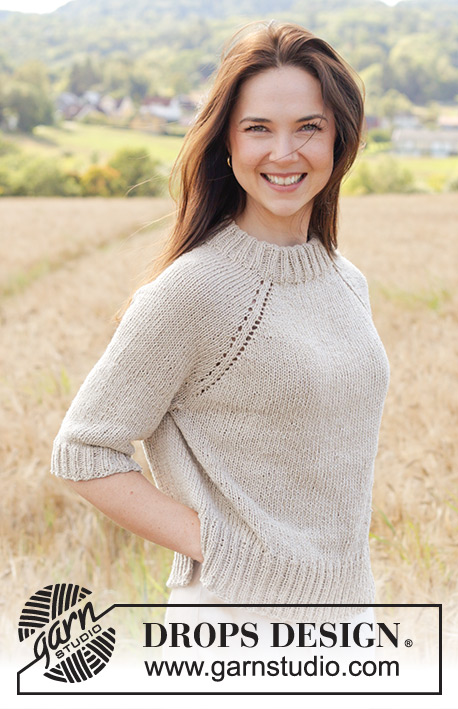
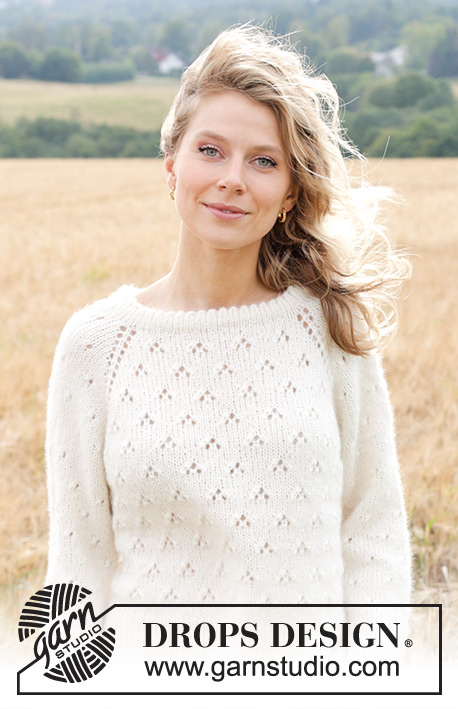
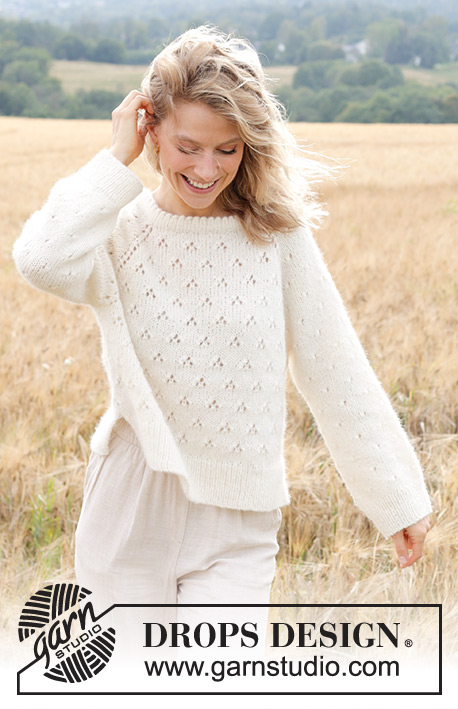
Knitted jumper in DROPS Air or DROPS Paris. The piece is worked top down with double neck, raglan, lace pattern and split in sides. Sizes S - XXXL.
DROPS 249-4 |
|||||||||||||
|
------------------------------------------------------- EXPLANATIONS FOR THE PATTERN: GARTER STITCH (worked back and forth): Knit all rows. 1 ridge = knit 2 rows. PATTERN: See diagrams A.1 (sleeve) and A.2 (front and back pieces). Choose diagram for your size (applies to A.1). As stitches are increased for raglan, work the new stitches into the pattern as shown in A.1 and A.2, i.e., work the new stitches in stocking stitch until there is room for a complete repeat of the pattern. Any stitches which do not fit into the pattern as you increase are worked in stocking stitch. INCREASE TIP (evenly spaced): Increase 1 stitch by making 1 yarn over, which is worked twisted on the next round to avoid a hole. RAGLAN: Increase 1 stitch after/before 1 knitted stitch in each transition between body and sleeves (4 marker-stitches called raglan-stitches in the text). Increase 1 stitch by making 1 yarn over, which is knitted on the next round to leave a hole. DECREASE TIP (for sleeves): Decrease 2 stitches on the round by decreasing 1 stitch on each side of the marker-stitch as follows: Work until there are 3 stitches left before the marker-stitch, knit 2 together, knit 3 (marker-stitch is the middle stitch), slip 1 stitch knit-wise, knit 1 and pass the slipped stitch over the knitted stitch (2 stitches decreased). ------------------------------------------------------- START THE PIECE HERE: ------------------------------------------------------- JUMPER – SHORT OVERVIEW OF THE PIECE: The pattern uses both long and short needles; start with the length which fits the number of stitches and change when necessary. The piece is worked top down, from the right back shoulder, in the round with circular needle. The double neck is worked first, then the yoke. When the yoke is finished, it is divided for body and sleeves, the body is continued in the round while the sleeves wait. The body is divided for the split in each side and each piece is finished separately, back and forth. The sleeves are worked in the round, top down. NECK: Cast on 90-94-94-102-106-112 stitches with circular needle size 5 mm and DROPS Air or DROPS Paris. Change to circular needle size 3.5 mm (casting on with a larger needle size makes the cast-on edge elastic). Work stocking stitch in the round for 3 cm. On the next round work a row of holes (= folding edge) as follows: (Knit 2 together, 1 yarn over) to end of round. Continue with stocking stitch until the neck measures 7 cm from the cast-on edge. Fold the neck double to the inside and work 1 more round of stocking stitch, working every 4th stitch together with its corresponding stitch on the cast-on edge. You now have a double neck of approx. 3 cm. Insert 1 marker-thread in this round; the yoke is measured from here. YOKE: Change to circular needle size 5 mm, knit 1 round and increase 6-2-2-14-10-4 stitches evenly spaced – read INCREASE TIP = 96-96-96-116-116-116 stitches. Insert 4 markers, without working the stitches, which will be used when increasing for raglan. Count 15-15-15-17-17-17 stitches (= sleeve), insert marker-1 in the next stitch, count 31-31-31-39-39-39 stitches (= front piece), insert marker-2 in the next stitch, count 15-15-15-17-17-17 stitches (= sleeve), insert marker-3 in the next stitch, count 31-31-31-39-39-39 stitches (= back piece), insert marker-4 in the last stitch. Now work PATTERN at the same time as increasing for RAGLAN, working the first round as follows: Increase 1 stitch for RAGLAN after marker-4 – read description above, work PATTERN A.1 – read description above (= sleeve), increase 1 stitch for raglan on each side of marker-1, work A.2A, then A.2B, 2-2-2-3-3-3 times in width, A.2C (= front piece), increase 1 stitch for raglan on each side of marker-2, work A.1 (= sleeve), increase 1 stitch for raglan on each side of marker-3, work A.2A, then A.2B, 2-2-2-3-3-3 times in width, A.2C (= back piece), increase 1 stitch for raglan before marker-4, knit marker-stitch-4. Continue this pattern and increase for raglan on each side of the 4 raglan-stitches every 2nd round a total of 16-16-18-22-20-12 times (including the first increase described above) = 224-224-240-292-276-212 stitches. REMEMBER THE KNITTING TENSION! Continue increasing as follows: Increase for raglan on the front and back pieces every 2nd round but only increase on the sleeves every 4th round (= alternately 4 and 8 increased stitches). Increase like this a total of 4-8-10-6-8-20 times on the front and back pieces (2-4-5-3-4-10 times on the sleeves). After the last increase there are 248-272-300-328-324-332 stitches. The yoke measures approx. 18-22-25-25-25-29 cm from the marker-thread on the neck. Continue working without further increases until the yoke measures 20-22-25-25-26-29 cm from the marker-thread. DIVIDE FOR BODY AND SLEEVES: Place the first 51-55-61-67-65-61 stitches on 1 thread for the sleeve (= between markers 4 and 1), cast on 7-7-7-7-15-23 stitches (= in side under sleeve), work the next 73-81-89-97-97-105 stitches in pattern as before (= front piece), place the next 51-55-61-67-65-61 stitches on 1 thread for the sleeve (= between markers 2 and 3), cast on 7-7-7-7-15-23 stitches (= in side under sleeve), work the last 73-81-89-97-97-105 stitches as before (= back piece). The body and sleeves are finished separately. The piece is now measured from here! BODY: = 160-176-192-208-224-256 stitches. Insert 1 marker in each side, in the middle stitch of the 7-7-7-7-15-23 cast-on under each sleeve. Allow the markers to follow your work onwards; they will mark the split in each side. Knit to the first marker. The round starts here. Continue A.2 in the round over all stitches – making sure to continue the pattern from the yoke. Work until the body measures 22-22-21-21-22-21 cm from the division – adjusting so there are at least 5 knitted rounds after a row of holes. Now divide for the split in each side by each marker and finish the front and back pieces separately. FRONT PIECE: = 80-88-96-104-112-128 stitches, continued back and forth. On the first row (= right side), start working rib and increase 35-37-41-45-47-55 stitches evenly on the row as follows = 115-125-137-149-159-183 stitches: Change to circular needle size 3.5 mm, work 1 GARTER STITCH - read description above, rib (= knit 1, purl 1 – remember the increases), until there are 2 stitches left, knit 1 and 1 garter stitch. When the rib measures 8 cm, cast off with Italian cast-off or with rib. The jumper measures approx. 54-56-58-60-62-64 cm from the shoulder. BACK PIECE: Work in the same way as the front piece. SLEEVES: Place the 51-55-61-67-65-61 stitches from the thread on the one side of the piece on short circular needle/double pointed needles size 5 mm and knit up 1 stitch in each of the 7-7-7-7-15-23 stitches cast on under the sleeve = 58-62-68-74-80-84 stitches. Insert a marker in the middle of the 7-7-7-7-15-23 stitches under the sleeve. Start at the marker and continue A.1 in the round – making sure to continue the pattern from the yoke. Stitches which do not fit into the pattern under the sleeve are worked in stocking stitch. . When the sleeve measures 2 cm from the division, decrease 2 stitches under the sleeve – read DECREASE TIP. Decrease like this every 2nd round a total of 0-0-0-5-6-7 times, then every 2 cm 4-5-8-5-6-6 times = 50-52-52-54-56-58 stitches. Continue working until the sleeve measures 39-38-36-36-35-32 cm from the division – adjusting so there are several knitted rounds after the last row of holes. There is approx. 6-6-6-7-7-7 cm left; try the jumper on and work to desired length before the rib. Change to double pointed needles size 3.5 mm and start working rib (knit 1, purl 1), at the same time as increasing 8-8-10-10-10-10 stitches evenly on the first round = 58-60-62-64-66-68 stitches. When the rib measures 6-6-6-7-7-7 cm, cast off with Italian cast-off or with rib. The sleeve measures approx. 45-44-42-43-42-39 cm. |
|||||||||||||
Diagram explanations |
|||||||||||||
|
|||||||||||||
 |
|||||||||||||
 |
|||||||||||||
 |
|||||||||||||
 |
|||||||||||||
Have you finished this pattern?Tag your pictures with #dropspattern #springsnowflakesweater or submit them to the #dropsfan gallery. Do you need help with this pattern?You'll find 34 tutorial videos, a Comments/Questions area and more by visiting the pattern on garnstudio.com. © 1982-2026 DROPS Design A/S. We reserve all rights. This document, including all its sub-sections, has copyrights. Read more about what you can do with our patterns at the bottom of each pattern on our site. |
|||||||||||||


With over 40 years in knitting and crochet design, DROPS Design offers one of the most extensive collections of free patterns on the internet - translated to 17 languages. As of today we count 324 catalogues and 12290 patterns translated into English (UK/cm). 12290
We work hard to bring you the best knitting and crochet have to offer, inspiration and advice as well as great quality yarns at incredible prices! Would you like to use our patterns for other than personal use? You can read what you are allowed to do in the Copyright text at the bottom of all our patterns. Happy crafting!
Post a comment to pattern DROPS 249-4
We would love to hear what you have to say about this pattern!
If you want to leave a question, please make sure you select the correct category in the form below, to speed up the answering process. Required fields are marked *.