
Popular categories
Looking for a yarn?


Comments / Questions (74)
![]() Anida wrote:
Anida wrote:
W opisach schematów,,2 oczka na prawo i zdjąć jedno oczko,drugie przerobić na prawo i przeciągnąć,,wyświetlają się niebieskie kwadraciki ze znakiem zapytania.Dlaczego?
20.11.2023 - 19:04DROPS Design answered:
Witaj, u mnie wszystko jest ok. Może to kwestia przeglądarki. Spróbuj wyczyścić ciasteczka. Pozdrawiamy!
21.11.2023 - 08:50
![]() Devaud wrote:
Devaud wrote:
Bonjour, combien de pelotes de drops kid silk pour un pull femme tricoté en trois fils et un autre pull en quatre fils. Merci de votre réponse et bonne journée
13.10.2023 - 11:20DROPS Design answered:
Bonjour Mme Devaud, tout dépend de la tension utilisée, en général, 2 fils Kid-Silk correspondent à une tension de 16-17 mailles (groupe de fils C) et 3 fils Kid-Silk à une tension de 14 mailles environ (groupe de fils D). Aidez-vous de notre moteur de recherches en choisissant les tensions souhaitées et utilisez le convertisseur pour avoir la quantité correspondante. Retrouvez plus d'infos sur les calculs ici. Votre magasin saura également vous conseiller, même par mail ou téléphone. Bon tricot!
13.10.2023 - 15:24
![]() Helene wrote:
Helene wrote:
Bonjour J'ai terminé l'encolure V avec les augmentations 3 fois tous les 8 rangs (taille L). Mais je ne vois pas de suite, après ces 3 fois, les augmentations d'encolure V sont finies ? On continue droit pour les devant ? Merci par avance de votre réponse. Bonne journée Hélène
31.08.2023 - 18:13DROPS Design answered:
Bonjour Hélène, tout à fait, en taille L, on augmente 3 fois tous les 8 rangs pour l'encolure V et c'est terminé pour ces augmentations. Bon tricot!
01.09.2023 - 08:37
![]() Diane wrote:
Diane wrote:
Le travail commence par 1 rang envers sur envers. Est-ce que cela veut tout simplement dire que je tricote mon premier rang à l’envers? Je ne comprends pas ce que vous voulez dire « sur envers ». Merci
26.08.2023 - 18:58DROPS Design answered:
Bonjour Diane, tout à fait, le tout premier rang est un rang sur l'envers de l'ouvrage et on va tricoter toutes les mailles à l'envers. Bon tricot!
28.08.2023 - 14:01
![]() Pascale Volkaerts wrote:
Pascale Volkaerts wrote:
Bonjour, pensez-vous que je peux réaliser ce modèle avec 1 seul fil Kid Silk?
31.07.2023 - 14:46DROPS Design answered:
Bonjour Mme Volkaerts, votre tension serait alors différente et vous devriez recalculer l'intégralité des explications; retrouvez ici nos modèles de gilets et vestes tricotés avec 1 seul fil du groupe A que vous pouvez réaliser en Kid-Silk, utilisez le convertisseur pour avoir la quantité nécessaire. Bon tricot!
31.07.2023 - 15:35
![]() Gul B wrote:
Gul B wrote:
This is such a gorgeous design. I have started to knit but got confused why the markers are placed in the stitches and not just between them? I think we need to move the markers up with each row right? Otherwise I might miss the right spot when to make the increases, Let me know. Thank you 😊
16.07.2023 - 21:55DROPS Design answered:
Hi Gul, The markers are placed in the stitches to give a slightly different raglan-line with a knitted stitch running up the middle. And, yes, you need to move the markers each time so the raglan-line remains straight. Happy summer!
17.07.2023 - 07:35
![]() Dorothy Mawby wrote:
Dorothy Mawby wrote:
Can I adapt this pattern to knitting hem up? I find that raglans sit better if they have a seam. I'll be using Aloft kid/mohair from nitpicks in the US as it is readily available.
17.06.2023 - 19:52DROPS Design answered:
Dear Dorothy, yes, you can work it from the bottom up. We don't make custom patterns so you will need to make all of the necessary modifications to the pattern yourself. Happy knitting!
18.06.2023 - 19:15
![]() Louise wrote:
Louise wrote:
Jeg forstår ikke hvordan i kommer fra 3. mønsterpind til 4. mønsterpind i diagram A1 og A2. Maskeantallet passer, men jeg forstår ikke hvordan der kommer en ekstra maske på højre side af ret masken? De to omslag er lavet på den modsatte side på retsiden. Når jeg skal strikke vrang tilbage vil mønsteret ikke komme til at passe?
26.04.2023 - 20:51DROPS Design answered:
Hej Louise, jo maskerne bliver hvad du gør dem til ;) så du strikker bare ifølge diagrammet, da vil du få ret over ret og vrang over vrang :)
27.04.2023 - 10:25
![]() Angelika Van Der Horst wrote:
Angelika Van Der Horst wrote:
Klopt het dat je maar 2 keer 1 steek voor de v-hals moet meerderen? ( Voor maat 40)
11.04.2023 - 11:01DROPS Design answered:
Dag Angelika,
Nee, je meerdert iedere 8e-8e-8e-6e-6e-6e naald 2-2-3-4-5-6 keer. Dit staat beschreven in het patroon. Bovenaan bij V-hals staat beschreven hoe je de minderingen maakt.
11.04.2023 - 20:48
![]() Melanie wrote:
Melanie wrote:
Hallo! Die rechte Masche hat mir gefehlt! Vielen Dank, das war es!
17.03.2023 - 12:52
|
|||||||||||||||||||||||||
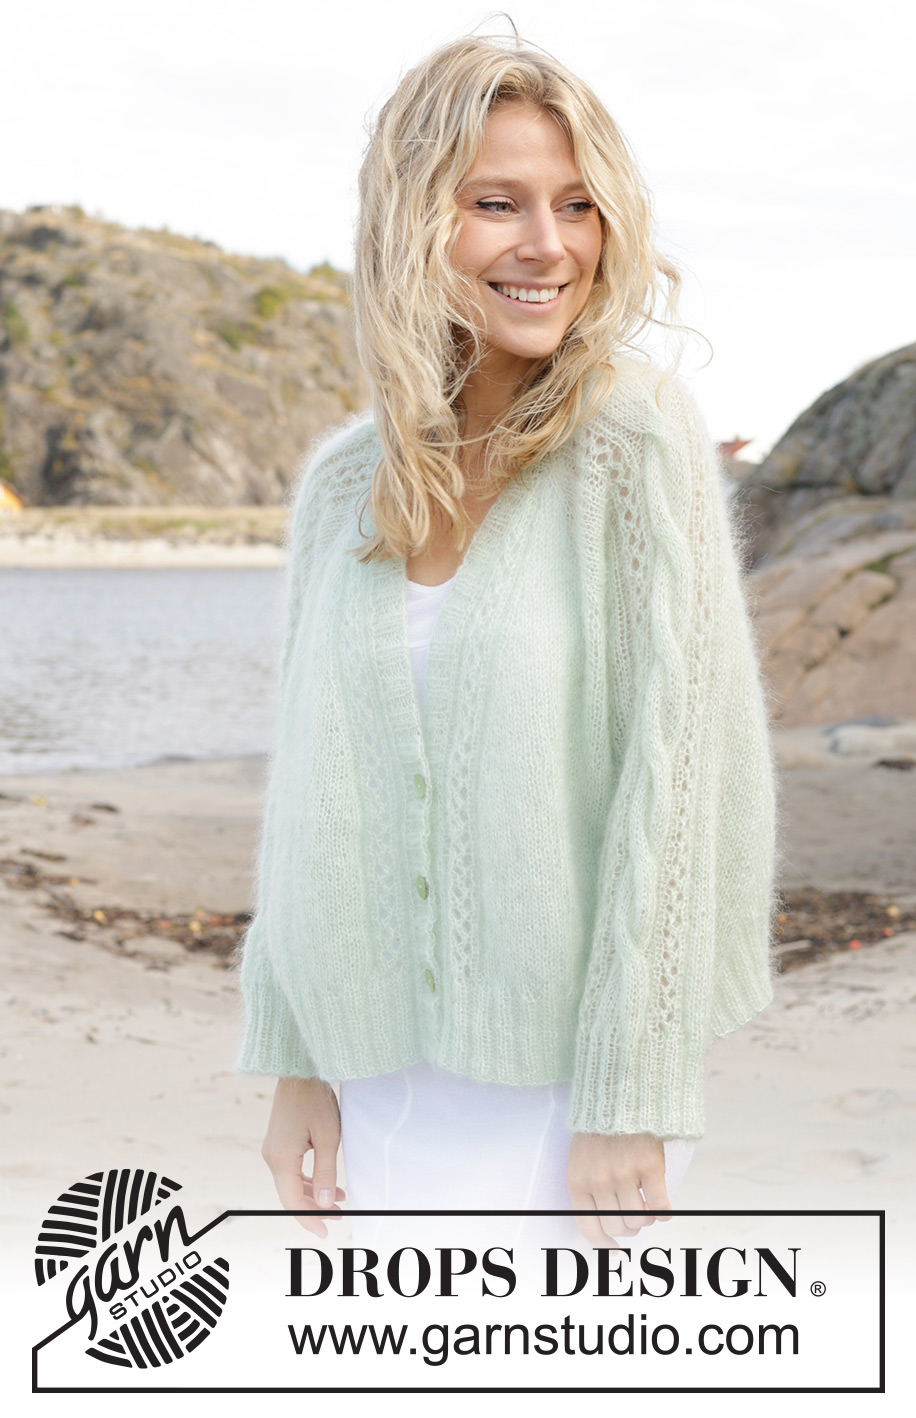
Sweet Spring Cardigan#sweetspringcardigan |
|||||||||||||||||||||||||
 |
 |
||||||||||||||||||||||||
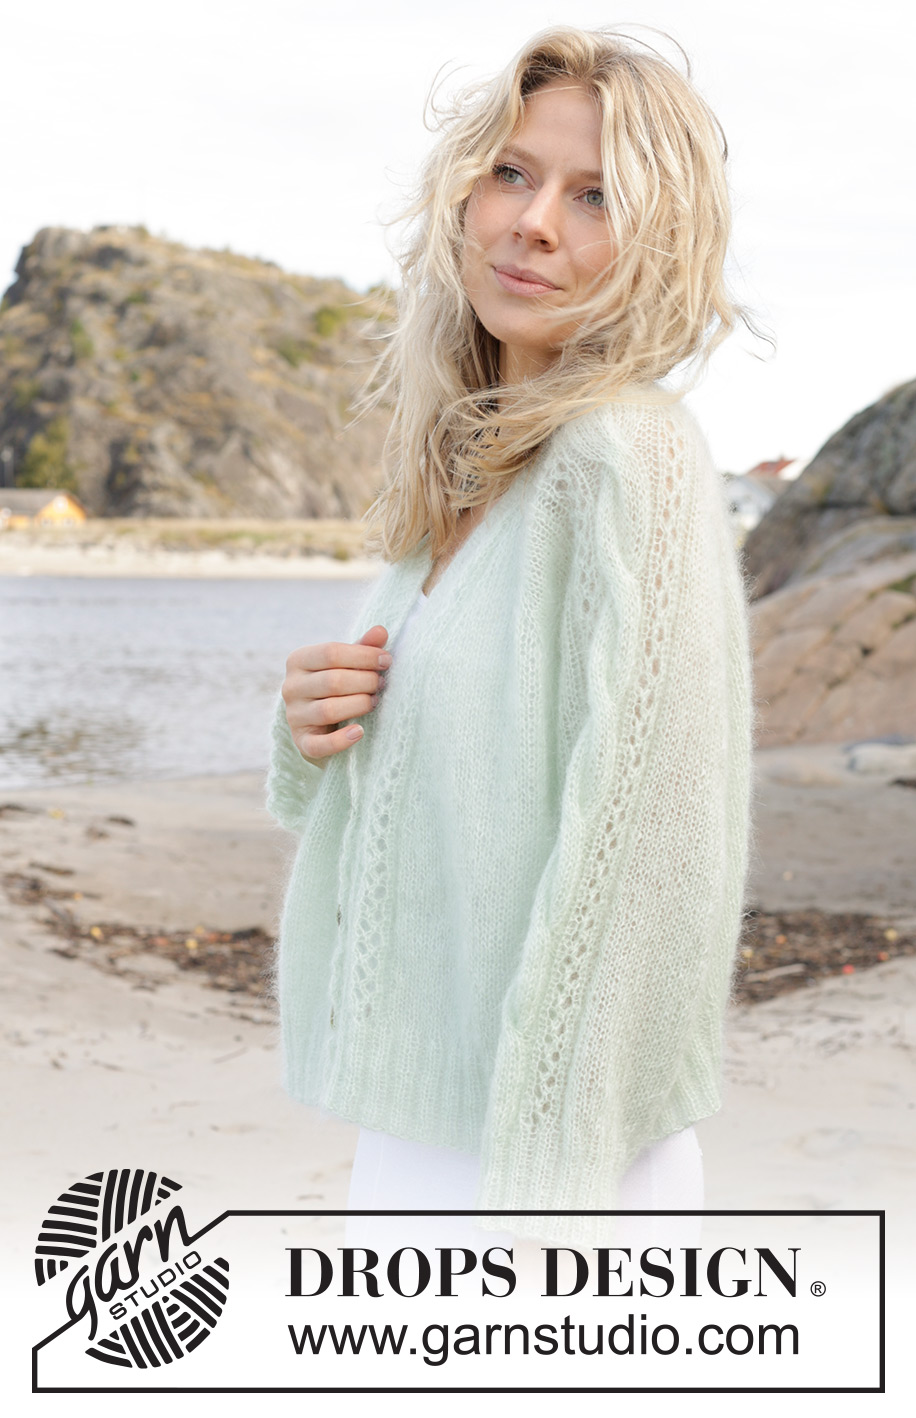
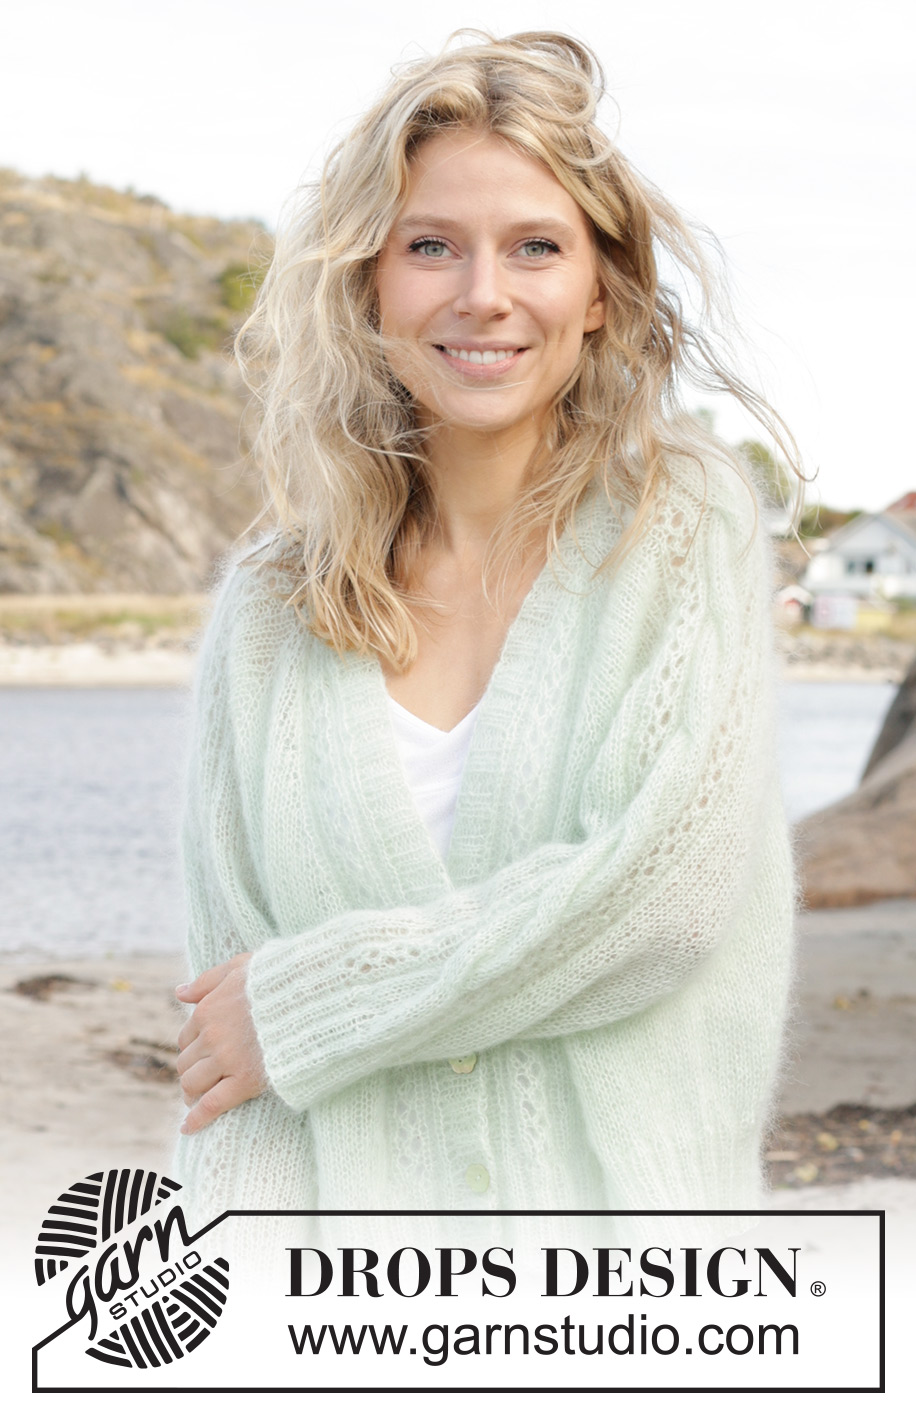
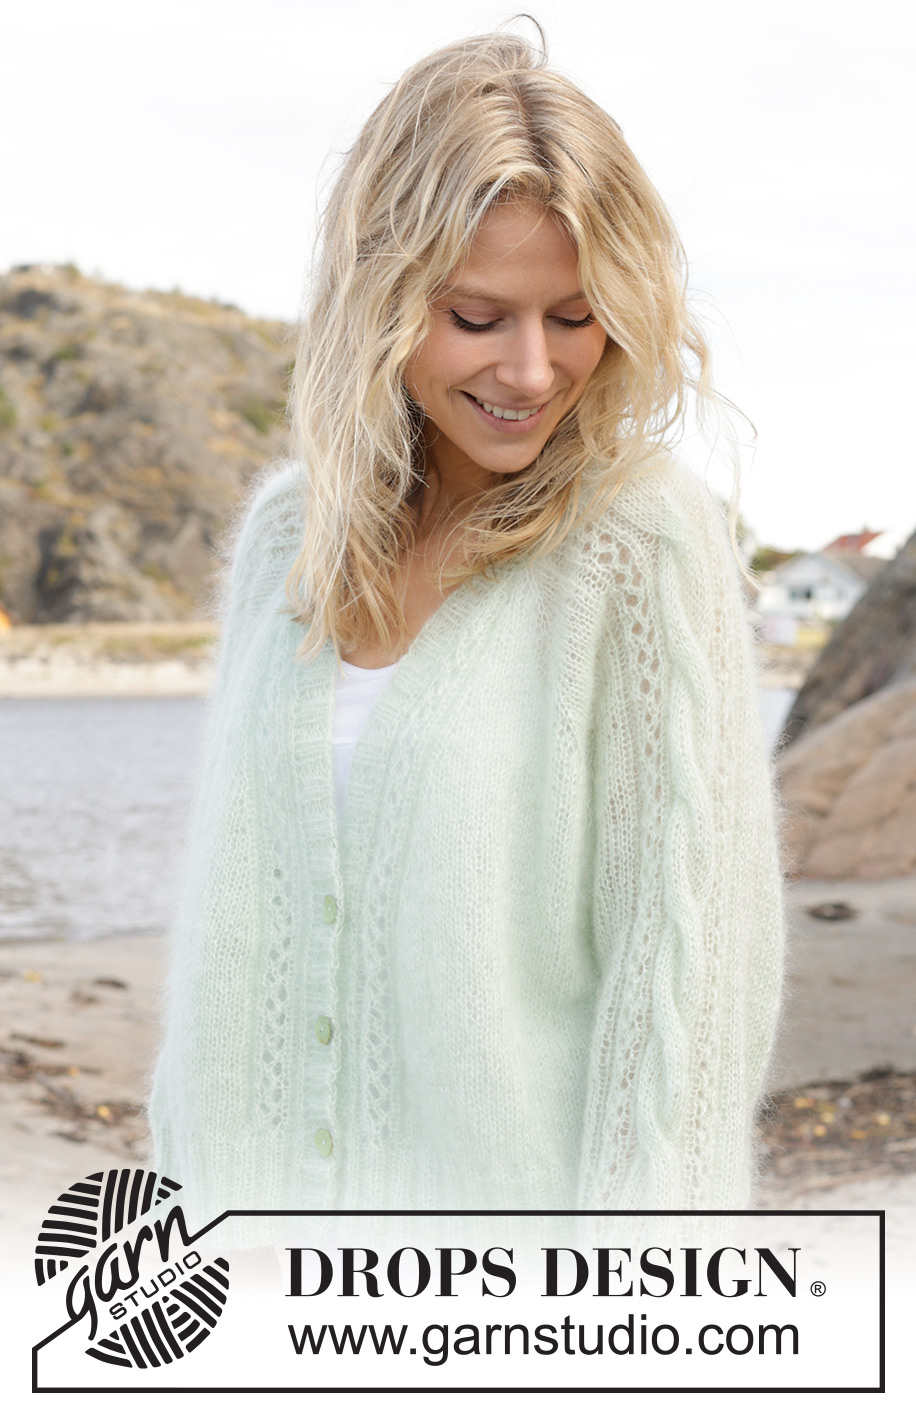
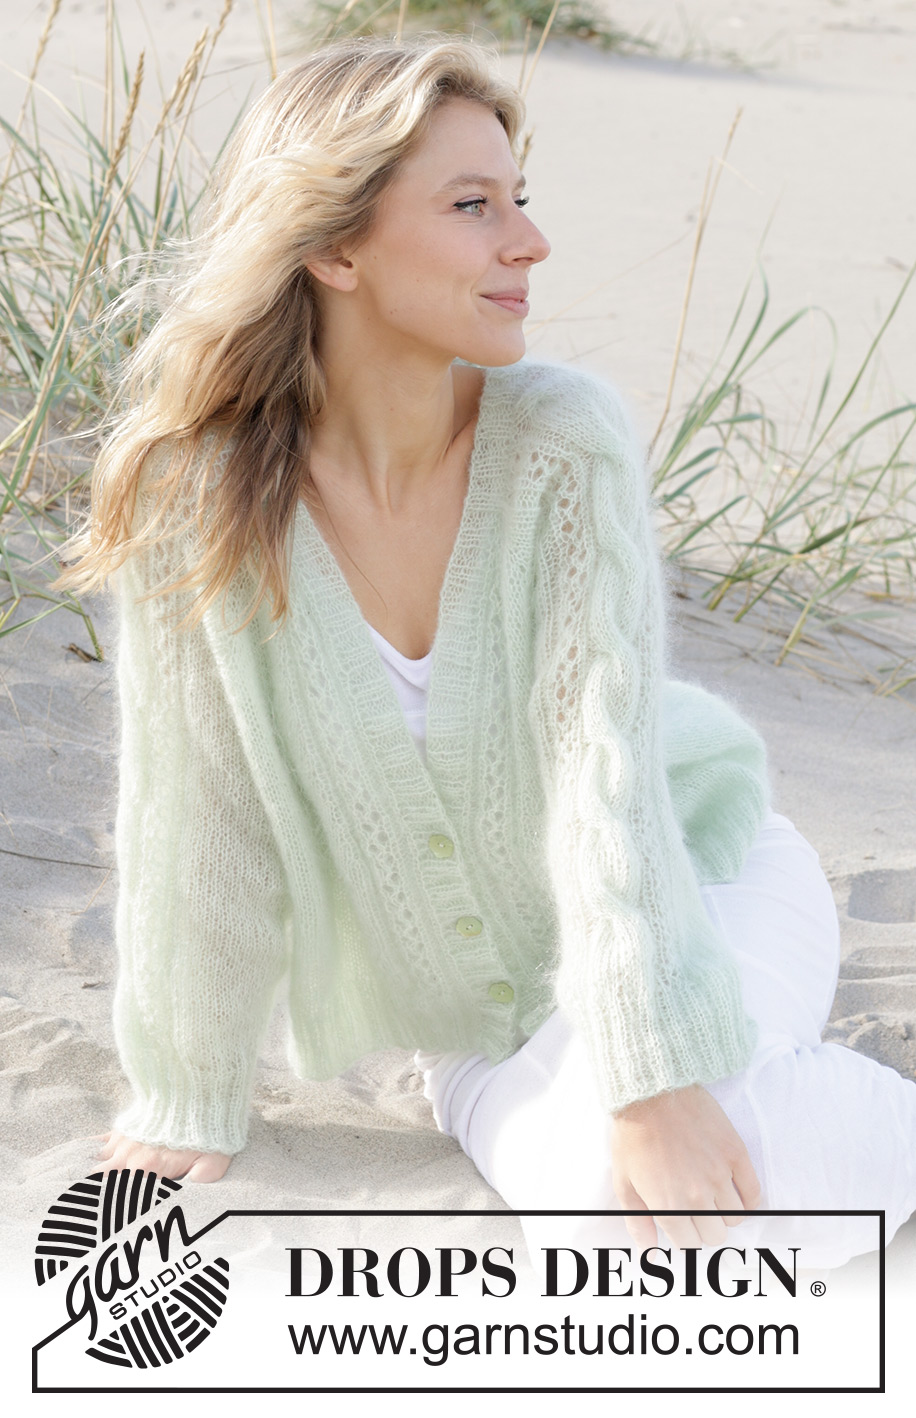
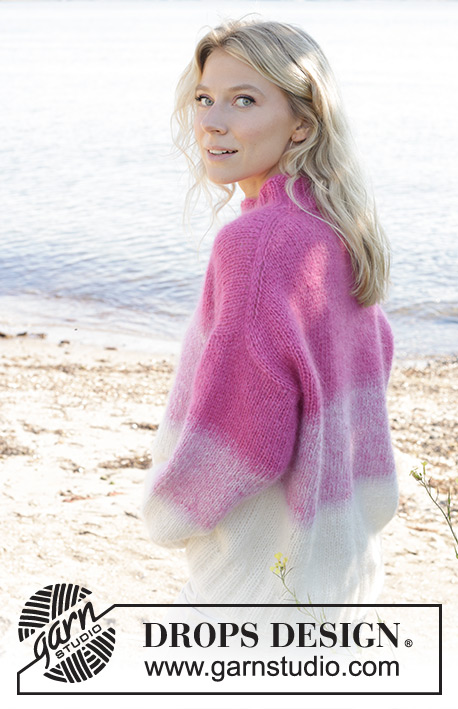
Knitted jacket in 2 strands DROPS Kid-Silk. The piece is worked top down with raglan, V-neck, cables and lace pattern. Sizes S - XXXL.
DROPS 241-11 |
|||||||||||||||||||||||||
|
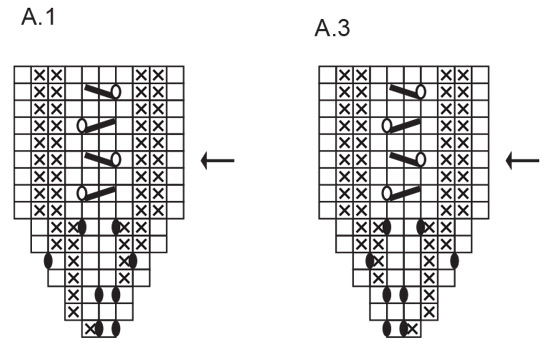
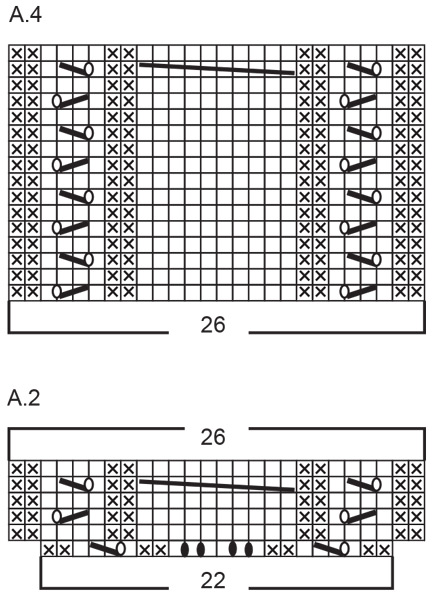
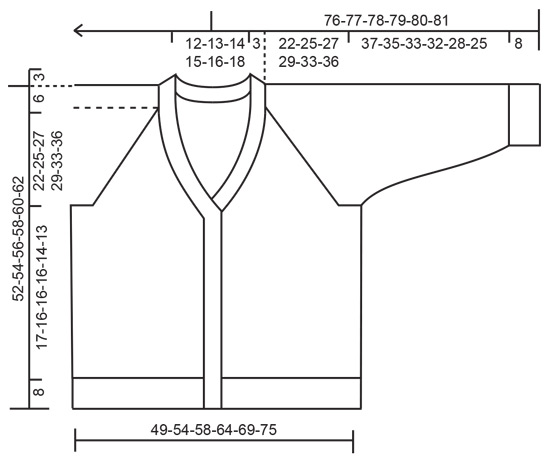
------------------------------------------------------- EXPLANATIONS FOR THE PATTERN: ------------------------------------------------------- RIDGE/GARTER STITCH (worked back and forth): Knit all rows. 1 ridge = knit 2 rows. PATTERN: See diagrams A.1 to A.4. The diagrams show all rows in the pattern from the right side. RAGLAN: Increase 1 stitch before/after the stitch in stocking stitch (= the stitch with the marker) in each transition between body and sleeves. Increase 1 stitch by making 1 yarn over, which is purled twisted on the next row to avoid a hole. Work the new stitches in stocking stitch. V-NECK: All increases are worked from the right side! Make 1 yarn over inside 11 stitches (1 edge stitch + A.1 / A.3 on each side (= 1 stitch increased on each side; 2 stitches increased on the row). On the next row (wrong side) purl the yarn overs twisted to avoid a hole. Work the new stitches in stocking stitch. DECREASE TIP (for sleeves): Decrease 1 stitch on either side of the marker-thread as follows: Work until there are 3 stitches left before the marker-thread, knit 2 together, knit 2 (marker-thread sits between these 2 stitches), slip 1 stitch as if to knit, knit 1 and pass the slipped stitch over the knitted stitch. BUTTONHOLES (on right band when jacket is worn): Decrease 3 buttonholes on the right band. 1 buttonhole = knit 2 together, make 1 yarn over. On the next row knit the yarn over to leave a hole. Work the buttonholes 8, 16 and 24 cm from the bottom edge. ------------------------------------------------------- START THE PIECE HERE: ------------------------------------------------------- JACKET – SHORT OVERVIEW OF THE PIECE: The yoke is worked back and forth with circular needle, top down. The sleeves are worked with cables and lace pattern. At the same time, stitches are increased for the V-neck and raglan. The yoke is divided for body and sleeves and the body continued back and forth with circular needle. The sleeves are worked in the round with double pointed needles/short circular needle. The neck and bands are worked to finish. YOKE: Cast on 72-74-76-78-80-82 stitches (including 1 edge stitch on each side) with circular needle size 5 mm and 2 strands DROPS Kid-Silk. Purl 1 row from the wrong side. OVERVIEW OF THE NEXT SECTION: The pattern starts on the sleeves at the same time as increases are worked for raglan and for the V-neck – read this section before continuing. Insert 4 markers in the piece, without working the stitches: Count 3 stitches (front piece), insert 1 marker in the next stitch, count 22 stitches (sleeve), insert 1 marker in the next stitch, count 18-20-22-24-26-28 stitches (back piece), insert 1 marker in the next stitch, count 22 stitches (sleeve), insert 1 marker in the next stitch, there are 3 stitches left (front piece). Work as follows: 1 edge stitch IN GARTER STITCH – see description above, work A.1, 1 yarn over, knit the marker-stitch, 1 yarn over, A.2, 1 yarn over, knit the marker-stitch, 1 yarn over, work stocking stitch over the next 18-20-22-24-26-28 stitches, 1 yarn over, knit the marker-stitch, 1 yarn over, work A.2, 1 yarn over, knit the marker-stitch, 1 yarn over, work A.3, 1 edge stitch in garter stitch. Continue this pattern and increase to RAGLAN in each transition between body and sleeves on each row from the right side – read description above. When A.2 is finished, work A.4 (26 stitches) over A.2. When A.1 and A.3 have been worked 1 time in height, repeat the last 4 rows onwards. Increase for raglan a total of 10-13-15-15-21-22 times on every other row (= on every row from right side) on each side of all 4 marker-stitches. Then continue to increase for raglan but every 2nd increase is now only on the body (4 stitches increased), i.e. increase every 2nd row on the body and every 4th row on the sleeves). Increase like this 14-14-14-16-14-16 times on the body (7-7-7-8-7-8 times on the sleeve). You increase a total of 24-27-29-31-35-38 times on the yoke and 17-20-22-23-28-30 times on the sleeves. AT THE SAME TIME on the row marked with an arrow in A.1/ A.3, start to increase for the V-NECK on each side – read description above: Increase every 8th-8th-8th-6th-6th-6th row 2-2-3-4-5-6 times. REMEMBER THE KNITTING TENSION! After the last increase for raglan continue working until the yoke measures 22-25-27-29-33-36 cm. There are 264-290-310-326-366-390 stitches. Divide for the body and sleeves on the next row as follows: Work the first 38-41-44-47-52-56 stitches (front piece), place the next 60-66-70-72-82-86 stitches on a thread for the sleeve, cast on 16-16-16-20-20-22 stitches (in side under sleeve), work the next 68-76-82-88-98-106 stitches (back piece), place the next 60-66-70-72-82-86 stitches on a thread for the sleeve, cast on 16-16-16-20-20-22 stitches (in side under sleeve), work the last 38-41-44-47-52-56 stitches (front piece). The piece is now measured from here! BODY: = 176-190-202-222-242-262 stitches. Continue with stocking stitch, 1 edge stitch in garter stitch on each side and A.1 /A.3. When the body measures 16-15-15-15-13-12 cm from the division, knit 1 row from the right side and increase 28-34-42-46-46-50 stitches evenly spaced = 204-224-244-268-288-312 stitches. Change to circular needle size 4 mm and work as follows from the wrong side: 1 edge stitch in garter stitch, * purl 2, knit 2 *, work from *-* until there are 3 stitches left, purl 2 and 1 edge stitch in garter stitch. Continue this rib for 8 cm. Cast off a little loosely. The jacket measures approx. 52-54-56-58-60-62 cm from the shoulder. SLEEVES: Place the 60-66-70-72-82-86 stitches from the thread on the one side of the piece on short circular needle/double pointed needles size 5 mm and knit up 1 stitch in each of the 16-16-16-20-20-22 stitches cast on under the sleeve = 76-82-86-92-102-108 stitches. Insert a marker-thread in the middle of the 16-16-16-20-20-22 stitches under the sleeve and allow it to follow your work onwards; it is used when decreasing under the sleeve. Start at the marker-thread. Continue with A.4 and stocking stitch in the round. When the sleeve measures 3 cm decrease 2 stitches mid under sleeve – read DECREASE TIP. Decrease like this every 2½-2-1½-1-1-1 cm a total of 10-11-13-16-19-20 times = 56-60-60-60-64-68 stitches. Continue working until the sleeve measures 37-35-33-32-28-25 cm from the division or to desired length. Change to double pointed needles size 4 mm and work rib (knit 2, purl 2) for 8 cm. Cast off a little loosely. The sleeve measures approx. 45-43-41-40-36-33 cm from the division. Work the other sleeve in the same way. BANDS/NECK: Insert 1 marker in the middle of the neck on the back piece; it is used to mark half the stitches on the neck/bands. The bands are knitted up inside the 1 edge stitch on the front piece, the neck in the first row on the neckline. Begin from the right side at the bottom of the right front piece and knit up 119-125-131-137-143-149 stitches as far as the marker at the back of the neck, with circular needle size 4 mm (leave the marker in place). Knit up 119-125-131-137-143-149 stitches down to the bottom of the left front piece; total number of stitches should be divisible by 4 + 2 = 238-250-262-274-286-298 stitches. It is important that the rib is neither loose with too many stitches nor tight with too few stitches. Work as follows from the wrong side: 2 garter stitches, * purl 2, knit 2 *, work from *-* until there are 4 stitches left, purl 2 and 2 garter stitches. Work this rib for 1½ cm. Now work the BUTTONHOLES on the right band – read description above. Continue working until the rib measures 3 cm. Cast off a little loosely. Sew the buttons onto the left band. |
|||||||||||||||||||||||||
Diagram explanations |
|||||||||||||||||||||||||
|
|||||||||||||||||||||||||
 |
|||||||||||||||||||||||||
 |
|||||||||||||||||||||||||
 |
|||||||||||||||||||||||||
Have you finished this pattern?Tag your pictures with #dropspattern #sweetspringcardigan or submit them to the #dropsfan gallery. Do you need help with this pattern?You'll find 31 tutorial videos, a Comments/Questions area and more by visiting the pattern on garnstudio.com. © 1982-2026 DROPS Design A/S. We reserve all rights. This document, including all its sub-sections, has copyrights. Read more about what you can do with our patterns at the bottom of each pattern on our site. |
|||||||||||||||||||||||||


With over 40 years in knitting and crochet design, DROPS Design offers one of the most extensive collections of free patterns on the internet - translated to 17 languages. As of today we count 324 catalogues and 12290 patterns translated into English (UK/cm). 12290
We work hard to bring you the best knitting and crochet have to offer, inspiration and advice as well as great quality yarns at incredible prices! Would you like to use our patterns for other than personal use? You can read what you are allowed to do in the Copyright text at the bottom of all our patterns. Happy crafting!
Post a comment to pattern DROPS 241-11
We would love to hear what you have to say about this pattern!
If you want to leave a question, please make sure you select the correct category in the form below, to speed up the answering process. Required fields are marked *.