
Popular categories
Looking for a yarn?


Comments / Questions (74)
![]() Ania wrote:
Ania wrote:
Nie mogę zrozumieć. W 1 rzędzie schematów dodajemy 8 oczek raglanowych + 6 według schematów. W kolejnym rzędzie do przerobienia mam 76+14=90. wg schematu 2 rzędu (lewy) mamy: 2 brzegowe + 8 (A1/A3) + 52 (2×A2) + 22 tył = 84. Rozmiar L. Dziękuję!
01.04.2026 - 13:10DROPS Design answered:
Witaj Aniu, w 1-szym rzędzie dodajesz 8 oczek na reglan (narzuty) i 12 oczek w schematach: 4 oczka w każdym schemacie A.2 na rękawach (8 oczek) i po 2 oczka w schemacie A.1 i w schemacie A.3 (przody). Po przerobieniu 1-szego rzędu powinnaś mieć 96 oczek na drutach. Pozdrawiamy!
03.04.2026 - 12:26
![]() Ania wrote:
Ania wrote:
Ile w sumie powinno być dodano oczek w 1 rzędzie przerabiania schematow? Ile oczek powinno być w 2 rzędzie? Czy A1 i A3 zawieraja oczka reglanowe czy mam je dodawać osobno. Dziękuję
01.04.2026 - 01:32DROPS Design answered:
Witaj Aniu, schematy A1 i A3 nie zawierają oczek reglanowych. Po przerobieniu 1-szego rzędu wg schematów, w rozmiarze L powinnaś mieć 96 oczek. Pozdrawiamy!
03.04.2026 - 12:28
![]() Eosia wrote:
Eosia wrote:
Dzien dobry, na początku wzoru w rozmiarze S jest podział z markerami, ale kiedy dziele 3-22-18-22-3 to nie wychodzi mi tak samo. Na początku nabieram 72 oczka a podzial sugeruje jakby miało być mniej i zostaje mi ta różnicą oczek zamiast tych 3. Czy jest jakiś błąd?
26.02.2026 - 19:09DROPS Design answered:
Witaj Eosiu, markery są wkładane w oczka, a nie między oczkami. To są te 4 brakujące oczka. Pozdrawiamy!
27.02.2026 - 10:12
![]() Jojo wrote:
Jojo wrote:
Hei, jeg sliter litt med å forstå hvordan og NÅR økningene til v-hals gjøres. Skal jeg gjøre de første gangen jeg strikker linjen med pil i diagram A1 og A3 (samtidig som jeg nå har begynt å strikke A4 for første gang)? Eller skal jeg strikke diagrammene 1 gang først uten økning til V-hals også øke på de neste 2 gangene diagrammene strikkes? Hvis de skal gjøres første gang vil jo dette skje samtidig som økning til raglan og dermed to økninger på akkurat samme plass???
12.02.2026 - 20:26
![]() Francine wrote:
Francine wrote:
Bonjour, lorsqu'il faut augmenter tous les 4 rangs, est-ce entre le devant et la manche ou entre la manche et le dos ? Si j'ai bien compris je tricote dans l'ordre : le devant - marqueur 1 - la manche - marqueur 2 - le dos - marqueur 3 - la manche - marqueur 4 - le devant. Je ne comprends pas si je dois augmenter tous les 4 rangs aux marqueurs 1 et 4 ou aux marqueurs 2 et 3. Merci d'avance de votre aide.
10.02.2026 - 03:45DROPS Design answered:
Bonjour Francine, quand vous augmentez alternativement 4 et 8 mailles, les 4 mailles sont à augmenter sur les devants et le dos et les 8 mailes comme avant autrement dit, tricotez ainsi: 1 rang en augmentant pour les devants et le dos, 1 rang sans augmenter, 1 rang en augmentant comme avant pour les devants, les manches et le dos, 1 rang sans augmenter. Pour augmenter uniquement 4, augmentez avant le 1er marqueur (devant gauche), après le 2ème marqueur et avant le 3ème marqueur (dos) et après le 4ème marqueur (devant droit). Bon tricot!
10.02.2026 - 17:44
![]() Daniela wrote:
Daniela wrote:
Verstehe ich das richtig: Es werden 2 Faden miteinander gestrickt, das heißt: von 2 Knäueln die Garne zusammenführen zu einem Faden mit welchem man strickt?
28.09.2025 - 11:08DROPS Design answered:
Hi Daniela, exactly. Happy knitting!
28.09.2025 - 11:12
![]() Rhea wrote:
Rhea wrote:
Please help with Then continue to increase for raglan but every 2nd increase is now only on the body (4 stitches increased), i.e. increase every 2nd row on the body and every 4th row on the sleeves). Is Wrong Side counted as row 1 and row 3 in this case that's why row 2 and 4 are the only rows with increases? Thank you!
24.09.2025 - 08:05DROPS Design answered:
Dear Rhea, yes, before, when we increased every 2nd row it was always on right side rows. Now we will also increase every 2nd row, but one time we increase 4 stitches and another time we increase 8. So we continue increasing in every right side row, but alternate between a right side row with 8 increases and a right side row with 4 increases, while the rows in the wrong side have no increases. Happy knitting!
05.10.2025 - 23:51
![]() Karen Robertson wrote:
Karen Robertson wrote:
How can I print this out
18.07.2025 - 07:13DROPS Design answered:
Hi Karen, the printer icon is on the right of the design name, at the very top in the pattern. Happy knitting!
18.07.2025 - 07:44
![]() Amna wrote:
Amna wrote:
Hey! I've been making a cardigan using your patterns but i find it difficult to understand. Your patterns are quite difficult to understand especially for beginners. I would be happy if you could add a little more explanation in them
12.07.2025 - 10:51
![]() Mathilde wrote:
Mathilde wrote:
Hvordan læser jeg brystmålet? Er det de mål som står noteret nederst på skitsen? Altså er det cardiganens bredeste mål?
27.05.2025 - 20:35DROPS Design answered:
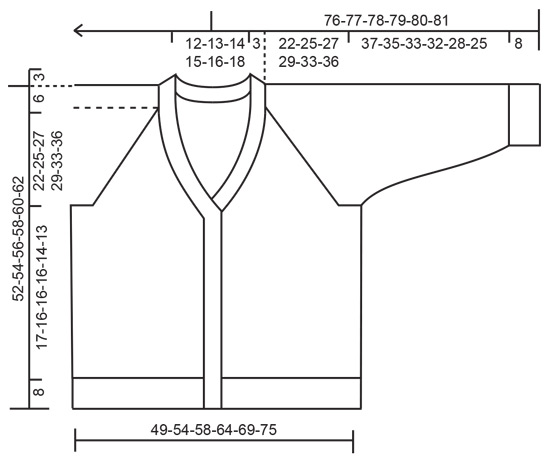
Hej Mathilde, ja i den mindste størrelse bliver det 49 cm x 2 = 98 cm i brystvidde :)
28.05.2025 - 08:25
|
|||||||||||||||||||||||||
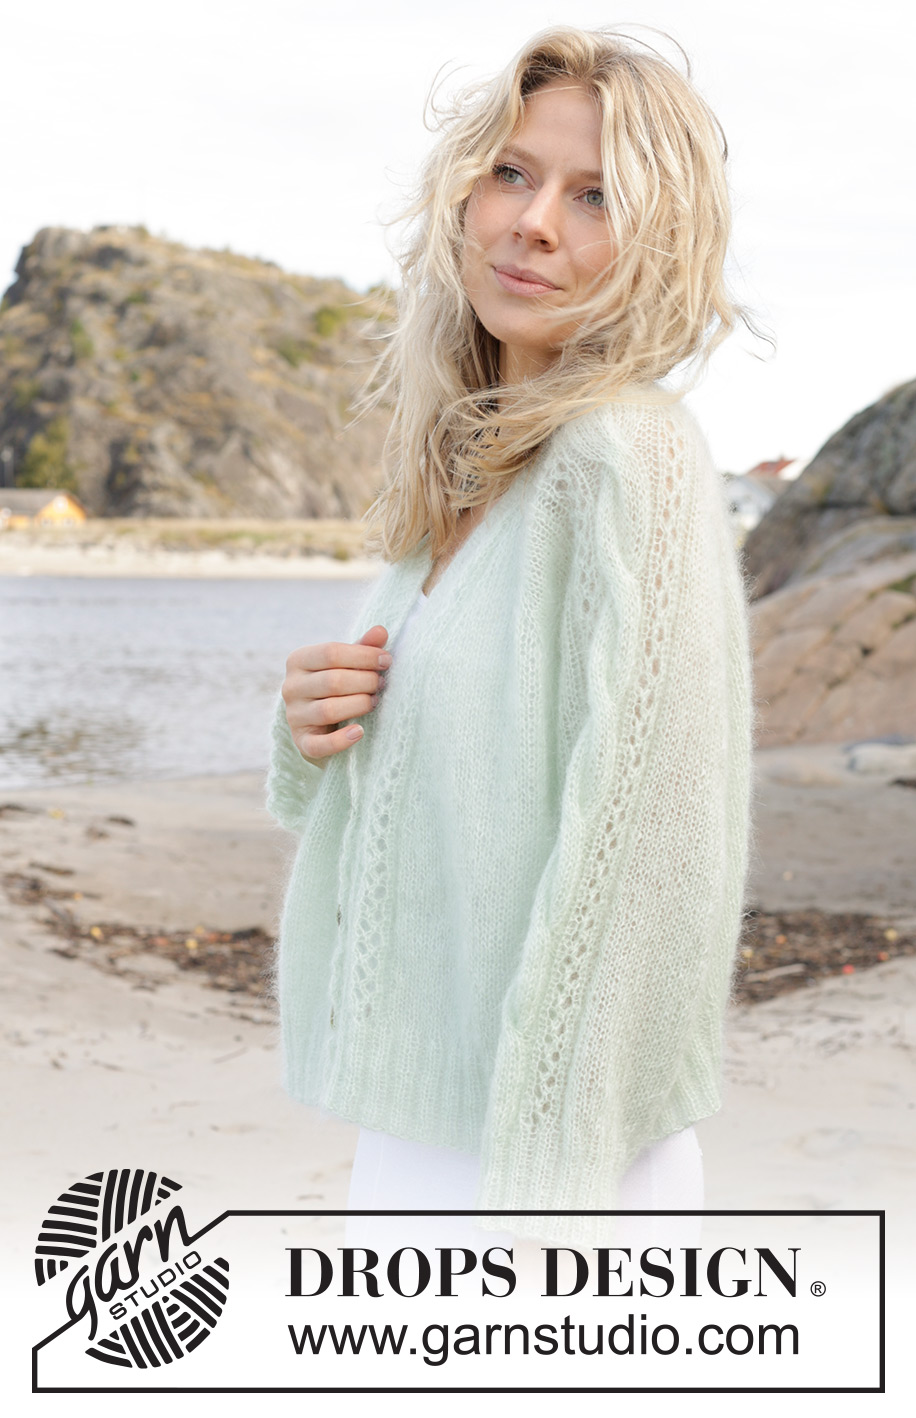
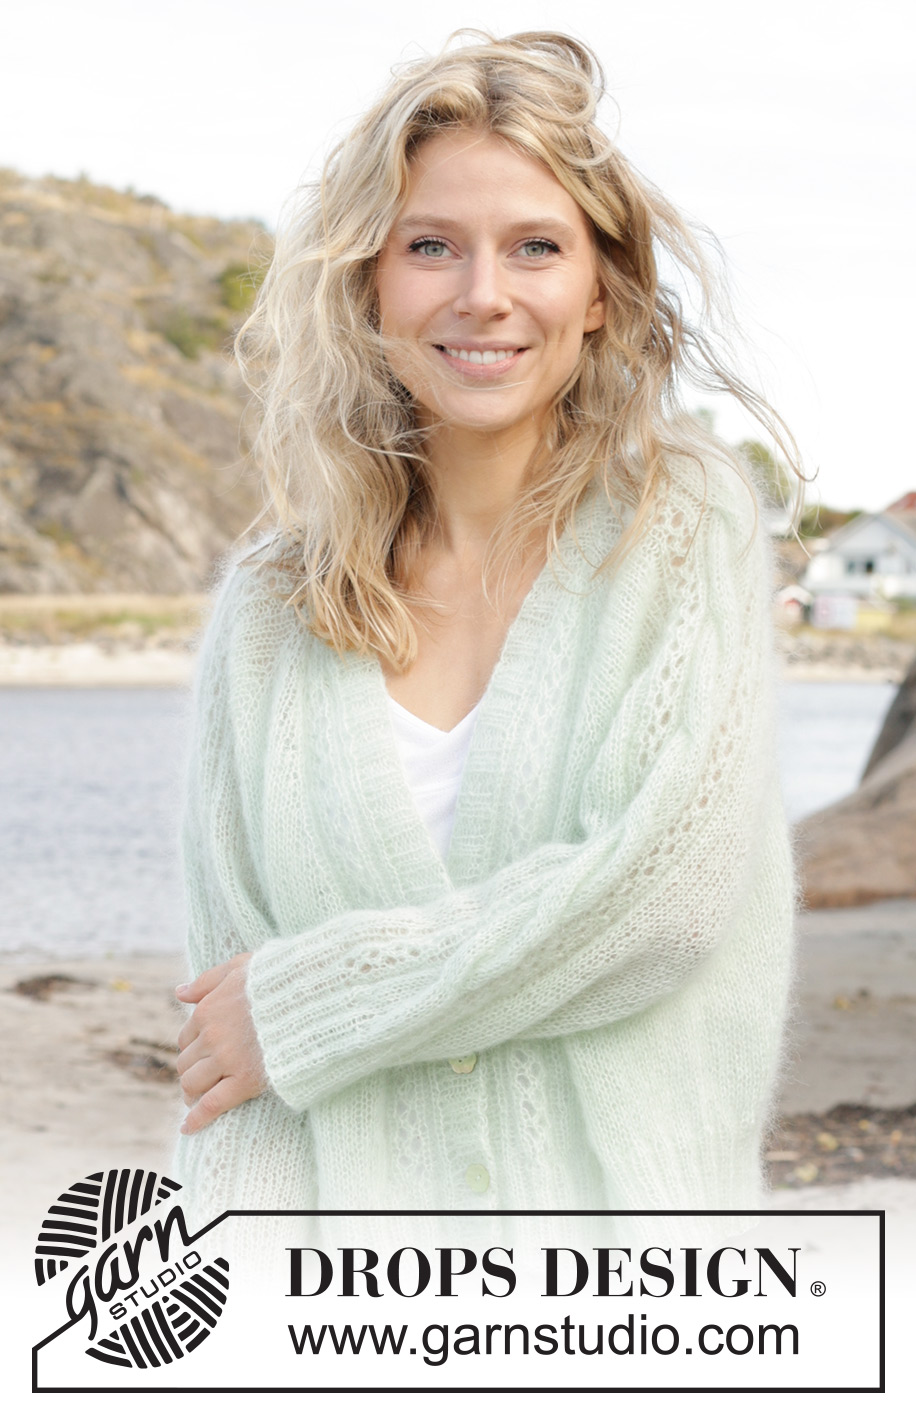
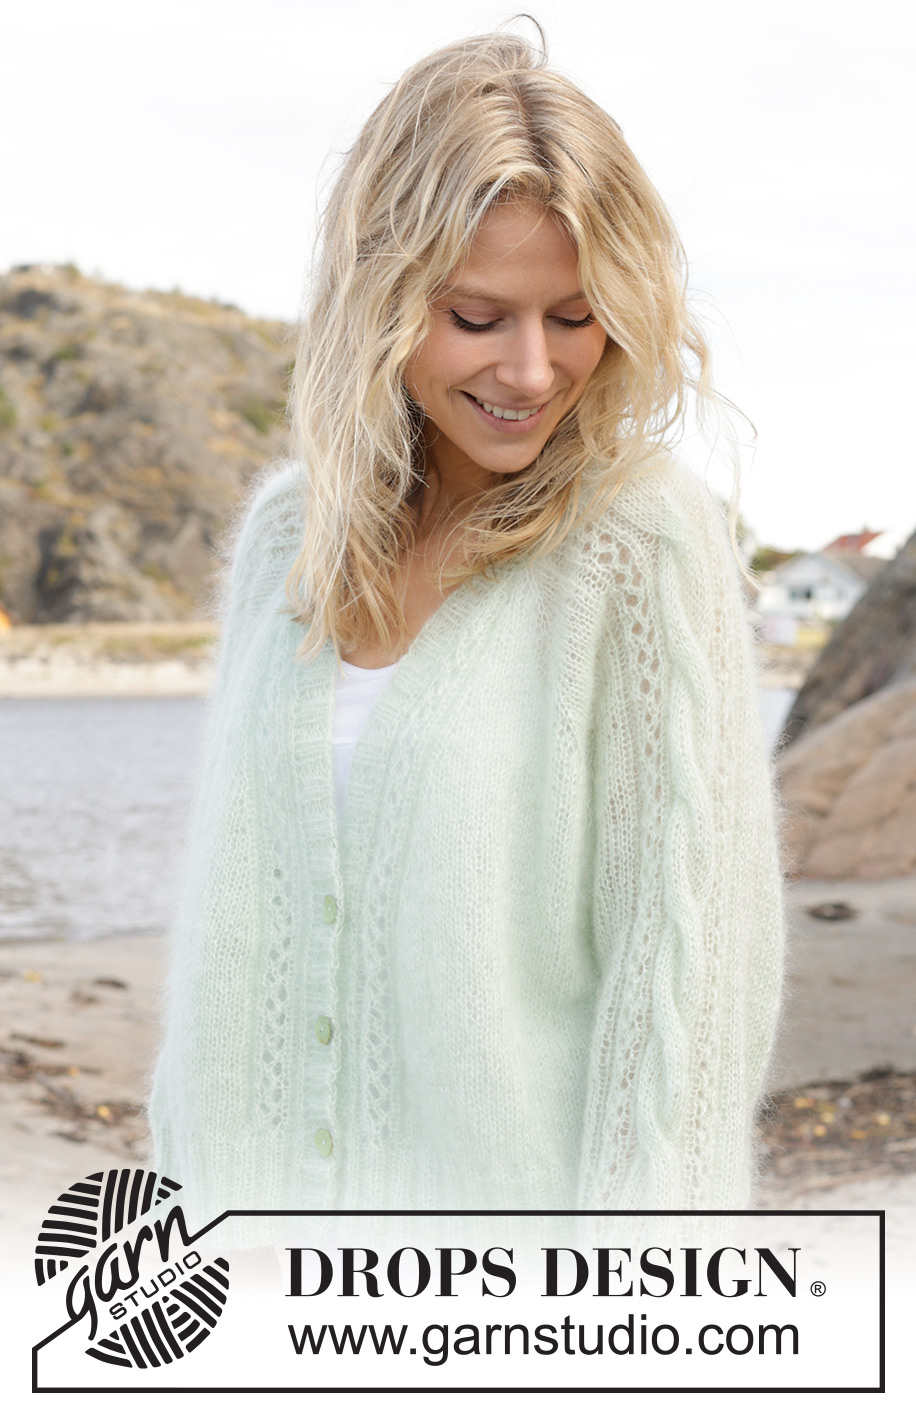
Sweet Spring Cardigan#sweetspringcardigan |
|||||||||||||||||||||||||
 |
 |
||||||||||||||||||||||||
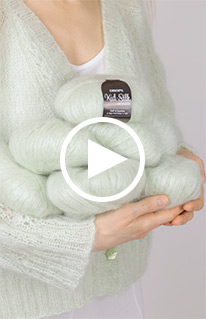
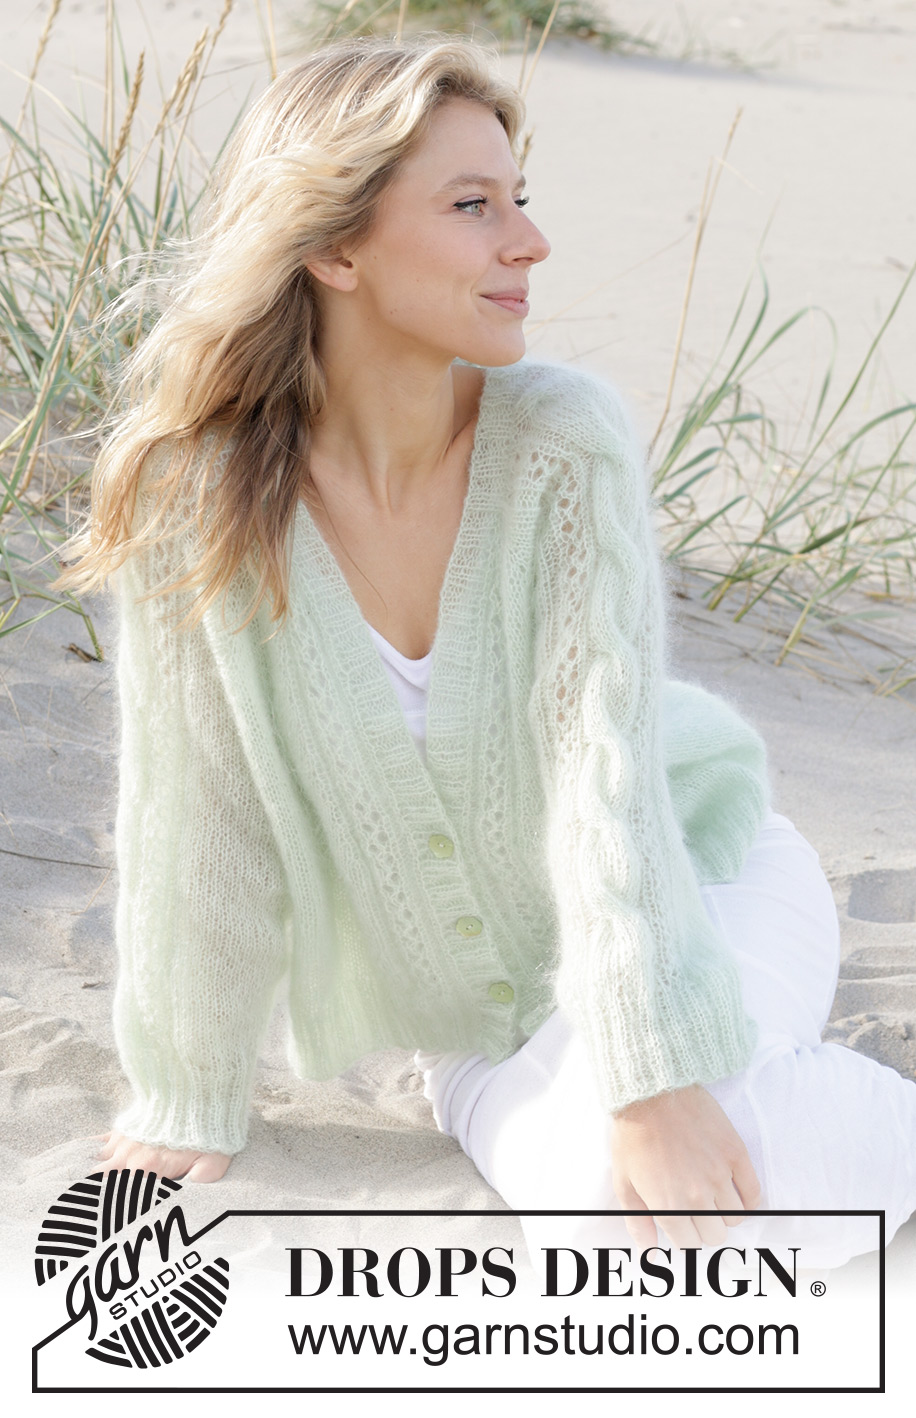
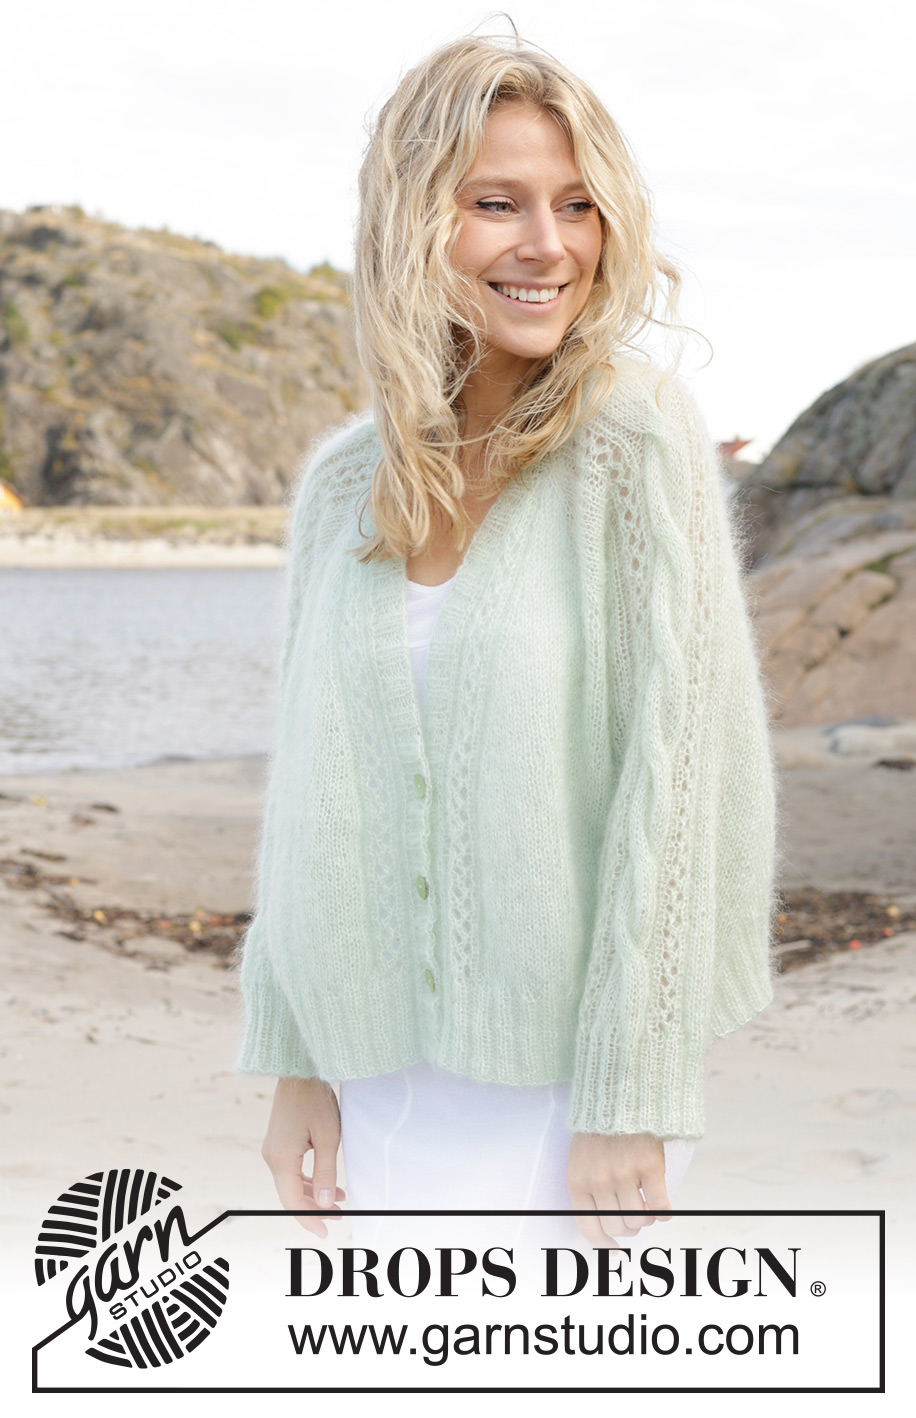
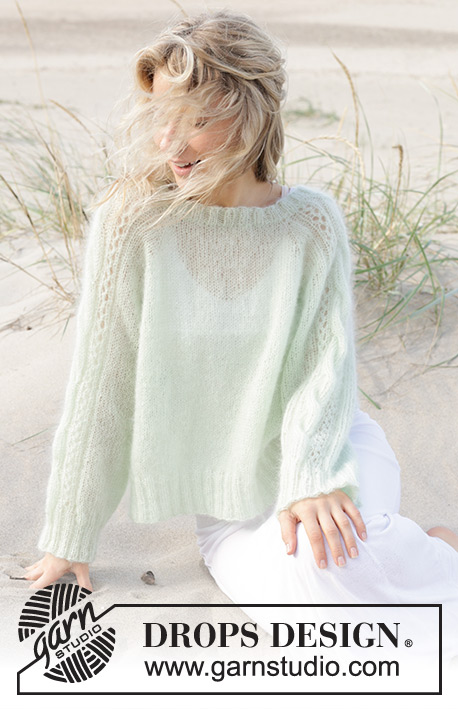
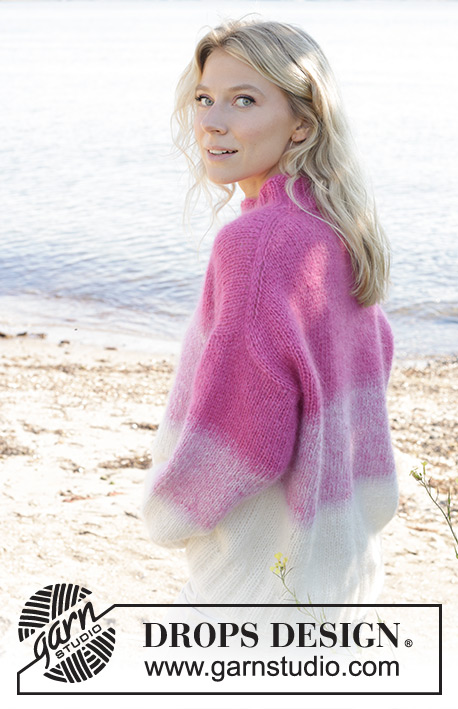
Knitted jacket in 2 strands DROPS Kid-Silk. The piece is worked top down with raglan, V-neck, cables and lace pattern. Sizes S - XXXL.
DROPS 241-11 |
|||||||||||||||||||||||||
|
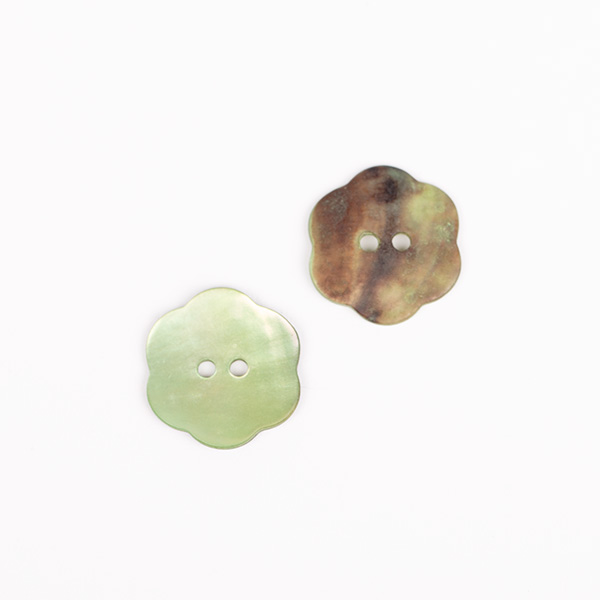
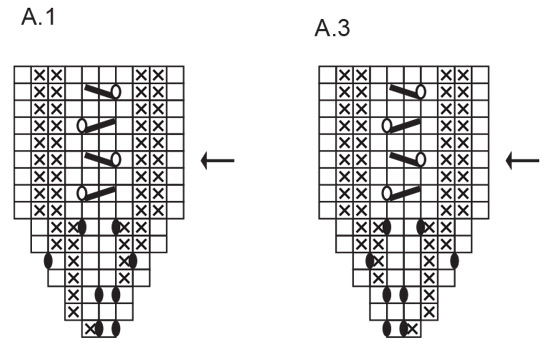
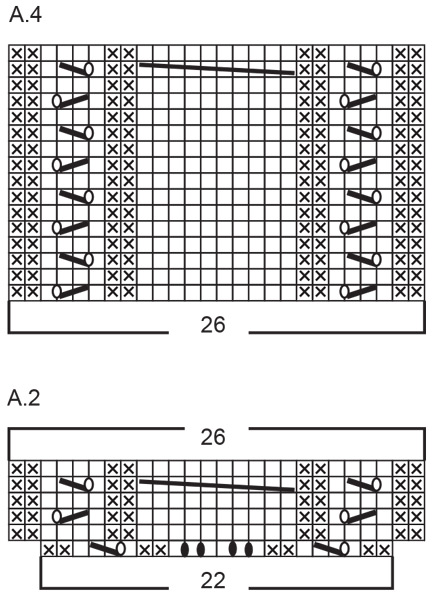
------------------------------------------------------- EXPLANATIONS FOR THE PATTERN: ------------------------------------------------------- RIDGE/GARTER STITCH (worked back and forth): Knit all rows. 1 ridge = knit 2 rows. PATTERN: See diagrams A.1 to A.4. The diagrams show all rows in the pattern from the right side. RAGLAN: Increase 1 stitch before/after the stitch in stocking stitch (= the stitch with the marker) in each transition between body and sleeves. Increase 1 stitch by making 1 yarn over, which is purled twisted on the next row to avoid a hole. Work the new stitches in stocking stitch. V-NECK: All increases are worked from the right side! Make 1 yarn over inside 11 stitches (1 edge stitch + A.1 / A.3 on each side (= 1 stitch increased on each side; 2 stitches increased on the row). On the next row (wrong side) purl the yarn overs twisted to avoid a hole. Work the new stitches in stocking stitch. DECREASE TIP (for sleeves): Decrease 1 stitch on either side of the marker-thread as follows: Work until there are 3 stitches left before the marker-thread, knit 2 together, knit 2 (marker-thread sits between these 2 stitches), slip 1 stitch as if to knit, knit 1 and pass the slipped stitch over the knitted stitch. BUTTONHOLES (on right band when jacket is worn): Decrease 3 buttonholes on the right band. 1 buttonhole = knit 2 together, make 1 yarn over. On the next row knit the yarn over to leave a hole. Work the buttonholes 8, 16 and 24 cm from the bottom edge. ------------------------------------------------------- START THE PIECE HERE: ------------------------------------------------------- JACKET – SHORT OVERVIEW OF THE PIECE: The yoke is worked back and forth with circular needle, top down. The sleeves are worked with cables and lace pattern. At the same time, stitches are increased for the V-neck and raglan. The yoke is divided for body and sleeves and the body continued back and forth with circular needle. The sleeves are worked in the round with double pointed needles/short circular needle. The neck and bands are worked to finish. YOKE: Cast on 72-74-76-78-80-82 stitches (including 1 edge stitch on each side) with circular needle size 5 mm and 2 strands DROPS Kid-Silk. Purl 1 row from the wrong side. OVERVIEW OF THE NEXT SECTION: The pattern starts on the sleeves at the same time as increases are worked for raglan and for the V-neck – read this section before continuing. Insert 4 markers in the piece, without working the stitches: Count 3 stitches (front piece), insert 1 marker in the next stitch, count 22 stitches (sleeve), insert 1 marker in the next stitch, count 18-20-22-24-26-28 stitches (back piece), insert 1 marker in the next stitch, count 22 stitches (sleeve), insert 1 marker in the next stitch, there are 3 stitches left (front piece). Work as follows: 1 edge stitch IN GARTER STITCH – see description above, work A.1, 1 yarn over, knit the marker-stitch, 1 yarn over, A.2, 1 yarn over, knit the marker-stitch, 1 yarn over, work stocking stitch over the next 18-20-22-24-26-28 stitches, 1 yarn over, knit the marker-stitch, 1 yarn over, work A.2, 1 yarn over, knit the marker-stitch, 1 yarn over, work A.3, 1 edge stitch in garter stitch. Continue this pattern and increase to RAGLAN in each transition between body and sleeves on each row from the right side – read description above. When A.2 is finished, work A.4 (26 stitches) over A.2. When A.1 and A.3 have been worked 1 time in height, repeat the last 4 rows onwards. Increase for raglan a total of 10-13-15-15-21-22 times on every other row (= on every row from right side) on each side of all 4 marker-stitches. Then continue to increase for raglan but every 2nd increase is now only on the body (4 stitches increased), i.e. increase every 2nd row on the body and every 4th row on the sleeves). Increase like this 14-14-14-16-14-16 times on the body (7-7-7-8-7-8 times on the sleeve). You increase a total of 24-27-29-31-35-38 times on the yoke and 17-20-22-23-28-30 times on the sleeves. AT THE SAME TIME on the row marked with an arrow in A.1/ A.3, start to increase for the V-NECK on each side – read description above: Increase every 8th-8th-8th-6th-6th-6th row 2-2-3-4-5-6 times. REMEMBER THE KNITTING TENSION! After the last increase for raglan continue working until the yoke measures 22-25-27-29-33-36 cm. There are 264-290-310-326-366-390 stitches. Divide for the body and sleeves on the next row as follows: Work the first 38-41-44-47-52-56 stitches (front piece), place the next 60-66-70-72-82-86 stitches on a thread for the sleeve, cast on 16-16-16-20-20-22 stitches (in side under sleeve), work the next 68-76-82-88-98-106 stitches (back piece), place the next 60-66-70-72-82-86 stitches on a thread for the sleeve, cast on 16-16-16-20-20-22 stitches (in side under sleeve), work the last 38-41-44-47-52-56 stitches (front piece). The piece is now measured from here! BODY: = 176-190-202-222-242-262 stitches. Continue with stocking stitch, 1 edge stitch in garter stitch on each side and A.1 /A.3. When the body measures 16-15-15-15-13-12 cm from the division, knit 1 row from the right side and increase 28-34-42-46-46-50 stitches evenly spaced = 204-224-244-268-288-312 stitches. Change to circular needle size 4 mm and work as follows from the wrong side: 1 edge stitch in garter stitch, * purl 2, knit 2 *, work from *-* until there are 3 stitches left, purl 2 and 1 edge stitch in garter stitch. Continue this rib for 8 cm. Cast off a little loosely. The jacket measures approx. 52-54-56-58-60-62 cm from the shoulder. SLEEVES: Place the 60-66-70-72-82-86 stitches from the thread on the one side of the piece on short circular needle/double pointed needles size 5 mm and knit up 1 stitch in each of the 16-16-16-20-20-22 stitches cast on under the sleeve = 76-82-86-92-102-108 stitches. Insert a marker-thread in the middle of the 16-16-16-20-20-22 stitches under the sleeve and allow it to follow your work onwards; it is used when decreasing under the sleeve. Start at the marker-thread. Continue with A.4 and stocking stitch in the round. When the sleeve measures 3 cm decrease 2 stitches mid under sleeve – read DECREASE TIP. Decrease like this every 2½-2-1½-1-1-1 cm a total of 10-11-13-16-19-20 times = 56-60-60-60-64-68 stitches. Continue working until the sleeve measures 37-35-33-32-28-25 cm from the division or to desired length. Change to double pointed needles size 4 mm and work rib (knit 2, purl 2) for 8 cm. Cast off a little loosely. The sleeve measures approx. 45-43-41-40-36-33 cm from the division. Work the other sleeve in the same way. BANDS/NECK: Insert 1 marker in the middle of the neck on the back piece; it is used to mark half the stitches on the neck/bands. The bands are knitted up inside the 1 edge stitch on the front piece, the neck in the first row on the neckline. Begin from the right side at the bottom of the right front piece and knit up 119-125-131-137-143-149 stitches as far as the marker at the back of the neck, with circular needle size 4 mm (leave the marker in place). Knit up 119-125-131-137-143-149 stitches down to the bottom of the left front piece; total number of stitches should be divisible by 4 + 2 = 238-250-262-274-286-298 stitches. It is important that the rib is neither loose with too many stitches nor tight with too few stitches. Work as follows from the wrong side: 2 garter stitches, * purl 2, knit 2 *, work from *-* until there are 4 stitches left, purl 2 and 2 garter stitches. Work this rib for 1½ cm. Now work the BUTTONHOLES on the right band – read description above. Continue working until the rib measures 3 cm. Cast off a little loosely. Sew the buttons onto the left band. |
|||||||||||||||||||||||||
Diagram explanations |
|||||||||||||||||||||||||
|
|||||||||||||||||||||||||
 |
|||||||||||||||||||||||||
 |
|||||||||||||||||||||||||
 |
|||||||||||||||||||||||||
Have you finished this pattern?Tag your pictures with #dropspattern #sweetspringcardigan or submit them to the #dropsfan gallery. Do you need help with this pattern?You'll find 31 tutorial videos, a Comments/Questions area and more by visiting the pattern on garnstudio.com. © 1982-2026 DROPS Design A/S. We reserve all rights. This document, including all its sub-sections, has copyrights. Read more about what you can do with our patterns at the bottom of each pattern on our site. |
|||||||||||||||||||||||||


With over 40 years in knitting and crochet design, DROPS Design offers one of the most extensive collections of free patterns on the internet - translated to 17 languages. As of today we count 324 catalogues and 12290 patterns translated into English (UK/cm). 12290
We work hard to bring you the best knitting and crochet have to offer, inspiration and advice as well as great quality yarns at incredible prices! Would you like to use our patterns for other than personal use? You can read what you are allowed to do in the Copyright text at the bottom of all our patterns. Happy crafting!
Post a comment to pattern DROPS 241-11
We would love to hear what you have to say about this pattern!
If you want to leave a question, please make sure you select the correct category in the form below, to speed up the answering process. Required fields are marked *.