Comments / Questions (14)
![]() Heidi Flamsholt wrote:
Heidi Flamsholt wrote:
Jeg er kun nået til bærestykket, og har strikket den 1. række efter diagram A1, 2, 3 og 4. Nu skal jeg så strikke fra vrang siden, og ifølge jeres forklaring, skal jeg strikke efter diagrammerne omvendt, altså først A4 osv.. Det stemmer så ikke med maskerne, idet jeg pludselig har for mange???Jeg har 119 masker efter den 1 række mønster.
18.08.2023 - 22:23
![]() Ann Vials wrote:
Ann Vials wrote:
Where do I find the size guide for this pattern please?
14.05.2023 - 12:06DROPS Design answered:
Dear Ann, this model is worked in sizes: S - M - L - XL - XXL - XXXL. Below the pattern instructions, you can find a measurement schematic which include the measurements in cm of different parts of the garment. For example, the measurements of the jacket's bust (multiply by 2 for the whole bust) is 45cm for the smallest size, 48 for size M, e.t.c. Check the following lesson for more information: https://www.garnstudio.com/lesson.php?id=24&cid=19. Happy knitting!
14.05.2023 - 17:43
![]() Amal wrote:
Amal wrote:
Thank you for the beautiful pattern. I made this in the beige and now I’m working on the pink one. I love the yarn but I’m having a difficult time maintaining tension. Do you have any tips on how to knit this without having so many uneven stitches? Thank you
24.06.2022 - 05:00DROPS Design answered:
Dear Amal, you may try different kind of needles, either you work with wood or metal, this can influence the way you are working and the tension - but sometimes blocking/washing just help to smooth irregular stitches. Your yarn store might have even more ideas/advices to share with you. Happy knitting!
24.06.2022 - 08:58
![]() Ulrike wrote:
Ulrike wrote:
Ich würde das Modell "Sommerabend" nennen
16.01.2022 - 20:31
New Land Cardigan#newlandcardigan |
||||||||||||||||||||||
 |
 |
|||||||||||||||||||||
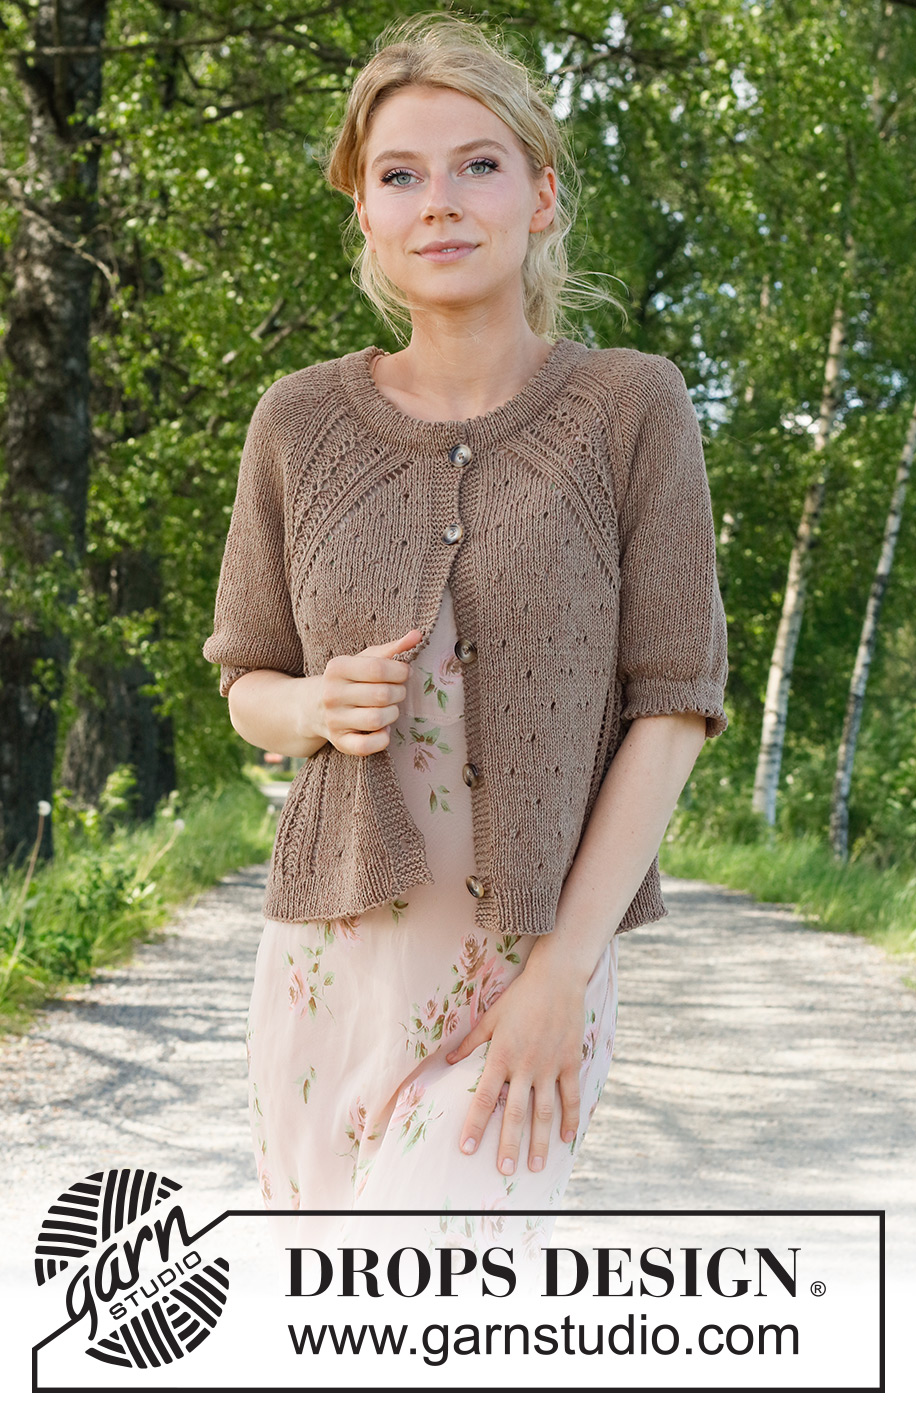
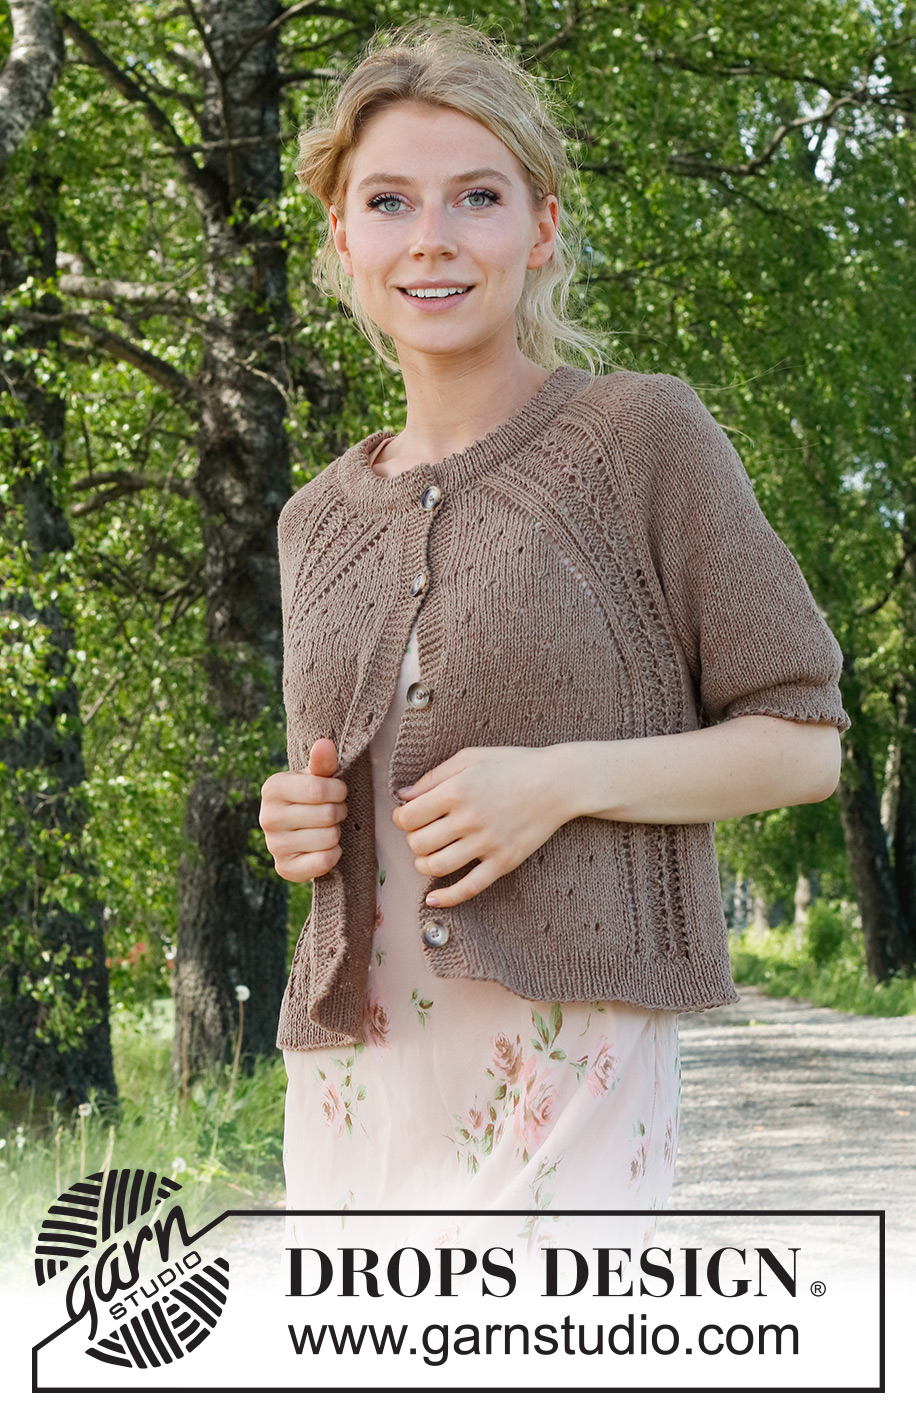
Knitted jacket in DROPS Belle. Piece is knitted top down with raglan, lace pattern, double edges and short sleeves. Size: S - XXXL
DROPS 232-10 |
||||||||||||||||||||||
|
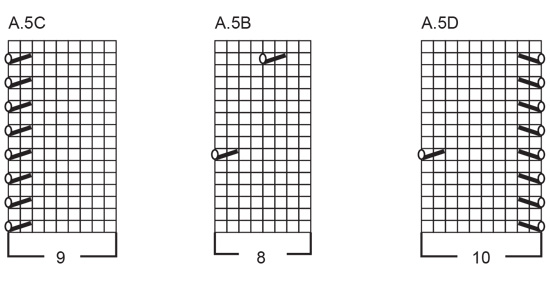
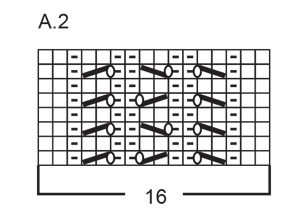
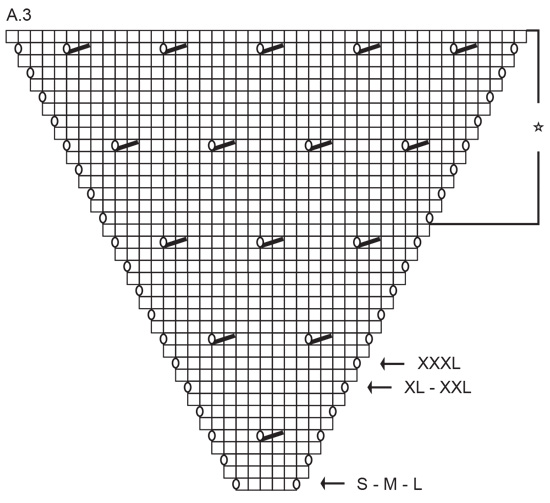
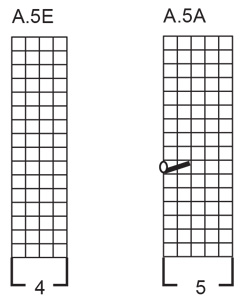
---------------------------------------------------------- EXPLANATION FOR THE PATTERN: ---------------------------------------------------------- GARTER STITCH (back and forth): Knit all rows. 1 ridge vertically = knit 2 rows. PATTERN: See diagrams A.1 to A.5. Diagrams show all rows in pattern seen from the right side. INCREASE TIP (applies to sides of body): Work until 2 stitches remain before marker thread, make 1 yarn over, knit 4 (marker thread is in the middle of these 4 stitches), make 1 yarn over. On next row work yarn overs twisted to avoid holes. Then work the new stitches in stocking stitch. DECREASE TIP (applies to mid under sleeves): Decrease 1 stitch on each side of marker thread as follows: Work until 3 stitches remain before marker thread and knit 2 together, knit 2 (marker thread is between these 2 stitches), slip 1 stitch knitwise, knit 1, pass slipped stitch over stitch worked. BUTTONHOLES: Decrease for buttonholes on right band (when garment is worn). Decrease from right side when 4 stitches remain on row as follows: Make 1 yarn over, knit the next 2 stitches together, knit the last 2 stitches. On next row (wrong side) knit the yarn over to make a hole. Decrease first buttonhole when neck edge has been worked Then decrease the next 4-4-5-5-5-5 buttonholes, approx. 10-10½-9-9-9½-9½ cm apart. ---------------------------------------------------------- START THE PIECE HERE: ---------------------------------------------------------- JACKET - SHORT OVERVIEW OF THE PIECE: Work double neck edge and yoke back and forth on circular needle from mid front, work top down. Now divide yoke for body and sleeves. Work body back and forth on circular needle. Work sleeves in the round on double pointed needles/a short circular needle. DOUBLE NECK EDGE: Cast on 131-131-131-159-159-165 stitches on circular needle size 3 mm with DROPS Belle. Purl 1 row from wrong side while decreasing 20-20-20-24-24-26 stitches evenly (do not decrease over the 6 outermost stitches in each side)= 111-111-111-135-135-139 stitches. Then work in stocking stitch back and forth with 1 stitch in GARTER STITCH in each side – read explanation above. When piece measures 3 cm, work next row as follows from right side: 1 stitch in garter stitch, * knit 2 together, make 1 yarn over *, work from *-* until 2 stitches remain, knit 1, 1 stitch in garter stitch (folding edge). Continue with stocking stitch and 1 stitch in garter stitch in each side until piece measures 3 cm from folding edge. Insert 1 marker after the outermost 6 stitches towards mid front. Work yoke as explained below - measure yoke from this marker! YOKE: Switch to circular needle size 4 mm. Work first row as follows from right side: 6 band stitches in garter stitch, A.1 (start at the arrow for your size), A.2, make 1 yarn over, 12-12-12-16-16-16 stitches in stocking stitch, make 1 yarn over, work A.2, A.3 (start at the arrow for your size), A.2, make 1 yarn over, 12-12-12-16-16-16 stitches in stocking stitch, make 1 yarn over, A.2, A.4 (start at the arrow for your size), and 6 band stitches in garter stitch – decrease for BUTTONHOLE on right band – read explanation above. 1 increase for raglan has been done, and there are 119-119-119-143-143-147 stitches on needle. Continue the pattern like this, and increase for raglan the same way on every row from right side, i.e. on front pieces and back piece increase for raglan with yarn overs as shown in A.1, A.3 and A.4. On sleeves increase with 1 yarn over on each side of stitches in stocking stitch (purl yarn overs on sleeves twisted to avoid holes). REMEMBER THE KNITTING TENSION! When A.1. A.3 and A.4 have been worked vertically, increases have been worked a total of 19-19-19-15-15-14 times for raglan and there are 263-263-263-255-255-251 stitches on needle. Continue the pattern the same way (pattern is repeated as shown in A.1, A.3 and A.4), continue the increases for raglan as follows: SIZE S - M - L - XL: Front pieces, back piece and sleeves: Increase the same way as before 8-8-16-16 more times (27-27-35-31 times in total vertically). SIZE XXL - XXXL: Front pieces/back piece: Increase the same way as before 24-32 more times (39-46 times in total vertically). Sleeve: Increase the same way as before every other row 13-14 more times, then every 4th row 6-9 times in total (34-37 times in total vertically). After last increase for raglan there are 327-327-391-383-427-471 stitches on needle. Then work A.5 instead of A.1, A.3 and A.4. In addition divide yoke for body and sleeves as explained under. Read PATTERN and DIVISION before continuing. PATTERN: Work first row as follows from right side: 6 band stitches in garter stitch, A.5A, work A.5B 2-2-3-3-4-5 times in total, A.5C, A.2, 66-66-82-78-84-90 stitches in stocking stitch, A.2, A.5D, work A.5B 5-5-7-7-9-11 times in total, A.5C, A.2, 66-66-82-78-84-90 stitches in stocking stitch, A.2, A.5D, work A.5B 2-2-3-3-4-5 times in total, A.5E, and 6 band stitches in garter stitch. Continue pattern like this. DIVISION: When piece measures approx. 20-22-25-25-28-33 cm from marker at the neck (increases for raglan should now be done, and 1 row pattern must have been worked as explained above), divide yoke for body and sleeves, i.e. work next row as follows: Work 52-52-60-60-68-76 stitches as before, slip the next 66-66-82-78-84-90 stitches on a thread for sleeve, cast on 4-10-6-12-12-10 new stitches on needle (in the side under sleeve), work 91-91-107-107-123-139 stitches as before, slip the next 66-66-82-78-84-90 stitches on a thread for sleeve, cast on 4-10-6-12-12-10 new stitches on needle (in the side under sleeve), and work the last 52-52-60-60-68-76 stitches as before. Finish body and sleeves separately. Now measure the piece from here. BODY: = 203-215-239-251-283-311 stitches. Insert 1 marker thread 54-57-63-66-74-81 stitches in from each side (there are 95-101-113-119-135-149 stitches between marker threads on back piece - marker thread is in the middle of the new stitches under each sleeve). Move the marker threads upwards when working - they should be used for increase. Continue the pattern back and forth as before – work the 4-10-6-12-12-10 stitches cast on in each side in stocking stitch. When piece measures 5 cm from division, increase 1 stitch on each side of both marker threads - read INCREASE TIP. Increase like this every 6-6-6-6-6-5 cm 3 times in total = 215-227-251-263-295-323 stitches. Work until piece measures approx. 23-23-22-23-22-19 cm from division, but adjust to have worked at least 5 rows in stocking stitch after a row with holes. Knit 1 row from right side while increasing 54-56-62-66-74-80 stitches evenly (do not increase over bands) = 269-283-313-329-369-403 stitches. Switch to circular needle size 3 mm. Work next row as follows from wrong side: 6 band stitches in garter stitch, * purl 1, knit 1 *, repeat from *-* until 7 stitches remain, purl 1, and 6 band stitches in garter stitch. Continue rib like this for 4 cm. Loosely cast off. Jacket measures approx. 50-52-54-56-58-60 cm from shoulder. SLEEVE: Slip the 66-66-82-78-84-90 stitches from stitch holder in one side of piece double pointed needles/a short circular needle size 4 mm– pick in addition up 1 stitch in each of the 4-10-6-12-12-10 new stitches cast on under sleeve = 70-76-88-90-96-100 stitches. Insert 1 marker thread in the middle of the 4-10-6-12-12-10 stitches under sleeve and move the marker thread upwards when working- it is used when decreasing. Begin round at the marker thread and work stocking stitch in the round. When piece measures 3-3-2-2-2-2 cm from division, decrease 2 stitches mid under sleeve - read DECREASE TIP. Decrease like this every 4-4-2½-2-2-1 cm 3-3-4-4-4-4 times in total = 64-70-80-82-88-92 stitches. Work in stocking stitch until sleeve measures 15-14-12-11-9-6 cm from division. Now work a double edge the same way as in the neck. Knit 1 round while decreasing 10-12-16-12-12-10 stitches evenly = 54-58-64-70-76-82 stitches. Switch to double pointed needles size 3 mm. Work stocking stitch in the round for 3 cm. Work next round as follows: * Knit 2 together, 1 yarn over *, work from *-* around the sleeve (folding edge). Work in stocking stitch until piece measures 3 cm from folding edge. Switch to double pointed needles size 4 mm, and loosely cast off. Work the other sleeve the same way. ASSEMBLY: Fold edge at the top of neck down on the inside of garment. Fasten edge to get a double neck edge. To avoid a tight neck edge that sticks out it is important to keep the seam elastic. Sew opening towards mid front together on bands with neat little stitches. Fold the edge at the bottom of sleeve in towards the wrong side and fasten the same way. Sew the buttons on to the left band. |
||||||||||||||||||||||
Diagram explanations |
||||||||||||||||||||||
|
||||||||||||||||||||||
 |
||||||||||||||||||||||
 |
||||||||||||||||||||||
 |
||||||||||||||||||||||
 |
||||||||||||||||||||||
 |
||||||||||||||||||||||
 |
||||||||||||||||||||||
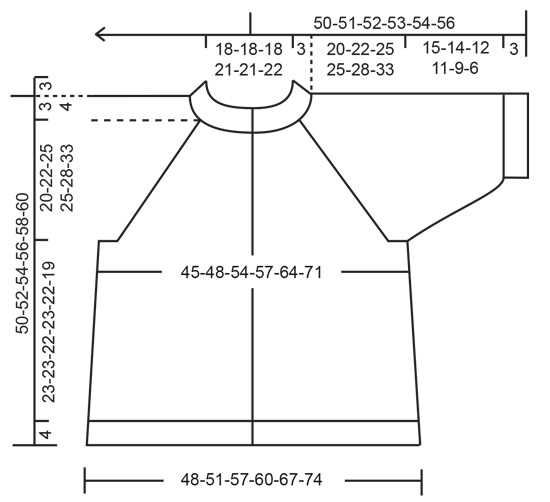 |
||||||||||||||||||||||
Have you finished this pattern?Tag your pictures with #dropspattern #newlandcardigan or submit them to the #dropsfan gallery. Do you need help with this pattern?You'll find 27 tutorial videos, a Comments/Questions area and more by visiting the pattern on garnstudio.com. © 1982-2026 DROPS Design A/S. We reserve all rights. This document, including all its sub-sections, has copyrights. Read more about what you can do with our patterns at the bottom of each pattern on our site. |
||||||||||||||||||||||




Post a comment to pattern DROPS 232-10
We would love to hear what you have to say about this pattern!
If you want to leave a question, please make sure you select the correct category in the form below, to speed up the answering process. Required fields are marked *.