
Popular categories
Looking for a yarn?


Comments / Questions (103)
![]() Marie-Laure Bougant wrote:
Marie-Laure Bougant wrote:
Et pour les rangs côte mousse on compte aussi la maille lisière au-dessus des 6….16 mailles ?
27.06.2023 - 16:07DROPS Design answered:
Bonjour Mme Bougant, tout à fait, vous tricotez au point mousse les 6 à 16 premières mailles et les 6 à 16 dernières mailles du rang (= de chaque côté, y compris les m lisières). Bon tricot!
28.06.2023 - 08:32
![]() Marie-Laure Bougant wrote:
Marie-Laure Bougant wrote:
Bonjour, Quand on rabat les 5….15 mailles pour les emmanchures (dos), nous devons y inclure les mailles lisière ou commencer à rabattre après? Merci, Bonne journée.
27.06.2023 - 12:10DROPS Design answered:
Bonjour Mme Bougant, effectivement, vous devez rabattre les 5 à 15 premières mailles en début de rang sur l'endroit (y compris la m lisière), tricotez le rang jusqu'à la fin, tournez, rabattez les 5 à 15 premières mailles au début du rang sur l'envers (y compris la m lisière) et tricotez le rang jusqu'à la fin. Continuez en jersey avec 1 maille lisière de chaque côté (= la 1ère et la dernière maille). Bon tricot!
27.06.2023 - 13:40
![]() Cindy wrote:
Cindy wrote:
Hello, I'd like to make this top but not sure which size to make, I have a 42" bust, don't see final garment measurements
30.05.2023 - 19:53DROPS Design answered:
Dear Cindy, you will find finished measurements on the top of the pattern together with the sizes, yarn requirements, needle size and tension. You will also find all measurements (taken flat from side to side) in the chart (in cm, convert into inches here) - read more about measurement charts here. Happy knitting!
31.05.2023 - 08:36
![]() Audrey-Maude Brosseau wrote:
Audrey-Maude Brosseau wrote:
Bonjour, je tricote ce modèle en XL et je ne comprends pas la fin du devant (PARTIE 1). J ai 130 mailles incluant les bordures en cotes mousse (12m) de chaque côté. Sur le rang suivant à l endroit de l ouvrage, j ai rabattu 11 mailles + 52 maille endroit + 2 sur aiguilles à torsade + 3 mailles ensemble. Il me reste donc 62 mailles à mettre de côté. Ça ne balance pas avec le Patron.
18.05.2023 - 20:47DROPS Design answered:
Bonjour Mme Brosseau, vous avez rabattu les 11 premières mailles, tricoté les 51 m suivantes (la 1ère des 52 m est déjà sur l'aiguille), et tricotez ensuite 3 m end à l'end = vous avez maintenant 53 m sur l'aiguille; mettez ces 53 mailles en attente pour la partie-1 et tricotez ensuite les mailles restantes: tricotez les 2 m en attente ensemble + 61 m jersey + 11 m point mousse. Bon tricot!
19.05.2023 - 08:55
![]() Louise wrote:
Louise wrote:
Hej, Ang diagram: er det korrekt forstået, at det kun er de sorte felter, der skal springes over/ikke eksisterer ? I forklaringen fremgår det, at det både er de sorte og hvide felter…?
13.05.2023 - 07:41DROPS Design answered:
Hei Louise. Kun de sorte feltene. Ser i den danske teksten, så har det kommet en svensk tekst (samme tekst som det er til den sort firkanten). Dette skal vi få ordnet asap, takk for at du gjorde oss oppmerksom på dette. mvh DROPS Design
15.05.2023 - 11:59
![]() Lisa wrote:
Lisa wrote:
Liebes DROPS Team, vielen Dank erst einmal für die vielen tollen Garne und Anleitungen! Meine Strickliste ist lang. :) Ich bin nun bei Teil 1 angekommen. Das linke Oberteil hat gut geklappt, nachdem ich verstanden hatte, dass Teil 2 das linke ist. Wo kommt denn die eine Masche mehr her bei Teil 1? Ich habe 43 Maschen stillgelegt und soll nun 44 aufnehmen. Was habe ich übersehen? Vielen Dank und viele Grüße Lisa
29.03.2023 - 15:27DROPS Design answered:
Liebe Lisa, ja stimmt, eine Korrektur erfolgt, es sind ja 43 Maschen für das Teil-1. Viel Spaß beim stricken!
18.04.2023 - 11:05
![]() Paula wrote:
Paula wrote:
Toista V-aukon kavennus jokaisella kerroksella (sekä työn oikealta että nurjalta puolelta) yhteensä 7-7-9-9-13-17 kertaa. Tarkoittaako tämä että kavennukset tehdään molemminpuolin 7 kertaa? Sekä oikealta että nurjalta.
27.03.2023 - 20:35DROPS Design answered:
Kavennukset tehdään yhteensä 7 kertaa, eli 4 kertaa työn oikealta puolelta ja 3 kertaa työn nurjalta puolelta.
28.03.2023 - 18:52
![]() Issertes Carole wrote:
Issertes Carole wrote:
Bonjour, Merci pour votre réponse rapide. Si j'ai bien compris, je fais la maille lisière point mousse sur tout l'ouvrage, même sur les côtés du haut de l'ouvrage avec les diminutions pour le devant et le dos.
22.03.2023 - 16:26DROPS Design answered:
Bonjour Mme Issertes, tout à fait. Bon tricot!
23.03.2023 - 09:21
![]() Karin wrote:
Karin wrote:
230-1 Withe Sails Wird das Top im Rippenmuster gestrickt oder glatt?
21.03.2023 - 22:09DROPS Design answered:
Liebe Karin, es sind 3 cm Rippenmuster unten dann wird man glatt rechts stricken, mit jeweils 1 Randmasche kraus rechts beidseitig - beim Vorderteil strickt man das Lochmuster A.1 dazu. Viel Spaß beim stricken!
22.03.2023 - 08:49
![]() Issertes Carole wrote:
Issertes Carole wrote:
Bonjour, J'ai choisi ce magnifique modèle pour cet été. Je ne comprends pas "faire une maille lisière au point mousse", pourtant je tricote depuis des années. Faut'il tricoter la première et la dernière maille au point mousse sur l'endroit et sur l'envers ? En faisant cela, ça fait des petits boudins de chaque côtés et cela m'étonne. Pouvez-vous m'éclairer. Merci.
21.03.2023 - 18:29DROPS Design answered:
Bonjour Mme Issertes, effectivement, les mailles lisière au point mousse se tricotent à l'endroit sur l'endroit et sur l'envers (cf cette vidéo). Vous ferez ensuite les coutures à 1 m des bords, comme dans cette vidéo. Bon tricot!
22.03.2023 - 08:43
|
||||||||||||||||
White Sails#whitesailstop |
||||||||||||||||
 |
 |
|||||||||||||||
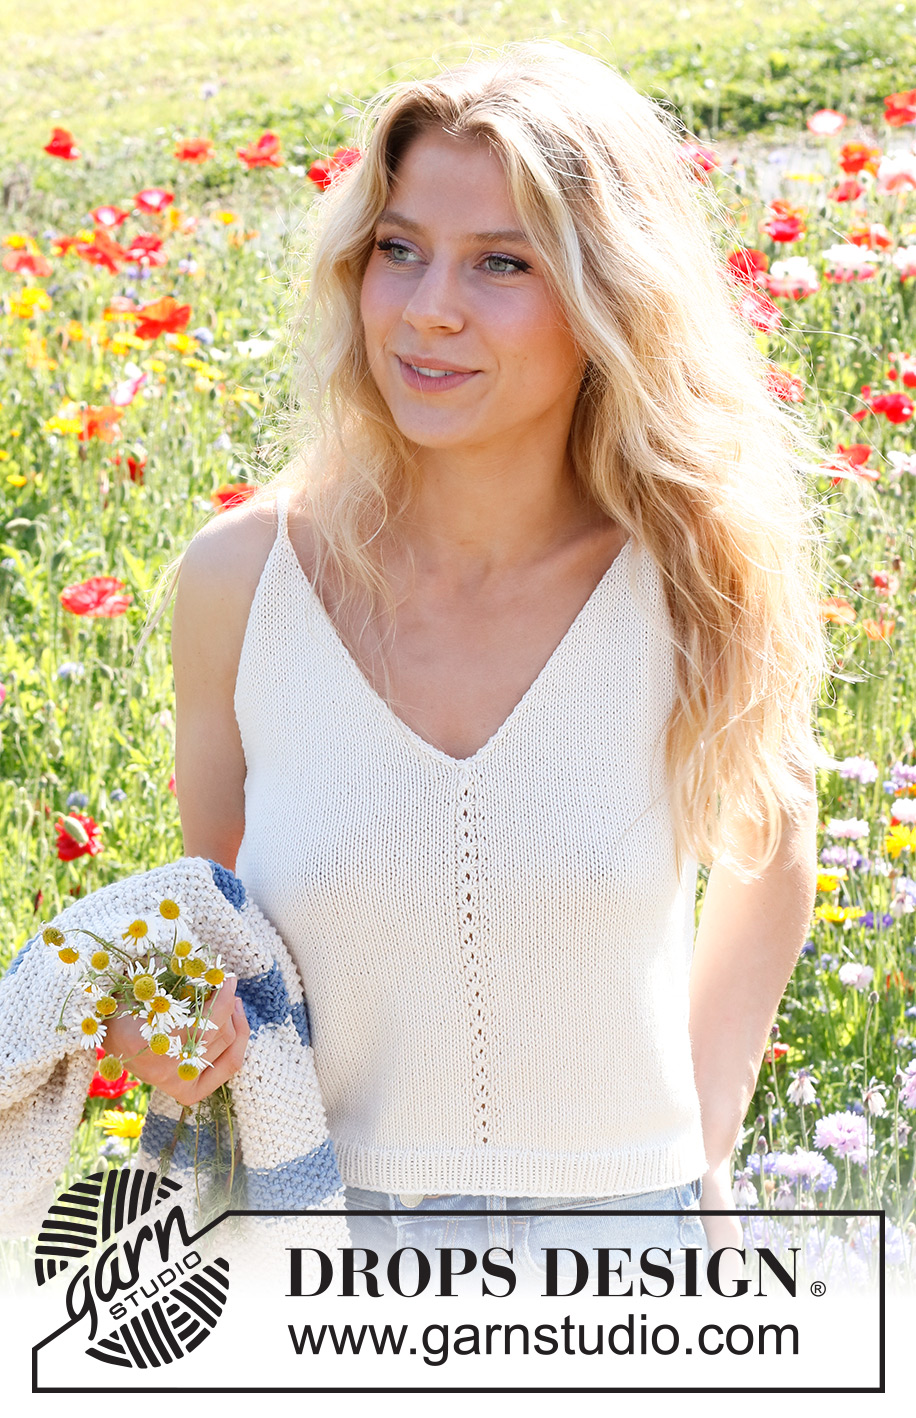
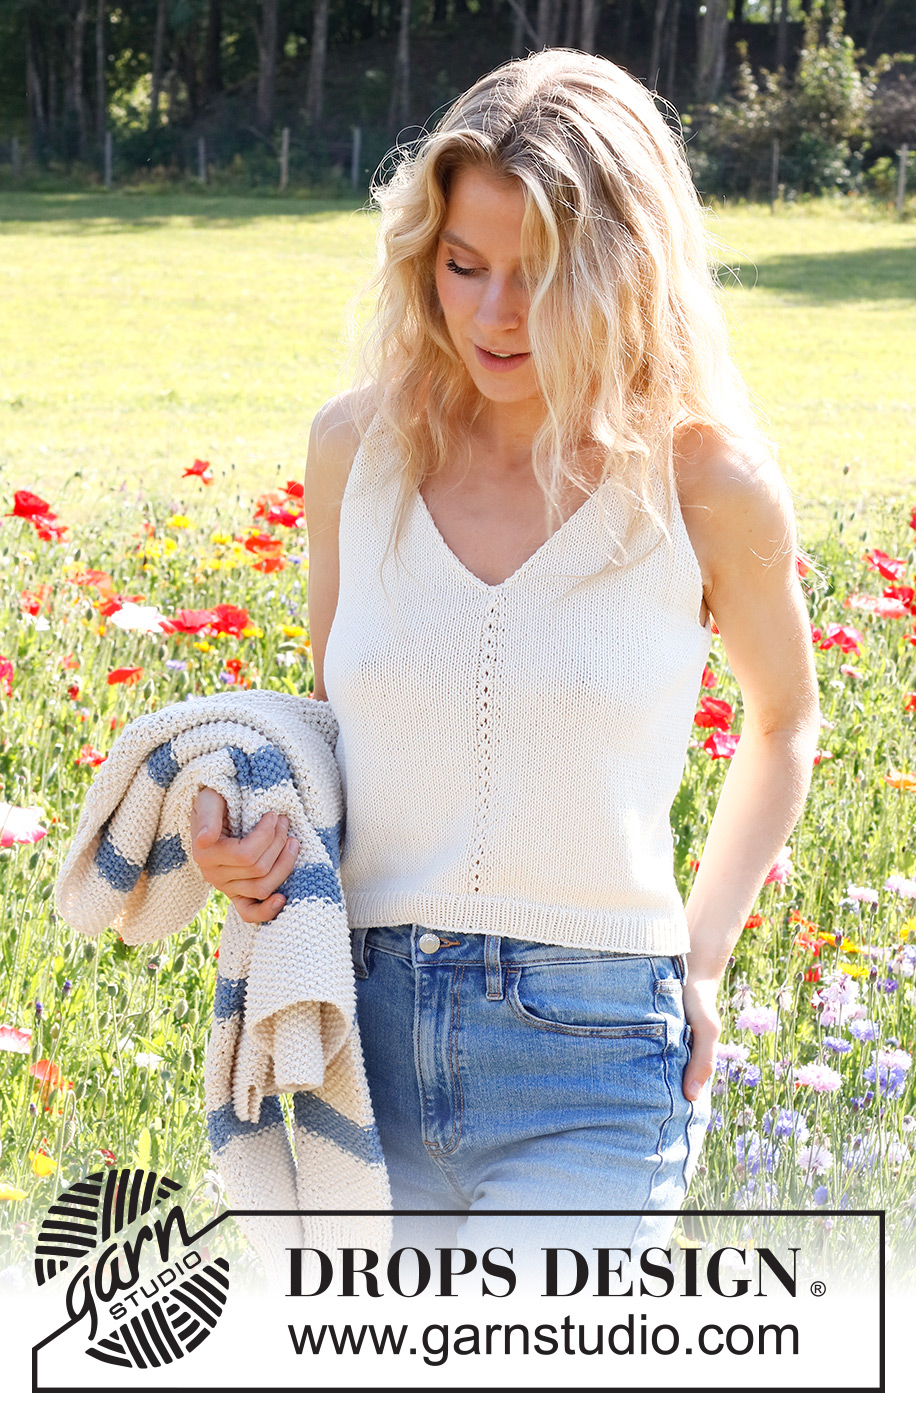
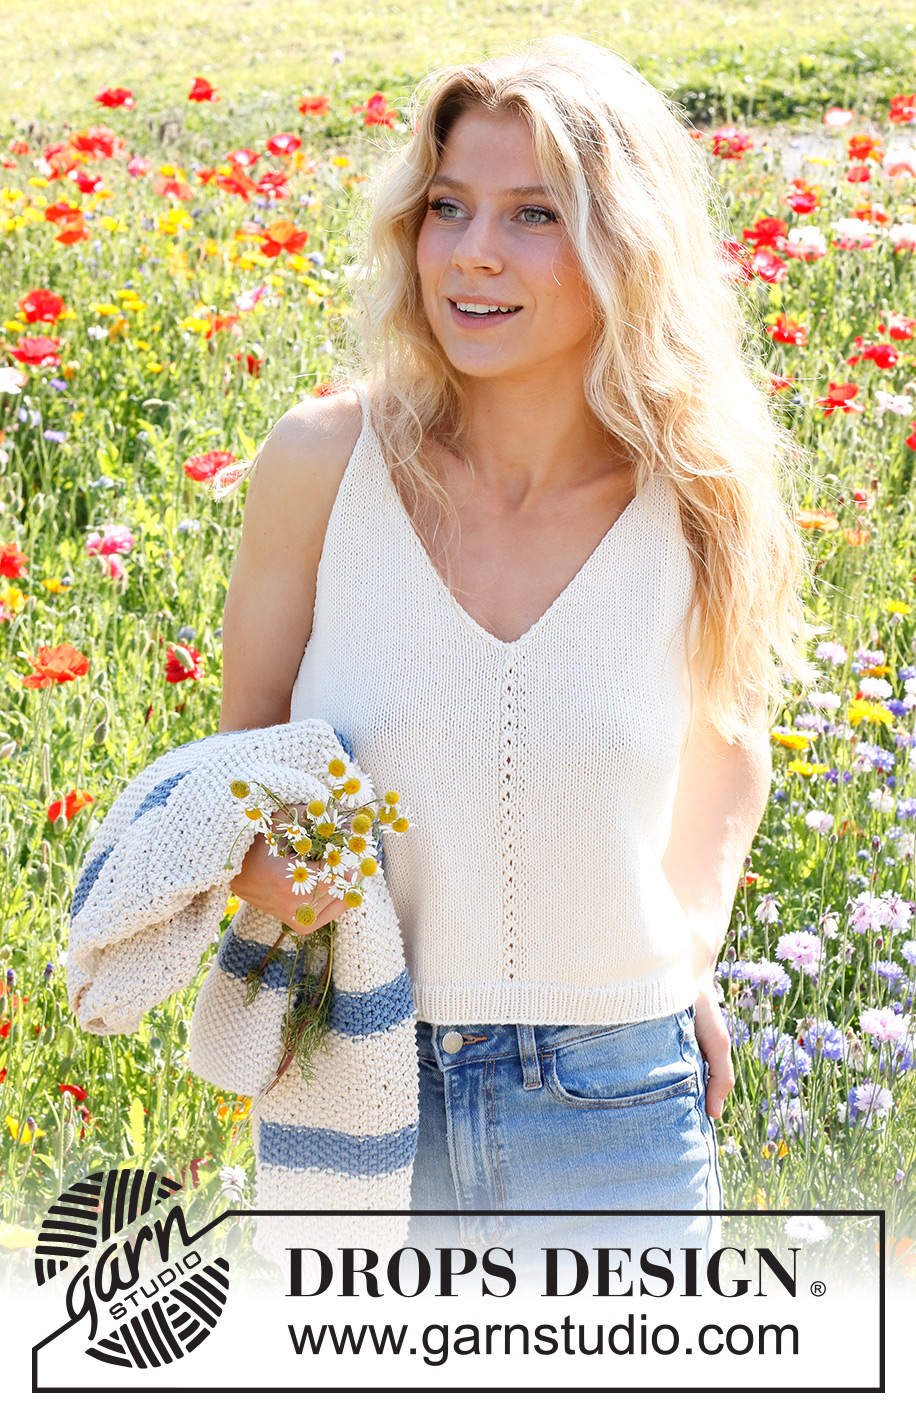
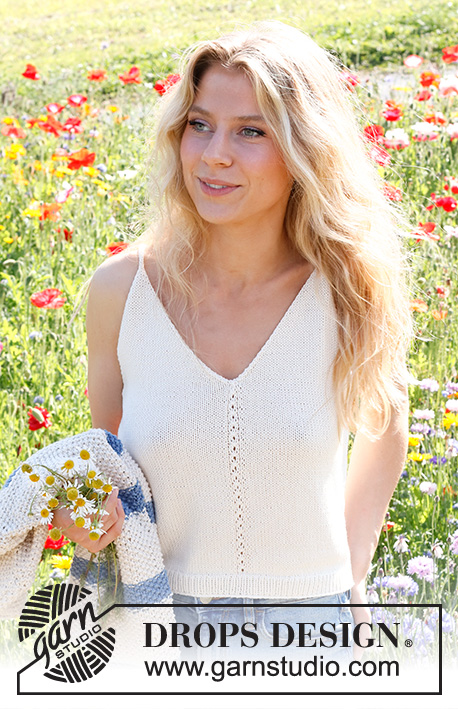
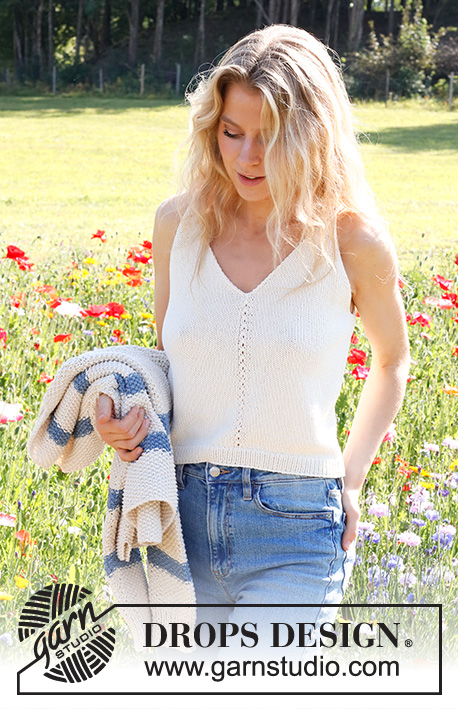
Knitted top in DROPS Safran. The piece if worked bottom up in stocking stitch. Sizes S - XXXL.
DROPS 230-1 |
||||||||||||||||
|
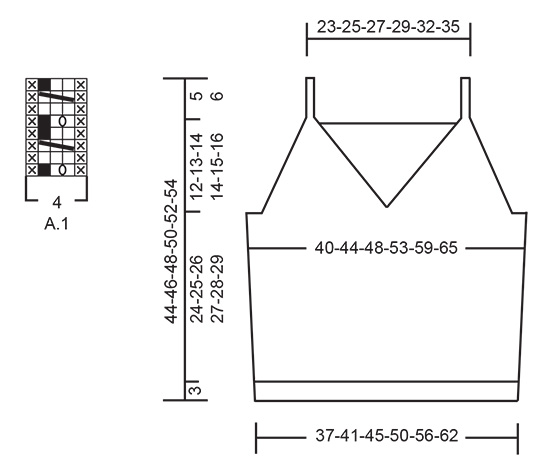
------------------------------------------------------- EXPLANATIONS FOR THE PATTERN: ------------------------------------------------------- RIDGE/GARTER STITCH (worked back and forth): Knit all rows. 1 ridge = knit 2 rows. PATTERN: See diagram A.1. The diagram shows all rows in the pattern from the right side. INCREASE TIP (sides): All increases are worked from the right side. Increase 1 stitch inside the 2 outermost stitches by making 1 yarn over. On the next row purl the yarn over twisted to avoid a hole. Then work the new stitch in stocking stitch. DECREASE TIP (for the armholes and V-neck): FROM THE RIGHT SIDE: After the 1 edge stitch: Slip 1 stitch as if to knit, knit 1 and pass the slipped stitch over the knitted stitch (= 1 stitch decreased). Before the 1 edge stitch: Work until there are 3 stitches left, knit 2 together, 1 edge stitch in garter stitch (= 1 stitch decreased). FROM THE WRONG SIDE: After the 1 edge stitch: Purl 2 together (= 1 stitch decreased). Before the 1 edge stitch: Work until there are 3 stitches left, purl 2 twisted together, edge stitch in garter stitch (= 1 stitch decreased). ------------------------------------------------------- START THE PIECE HERE: ------------------------------------------------------- TOP – SHORT OVERVIEW OF THE PIECE: The back and front pieces are worked separately, back and forth and bottom up. Straps are worked on the front piece, then sewn onto the back piece. BACK PIECE: Cast on 100-112-122-136-150-166 stitches with needle size 2.5 mm and DROPS Safran. Purl 1 row from the wrong side, then work rib (knit 1, purl 1), with 1 edge stitch in GARTER STITCH on each side – read description above. When the rib measures 3 cm, knit 1 row from the right side where you decrease 10-12-12-14-14-16 stitches evenly spaced = 90-100-110-122-136-150 stitches. Change to needle size 3 mm. Work stocking stitch back and forth with 1 edge stitch in garter stitch on each side. REMEMBER THE KNITTING TENSION! When the piece measures 6 cm, increase 1 stitch on each side – read INCREASE TIP. Increase like this every 6 cm a total of 4 times on each side = 98-108-118-130-144-158 stitches. When the piece measures 26-27-28-29-30-31 cm, work 2 ridges over the outermost 6-8-10-12-14-16 stitches on each side (the other stitches are continued in stocking stitch). After the 2 ridges, cast off 5-7-9-11-13-15 stitches at the beginning of the next 2 rows for the armholes = 88-94-100-108-118-128 stitches. Continue with stocking stitch and 1 edge stitch in garter stitch on each side. AT THE SAME TIME on the first row from the right side decrease 1 stitch on each side for the armholes – read DECREASE TIP. Decrease like this every 2nd row (each row from the right side) a total of 16-17-18-19-21-22 times = 56-60-64-70-76-84 stitches. Knit 1 row from the right side where you increase 7-7-7-7-9-9 stitches evenly spaced = 63-67-71-77-85-93 stitches. Change to needle size 2.5 mm. Work rib as follows from the wrong side: 1 edge stitch in garter stitch, * purl 1, knit 1 *, work from *-* until there are 2 stitches left, purl 1 and1 edge stitch in garter stitch. Continue this rib for 3 cm. Cast off a little loosely. FRONT PIECE: Cast on 100-112-122-136-150-166 stitches with needle size 2.5 mm and DROPS Safran. Purl 1 row from the wrong side, then work rib (knit 1, purl 1) with 1 edge stitch in garter stitch on each side. When the rib measures 3 cm, knit 1 row from the right side where you decrease 10-12-12-14-14-16 stitches evenly spaced = 90-100-110-122-136-150 stitches. Change to needle size 3 mm. Work stocking stitch back and forth with 1 edge stitch in garter stitch on each side. Purl 1 row from the wrong side with 1 edge stitch in garter stitch on each side. The next row is worked as follows from the right side: 1 edge stitch in garter stitch, 42-47-52-58-65-72 stitches in stocking stitch, A.1, 42-47-52-58-65-72 stitches in stocking stitch and 1 edge stitch in garter stitch. Continue this pattern. When the piece measures 6 cm, increase 1 stitch on each side. Increase like this every 6 cm a total of 4 times on each side = 98-108-118-130-144-158 stitches. When the piece measures 26-27-28-29-30-31 cm (adjust so the next row is either row 3 or 7 in A.1), work 2 ridges over the outermost 6-8-10-12-14-16 stitches on each side (the other stitches are continued in stocking stitch and pattern as before). After the 2 ridges work the next row from the right side as follows: Cast off 5-7-9-11-13-15 stitches for the armhole, work 42-45-48-52-57-62 stitches in stocking stitch, place the next 2 stitches on a cable needle in front of the piece, knit the next 3 stitches together and place these 43-46-49-53-58-63 stitches on a thread or extra needle = PART-1. PART-2: Knit twisted together the 2 stitches from the cable needle, work 41-44-47-51-56-61 stitches in stocking stitch and 6-8-10-12-14-16 stitches in garter stitch. Turn, cast off 5-7-9-11-13-15 stitches for the armhole, work stocking stitch until there is 1 stitch left and 1 stitch in garter stitch = 43-46-49-53-58-63 stitches. OVERVIEW OF THE NEXT SECTION: Continue with stocking stitch and 1 edge stitch in garter stitch on each side. AT THE SAME TIME on the first row from the right side, begin to decrease for the armhole and V-neck. Decrease inside the 1 edge stitch – read DECREASE TIP; the decreases are different for the armhole and neck - read ARMHOLE and V-NECK before continuing. ARMHOLE: Decrease every 2nd row (each row from the right side) a total of 16-17-18-19-21-22 times. V-NECK: Decrease every row (both right side and wrong side) a total of 7-7-9-9-13-17 times, then every 2nd row (each row from the right side) 15-17-17-18-17-17 times. After all the decreases there are 5-5-5-7-7-7 stitches left for the strap. STRAP: = 5-5-5-7-7-7 stitches. Knit 1 row from the right side, * push the stitches back to the beginning of the needle, tighten the strand and knit the 5-5-5-7-7-7 stitches from the right side again *, work from *-* until the strap measures 9-9-10-11-11-11 cm – work to desired length; the strap is sewn to the back piece later. Cut the strand, pull it through the 5-5-5-7-7-7 stitches, tighten and fasten well. PART-1: Place the 43-46-49-53-58-63 stitches from PART-1 back on needle size 3 mm. Work stocking stitch back and forth with 1 edge stitch in garter stitch on each side. AT THE SAME TIME on the first row from the right side, begin to decrease for the armhole and V-neck in the same way as on PART-2 = 5-5-5-7-7-7 stitches left for the strap. Work the strap in the same way as on part-2. ASSEMBLY: Sew the straps to the back piece – outermost on each side. Sew the side seams inside the 1 edge stitch. |
||||||||||||||||
Diagram explanations |
||||||||||||||||
|
||||||||||||||||
 |
||||||||||||||||
Have you finished this pattern?Tag your pictures with #dropspattern #whitesailstop or submit them to the #dropsfan gallery. Do you need help with this pattern?You'll find 27 tutorial videos, a Comments/Questions area and more by visiting the pattern on garnstudio.com. © 1982-2026 DROPS Design A/S. We reserve all rights. This document, including all its sub-sections, has copyrights. Read more about what you can do with our patterns at the bottom of each pattern on our site. |
||||||||||||||||


With over 40 years in knitting and crochet design, DROPS Design offers one of the most extensive collections of free patterns on the internet - translated to 17 languages. As of today we count 324 catalogues and 12290 patterns translated into English (UK/cm). 12290
We work hard to bring you the best knitting and crochet have to offer, inspiration and advice as well as great quality yarns at incredible prices! Would you like to use our patterns for other than personal use? You can read what you are allowed to do in the Copyright text at the bottom of all our patterns. Happy crafting!
Post a comment to pattern DROPS 230-1
We would love to hear what you have to say about this pattern!
If you want to leave a question, please make sure you select the correct category in the form below, to speed up the answering process. Required fields are marked *.