
Popular categories
Looking for a yarn?


Comments / Questions (103)
![]() Gemm wrote:
Gemm wrote:
Hola! Las agujas son rectas o de doble punta? Gracias!
15.09.2025 - 01:26DROPS Design answered:
Hola Gemm, si solo pone agujas quiere decir que son agujas rectas.
15.09.2025 - 01:55
![]() Hannah wrote:
Hannah wrote:
Hoi, Ik kom niet uit met het patroon A1. Als ik het telpatroon volg, brei ik na 1 kantsteek en 42 normale steken A1, maar na het telpatroon hou ik dan 43 steken over ipv 42+kantsteek. A1 geeft aan: 1 averecht, 1 recht, omslag, 1 recht en 1 averecht. Of begrijp ik het verkeerd? Groetjes, Hannah
28.07.2025 - 18:04DROPS Design answered:
Dag Hannah,
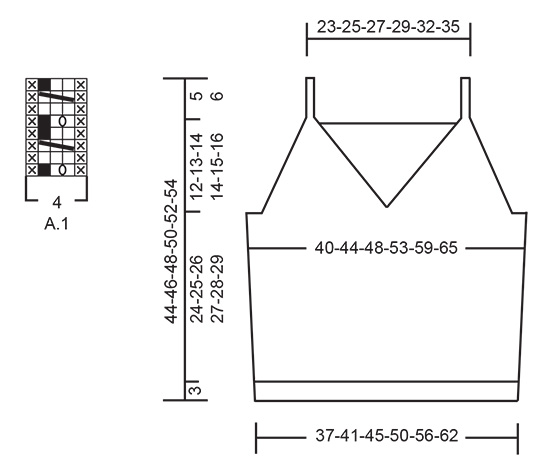
A.1 heeft in de eerste naald 4 steken, het zwarte vierkantje is namelijk geen steek, dus je breit 1 averecht, 1 recht, 1 omslag, 1 recht, 1 averecht. Dus je breit 1 ribbelsteek, 42 tricotsteken, 4 steken A.1, 42 tricotsteken, 1 ribbelsteek = 90 steken in totaal.
28.07.2025 - 21:28
![]() Susanne wrote:
Susanne wrote:
Hallo, wozu brauche ich die Zopfnadel?
27.07.2025 - 10:36DROPS Design answered:
Liebe Susanne, die Zopfnadel wird benutzt, wenn man das Rückenteil für die 2 Seiten aufteilt. Viel Spaß beim Stricken!
04.08.2025 - 11:28
![]() Susanne wrote:
Susanne wrote:
Hallo, kann man das Top nicht auf einmal mit einer Rundstricknadel, ohne Seitennähte, stricken?
25.07.2025 - 11:03DROPS Design answered:
Liebe Susanne, ja wahrscheinlich können Sie die Anleitung so anpassen, damit der Rumfpteil von unten bis zum Armloch in der Runde gestrickt wird, dann stricken Sie jedes Teil separat in Hin- und Rückreihen fertig. Viel spaß beim Stricken!
25.07.2025 - 16:23
![]() Giuseppa wrote:
Giuseppa wrote:
Come eseguire il giro maniche di una canotta e lo scollo
18.07.2025 - 10:20DROPS Design answered:
Buonasera Giuseppa, le indicazioni sono riportate nel modello, c'è qualche passaggio che le risulta difficile? Buon lavoro!
20.07.2025 - 17:05
![]() Jacqueline wrote:
Jacqueline wrote:
Comment faire le motif A1? C'est 4 ou 5 mailles🤔?
24.06.2025 - 10:57DROPS Design answered:
Bonjour Jacqueline, tout dépend du rang de A.1, il se commence sur 4 mailles, mais vous faites 1 jeté au 1er rang = vous aurez donc 5 mailles. Puis vous avez de nouveau 4 mailles du 3ème et au 4ème rang. Au 5ème rang, vous faites 1 jeté entre les 2 m endroit = 5 mailles de nouveau. Bon tricot!
24.06.2025 - 18:04
![]() Jacqueline Blake wrote:
Jacqueline Blake wrote:
Je ne comprends pas l'explication du diagramme A1 dans ces explications
23.06.2025 - 23:04DROPS Design answered:
Bonjour Mme Blake, découvrez ici comment lire un diagramme et retrouvez ici comment réaliser une petite torsade du même type; le nombre de mailles de A.1 va varier entre 4 mailles et 5 mailles en fonction du rang, mais quand le nombre de mailles est indiqué, on le compte alors sur 4 mailles. Bon tricot!
24.06.2025 - 18:03
![]() Basset Véronique wrote:
Basset Véronique wrote:
Bonjour, Je ne comprends pas le diagramme A1. Pourquoi dites-vous qu’il se fait sur 4 mailles, j’en vois 5. Par exemple au rg 2 : 1m endroit, 3m envers 1m endroit. Et si c’est bien 5, c’est un nombre impair, il ne sera pas centré ? Merci beaucoup de votre explication.
13.06.2025 - 17:31DROPS Design answered:
Bonjour Mme Basset, le nombre de mailles de A.1 va varier entre 4 et 5 mailles selon les rangs, mais il est compté sur 4 mailles tout du long. Cette petite torsade se fait de façon analogue à celle de cette vidéo. Bon tricot!
16.06.2025 - 07:24
![]() Joan Lyngby Jepsen wrote:
Joan Lyngby Jepsen wrote:
Vedr. 230-1: jeg skal starte ved ærmgab og strikker str. xxxl. Mvh. Joan.
23.05.2025 - 08:36DROPS Design answered:
Hei Joan. Jo, du har 63 masker. Det skal felles til ermhull på hver 2. pinne 22 ganger = 63-22 = 41 masker. Det skal felles til V-hals på hver pinne 17 ganger (ikke 17 x 2, men 1 gang fra retten, så 1 gang fra vrangen, så 1 gang fra retten igjen osv til det er felt 17 ganger) = 41-17 = 24 masker. Deretter skal det felles på hver 2. pinne 17 ganger = 24 + 17 = 7 masker igjen til å strikke stroppen. mvh DROPS Design
26.05.2025 - 09:24
![]() Joan Jepsen wrote:
Joan Jepsen wrote:
Hej igen. Vedr. 230-1.: indtag til ærmgab 22 gange og indtag til hals 17 gange både på ret-og vrangside. Og derefter 17 gange fra retsiden. Det giver 22+34+17=73 masker og jeg har kun 61 masker. Hvad gør jeg?
21.05.2025 - 16:01DROPS Design answered:
Hej Joan, vi finder ikke de tal du henviser til .. hvor er du i opskriften og hvilken størrelse strikker du?
23.05.2025 - 07:56
|
||||||||||||||||
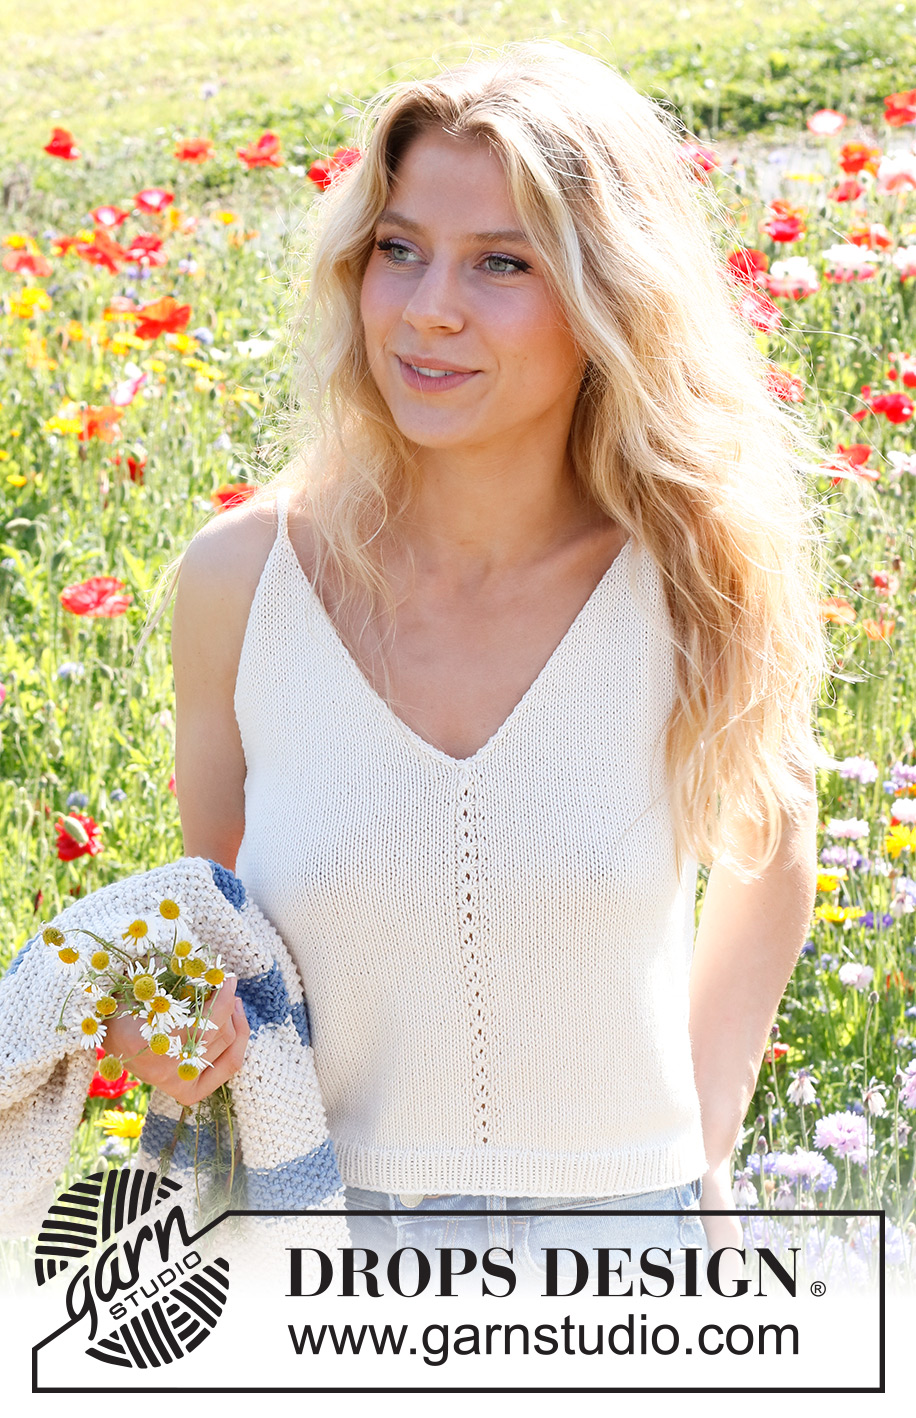
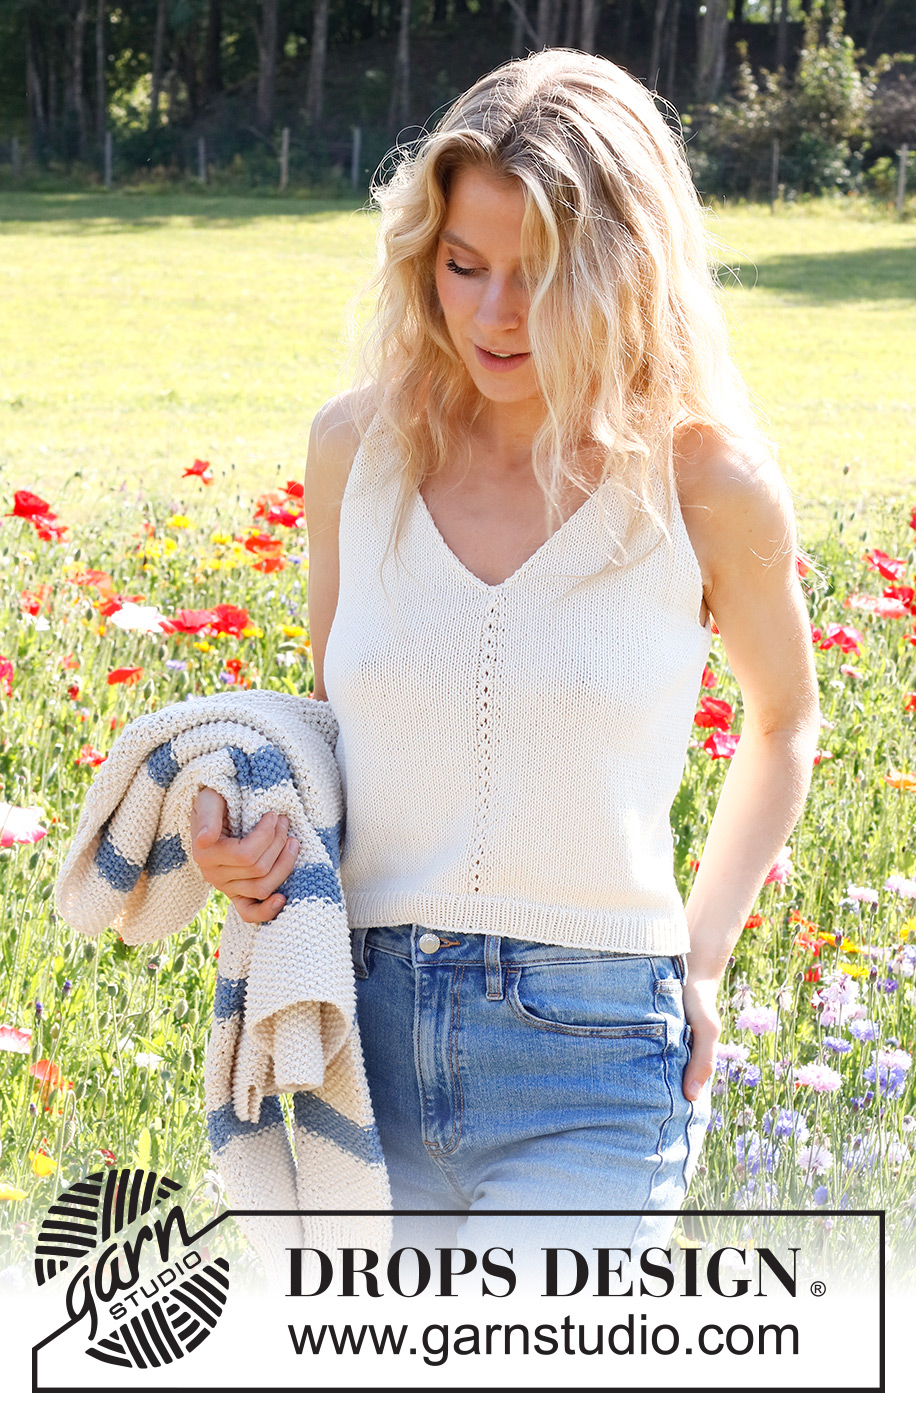
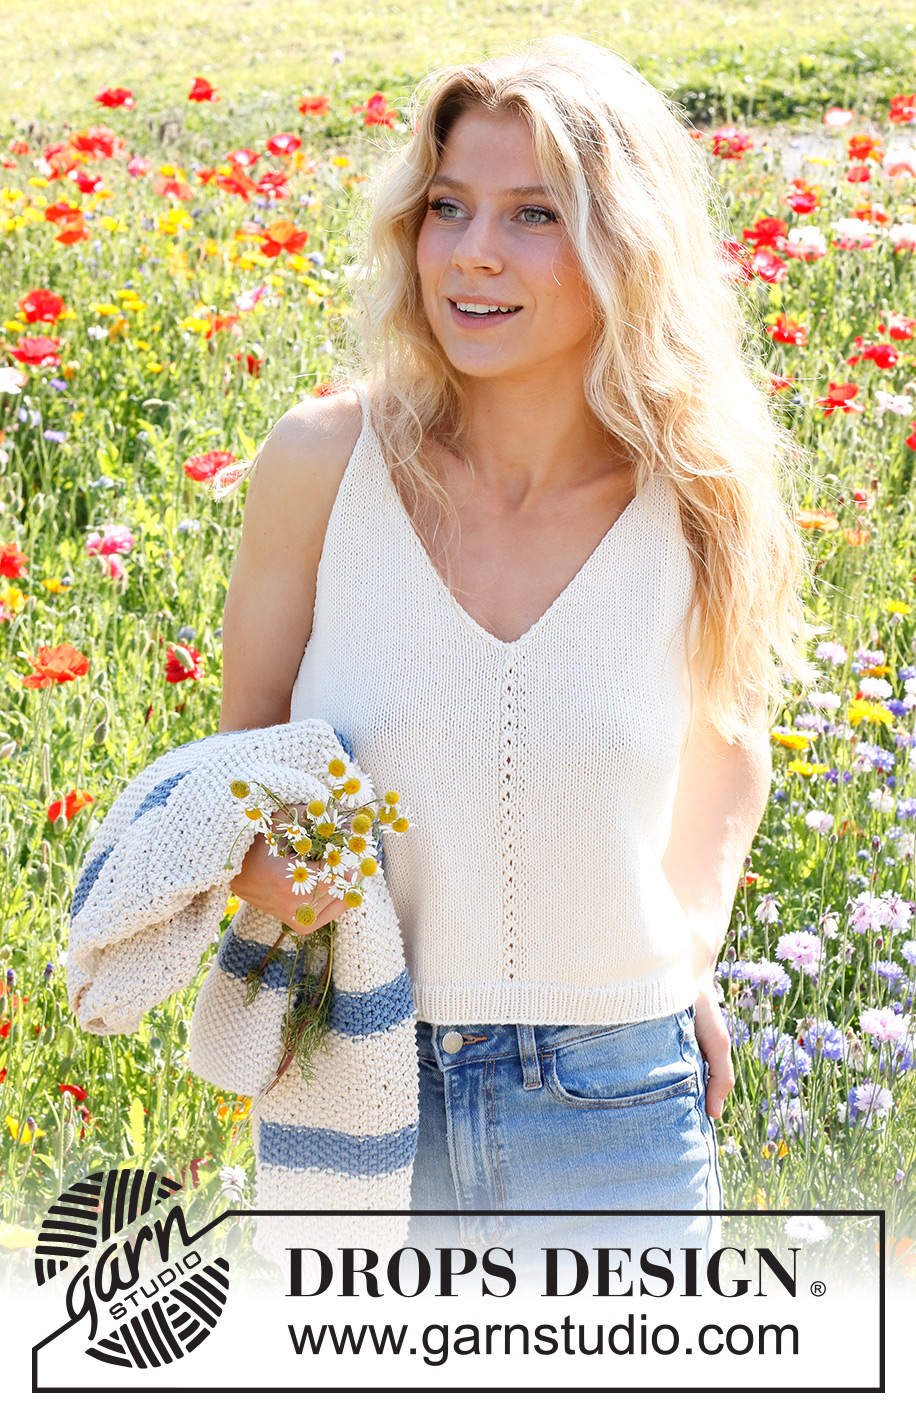
White Sails#whitesailstop |
||||||||||||||||
 |
 |
|||||||||||||||
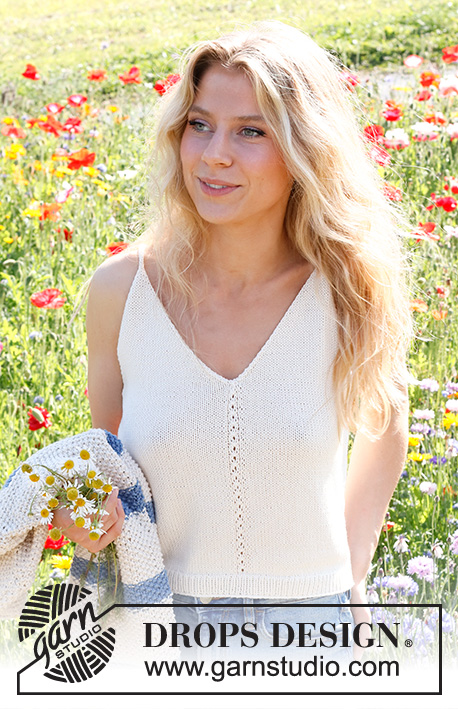
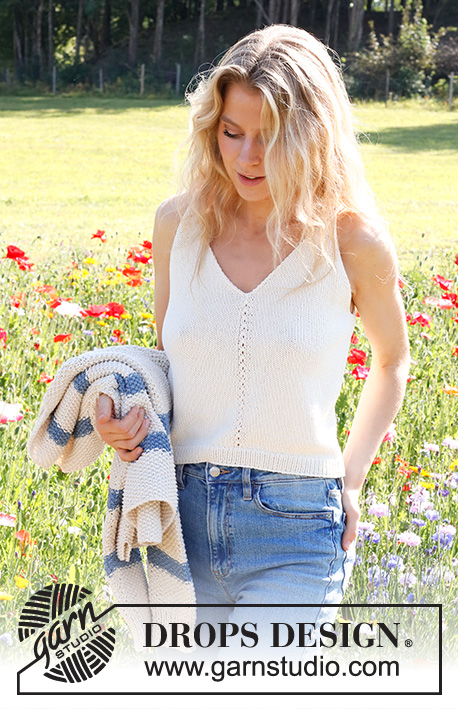
Knitted top in DROPS Safran. The piece if worked bottom up in stocking stitch. Sizes S - XXXL.
DROPS 230-1 |
||||||||||||||||
|
------------------------------------------------------- EXPLANATIONS FOR THE PATTERN: ------------------------------------------------------- RIDGE/GARTER STITCH (worked back and forth): Knit all rows. 1 ridge = knit 2 rows. PATTERN: See diagram A.1. The diagram shows all rows in the pattern from the right side. INCREASE TIP (sides): All increases are worked from the right side. Increase 1 stitch inside the 2 outermost stitches by making 1 yarn over. On the next row purl the yarn over twisted to avoid a hole. Then work the new stitch in stocking stitch. DECREASE TIP (for the armholes and V-neck): FROM THE RIGHT SIDE: After the 1 edge stitch: Slip 1 stitch as if to knit, knit 1 and pass the slipped stitch over the knitted stitch (= 1 stitch decreased). Before the 1 edge stitch: Work until there are 3 stitches left, knit 2 together, 1 edge stitch in garter stitch (= 1 stitch decreased). FROM THE WRONG SIDE: After the 1 edge stitch: Purl 2 together (= 1 stitch decreased). Before the 1 edge stitch: Work until there are 3 stitches left, purl 2 twisted together, edge stitch in garter stitch (= 1 stitch decreased). ------------------------------------------------------- START THE PIECE HERE: ------------------------------------------------------- TOP – SHORT OVERVIEW OF THE PIECE: The back and front pieces are worked separately, back and forth and bottom up. Straps are worked on the front piece, then sewn onto the back piece. BACK PIECE: Cast on 100-112-122-136-150-166 stitches with needle size 2.5 mm and DROPS Safran. Purl 1 row from the wrong side, then work rib (knit 1, purl 1), with 1 edge stitch in GARTER STITCH on each side – read description above. When the rib measures 3 cm, knit 1 row from the right side where you decrease 10-12-12-14-14-16 stitches evenly spaced = 90-100-110-122-136-150 stitches. Change to needle size 3 mm. Work stocking stitch back and forth with 1 edge stitch in garter stitch on each side. REMEMBER THE KNITTING TENSION! When the piece measures 6 cm, increase 1 stitch on each side – read INCREASE TIP. Increase like this every 6 cm a total of 4 times on each side = 98-108-118-130-144-158 stitches. When the piece measures 26-27-28-29-30-31 cm, work 2 ridges over the outermost 6-8-10-12-14-16 stitches on each side (the other stitches are continued in stocking stitch). After the 2 ridges, cast off 5-7-9-11-13-15 stitches at the beginning of the next 2 rows for the armholes = 88-94-100-108-118-128 stitches. Continue with stocking stitch and 1 edge stitch in garter stitch on each side. AT THE SAME TIME on the first row from the right side decrease 1 stitch on each side for the armholes – read DECREASE TIP. Decrease like this every 2nd row (each row from the right side) a total of 16-17-18-19-21-22 times = 56-60-64-70-76-84 stitches. Knit 1 row from the right side where you increase 7-7-7-7-9-9 stitches evenly spaced = 63-67-71-77-85-93 stitches. Change to needle size 2.5 mm. Work rib as follows from the wrong side: 1 edge stitch in garter stitch, * purl 1, knit 1 *, work from *-* until there are 2 stitches left, purl 1 and1 edge stitch in garter stitch. Continue this rib for 3 cm. Cast off a little loosely. FRONT PIECE: Cast on 100-112-122-136-150-166 stitches with needle size 2.5 mm and DROPS Safran. Purl 1 row from the wrong side, then work rib (knit 1, purl 1) with 1 edge stitch in garter stitch on each side. When the rib measures 3 cm, knit 1 row from the right side where you decrease 10-12-12-14-14-16 stitches evenly spaced = 90-100-110-122-136-150 stitches. Change to needle size 3 mm. Work stocking stitch back and forth with 1 edge stitch in garter stitch on each side. Purl 1 row from the wrong side with 1 edge stitch in garter stitch on each side. The next row is worked as follows from the right side: 1 edge stitch in garter stitch, 42-47-52-58-65-72 stitches in stocking stitch, A.1, 42-47-52-58-65-72 stitches in stocking stitch and 1 edge stitch in garter stitch. Continue this pattern. When the piece measures 6 cm, increase 1 stitch on each side. Increase like this every 6 cm a total of 4 times on each side = 98-108-118-130-144-158 stitches. When the piece measures 26-27-28-29-30-31 cm (adjust so the next row is either row 3 or 7 in A.1), work 2 ridges over the outermost 6-8-10-12-14-16 stitches on each side (the other stitches are continued in stocking stitch and pattern as before). After the 2 ridges work the next row from the right side as follows: Cast off 5-7-9-11-13-15 stitches for the armhole, work 42-45-48-52-57-62 stitches in stocking stitch, place the next 2 stitches on a cable needle in front of the piece, knit the next 3 stitches together and place these 43-46-49-53-58-63 stitches on a thread or extra needle = PART-1. PART-2: Knit twisted together the 2 stitches from the cable needle, work 41-44-47-51-56-61 stitches in stocking stitch and 6-8-10-12-14-16 stitches in garter stitch. Turn, cast off 5-7-9-11-13-15 stitches for the armhole, work stocking stitch until there is 1 stitch left and 1 stitch in garter stitch = 43-46-49-53-58-63 stitches. OVERVIEW OF THE NEXT SECTION: Continue with stocking stitch and 1 edge stitch in garter stitch on each side. AT THE SAME TIME on the first row from the right side, begin to decrease for the armhole and V-neck. Decrease inside the 1 edge stitch – read DECREASE TIP; the decreases are different for the armhole and neck - read ARMHOLE and V-NECK before continuing. ARMHOLE: Decrease every 2nd row (each row from the right side) a total of 16-17-18-19-21-22 times. V-NECK: Decrease every row (both right side and wrong side) a total of 7-7-9-9-13-17 times, then every 2nd row (each row from the right side) 15-17-17-18-17-17 times. After all the decreases there are 5-5-5-7-7-7 stitches left for the strap. STRAP: = 5-5-5-7-7-7 stitches. Knit 1 row from the right side, * push the stitches back to the beginning of the needle, tighten the strand and knit the 5-5-5-7-7-7 stitches from the right side again *, work from *-* until the strap measures 9-9-10-11-11-11 cm – work to desired length; the strap is sewn to the back piece later. Cut the strand, pull it through the 5-5-5-7-7-7 stitches, tighten and fasten well. PART-1: Place the 43-46-49-53-58-63 stitches from PART-1 back on needle size 3 mm. Work stocking stitch back and forth with 1 edge stitch in garter stitch on each side. AT THE SAME TIME on the first row from the right side, begin to decrease for the armhole and V-neck in the same way as on PART-2 = 5-5-5-7-7-7 stitches left for the strap. Work the strap in the same way as on part-2. ASSEMBLY: Sew the straps to the back piece – outermost on each side. Sew the side seams inside the 1 edge stitch. |
||||||||||||||||
Diagram explanations |
||||||||||||||||
|
||||||||||||||||
 |
||||||||||||||||
Have you finished this pattern?Tag your pictures with #dropspattern #whitesailstop or submit them to the #dropsfan gallery. Do you need help with this pattern?You'll find 27 tutorial videos, a Comments/Questions area and more by visiting the pattern on garnstudio.com. © 1982-2026 DROPS Design A/S. We reserve all rights. This document, including all its sub-sections, has copyrights. Read more about what you can do with our patterns at the bottom of each pattern on our site. |
||||||||||||||||


With over 40 years in knitting and crochet design, DROPS Design offers one of the most extensive collections of free patterns on the internet - translated to 17 languages. As of today we count 324 catalogues and 12290 patterns translated into English (UK/cm). 12290
We work hard to bring you the best knitting and crochet have to offer, inspiration and advice as well as great quality yarns at incredible prices! Would you like to use our patterns for other than personal use? You can read what you are allowed to do in the Copyright text at the bottom of all our patterns. Happy crafting!
Post a comment to pattern DROPS 230-1
We would love to hear what you have to say about this pattern!
If you want to leave a question, please make sure you select the correct category in the form below, to speed up the answering process. Required fields are marked *.