
Popular categories
Looking for a yarn?


Comments / Questions (103)
![]() Ursula wrote:
Ursula wrote:
Hi, I knitted half of the back piece. The edges of my piece are curling quite bit although I am using the recommended edge stitch in garter stitch. I am worried that this will not look good when I am getting to the visible edges in the openings for the arms and around the neck. Could a different edge stitch help with that?
29.04.2026 - 05:13DROPS Design answered:
See above :)
29.04.2026 - 09:30
![]() Ursula wrote:
Ursula wrote:
Hi, I knitted half of the back piece. The edges of my piece are curling quite bit although I am using the recommended edge stitch in garter stitch. I am worried that this will not look good when I am getting to the visible edges in the openings for the arms and around the neck. Could a different edge stitch help with that?
29.04.2026 - 05:11DROPS Design answered:
Dear Ursula, if pieces still curl at the end you can simply block it at the very end so that bottom will not curl anymore. Happy knitting!
29.04.2026 - 09:29
![]() Malin wrote:
Malin wrote:
Hej, jag får upp symbolerna för diagrammet men inte själva diagrammet nu när jag ska börja på framstycket. Har ni tagit bort diagrammet och var kan jag i så fall få tag på det igen? MVH Malin
28.04.2026 - 23:22DROPS Design answered:
Hei Malin. Har vært noen problemer med nedlastningen, men skal nå være OK nå. mvh DROPS design
29.04.2026 - 08:36
![]() Anja wrote:
Anja wrote:
Met staat bij het achterpand: boordsteek verkeerde kant: 1 kantsteek ribbelsteek,*1averecht, 1rechts, *,brei van**tot er 2steken over zijn, 1 averecht en 1 kantsteek in ribbelsteek Snap niets van deze zin Gr Anja
08.03.2026 - 07:23DROPS Design answered:
Dag Anja,
Helaas begrijp ik niet helemaal waar je bent. Op het achterpand brei je kantsteek (1 recht, 1 averecht) met 1 kantsteek aan het begin en einde van de naald.
09.03.2026 - 13:35
![]() Denise wrote:
Denise wrote:
J’ai de la misère avec le diagramme. Le carré noir. On commence à tricoter par en haut ou par en bas du diagramme. On arrive sur une case noir ? Comment on fait ? Si on ne la tricote pas on la glisse sur l’aiguille de droite et au tour suivant on a une maille de trop.
17.02.2026 - 14:29DROPS Design answered:
Cf. réponse ci-dessous. Bon tricot!
18.02.2026 - 09:53
![]() Denise wrote:
Denise wrote:
J’ai de la misère avec le diagramme. Le carré noir. On commence à tricoter par en haut ou par en bas du diagramme. On arrive sur une case noir ? Comment on fait ? Si on ne la tricote pas on la glisse sur l’aiguille de droite et au tour suivant on a une maille de trop.
17.02.2026 - 03:09DROPS Design answered:
Bonjour Denise, le diagramme se lit de haut en bas, il se tricote sur 4 m au 1er rang, et dès le 1er rang on fait 1 jeté (= on a ainsi 5 m dans A.1) soit: 1 m env, 1m end, 1 jeté, 1 m end, 1 jeté - le carré noir correspond à la maille qui est formée grâce au jeté; puis au 3ème rang, on va diminuer cette maille = il reste de nouveau 2 m endroit. Retrouvez comment tricoter ce type de petites torsades ici, en vidéo. Bon tricot!
18.02.2026 - 09:44
![]() Dagmar Hägele wrote:
Dagmar Hägele wrote:
Warum muss man nach den 3 cm gestrickten Bund Maschen abnehmen? Freue mich auf die Antwort
12.02.2026 - 16:05DROPS Design answered:
Liebe Dagmar, das Bündchen soll sich nicht zusammenziehen, sondern locker fallen und eine ähnliche Breite wie das Rumpfteil haben, daher werden Maschen abgenommen. Viel Spaß beim Stricken!
18.02.2026 - 15:04
![]() Greer wrote:
Greer wrote:
What does it mean to knit yge stitches again from the right side. For the straps.
07.02.2026 - 19:01DROPS Design answered:
Hi Greer, You work across the strap-stitches, always from the right side without turning the piece. Push the stitches back to the beginning of the needle instead of turning and work them again from the same side. The working yarn will tighten the stitches into a tube. Regards, Drops Team.
10.02.2026 - 07:22
![]() Özi wrote:
Özi wrote:
Hi Drops Team, Kann man das Top in Runden ohne Seitennähte stricken ?
01.10.2025 - 18:48DROPS Design answered:
Hi Özi, of course, until the armholes. From there you have to work back and forth. Happy knitting!
02.10.2025 - 09:27
![]() Liv Anne wrote:
Liv Anne wrote:
Jeg forstår ikke diagrammet helt. Skal jeg først strikke en vrang fra retten og så direkte lage et kast? Eller er det en rettmaske på hver side av kastet? Og skal jeg gjøre dette 2 ganger etter hverandre på samme pinne? For først skal det strikkes 47 masker. Og så skal det stå igjen 47 masker som skal strikkes ut pinnen. Og da må jeg jo ha strikket 6 masker på et vis….. jeg strikker str M
16.09.2025 - 13:03
|
||||||||||||||||
White Sails#whitesailstop |
||||||||||||||||
 |
 |
|||||||||||||||
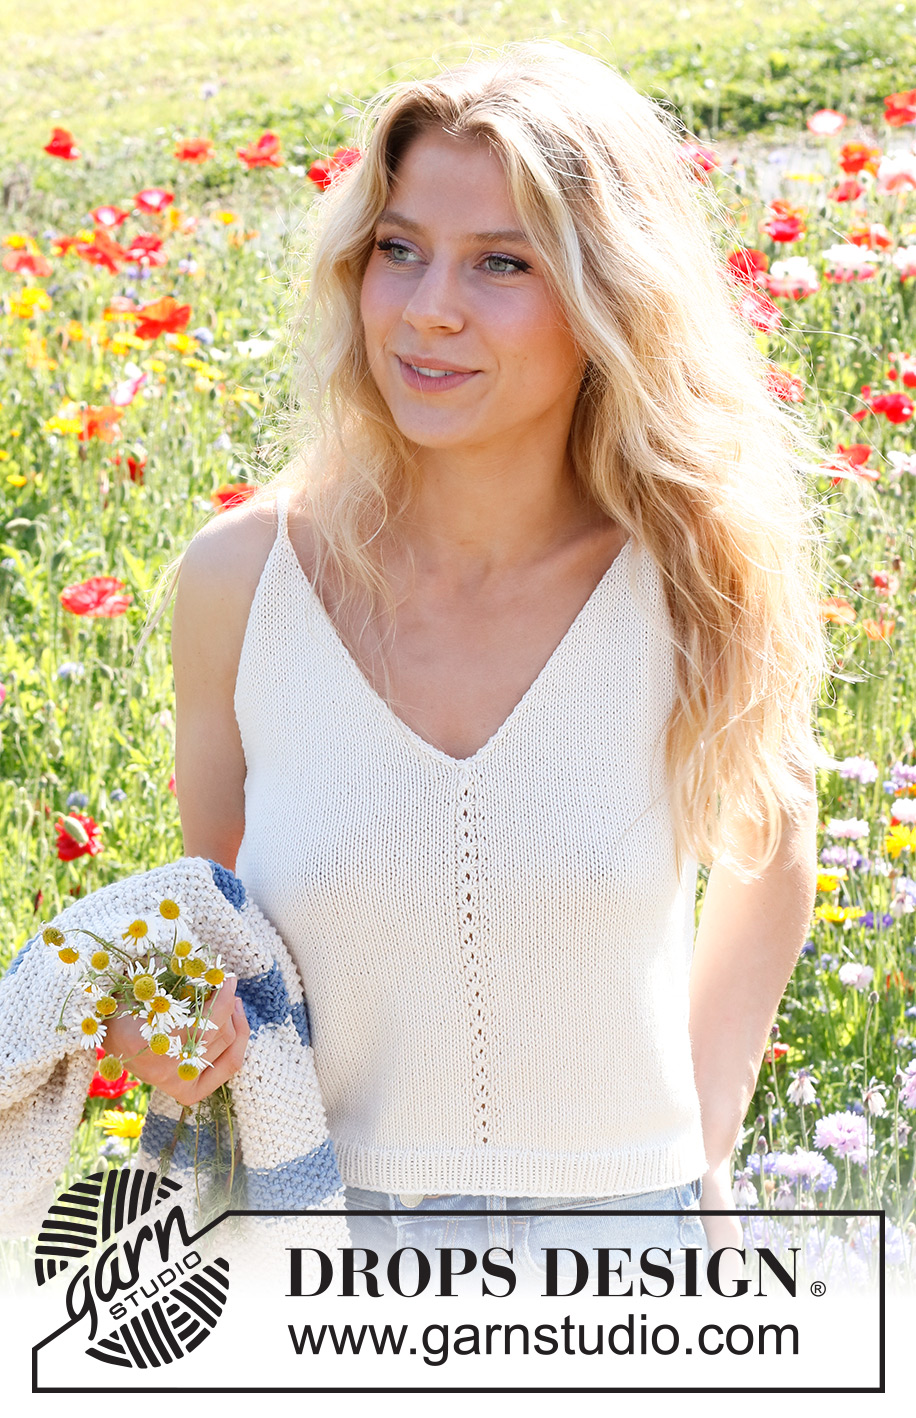
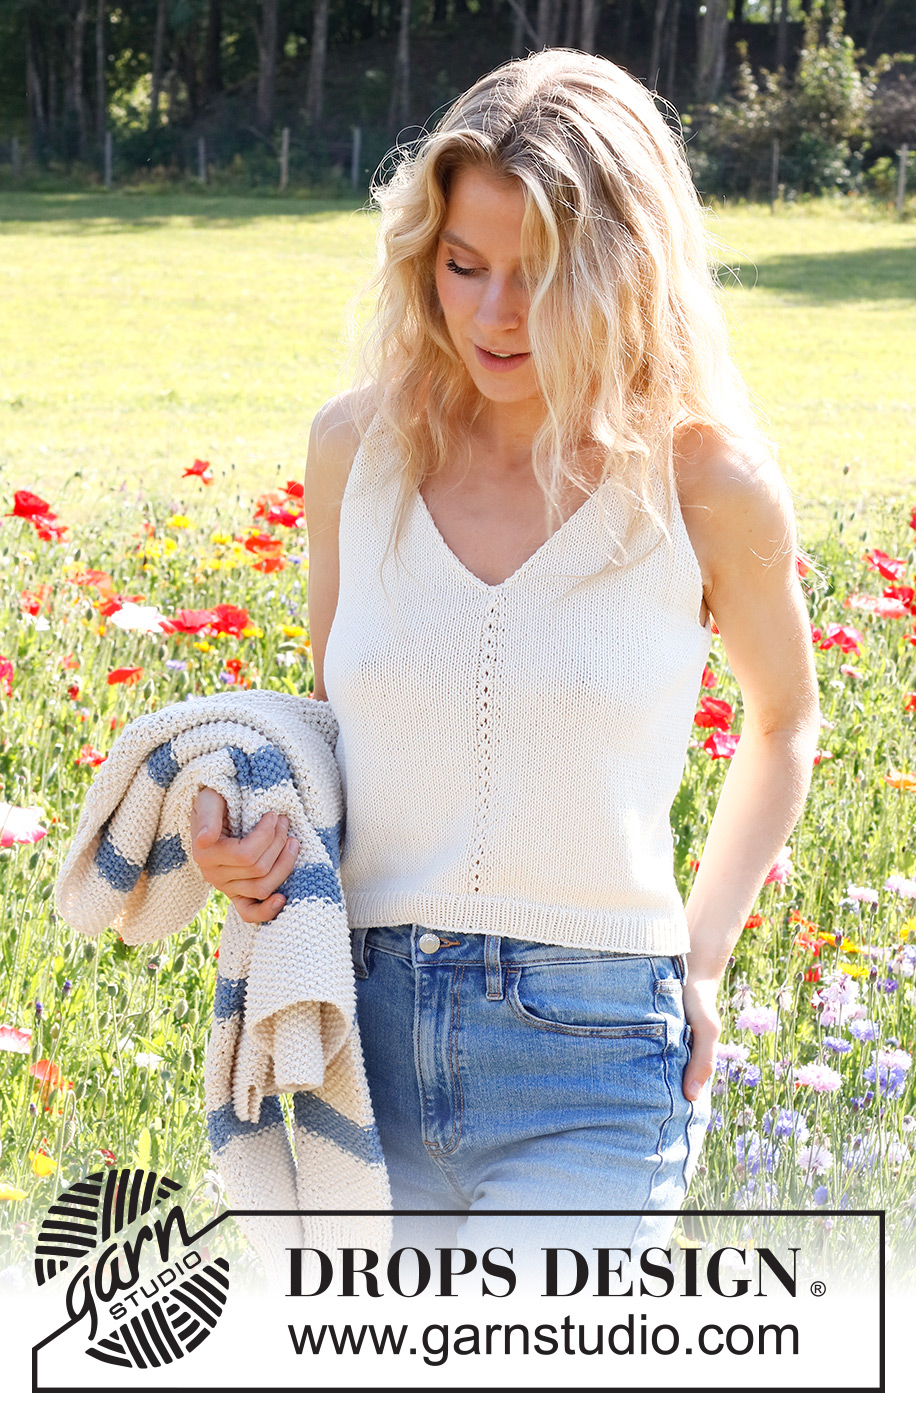
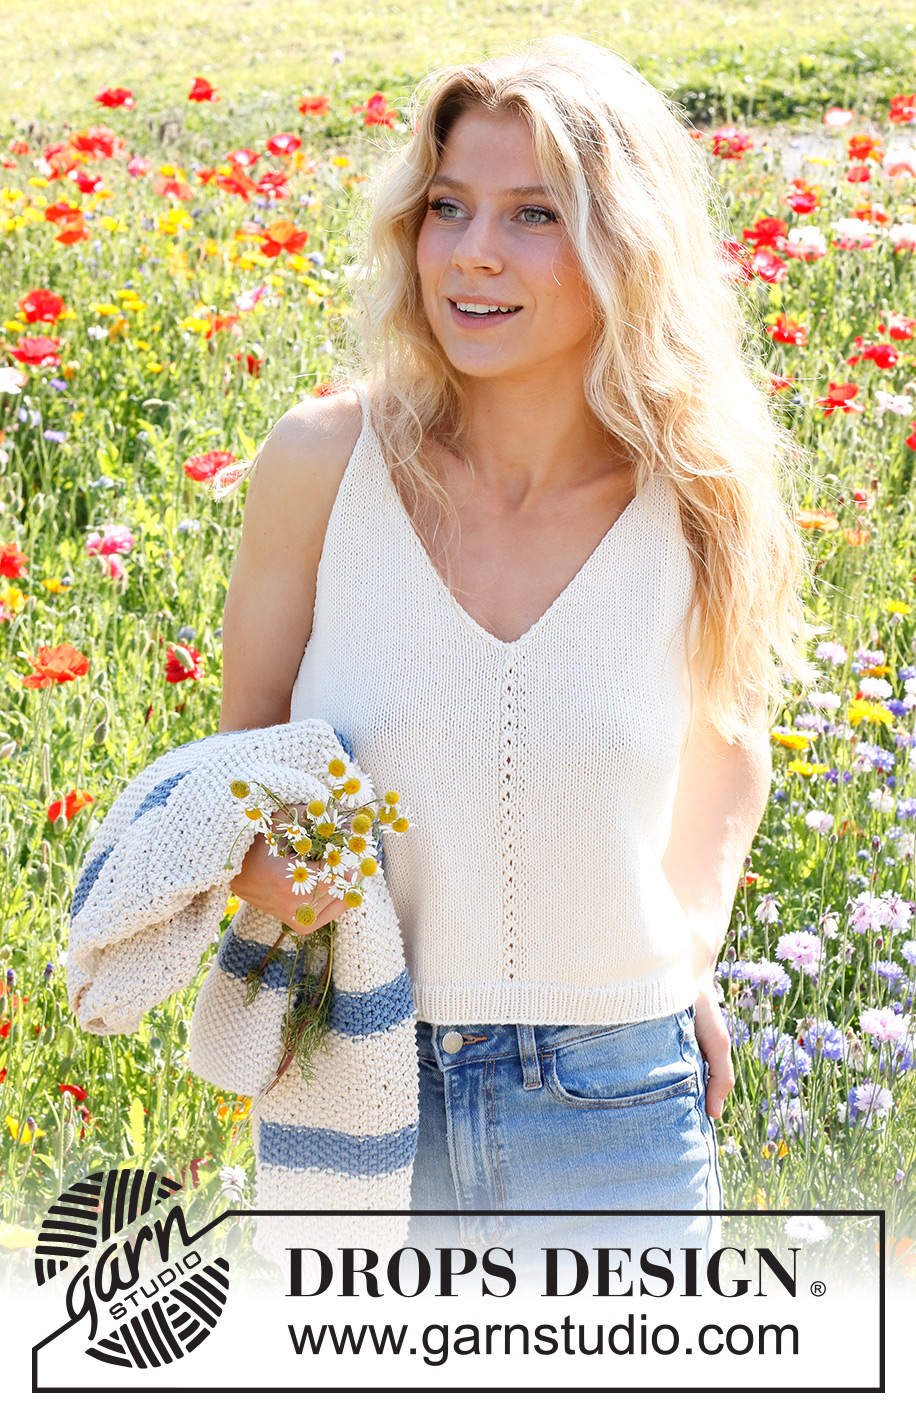
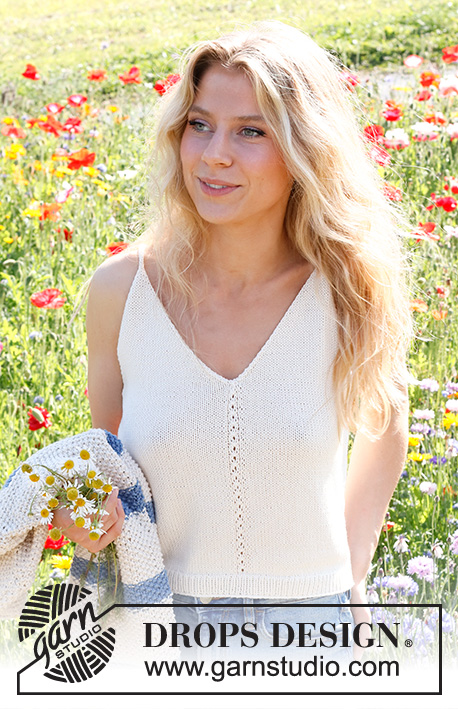
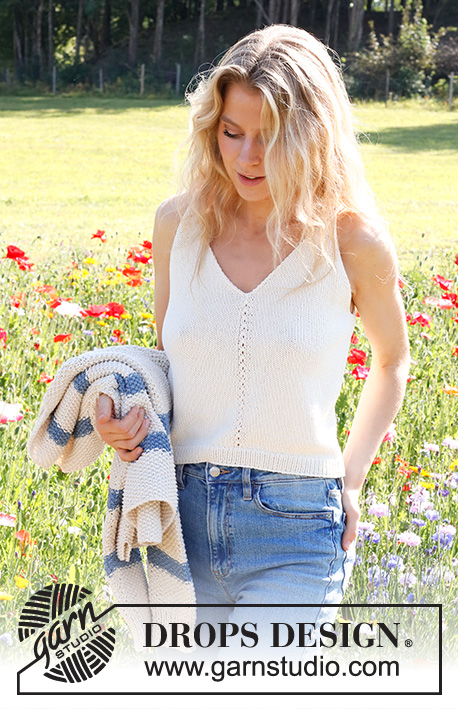
Knitted top in DROPS Safran. The piece if worked bottom up in stocking stitch. Sizes S - XXXL.
DROPS 230-1 |
||||||||||||||||
|
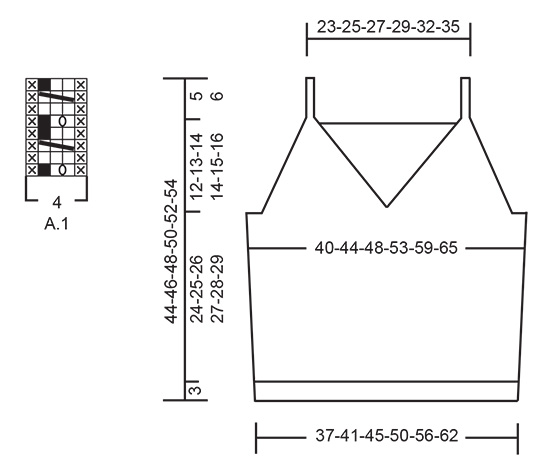
------------------------------------------------------- EXPLANATIONS FOR THE PATTERN: ------------------------------------------------------- RIDGE/GARTER STITCH (worked back and forth): Knit all rows. 1 ridge = knit 2 rows. PATTERN: See diagram A.1. The diagram shows all rows in the pattern from the right side. INCREASE TIP (sides): All increases are worked from the right side. Increase 1 stitch inside the 2 outermost stitches by making 1 yarn over. On the next row purl the yarn over twisted to avoid a hole. Then work the new stitch in stocking stitch. DECREASE TIP (for the armholes and V-neck): FROM THE RIGHT SIDE: After the 1 edge stitch: Slip 1 stitch as if to knit, knit 1 and pass the slipped stitch over the knitted stitch (= 1 stitch decreased). Before the 1 edge stitch: Work until there are 3 stitches left, knit 2 together, 1 edge stitch in garter stitch (= 1 stitch decreased). FROM THE WRONG SIDE: After the 1 edge stitch: Purl 2 together (= 1 stitch decreased). Before the 1 edge stitch: Work until there are 3 stitches left, purl 2 twisted together, edge stitch in garter stitch (= 1 stitch decreased). ------------------------------------------------------- START THE PIECE HERE: ------------------------------------------------------- TOP – SHORT OVERVIEW OF THE PIECE: The back and front pieces are worked separately, back and forth and bottom up. Straps are worked on the front piece, then sewn onto the back piece. BACK PIECE: Cast on 100-112-122-136-150-166 stitches with needle size 2.5 mm and DROPS Safran. Purl 1 row from the wrong side, then work rib (knit 1, purl 1), with 1 edge stitch in GARTER STITCH on each side – read description above. When the rib measures 3 cm, knit 1 row from the right side where you decrease 10-12-12-14-14-16 stitches evenly spaced = 90-100-110-122-136-150 stitches. Change to needle size 3 mm. Work stocking stitch back and forth with 1 edge stitch in garter stitch on each side. REMEMBER THE KNITTING TENSION! When the piece measures 6 cm, increase 1 stitch on each side – read INCREASE TIP. Increase like this every 6 cm a total of 4 times on each side = 98-108-118-130-144-158 stitches. When the piece measures 26-27-28-29-30-31 cm, work 2 ridges over the outermost 6-8-10-12-14-16 stitches on each side (the other stitches are continued in stocking stitch). After the 2 ridges, cast off 5-7-9-11-13-15 stitches at the beginning of the next 2 rows for the armholes = 88-94-100-108-118-128 stitches. Continue with stocking stitch and 1 edge stitch in garter stitch on each side. AT THE SAME TIME on the first row from the right side decrease 1 stitch on each side for the armholes – read DECREASE TIP. Decrease like this every 2nd row (each row from the right side) a total of 16-17-18-19-21-22 times = 56-60-64-70-76-84 stitches. Knit 1 row from the right side where you increase 7-7-7-7-9-9 stitches evenly spaced = 63-67-71-77-85-93 stitches. Change to needle size 2.5 mm. Work rib as follows from the wrong side: 1 edge stitch in garter stitch, * purl 1, knit 1 *, work from *-* until there are 2 stitches left, purl 1 and1 edge stitch in garter stitch. Continue this rib for 3 cm. Cast off a little loosely. FRONT PIECE: Cast on 100-112-122-136-150-166 stitches with needle size 2.5 mm and DROPS Safran. Purl 1 row from the wrong side, then work rib (knit 1, purl 1) with 1 edge stitch in garter stitch on each side. When the rib measures 3 cm, knit 1 row from the right side where you decrease 10-12-12-14-14-16 stitches evenly spaced = 90-100-110-122-136-150 stitches. Change to needle size 3 mm. Work stocking stitch back and forth with 1 edge stitch in garter stitch on each side. Purl 1 row from the wrong side with 1 edge stitch in garter stitch on each side. The next row is worked as follows from the right side: 1 edge stitch in garter stitch, 42-47-52-58-65-72 stitches in stocking stitch, A.1, 42-47-52-58-65-72 stitches in stocking stitch and 1 edge stitch in garter stitch. Continue this pattern. When the piece measures 6 cm, increase 1 stitch on each side. Increase like this every 6 cm a total of 4 times on each side = 98-108-118-130-144-158 stitches. When the piece measures 26-27-28-29-30-31 cm (adjust so the next row is either row 3 or 7 in A.1), work 2 ridges over the outermost 6-8-10-12-14-16 stitches on each side (the other stitches are continued in stocking stitch and pattern as before). After the 2 ridges work the next row from the right side as follows: Cast off 5-7-9-11-13-15 stitches for the armhole, work 42-45-48-52-57-62 stitches in stocking stitch, place the next 2 stitches on a cable needle in front of the piece, knit the next 3 stitches together and place these 43-46-49-53-58-63 stitches on a thread or extra needle = PART-1. PART-2: Knit twisted together the 2 stitches from the cable needle, work 41-44-47-51-56-61 stitches in stocking stitch and 6-8-10-12-14-16 stitches in garter stitch. Turn, cast off 5-7-9-11-13-15 stitches for the armhole, work stocking stitch until there is 1 stitch left and 1 stitch in garter stitch = 43-46-49-53-58-63 stitches. OVERVIEW OF THE NEXT SECTION: Continue with stocking stitch and 1 edge stitch in garter stitch on each side. AT THE SAME TIME on the first row from the right side, begin to decrease for the armhole and V-neck. Decrease inside the 1 edge stitch – read DECREASE TIP; the decreases are different for the armhole and neck - read ARMHOLE and V-NECK before continuing. ARMHOLE: Decrease every 2nd row (each row from the right side) a total of 16-17-18-19-21-22 times. V-NECK: Decrease every row (both right side and wrong side) a total of 7-7-9-9-13-17 times, then every 2nd row (each row from the right side) 15-17-17-18-17-17 times. After all the decreases there are 5-5-5-7-7-7 stitches left for the strap. STRAP: = 5-5-5-7-7-7 stitches. Knit 1 row from the right side, * push the stitches back to the beginning of the needle, tighten the strand and knit the 5-5-5-7-7-7 stitches from the right side again *, work from *-* until the strap measures 9-9-10-11-11-11 cm – work to desired length; the strap is sewn to the back piece later. Cut the strand, pull it through the 5-5-5-7-7-7 stitches, tighten and fasten well. PART-1: Place the 43-46-49-53-58-63 stitches from PART-1 back on needle size 3 mm. Work stocking stitch back and forth with 1 edge stitch in garter stitch on each side. AT THE SAME TIME on the first row from the right side, begin to decrease for the armhole and V-neck in the same way as on PART-2 = 5-5-5-7-7-7 stitches left for the strap. Work the strap in the same way as on part-2. ASSEMBLY: Sew the straps to the back piece – outermost on each side. Sew the side seams inside the 1 edge stitch. |
||||||||||||||||
Diagram explanations |
||||||||||||||||
|
||||||||||||||||
 |
||||||||||||||||
Have you finished this pattern?Tag your pictures with #dropspattern #whitesailstop or submit them to the #dropsfan gallery. Do you need help with this pattern?You'll find 27 tutorial videos, a Comments/Questions area and more by visiting the pattern on garnstudio.com. © 1982-2026 DROPS Design A/S. We reserve all rights. This document, including all its sub-sections, has copyrights. Read more about what you can do with our patterns at the bottom of each pattern on our site. |
||||||||||||||||


With over 40 years in knitting and crochet design, DROPS Design offers one of the most extensive collections of free patterns on the internet - translated to 17 languages. As of today we count 324 catalogues and 12290 patterns translated into English (UK/cm). 12290
We work hard to bring you the best knitting and crochet have to offer, inspiration and advice as well as great quality yarns at incredible prices! Would you like to use our patterns for other than personal use? You can read what you are allowed to do in the Copyright text at the bottom of all our patterns. Happy crafting!
Post a comment to pattern DROPS 230-1
We would love to hear what you have to say about this pattern!
If you want to leave a question, please make sure you select the correct category in the form below, to speed up the answering process. Required fields are marked *.