
Popular categories
Looking for a yarn?


Comments / Questions (57)
![]() Katrin wrote:
Katrin wrote:
Hallo! Wird das Diagramm mit dem Muster von oben oder von unten gelesen? Vielen Dank!
23.04.2023 - 20:45DROPS Design answered:
Liebe Katrin, Diagramme lesen Sie von unten nach oben, die Hinreihen lesen Sie rechts nach links und die Rückreihe links nach rechts. Viel Spaß beim stricken!
24.04.2023 - 10:16
![]() DOMI wrote:
DOMI wrote:
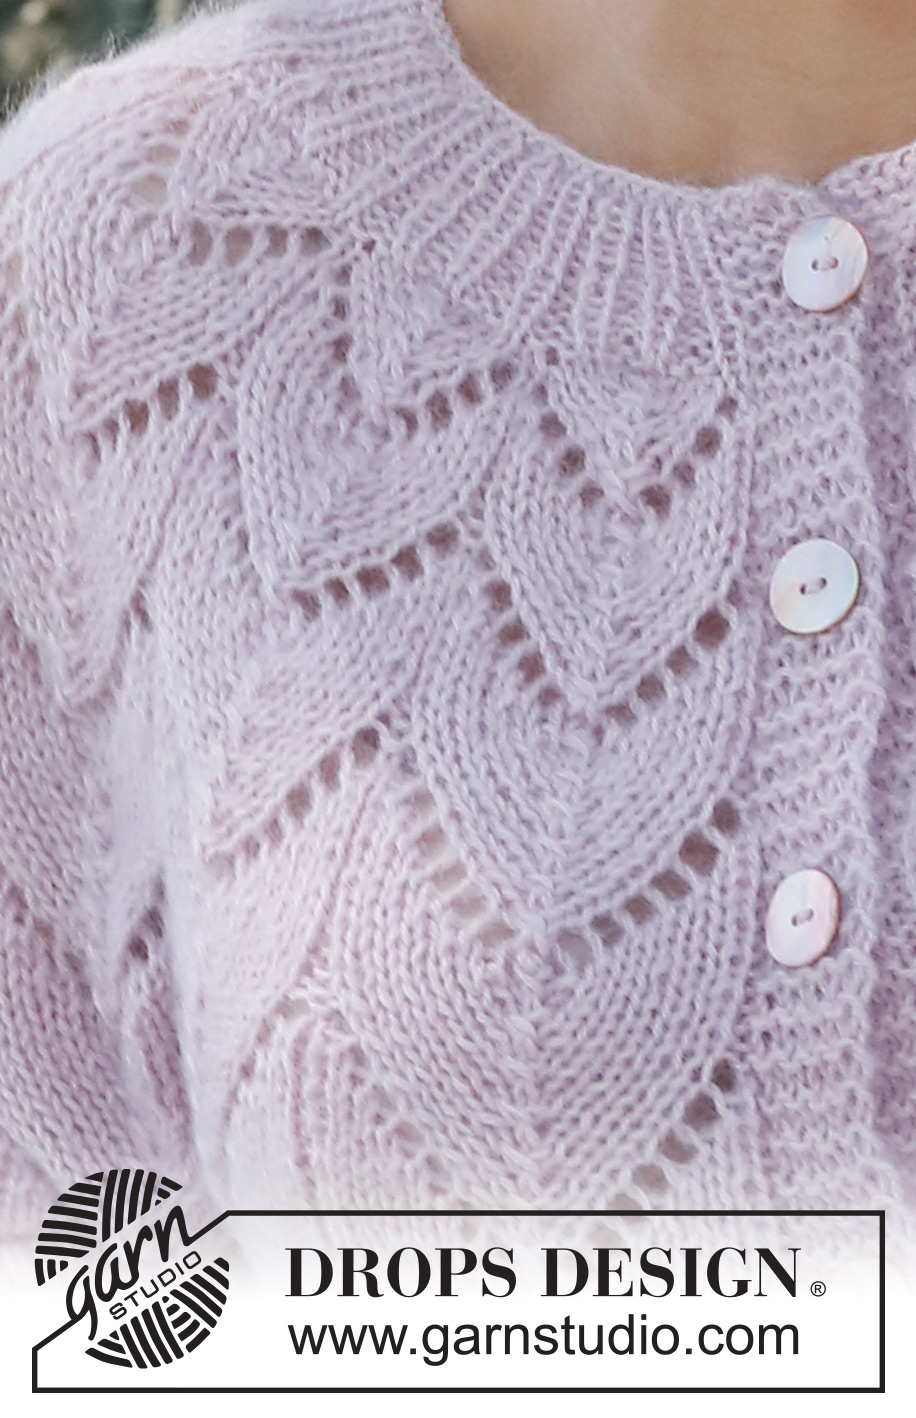
Bonjour, je commence juste ce pull en taille L et je me demande s’il n’y aurait pas une erreur au niveau du diagramme. En effet la 1ere maille est elle vraiment à l’envers car en regardant de plus près le modèle photo, je ne vois aucune maille envers dans le motif. Avant de commencer le dessin, je voudrais être sûre et ne pas me tromper. Merci pour votre réponse
26.03.2023 - 10:53DROPS Design answered:
Bonjour Domi, la 1ère maille de chaque diagramme est bien une maille envers, tricotez les diagrammes comme indiqué pour obtenir le même motif que sur les photos. (on voit très peu les mailles envers entre les diagrammes, mais en regardant bien la dernière photo, vous arriverez à les voir). Bon tricot!
27.03.2023 - 09:21
![]() Veronique wrote:
Veronique wrote:
Bonjour, Peut-on tricoter ce modèle avec 1 seul fils KID-SILK en gardant les mêmes explications ?
24.01.2023 - 12:02DROPS Design answered:
Bonjour Véronique, pas vraiment, car avec 1 seul fil Kid-Silk vous n'aurez pas le bon échantillon ( 17 m x 22 rangs jersey = 10 x 10 cm), et il vous faudrait alors tout recalculer (le rendu serait aussi différent). Bon tricot!
24.01.2023 - 12:16
![]() Renata wrote:
Renata wrote:
Czy podana próbka (17 oczek na szerokość i 22 rzędy) dotyczy drutów 4mm czy 5mm?
24.01.2023 - 10:24DROPS Design answered:
Witaj Renato, próbka jest wykonywana na grubszych drutach (tutaj nr 5), czyli tymi którymi jest wykonywana główna część swetra. Pozdrawiamy!
24.01.2023 - 20:12
![]() Ococ wrote:
Ococ wrote:
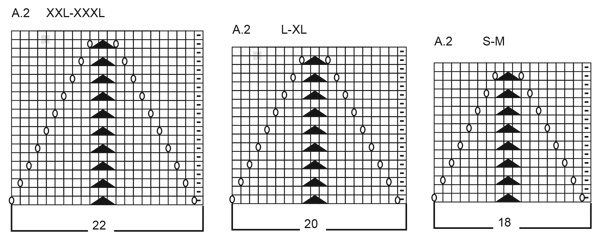
Bonjour , Quand faut il commencer le schéma A2 il n’y a pas d’explication Merci d’avance
29.11.2022 - 15:30DROPS Design answered:
Bonjour Mme Ococ, on tricote A.2 uniquement sur les manches, pas avant. Bon tricot!
29.11.2022 - 16:47
![]() Alexandra Landau wrote:
Alexandra Landau wrote:
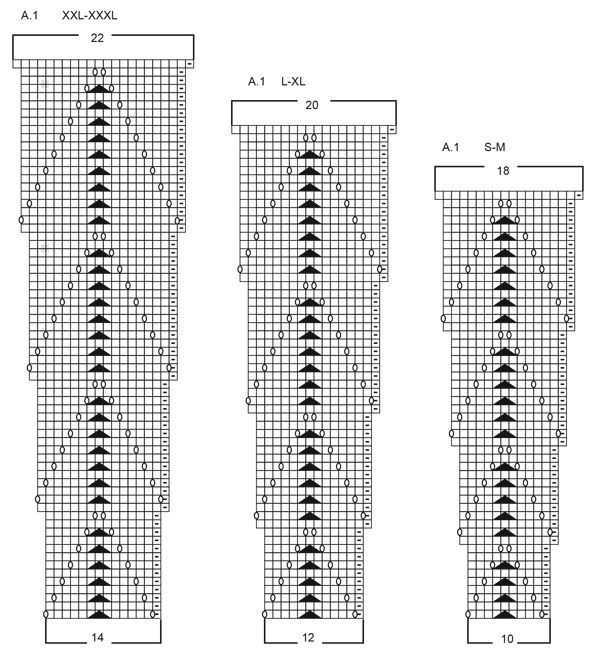
Aber der Rapport ist doch bei L-Xl 14 Maschen breit nicht 12....da gehen nur 12 Rapport raus auf die Maschenzahl nicht 14
19.08.2022 - 09:41DROPS Design answered:
Liebe Frau Landau, bei L/XL beginnt A.1 mit 12 Maschen - (A.1 in S/M beginnt mit 10 Maschen und A.1 in XXL/XXXL beginnt mit 14 Maschen) so stricken Sie die 12 Maschen insgesamt 14 Mal = 168 M + Blende-Maschen + die 1. Masche A.1 = 179 Maschen. Viel Spaß beim stricken!
19.08.2022 - 11:32
![]() Alexandra Landau wrote:
Alexandra Landau wrote:
Hallo, wenn ich xl stricke und mit 168 M plus 10M Blende stricke, habe ich den Rapport 12 Mal. Dann bin ich am Ende von A1 aber bei 251 M statt 291 M?? Die Aufteilung stimmt dann nicht.
18.08.2022 - 21:37DROPS Design answered:
Liebe Frau Landau, in XL stricken Sie: 5 Blende + 14 x 12 Maschen A.1 + die 1. Masche A.1 + 5 Blende (=5+168+1+5=179 M). Am Ende A.1 sind es je 20 Maschen = 5 Blende + 14 x 20 M A.1 + die 1. Masche A.1 + 5 Blende = 5+280+1+5=291 Maschen. Viel Spaß beim stricken!
19.08.2022 - 08:47
![]() Birgit Reenberg wrote:
Birgit Reenberg wrote:
Hvilke pinde nr. skal jeg bruge til strikkeprøven, I anbefaler ikke om det er 4 el. 5. Jeg har oplevet det flere gange hvor I ikke anbefaler pindenr. til strikkeprøven Venlig hilsen Birgit Reenberg
06.07.2022 - 11:11DROPS Design answered:
Hej Birgit, Vi får 17 masker glatstrik på pind nr 5 :)
06.07.2022 - 12:29
![]() Corinne wrote:
Corinne wrote:
Hi Team Drops, Is there any positive ease to this pattern ? I have the impression that there is none or so. Could you confirm ? Thank you !
22.06.2022 - 21:18DROPS Design answered:
Dear Corinne, measure a similar garment you have and like the shape (= choose your own desired "ease") and compare this to the chart at the bottom of the page to find the matching size - read more here. Happy knitting!
23.06.2022 - 08:39
![]() Nicole wrote:
Nicole wrote:
J’ai acheté cette laine ( drops alpaca et kid silk) pour faire ce modèle mais je n’arrive pas aux mesures de votre échantillon. J’ai augmenté avec aiguilles #6mm et encore trop de mailles et je n’aime pas le rendu qui est trop ajouré. Est-ce qu’il y a une façon de faire pour adapter ce patron et la quantité de laine pour mon échantillon de 22 m x 28 rangs= 10 cm avec aiguilles #5mm ? Je ne comprend pas car l’échantillon du modele ne reflète pas la réalité…merci
21.06.2022 - 03:51DROPS Design answered:
Bonjour Nicole, la tension proposée ici correspond à ce mélange Alpaga + Kid-Silk très souvent proposé dans notre gamme, mais naturellement, la taille des aiguilles est propre à chacune et à sa façon de tricoter. Si vous préférez une tension plus serrée, il vous faudra entièrement recalculer les explications sur la base de votre propre tension; vous pouvez également consulter les modèles correspondant à votre tension, par exemple découvrez ici les modèles avec 22-20 mailles pour 10 cm. Bon tricot!
21.06.2022 - 09:39
|
|||||||||||||
Wishing Well Cardigan#wishingwellcardigan |
|||||||||||||
 |
 |
||||||||||||
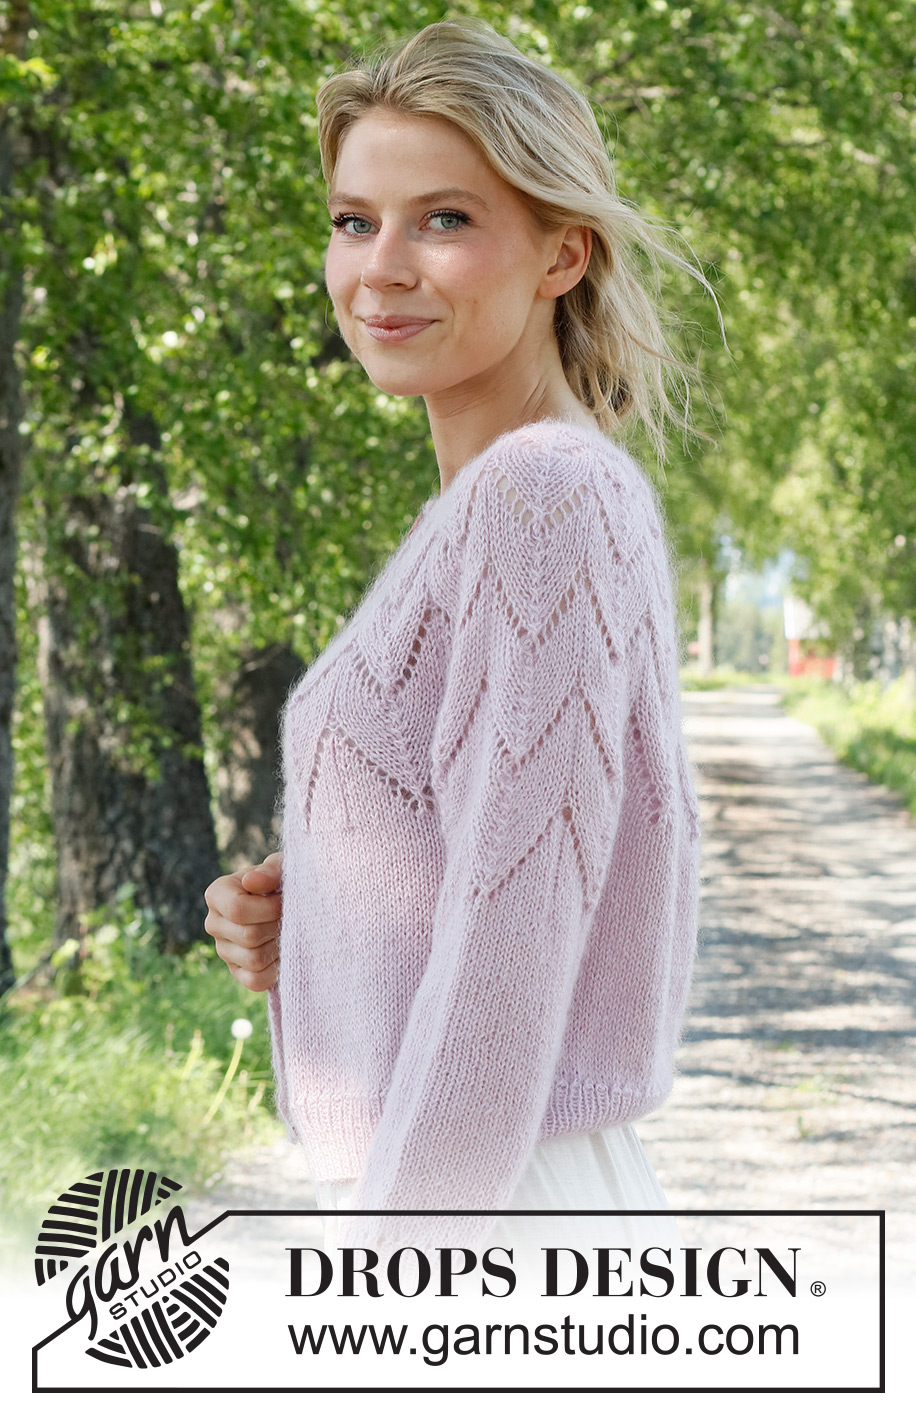
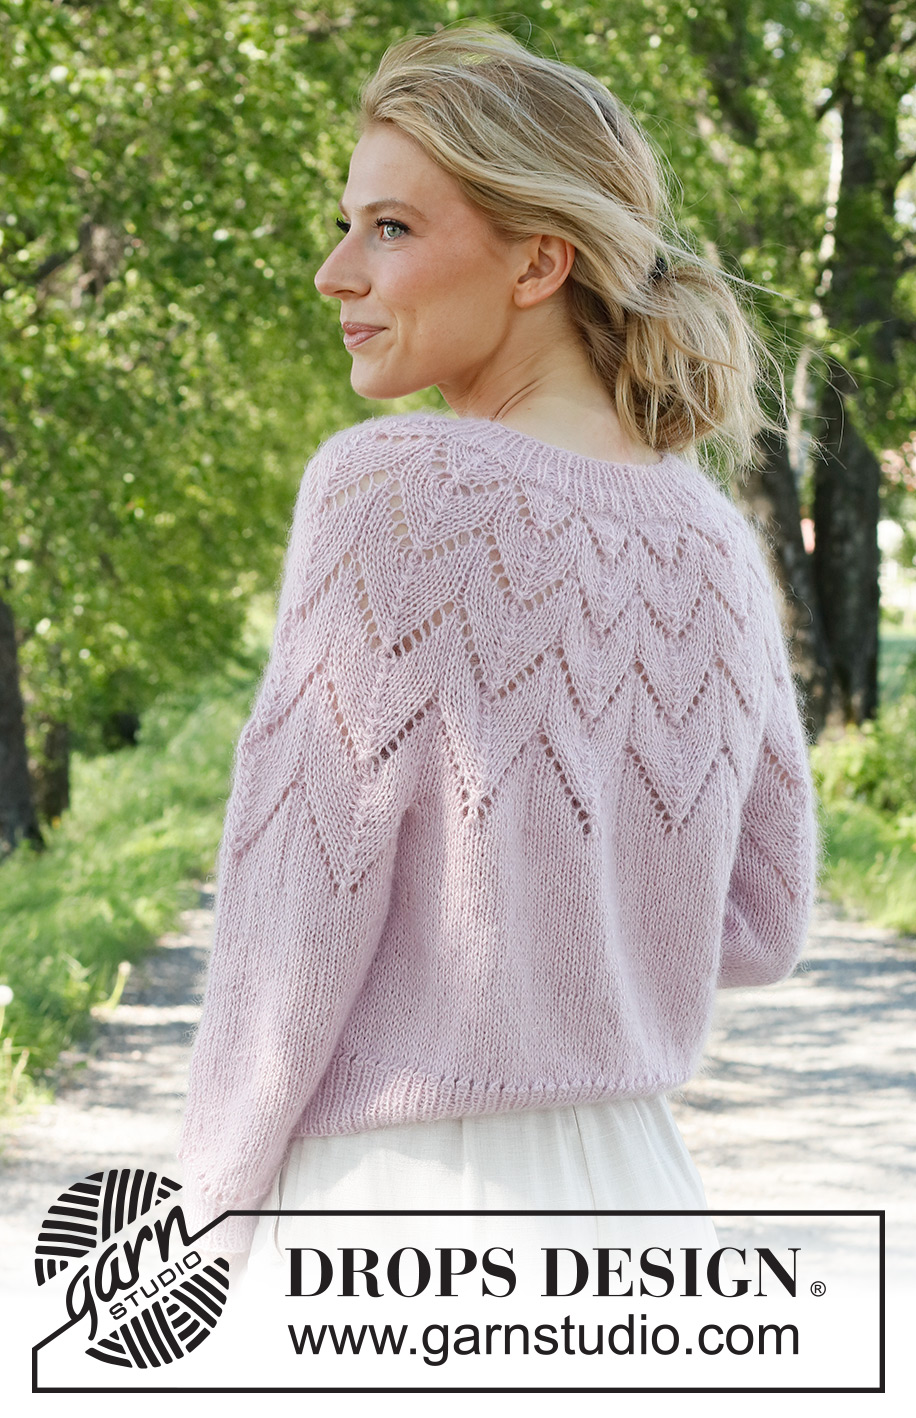
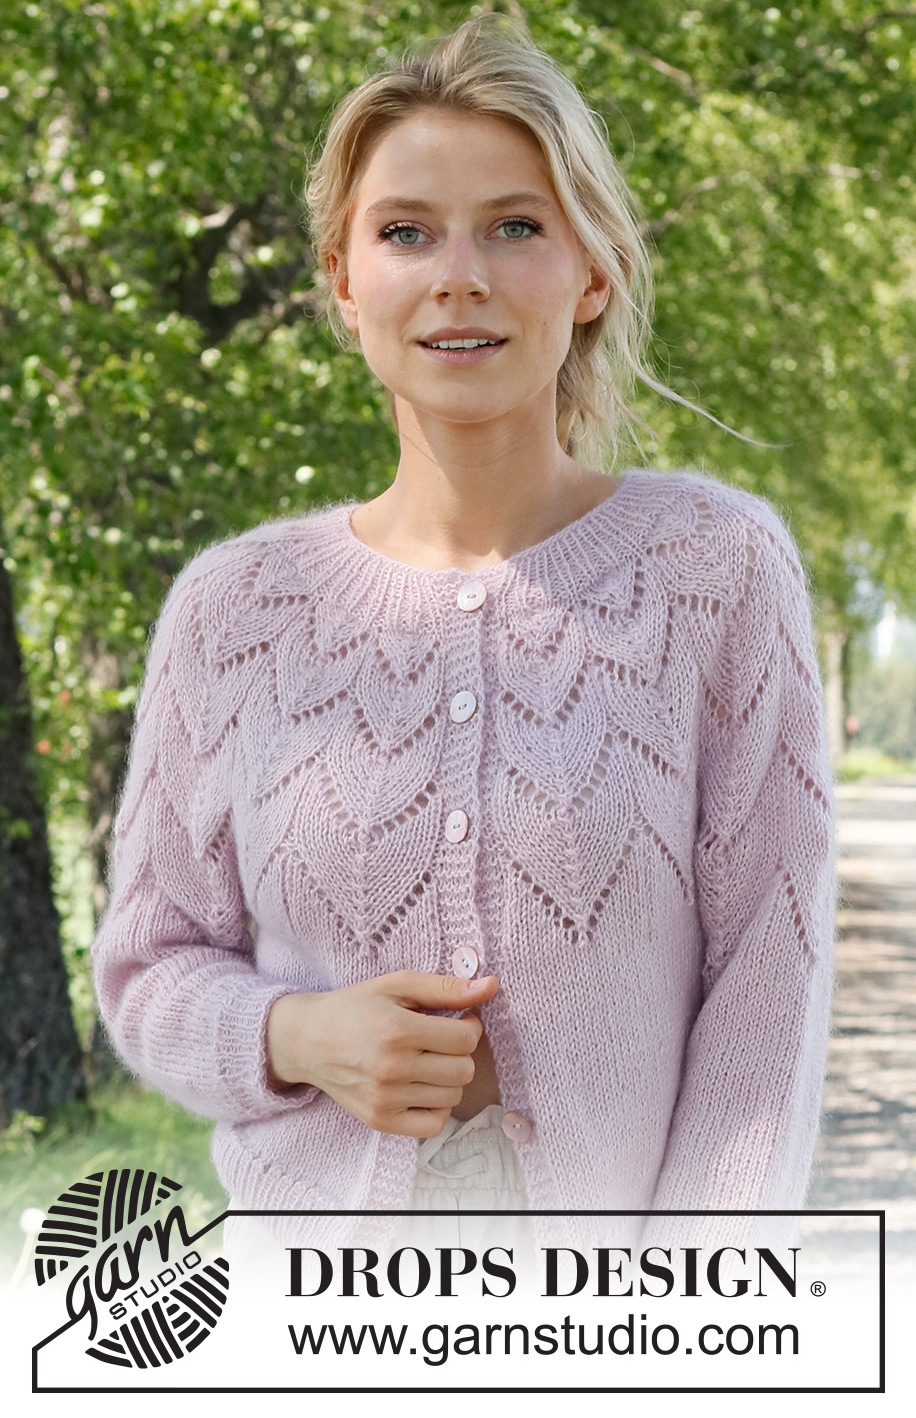
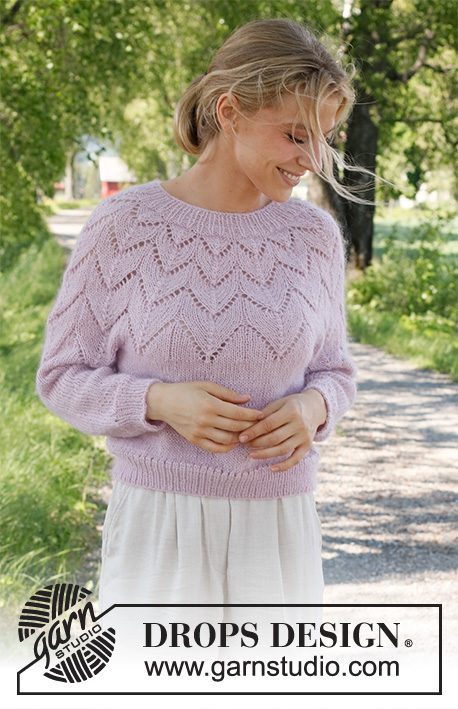
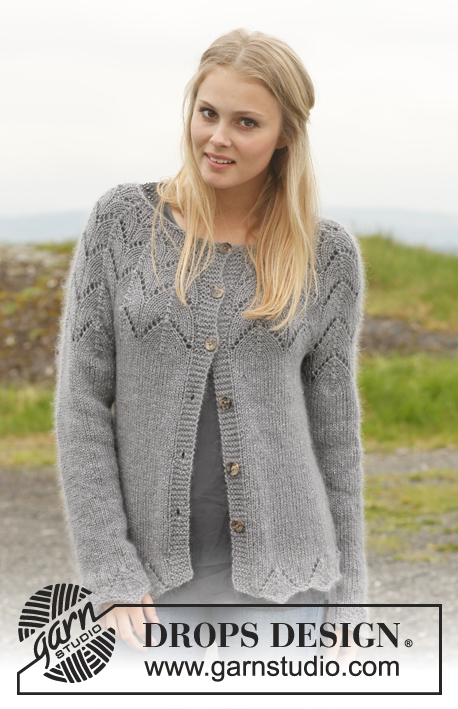
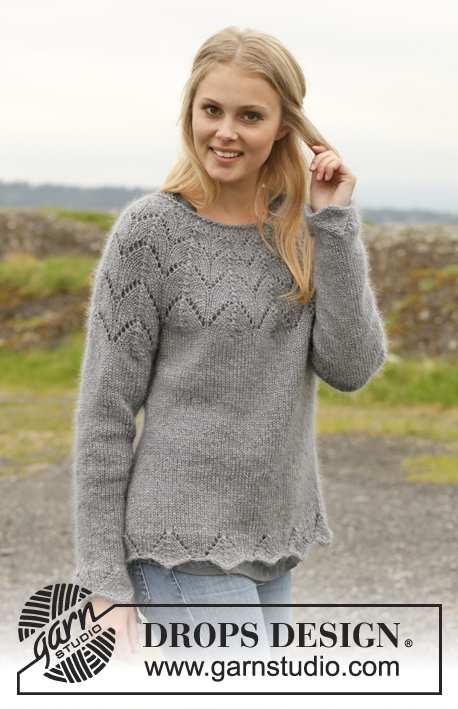
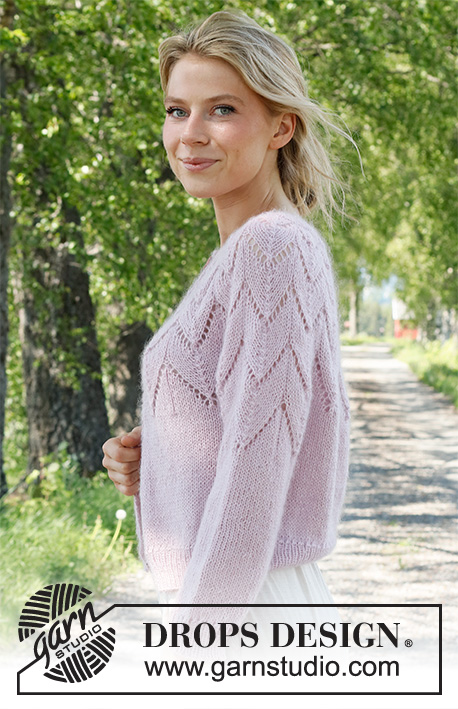
Knitted jacket in DROPS Alpaca and DROPS Kid-Silk. The piece is worked top down, with round yoke and lace pattern. Sizes S - XXXL.
DROPS 231-10 |
|||||||||||||
|
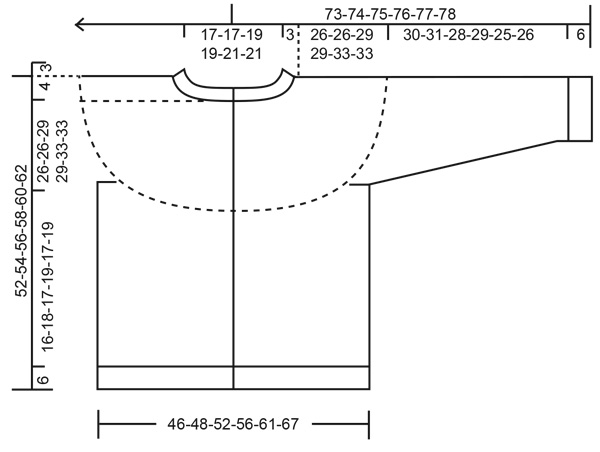
------------------------------------------------------- EXPLANATIONS FOR THE PATTERN: ------------------------------------------------------- RIDGE/GARTER STITCH (worked back and forth): Knit all rows. 1 ridge = knit 2 rows. PATTERN: See diagrams A.1 and A.2. The diagrams show all rows in the pattern from the right side. Choose diagram for your size. BUTTONHOLES: Work the buttonholes on the right band (when the garment is worn). 1 buttonhole: From the right side, work until there are 3 stitches left, make 1 yarn over, knit 2 together, knit 1. On the next row (wrong side) knit the yarn over to leave a hole. The first buttonhole is worked when the neck measures 3 cm, then the other 5-5-5-6-6-6 buttonholes with approx. 8½-9-9-8-8-9 cm between each one. DECREASE TIP (sleeves): Decrease 1 stitch on either side of the marker as follows: Work until there are 3 stitches left before the marker, knit 2 together, knit 2 (marker sits between these 2 stitches), slip 1 stitch as if to knit, knit 1 and pass the slipped stitch over the knitted stitch. ------------------------------------------------------- START THE PIECE HERE: ------------------------------------------------------- JACKET – SHORT OVERVIEW OF THE PIECE. The neck and yoke are worked back and forth with circular needle, from mid front and top down. The yoke is divided for body and sleeves and the body continued back and forth. The sleeves are worked in the round with double pointed needles/short circular needle, top down. NECK/YOKE: Cast on 95-95-101-101-107-107 stitches with circular needle size 4 mm and 1 strand DROPS Kid-Silk and 1 strand DROPS Alpaca. Purl 1 row (wrong side). The next row is worked as follows from the right side: 5 band stitches in GARTER STITCH – read description above, * knit 1, purl 1 *, work from *-* until there are 6 stitches left, knit 1 and 5 band stitches in garter stitch. Continue this rib for 3 cm. Work the first BUTTONHOLE on the right band – read description above. On the next row from the right side increase 1 stitch at the end of each purled section by making 1 yarn over. On the next row (wrong side) knit the yarn overs twisted = 137-137-146-146-155-155 stitches. Continue as follows from the right side: 5 band stitches in garter stitch, * knit 1, purl 2 *, work from *-* until there are 6 stitches left, knit 1 and 5 band stitches in garter stitch. Continue the new rib until the neck measures 5 cm; finish after a row from the wrong side. Knit 1 row from the right side where you increase 14-14-33-33-52-52 stitches evenly spaced = 151-151-179-179-207-207 stitches (do not increase over the bands). Change to circular needle size 5 mm. Purl 1 row from the wrong side (yarn overs purled twisted and bands knitted). The next row is worked as follows from the right side: 5 band stitches in garter stitch, A.1 over the next 140-140-168-168-196-196 stitches, work the first stitch in A.1 (so the pattern is symmetrical) and 5 band stitches in garter stitch. Work and increase according to A.1. When A.1 has been completed in height there are 263-263-291-291-319-319 stitches on the needle. The piece measures approx. 26-26-29-29-33-33 cm from the cast-on edge. Divide for the body on the next row as follows: Work the first 41-41-45-45-49-49 stitches (front piece), place the next 54-54-60-60-66-66 stitches on a thread for the sleeve, cast on 6-8-8-10-10-14 stitches (in side under sleeve), work 72-72-80-80-88-88 stitches (back piece), place the next 54-54-60-60-66-66 stitches on a thread for the sleeve, cast on 6-8-8-10-10-14 stitches (in side under sleeve), work the remaining 42-42-46-46-50-50 stitches (front piece). The body and sleeves are finished separately. BODY: = 167-171-187-191-207-215 stitches. Continue back and forth with stocking stitch and 5 band stitches in garter stitch on each side and on the first row increase 0-2-0-8-10-24 stitches evenly spaced = 167-173-187-199-217-239 stitches. When the piece measures 16-18-17-19-17-19 cm from the division work as follows from the right side: 5 band stitches in garter stitch, * knit 2 together, 1 yarn over *, work from *-* until there are 6 stitches left, knit 1 and 5 band stitches in garter stitch. Change to circular needle size 4 mm and work as follows from the wrong side: 5 band stitches in garter stitch, * purl 1, knit 1 *, work from *-* until there are 6 stitches left, purl 1 and 5 band stitches in garter stitch. Continue this rib for 6 cm. Cast off. The jacket measures approx. 52-54-56-58-60-62 cm from the shoulder down. SLEEVES: Place the 54-54-60-60-66-66 stitches from the thread on the one side of the piece on double pointed needles/short circular needle size 5 mm and knit up 1 stitch in each of the 6-8-8-10-10-14 stitches cast on under the sleeve = 60-62-68-70-76-80 stitches. Insert a marker in the middle of the 6-8-8-10-10-14 stitches under the sleeve. Allow the marker to follow your work onwards; it will be used when decreasing under the sleeve. Start at the marker and work 3-4-4-5-5-7 stitches in stocking stitch, A.2 over the next 54-54-60-66-66 stitches and 3-4-4-5-5-7 stitches in stocking stitch. When A.2 has been completed in height continue with stocking stitch over all stitches. When the sleeve measures 4 cm decrease 2 stitches under the sleeve – read DECREASE TIP. Decrease like this every 3½-3½-2½-2½-1½-1½ cm a total of 8-8-10-10-12-13 times = 44-46-48-50-52-54 stitches. Continue working until the sleeve measures 30-31-28-29-25-26 cm from the division. Work the next round as follows: * Knit 2 together, 1 yarn over *, work from *-* over all stitches. Change to double pointed needles size 4 mm. Work rib (knit 1, purl 1) for 6 cm. Cast off. The sleeve measures approx. 36-37-34-35-31-32 cm from the division. Work the other sleeve in the same way. ASSEMBLY: Sew the buttons onto the left band. |
|||||||||||||
Diagram explanations |
|||||||||||||
|
|||||||||||||
 |
|||||||||||||
 |
|||||||||||||
 |
|||||||||||||
Have you finished this pattern?Tag your pictures with #dropspattern #wishingwellcardigan or submit them to the #dropsfan gallery. Do you need help with this pattern?You'll find 33 tutorial videos, a Comments/Questions area and more by visiting the pattern on garnstudio.com. © 1982-2026 DROPS Design A/S. We reserve all rights. This document, including all its sub-sections, has copyrights. Read more about what you can do with our patterns at the bottom of each pattern on our site. |
|||||||||||||


With over 40 years in knitting and crochet design, DROPS Design offers one of the most extensive collections of free patterns on the internet - translated to 17 languages. As of today we count 324 catalogues and 12290 patterns translated into English (UK/cm). 12290
We work hard to bring you the best knitting and crochet have to offer, inspiration and advice as well as great quality yarns at incredible prices! Would you like to use our patterns for other than personal use? You can read what you are allowed to do in the Copyright text at the bottom of all our patterns. Happy crafting!
Post a comment to pattern DROPS 231-10
We would love to hear what you have to say about this pattern!
If you want to leave a question, please make sure you select the correct category in the form below, to speed up the answering process. Required fields are marked *.