
Popular categories
Looking for a yarn?


Comments / Questions (57)
![]() Leni wrote:
Leni wrote:
Es geht um 52 M gleichmäßig verteilt zu zunehmen . Also 145 M : 52 = 2,8 . Nehme ich also nach jeder dritten M zu , komme ich auf 48 M . Ich habe viele Möglichkeiten versucht , es ist nicht möglich gleichmäßig zu zunehmen .
04.09.2024 - 11:45DROPS Design answered:
Liebe Leni, ich bin mir ganz sicher, dass Sie das hinbekommen! Probieren Sie einfach mal folgendes aus: 20x (M1, K3); 10x (M1, K2); 21x (M1, K3); M1, K1. Ich drück Ihnen die Daumen!
05.09.2024 - 03:36
![]() Leni wrote:
Leni wrote:
Halsblende : Eine Hin - Reihe rechts stricken und dabei gleichmäßig verteilt 52 M zunehmen . Wie nehme ich da gleichmäßig verteilt zu 🤔 ? Ich komm nicht drauf . Würde mich freuen von Ihnen zu hören . MfG Leni
03.09.2024 - 21:08DROPS Design answered:
Liebe Leni, um zu berechnen, wie gleichmäßig verteilt zugenommen werden muss, die gesamte Maschenzahl auf der Nadel (z.B. 155 Maschen), abzüglich der Blenden-Maschen (z.B. 10 Maschen, d.h. 155 Maschen minus 10 Maschen = 145 Maschen), durch die Anzahl an Zunahmen, die gemacht werden sollen, teilen (z.B. 52, d.h. 145 Maschen durch 52) = 2,8. In diesem Beispiel machen Sie einen Umschlag nach ca. jeder dritten Masche - dabei zählen wir die Blendenmaschen nicht mit und nehmen auch nicht bei den Blendenmaschen zu. Viel Spaß beim Stricken!
03.09.2024 - 21:41
![]() Helle wrote:
Helle wrote:
Udtagningen ved rib kanten skal jeg strikkes drejet vrang, men skal jeg også strikke drejet vrang eller bare almindelig vrang under mønster A1 ?
14.08.2024 - 19:25DROPS Design answered:
Hej Helle, omslagene i diagrammerne skal blive til huller, så dem strikker du almindeligt (ikke drejet) :)
15.08.2024 - 09:52
![]() Aud wrote:
Aud wrote:
Hvordan strikke forhøyning bak på dette mønsteret?
23.07.2024 - 14:55DROPS Design answered:
Hej Aud, der er ikke forhøjning bagpå i dette mønster :)
01.08.2024 - 08:32
![]() Aud wrote:
Aud wrote:
Hvordan strikke forhøyning bak på dette mønsteret?
23.07.2024 - 14:54
![]() Katy wrote:
Katy wrote:
Buongiorno, ho appena iniziato il modello. Considerando che il collo misura 3cm non è troppo tardi fare la prima asola \"quando il collo misura 3cm\"? Ingrandendo l\'immagine la prima asola sembra aperta dopo la 4° \"riga\" di legaccio. Grazie.
29.06.2024 - 07:52DROPS Design answered:
Buonasera Katy, è corretto, deve lavorare la prima asola dopo 3 cm del collo. Buon lavoro!
03.07.2024 - 18:29
![]() Dominique wrote:
Dominique wrote:
Je n'ai pas très bien compris les augmentations du dessin A1, avant ou après la maille envers ? Ça ne joue pas avec le nombre de maille
06.06.2024 - 22:13DROPS Design answered:
Bonjour Dominique, les augmentations dans le diagramme A.1 se font au milieu du motif (au milieu des mailles endroit), lorsque que l'on fait 2 jetés (1 de part et d'autre de la maille jersey du milieu) sans diminuer en même temps, on va ainsi augmenter 2 mailles. Bon tricot!
07.06.2024 - 08:00
![]() FRANÇOISE LELARGE wrote:
FRANÇOISE LELARGE wrote:
Bonjour, puis-je utilisé un fil c et combien de pelote me faut- il ? pour ce modèle. Merci de votre réponse qui me sera la plus précieuse.
07.10.2023 - 14:21DROPS Design answered:
Bonjour Mme Lelarge, tout à fait, vous pouvez utiliser un seul fil du groupe C pour remplacer les 2 fils du groupe A (Alpaca et Kid-Silk); utilisez notre convertisseur pour voir les alternatives et les nouvelles quantités correspondantes. Bon tricot!
09.10.2023 - 08:35
![]() Fatma KISRANE wrote:
Fatma KISRANE wrote:
Bonsoir comment tricoter le motif a l enver . est ce que ont tricote toutes les mailles comme elles se presente merci
28.09.2023 - 20:18DROPS Design answered:
Bonjour, En effet, les mailles se tricotent comme elles se presentent sur l'envers (les mailles endroit et les jetés à l'envers, les mailles envers, à l'endroit). Bon tricot!
29.09.2023 - 09:52
![]() Fatma KISRANE wrote:
Fatma KISRANE wrote:
Bonjour je n est pas compris l augmentation d 1 maille a l envers apres chaque secion apres avoir tricoter les 3 cm de col comment les augmenter merci
27.09.2023 - 20:25DROPS Design answered:
Bonjour, Après avoir tricoté les sections de 3 mailles enverts, vous faites 1 jeté. Au rang, suivant, vous tricotez le jeté torse. (=1 maille augmentée). Voici le tutotiel en vídeo pour vous aider à faire 1 augmentation avec 1 jeté: https://www.garnstudio.com/video.php?id=12&lang=fr Bon tricot!
28.09.2023 - 11:21
|
|||||||||||||
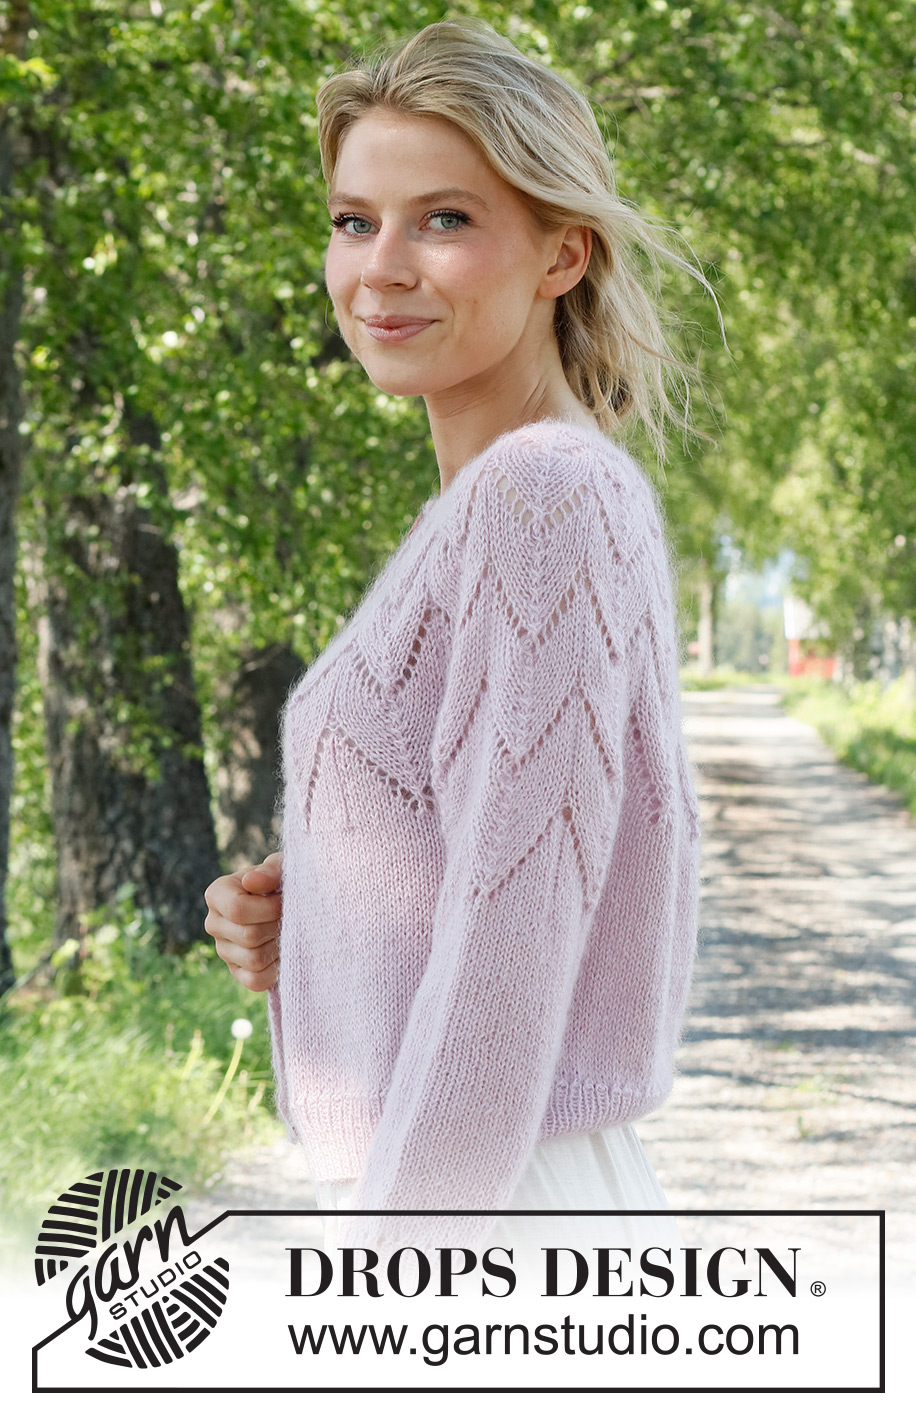
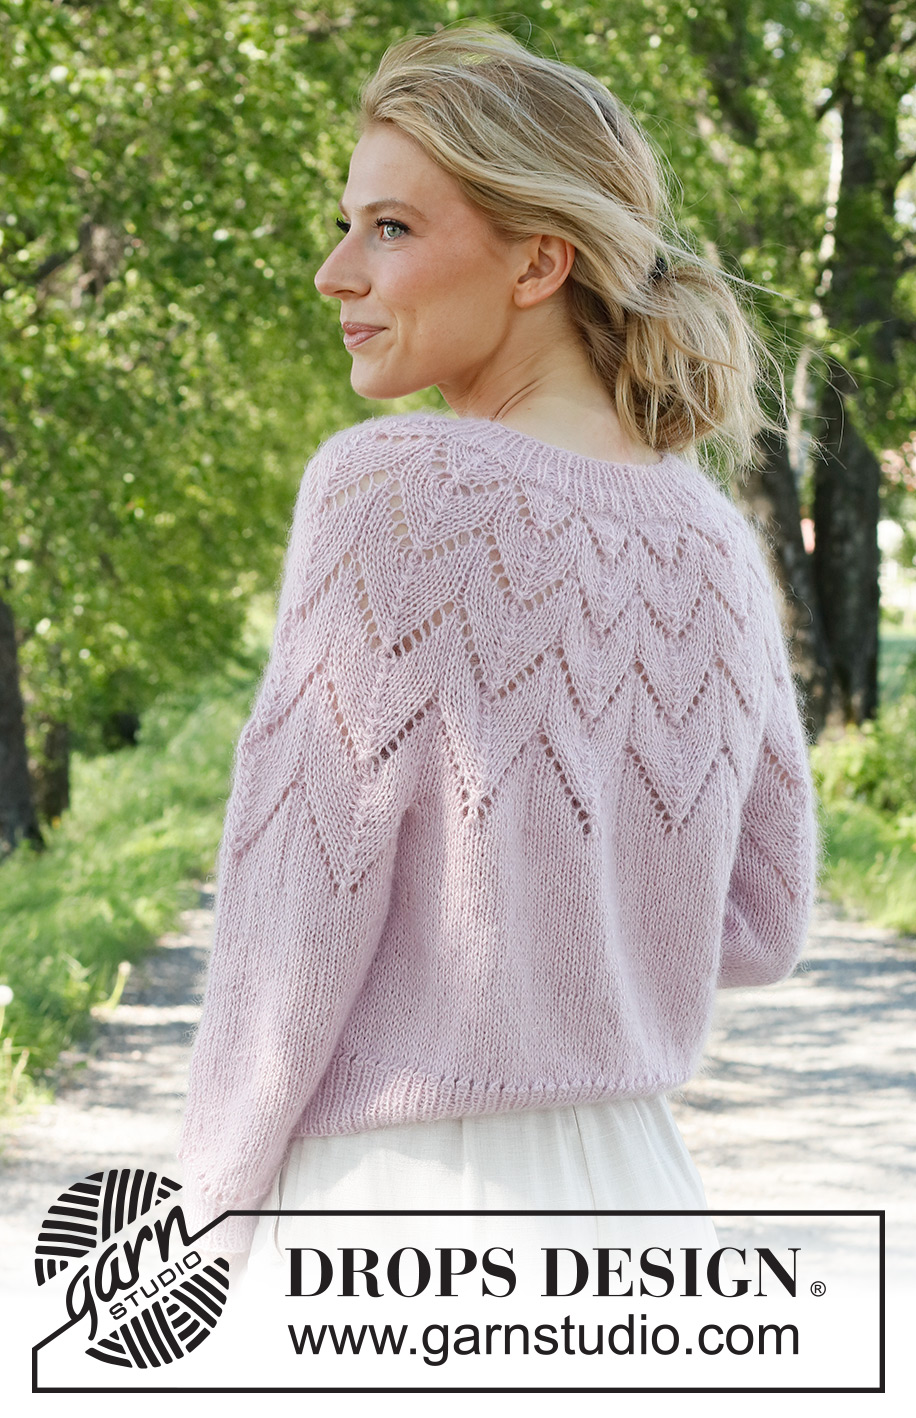
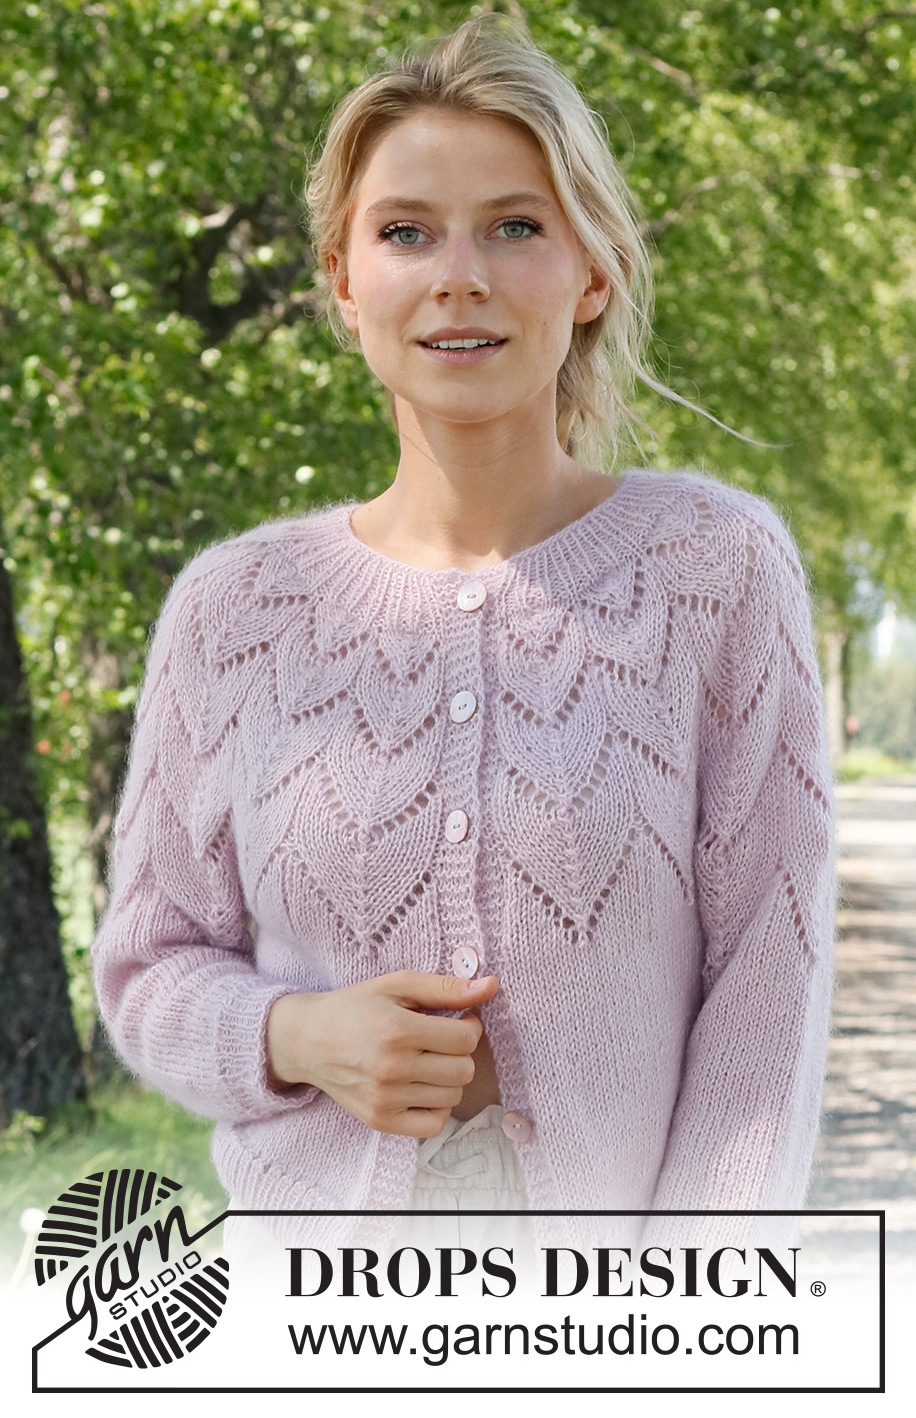
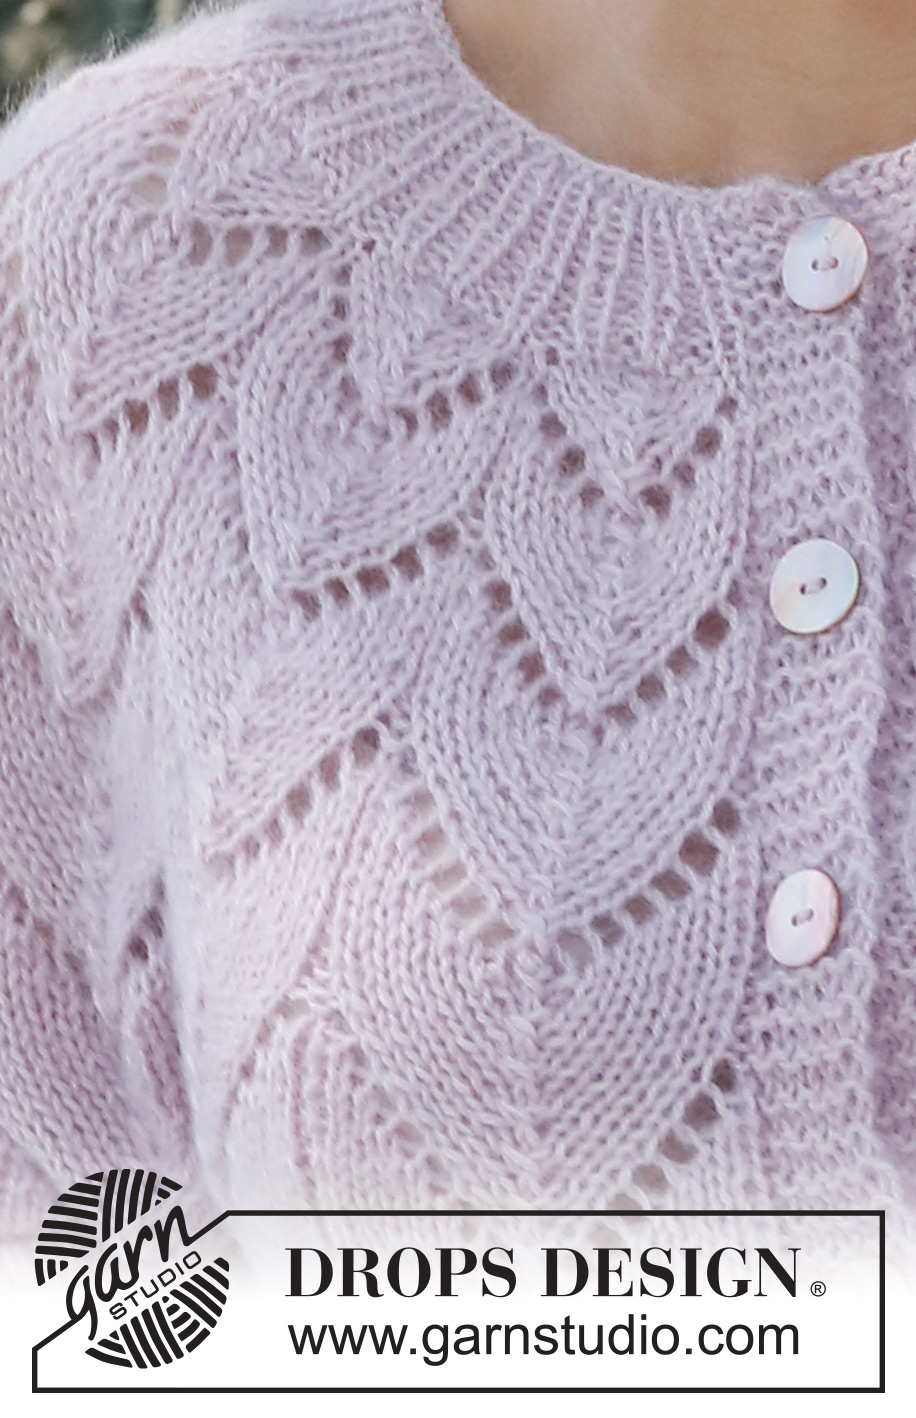
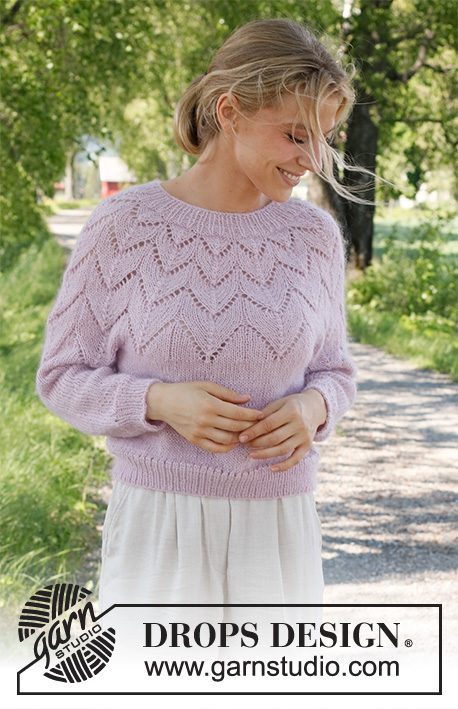
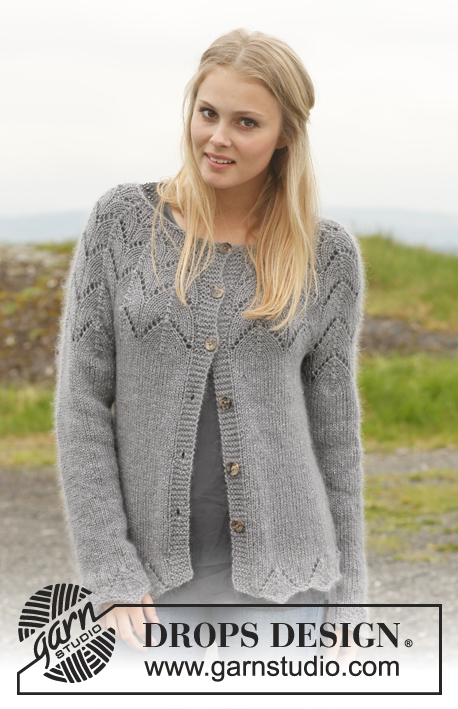
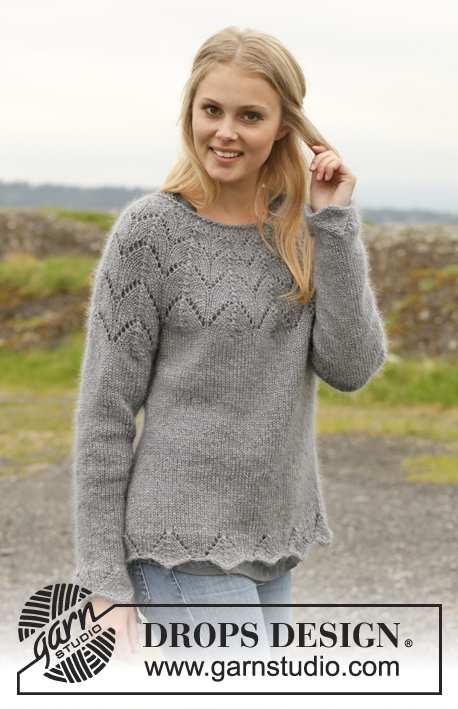
Wishing Well Cardigan#wishingwellcardigan |
|||||||||||||
 |
 |
||||||||||||
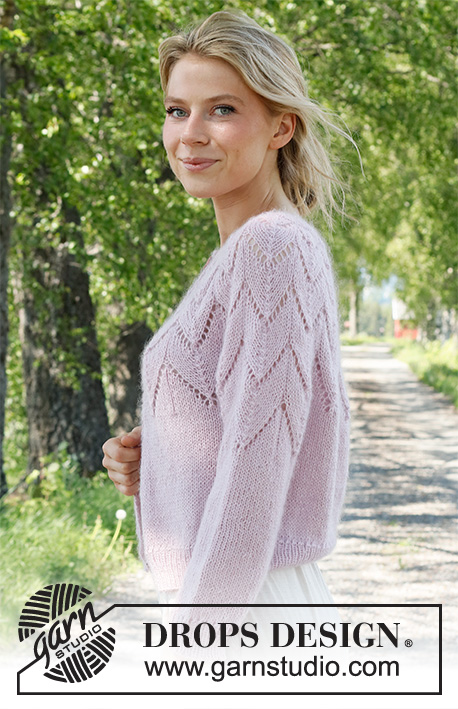
Knitted jacket in DROPS Alpaca and DROPS Kid-Silk. The piece is worked top down, with round yoke and lace pattern. Sizes S - XXXL.
DROPS 231-10 |
|||||||||||||
|
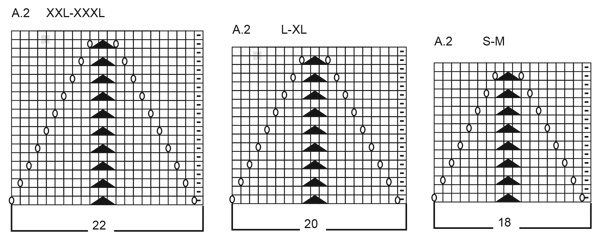
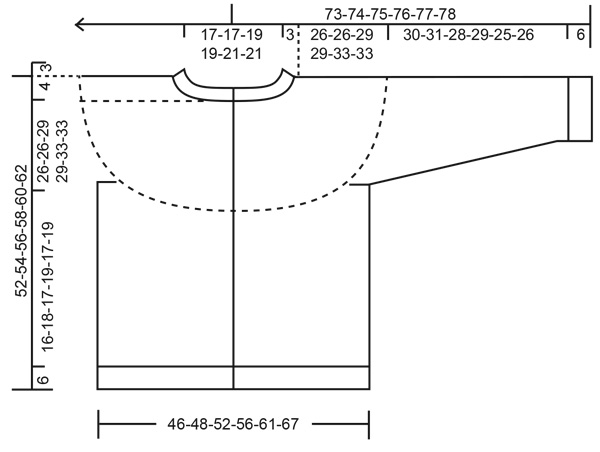
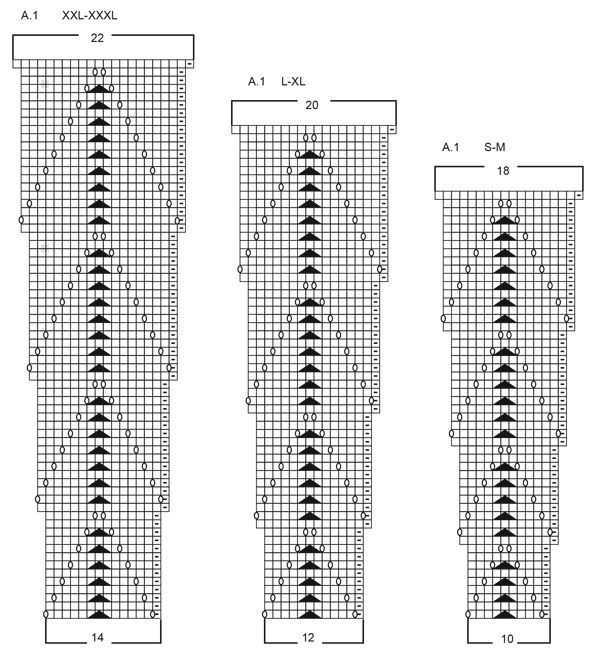
------------------------------------------------------- EXPLANATIONS FOR THE PATTERN: ------------------------------------------------------- RIDGE/GARTER STITCH (worked back and forth): Knit all rows. 1 ridge = knit 2 rows. PATTERN: See diagrams A.1 and A.2. The diagrams show all rows in the pattern from the right side. Choose diagram for your size. BUTTONHOLES: Work the buttonholes on the right band (when the garment is worn). 1 buttonhole: From the right side, work until there are 3 stitches left, make 1 yarn over, knit 2 together, knit 1. On the next row (wrong side) knit the yarn over to leave a hole. The first buttonhole is worked when the neck measures 3 cm, then the other 5-5-5-6-6-6 buttonholes with approx. 8½-9-9-8-8-9 cm between each one. DECREASE TIP (sleeves): Decrease 1 stitch on either side of the marker as follows: Work until there are 3 stitches left before the marker, knit 2 together, knit 2 (marker sits between these 2 stitches), slip 1 stitch as if to knit, knit 1 and pass the slipped stitch over the knitted stitch. ------------------------------------------------------- START THE PIECE HERE: ------------------------------------------------------- JACKET – SHORT OVERVIEW OF THE PIECE. The neck and yoke are worked back and forth with circular needle, from mid front and top down. The yoke is divided for body and sleeves and the body continued back and forth. The sleeves are worked in the round with double pointed needles/short circular needle, top down. NECK/YOKE: Cast on 95-95-101-101-107-107 stitches with circular needle size 4 mm and 1 strand DROPS Kid-Silk and 1 strand DROPS Alpaca. Purl 1 row (wrong side). The next row is worked as follows from the right side: 5 band stitches in GARTER STITCH – read description above, * knit 1, purl 1 *, work from *-* until there are 6 stitches left, knit 1 and 5 band stitches in garter stitch. Continue this rib for 3 cm. Work the first BUTTONHOLE on the right band – read description above. On the next row from the right side increase 1 stitch at the end of each purled section by making 1 yarn over. On the next row (wrong side) knit the yarn overs twisted = 137-137-146-146-155-155 stitches. Continue as follows from the right side: 5 band stitches in garter stitch, * knit 1, purl 2 *, work from *-* until there are 6 stitches left, knit 1 and 5 band stitches in garter stitch. Continue the new rib until the neck measures 5 cm; finish after a row from the wrong side. Knit 1 row from the right side where you increase 14-14-33-33-52-52 stitches evenly spaced = 151-151-179-179-207-207 stitches (do not increase over the bands). Change to circular needle size 5 mm. Purl 1 row from the wrong side (yarn overs purled twisted and bands knitted). The next row is worked as follows from the right side: 5 band stitches in garter stitch, A.1 over the next 140-140-168-168-196-196 stitches, work the first stitch in A.1 (so the pattern is symmetrical) and 5 band stitches in garter stitch. Work and increase according to A.1. When A.1 has been completed in height there are 263-263-291-291-319-319 stitches on the needle. The piece measures approx. 26-26-29-29-33-33 cm from the cast-on edge. Divide for the body on the next row as follows: Work the first 41-41-45-45-49-49 stitches (front piece), place the next 54-54-60-60-66-66 stitches on a thread for the sleeve, cast on 6-8-8-10-10-14 stitches (in side under sleeve), work 72-72-80-80-88-88 stitches (back piece), place the next 54-54-60-60-66-66 stitches on a thread for the sleeve, cast on 6-8-8-10-10-14 stitches (in side under sleeve), work the remaining 42-42-46-46-50-50 stitches (front piece). The body and sleeves are finished separately. BODY: = 167-171-187-191-207-215 stitches. Continue back and forth with stocking stitch and 5 band stitches in garter stitch on each side and on the first row increase 0-2-0-8-10-24 stitches evenly spaced = 167-173-187-199-217-239 stitches. When the piece measures 16-18-17-19-17-19 cm from the division work as follows from the right side: 5 band stitches in garter stitch, * knit 2 together, 1 yarn over *, work from *-* until there are 6 stitches left, knit 1 and 5 band stitches in garter stitch. Change to circular needle size 4 mm and work as follows from the wrong side: 5 band stitches in garter stitch, * purl 1, knit 1 *, work from *-* until there are 6 stitches left, purl 1 and 5 band stitches in garter stitch. Continue this rib for 6 cm. Cast off. The jacket measures approx. 52-54-56-58-60-62 cm from the shoulder down. SLEEVES: Place the 54-54-60-60-66-66 stitches from the thread on the one side of the piece on double pointed needles/short circular needle size 5 mm and knit up 1 stitch in each of the 6-8-8-10-10-14 stitches cast on under the sleeve = 60-62-68-70-76-80 stitches. Insert a marker in the middle of the 6-8-8-10-10-14 stitches under the sleeve. Allow the marker to follow your work onwards; it will be used when decreasing under the sleeve. Start at the marker and work 3-4-4-5-5-7 stitches in stocking stitch, A.2 over the next 54-54-60-66-66 stitches and 3-4-4-5-5-7 stitches in stocking stitch. When A.2 has been completed in height continue with stocking stitch over all stitches. When the sleeve measures 4 cm decrease 2 stitches under the sleeve – read DECREASE TIP. Decrease like this every 3½-3½-2½-2½-1½-1½ cm a total of 8-8-10-10-12-13 times = 44-46-48-50-52-54 stitches. Continue working until the sleeve measures 30-31-28-29-25-26 cm from the division. Work the next round as follows: * Knit 2 together, 1 yarn over *, work from *-* over all stitches. Change to double pointed needles size 4 mm. Work rib (knit 1, purl 1) for 6 cm. Cast off. The sleeve measures approx. 36-37-34-35-31-32 cm from the division. Work the other sleeve in the same way. ASSEMBLY: Sew the buttons onto the left band. |
|||||||||||||
Diagram explanations |
|||||||||||||
|
|||||||||||||
 |
|||||||||||||
 |
|||||||||||||
 |
|||||||||||||
Have you finished this pattern?Tag your pictures with #dropspattern #wishingwellcardigan or submit them to the #dropsfan gallery. Do you need help with this pattern?You'll find 33 tutorial videos, a Comments/Questions area and more by visiting the pattern on garnstudio.com. © 1982-2026 DROPS Design A/S. We reserve all rights. This document, including all its sub-sections, has copyrights. Read more about what you can do with our patterns at the bottom of each pattern on our site. |
|||||||||||||


With over 40 years in knitting and crochet design, DROPS Design offers one of the most extensive collections of free patterns on the internet - translated to 17 languages. As of today we count 324 catalogues and 12290 patterns translated into English (UK/cm). 12290
We work hard to bring you the best knitting and crochet have to offer, inspiration and advice as well as great quality yarns at incredible prices! Would you like to use our patterns for other than personal use? You can read what you are allowed to do in the Copyright text at the bottom of all our patterns. Happy crafting!
Post a comment to pattern DROPS 231-10
We would love to hear what you have to say about this pattern!
If you want to leave a question, please make sure you select the correct category in the form below, to speed up the answering process. Required fields are marked *.