
Popular categories
Looking for a yarn?


Comments / Questions (57)
![]() Sophia Hogan-Lopez wrote:
Sophia Hogan-Lopez wrote:
Good morning, I have a question about where the first increases are in the pattern. After the initial ribbing it says “increase 1 stitch at the end of each purled section”. Which part is the “purled section” if we are still working in ribbing and 2 small sections of garter stitch? Thank you for your help!
14.10.2024 - 14:35DROPS Design answered:
Dear Mrs Hogan-Lopez, you first work rib K1, P1, you now increase in each P-section as follows: K1, P1, YO, then work on next row to get rib K1, P2 seen from RS (K2, P1 seen from WS). At the same time continue working the 5 front band stitches in garter stitch as before. Happy knitting!
14.10.2024 - 16:21
![]() Edith Pedersen wrote:
Edith Pedersen wrote:
Hvad for en af de mønster skal man bruge når man starte med mønster
30.09.2024 - 16:50DROPS Design answered:
Hei Edit. Du må velge diagram/mønster for den størrelsen du strikker. Over diagrammene står det enten A.1 eller A.2, og så hvilken størrelse. mvh DROPS Design
14.10.2024 - 08:31
![]() Edith Pedersen wrote:
Edith Pedersen wrote:
Skriver lige i gen er det sidst i pinden man tage ud nå der står vrangparti har strikket 3cm og lavet knaphul så skal der ud til 137m og syntes ikke jeg får nok vis jeg tage ud i hvær side
28.09.2024 - 14:28DROPS Design answered:
Hei Edit. Se våre svar på dine forregående spørsmål. Håper de gir deg svar :) mvh DROPS Design
07.10.2024 - 14:07
![]() Edith Pedersen wrote:
Edith Pedersen wrote:
Hvor Dan ligge man ud når der står vrangpati er det ved vær vrangmaske
28.09.2024 - 09:02
![]() Edith Pedersen wrote:
Edith Pedersen wrote:
Skal man tage ud ved hvær vrang maske hvor der står vrangparti
28.09.2024 - 08:47DROPS Design answered:
Hei Edit. Under HALSKANT strikkes det stolpemasker og vrangbord (1 rett, 1 vrang). Når vrangborden måler 3 cm og neste pinne fra retten økes det 1 maske på slutten av hvert vrangparti, øk ved å lage 1 kast. Her er vrangpartiet 1 vrangmaske. Om du f.eks strikker str. S legger du opp 95 masker. 10 av maskene er stolpemasker og for at man skal starte og slutte med 1 rett maske etter/før hver stolpe strikkes det 43 rettmasker og 42 vrangmasker. Når man skal øke ved hver vrangmaske / vrangparti øker man da med 42 masker = 95 + 42 = 137 masker. mvh DROPS Design
07.10.2024 - 13:43
![]() Edith Pedersen wrote:
Edith Pedersen wrote:
Er det forstået så Dan at man skal tage ud i hvær vrang maske
27.09.2024 - 16:06DROPS Design answered:
Hei Edit. Under HALSKANT står det: På neste pinne fra retten økes det 1 maske på slutten av hvert vrangparti, øk ved å lage 1 kast. På neste pinne (= fra vrangen) strikkes kastene vridd rett = 137-137-146-146-155-155 masker. mvh DROPS Design
07.10.2024 - 13:01
![]() Edith Pedersenn wrote:
Edith Pedersenn wrote:
Hvor når begynder man at strikke med pind nr 5
27.09.2024 - 15:45DROPS Design answered:
Hei Edit. Når halskanten måler 5 cm strikkes det en pinne fra retten der det økes med 14-14-33-33-52-52 masker jevnt fordelt = 151-151-179-179-207-207 masker. Så byttes det til rundpinne 5. mvh DROPS Design
07.10.2024 - 11:56
![]() Edith Pedersen wrote:
Edith Pedersen wrote:
Kan man ikke få denne opskrift på dansk
27.09.2024 - 09:59
![]() Françoise LELARGE wrote:
Françoise LELARGE wrote:
Bonjour je n'est pas compris augmentation 1maille à la fin de chaque section en maille envers en faisant 1 jeté. dois-je augmenté toutes les deux mailles ou à la fin de chaque tour afin d'obtenir 144 mailles Merci pour votre réponse qui me sera très précieuse
09.09.2024 - 16:49DROPS Design answered:
Bonjour Mme Lelarge, on va effectivement augmenter les mailles envers des côtes, vu sur l'endroit, autrement dit on va tricoter (1 m end, 1 m env, 1 jeté) et au rang suivant, tricoter le jeté torse à l'endroit pour que les côtes soient désormais (1 m end, 2 m env), vues sur l'endroit. Bon tricot!
10.09.2024 - 09:04
![]() Leni wrote:
Leni wrote:
Vielen lieben Dank fürs Daumen drücken , hat aber leider nicht geklappt . Was bedeutet bitte M2 / K3 🤔 . Ich gebe auf , zu kompliziert für mich .
05.09.2024 - 15:57DROPS Design answered:
Liebe Leni, es sieht auf den ersten Blick vielleicht etwas kompliziert aus, aber es wird bestimmt gelingen! 😊 M1 bedeutet ‚Make 1‘, also eine Masche zunehmen. K2 steht für ‚Knit 2‘, das heißt, 2 Maschen werden rechts gestrickt. K3 bedeutet ‚Knit 3‘, also 3 Maschen rechts stricken. Frohes Schaffen und viel Erfolg! Sollte es doch Schwierigkeiten geben, einfach wieder melden!
05.09.2024 - 17:27
|
|||||||||||||
Wishing Well Cardigan#wishingwellcardigan |
|||||||||||||
 |
 |
||||||||||||
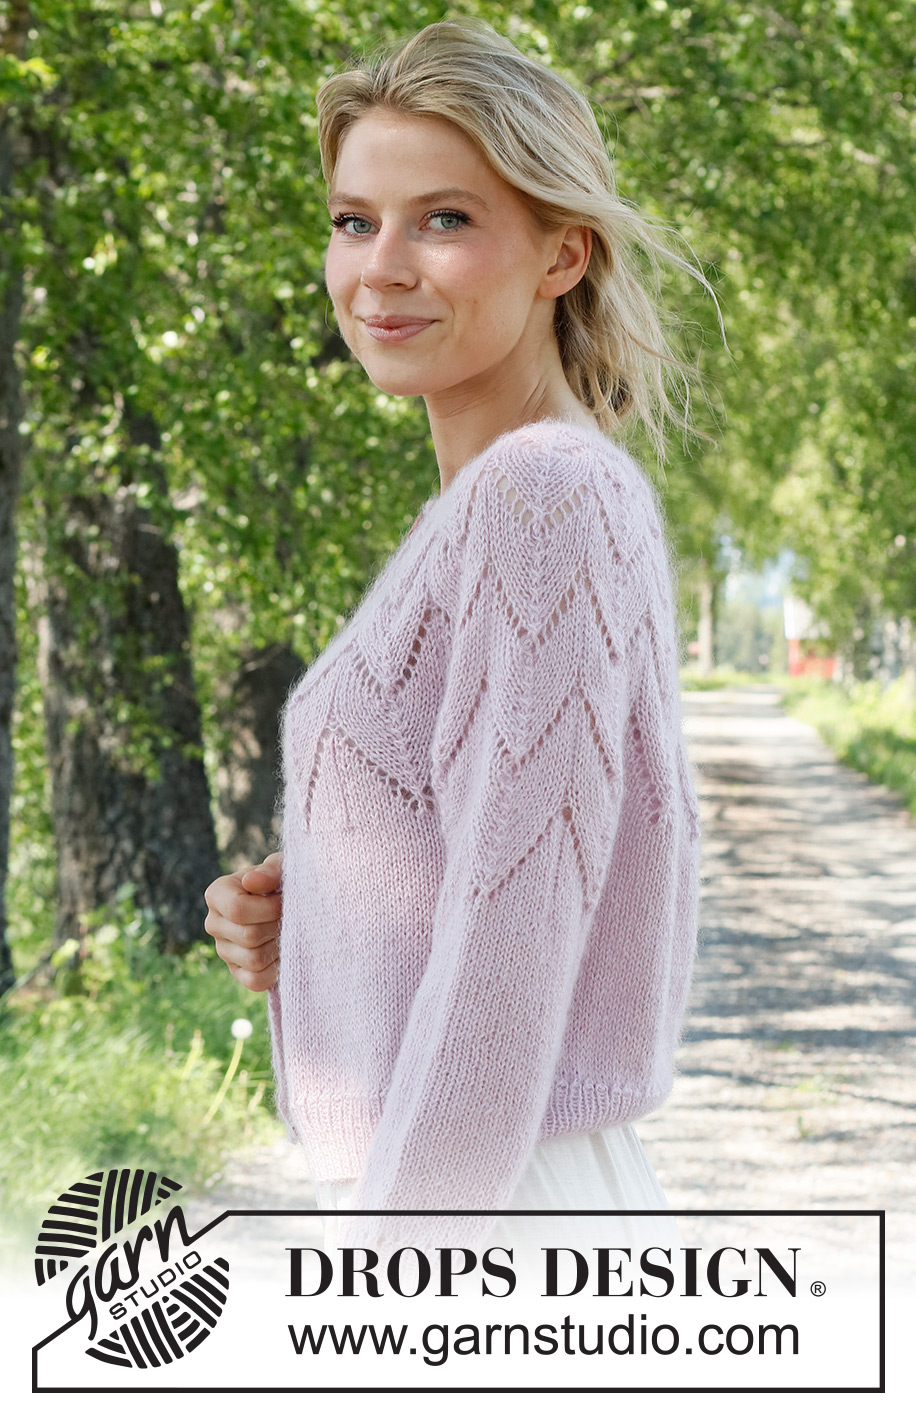
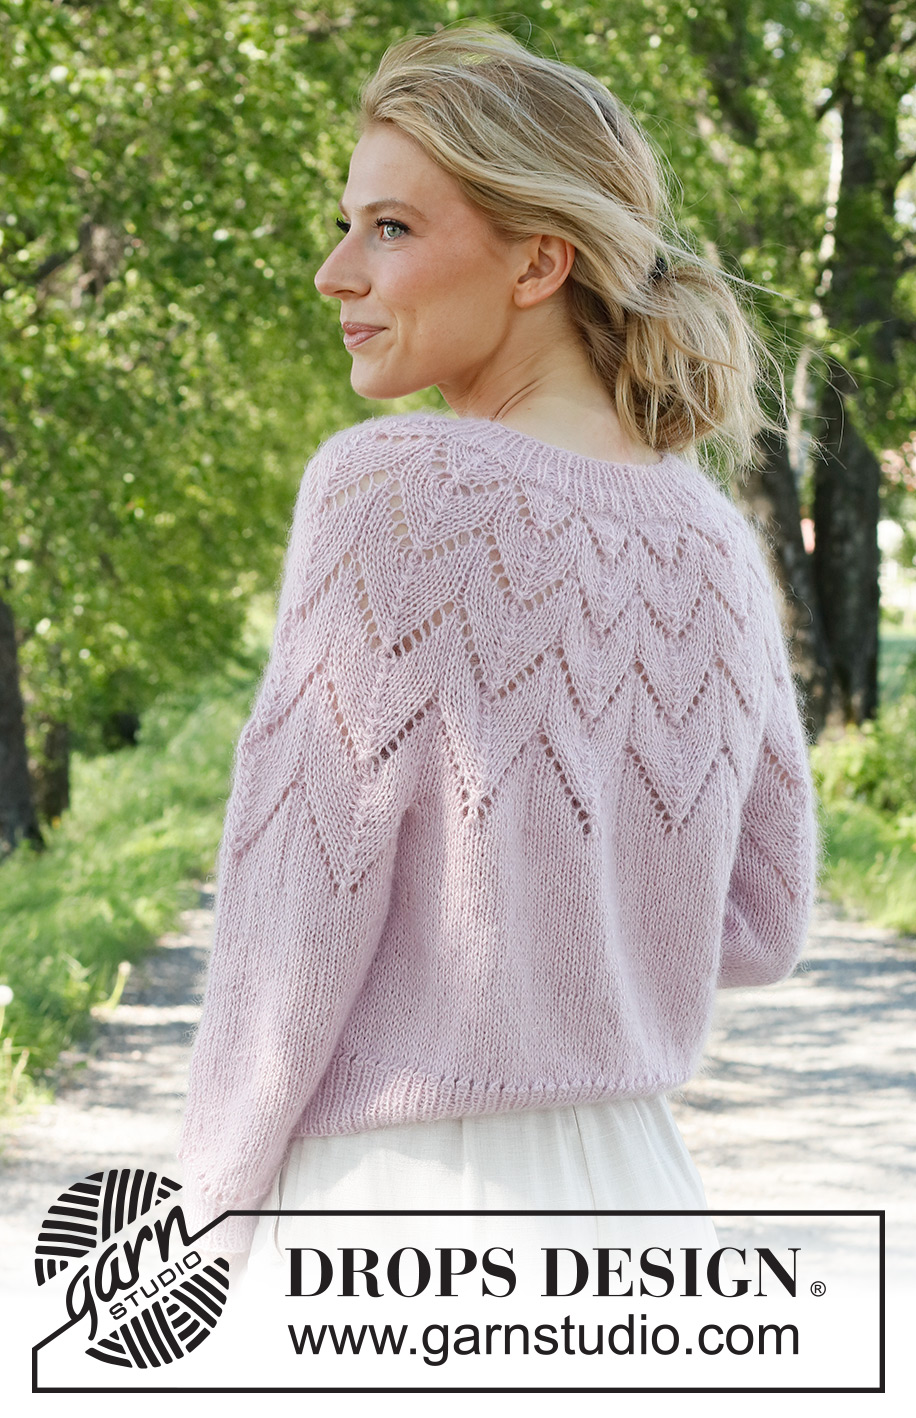
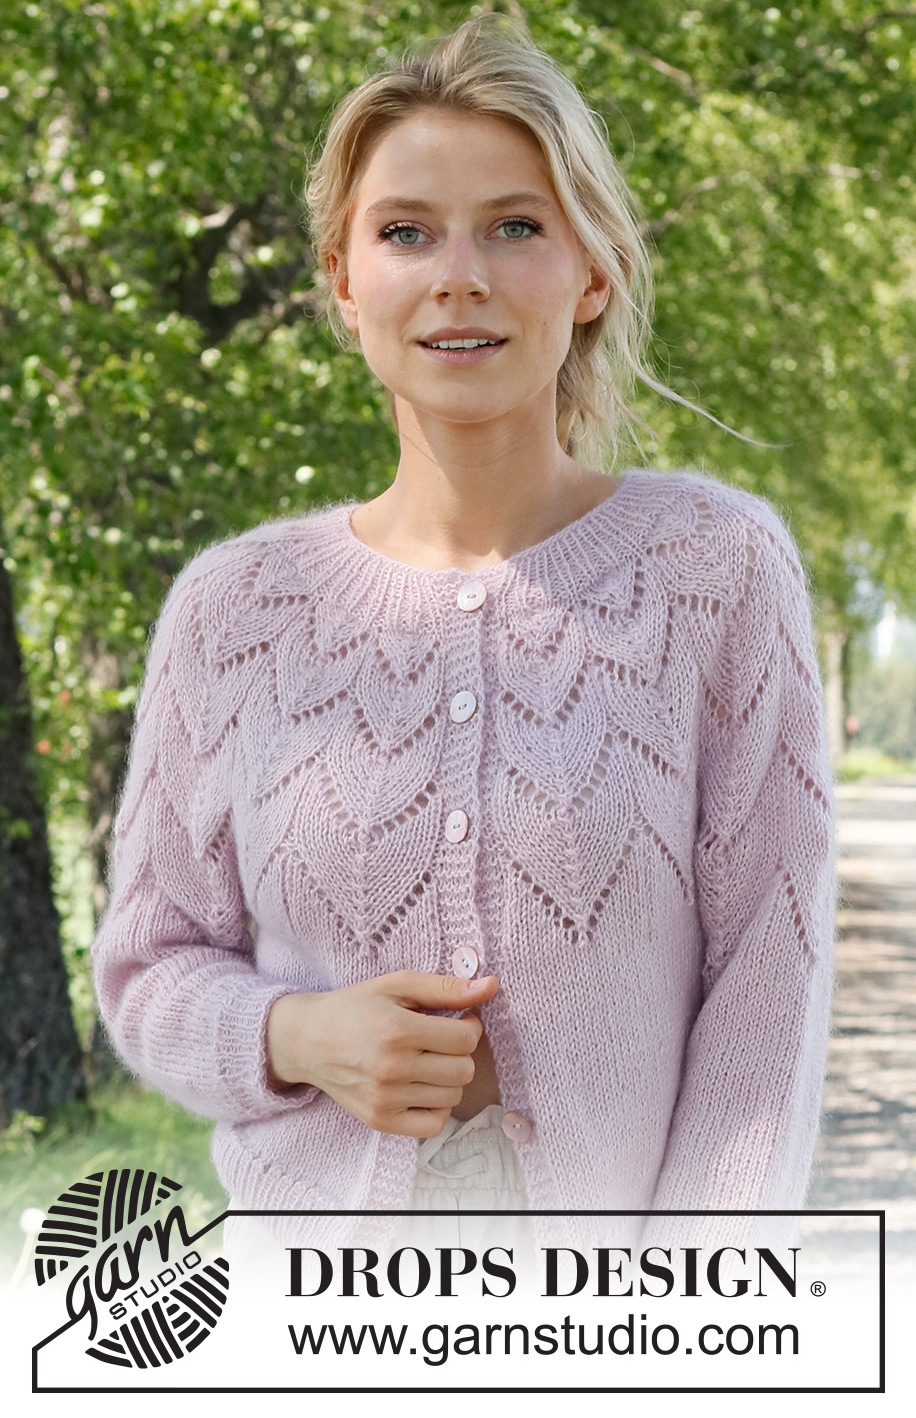
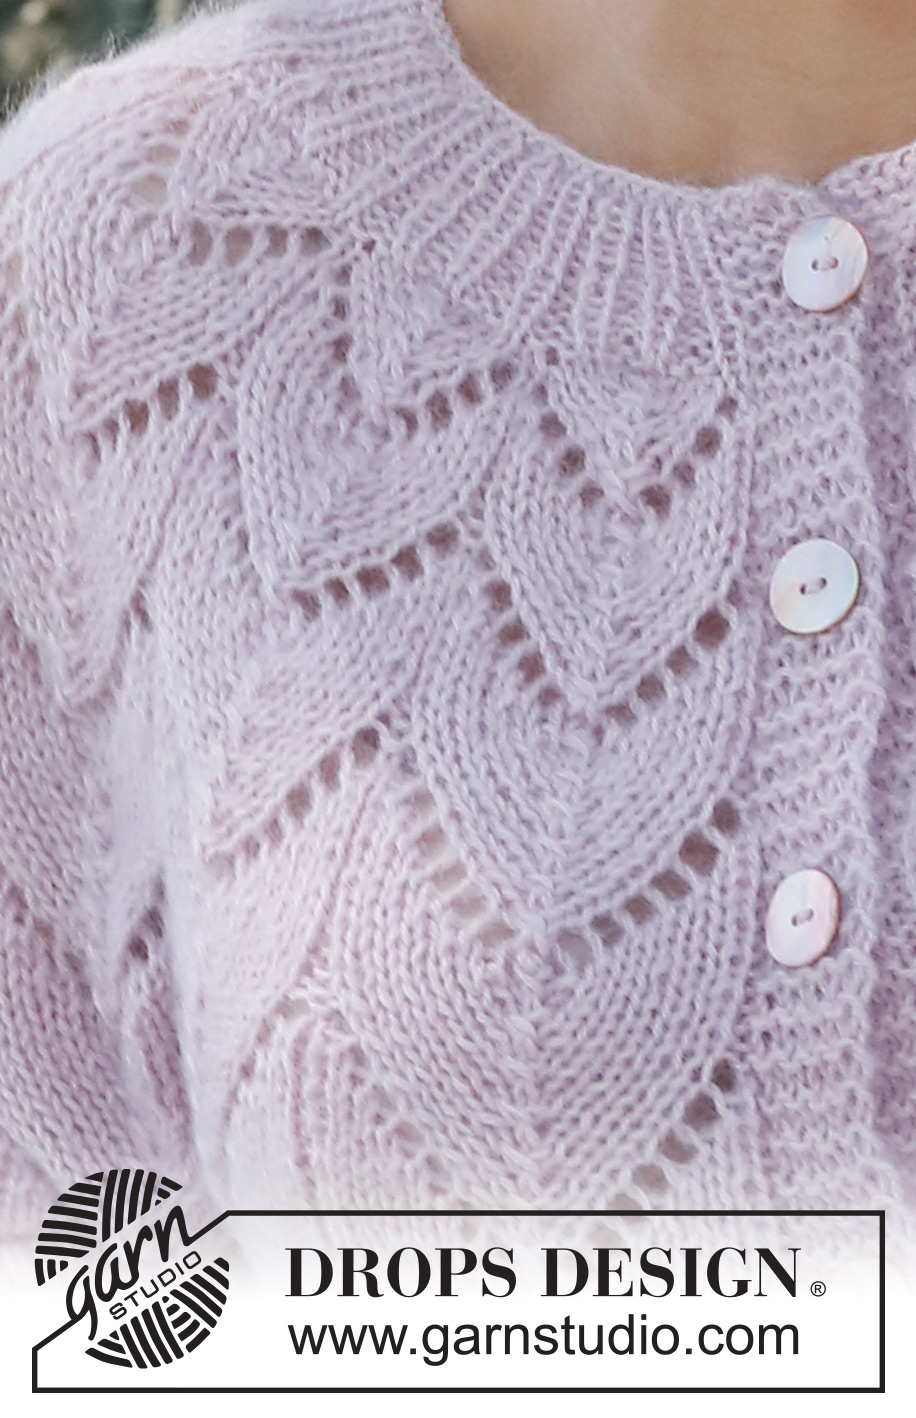
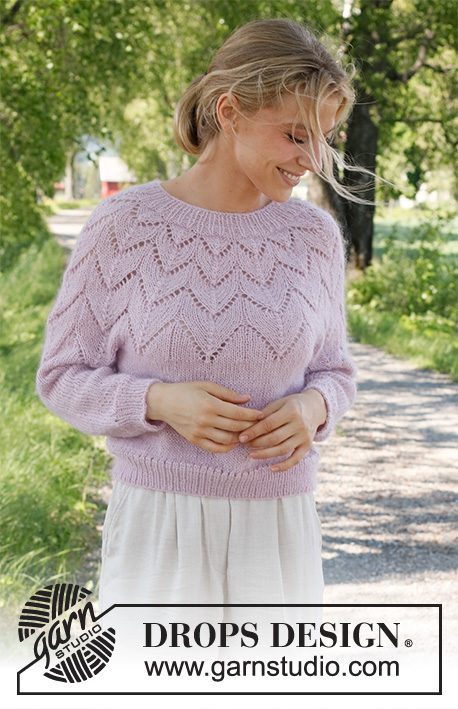
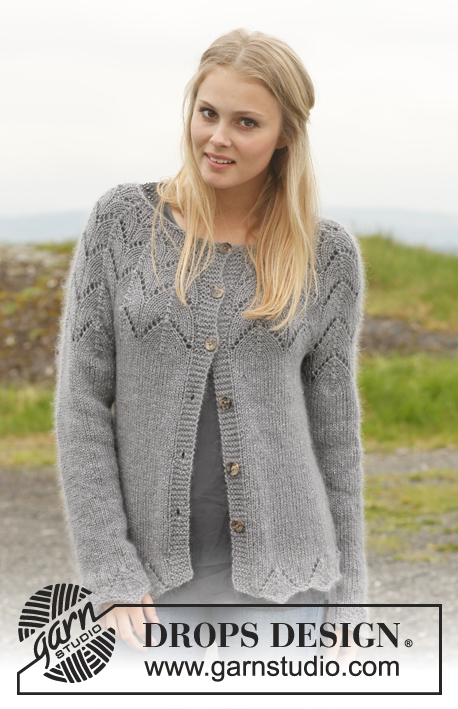
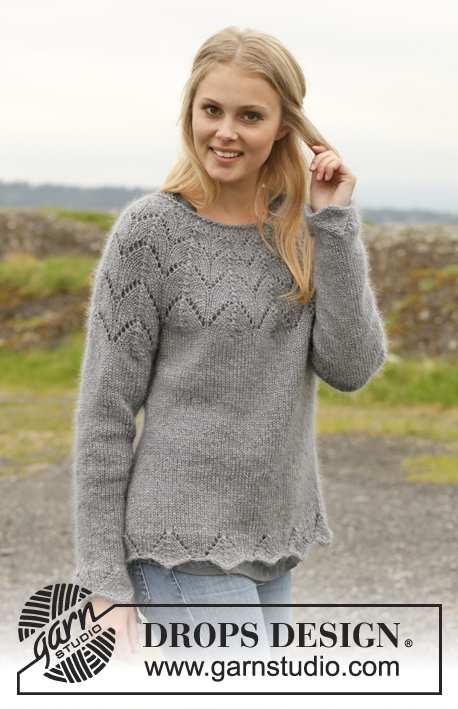
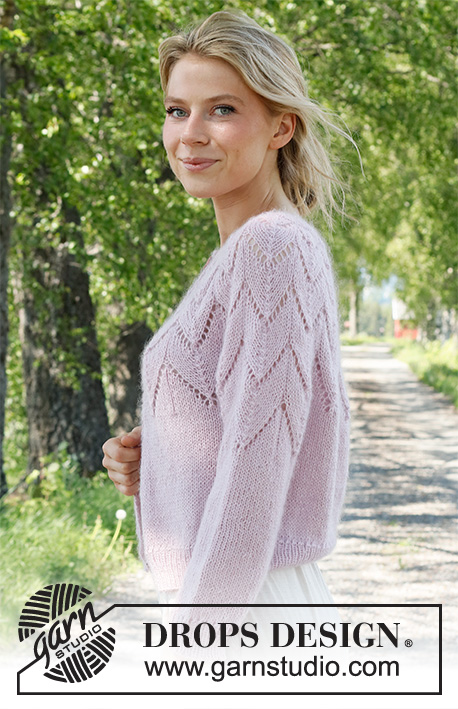
Knitted jacket in DROPS Alpaca and DROPS Kid-Silk. The piece is worked top down, with round yoke and lace pattern. Sizes S - XXXL.
DROPS 231-10 |
|||||||||||||
|
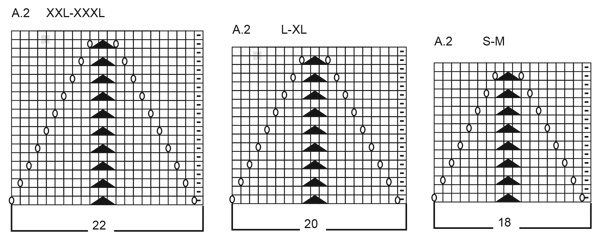
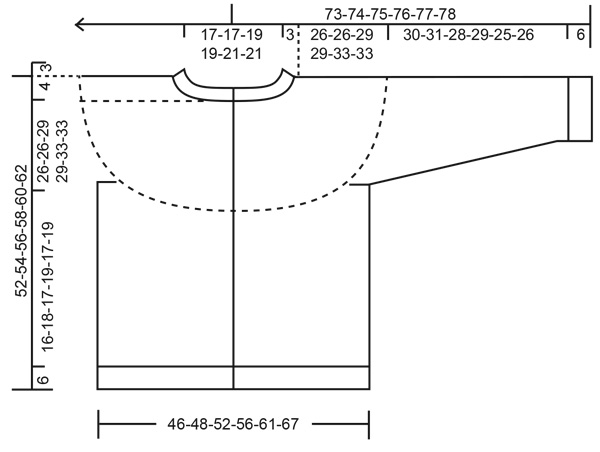
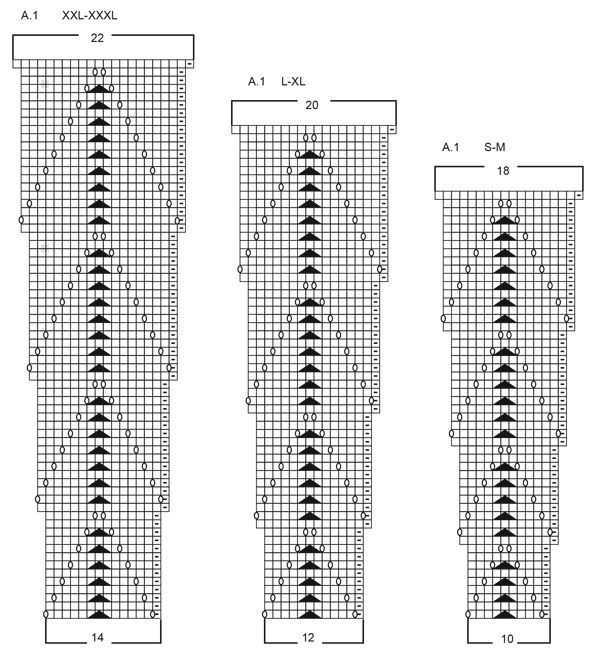
------------------------------------------------------- EXPLANATIONS FOR THE PATTERN: ------------------------------------------------------- RIDGE/GARTER STITCH (worked back and forth): Knit all rows. 1 ridge = knit 2 rows. PATTERN: See diagrams A.1 and A.2. The diagrams show all rows in the pattern from the right side. Choose diagram for your size. BUTTONHOLES: Work the buttonholes on the right band (when the garment is worn). 1 buttonhole: From the right side, work until there are 3 stitches left, make 1 yarn over, knit 2 together, knit 1. On the next row (wrong side) knit the yarn over to leave a hole. The first buttonhole is worked when the neck measures 3 cm, then the other 5-5-5-6-6-6 buttonholes with approx. 8½-9-9-8-8-9 cm between each one. DECREASE TIP (sleeves): Decrease 1 stitch on either side of the marker as follows: Work until there are 3 stitches left before the marker, knit 2 together, knit 2 (marker sits between these 2 stitches), slip 1 stitch as if to knit, knit 1 and pass the slipped stitch over the knitted stitch. ------------------------------------------------------- START THE PIECE HERE: ------------------------------------------------------- JACKET – SHORT OVERVIEW OF THE PIECE. The neck and yoke are worked back and forth with circular needle, from mid front and top down. The yoke is divided for body and sleeves and the body continued back and forth. The sleeves are worked in the round with double pointed needles/short circular needle, top down. NECK/YOKE: Cast on 95-95-101-101-107-107 stitches with circular needle size 4 mm and 1 strand DROPS Kid-Silk and 1 strand DROPS Alpaca. Purl 1 row (wrong side). The next row is worked as follows from the right side: 5 band stitches in GARTER STITCH – read description above, * knit 1, purl 1 *, work from *-* until there are 6 stitches left, knit 1 and 5 band stitches in garter stitch. Continue this rib for 3 cm. Work the first BUTTONHOLE on the right band – read description above. On the next row from the right side increase 1 stitch at the end of each purled section by making 1 yarn over. On the next row (wrong side) knit the yarn overs twisted = 137-137-146-146-155-155 stitches. Continue as follows from the right side: 5 band stitches in garter stitch, * knit 1, purl 2 *, work from *-* until there are 6 stitches left, knit 1 and 5 band stitches in garter stitch. Continue the new rib until the neck measures 5 cm; finish after a row from the wrong side. Knit 1 row from the right side where you increase 14-14-33-33-52-52 stitches evenly spaced = 151-151-179-179-207-207 stitches (do not increase over the bands). Change to circular needle size 5 mm. Purl 1 row from the wrong side (yarn overs purled twisted and bands knitted). The next row is worked as follows from the right side: 5 band stitches in garter stitch, A.1 over the next 140-140-168-168-196-196 stitches, work the first stitch in A.1 (so the pattern is symmetrical) and 5 band stitches in garter stitch. Work and increase according to A.1. When A.1 has been completed in height there are 263-263-291-291-319-319 stitches on the needle. The piece measures approx. 26-26-29-29-33-33 cm from the cast-on edge. Divide for the body on the next row as follows: Work the first 41-41-45-45-49-49 stitches (front piece), place the next 54-54-60-60-66-66 stitches on a thread for the sleeve, cast on 6-8-8-10-10-14 stitches (in side under sleeve), work 72-72-80-80-88-88 stitches (back piece), place the next 54-54-60-60-66-66 stitches on a thread for the sleeve, cast on 6-8-8-10-10-14 stitches (in side under sleeve), work the remaining 42-42-46-46-50-50 stitches (front piece). The body and sleeves are finished separately. BODY: = 167-171-187-191-207-215 stitches. Continue back and forth with stocking stitch and 5 band stitches in garter stitch on each side and on the first row increase 0-2-0-8-10-24 stitches evenly spaced = 167-173-187-199-217-239 stitches. When the piece measures 16-18-17-19-17-19 cm from the division work as follows from the right side: 5 band stitches in garter stitch, * knit 2 together, 1 yarn over *, work from *-* until there are 6 stitches left, knit 1 and 5 band stitches in garter stitch. Change to circular needle size 4 mm and work as follows from the wrong side: 5 band stitches in garter stitch, * purl 1, knit 1 *, work from *-* until there are 6 stitches left, purl 1 and 5 band stitches in garter stitch. Continue this rib for 6 cm. Cast off. The jacket measures approx. 52-54-56-58-60-62 cm from the shoulder down. SLEEVES: Place the 54-54-60-60-66-66 stitches from the thread on the one side of the piece on double pointed needles/short circular needle size 5 mm and knit up 1 stitch in each of the 6-8-8-10-10-14 stitches cast on under the sleeve = 60-62-68-70-76-80 stitches. Insert a marker in the middle of the 6-8-8-10-10-14 stitches under the sleeve. Allow the marker to follow your work onwards; it will be used when decreasing under the sleeve. Start at the marker and work 3-4-4-5-5-7 stitches in stocking stitch, A.2 over the next 54-54-60-66-66 stitches and 3-4-4-5-5-7 stitches in stocking stitch. When A.2 has been completed in height continue with stocking stitch over all stitches. When the sleeve measures 4 cm decrease 2 stitches under the sleeve – read DECREASE TIP. Decrease like this every 3½-3½-2½-2½-1½-1½ cm a total of 8-8-10-10-12-13 times = 44-46-48-50-52-54 stitches. Continue working until the sleeve measures 30-31-28-29-25-26 cm from the division. Work the next round as follows: * Knit 2 together, 1 yarn over *, work from *-* over all stitches. Change to double pointed needles size 4 mm. Work rib (knit 1, purl 1) for 6 cm. Cast off. The sleeve measures approx. 36-37-34-35-31-32 cm from the division. Work the other sleeve in the same way. ASSEMBLY: Sew the buttons onto the left band. |
|||||||||||||
Diagram explanations |
|||||||||||||
|
|||||||||||||
 |
|||||||||||||
 |
|||||||||||||
 |
|||||||||||||
Have you finished this pattern?Tag your pictures with #dropspattern #wishingwellcardigan or submit them to the #dropsfan gallery. Do you need help with this pattern?You'll find 33 tutorial videos, a Comments/Questions area and more by visiting the pattern on garnstudio.com. © 1982-2026 DROPS Design A/S. We reserve all rights. This document, including all its sub-sections, has copyrights. Read more about what you can do with our patterns at the bottom of each pattern on our site. |
|||||||||||||


With over 40 years in knitting and crochet design, DROPS Design offers one of the most extensive collections of free patterns on the internet - translated to 17 languages. As of today we count 324 catalogues and 12290 patterns translated into English (UK/cm). 12290
We work hard to bring you the best knitting and crochet have to offer, inspiration and advice as well as great quality yarns at incredible prices! Would you like to use our patterns for other than personal use? You can read what you are allowed to do in the Copyright text at the bottom of all our patterns. Happy crafting!
Post a comment to pattern DROPS 231-10
We would love to hear what you have to say about this pattern!
If you want to leave a question, please make sure you select the correct category in the form below, to speed up the answering process. Required fields are marked *.