
Popular categories
Looking for a yarn?


Comments / Questions (26)
![]() Louise wrote:
Louise wrote:
Jeg er nået til udtagning af bærestykke og skal flytte de fire mærketråde. Jeg har 306 masker i hele arbejdet, som jeg skal have, men jeg får 65 masker på hver af mit ærme, hvad har jeg gjort forkert?
07.02.2022 - 16:05DROPS Design answered:
Hej Louise, det lyder til at det stemmer, hvis du har 1 mærke i 1.maske og 1 mærke i 65. maske, så har du 63 masker imellem maskerne med mærker i :)
09.02.2022 - 11:12
![]() Anne wrote:
Anne wrote:
In de Nederlandse versie lijkt de tip voor het meerderen-2 verkeerd vertaald? Bij het meerderen VOOR de markeerdraad moet de draad van achteren opgenomen worden, en bij het meerderen NA de markeerdraad juist van voren. (Dit staat in de Noorse, Engelse en Duitse versie.)
12.10.2021 - 23:34
![]() Theresa wrote:
Theresa wrote:
Hallo sind die beiden Videos zu der sattelschulter Zunahme und der Ärmel zunahme das selbe ? Ich erkenne da keinen Unterschied wie sie die Maschen aufnimmt . Ich hänge gerade an der Ärmel Zunahme und komme überhaupt nicht weiter weil ich nicht weis wie ich das aufnehmen muss im Vergleich zu zuvor bei der Schulter Zunahme.
05.09.2021 - 07:51DROPS Design answered:
Liebe Theresa, wie man die Maschen aufnimmt wird hier das selbe sein, der Unterschied wird nur wo diese Maschen zugenommen werden; beim Sattelschulter haben Sie vor 1./3. Mark. und nach 2. und 4. Mark zugenommen, jetzt nehmen Sie nach 1. und 3. und vor 2. und 4. Markierungen. Kann das Ihnen helfen? Viel Spaß beim stricken!
06.09.2021 - 07:36
![]() Ruth Leibbrandt wrote:
Ruth Leibbrandt wrote:
Is this a front button down Cardigan. Also is it waist length and can it be easily adjusted to be a little longer? I would like to knit it with your yarn but I need to have an answer to these two questions. I saw one picture where it seemed front buttoning but on another it did not seem like it. My eyes are not so good any more!! Many thanks.
12.07.2021 - 22:09DROPS Design answered:
Dear Ruth, this pattern is a sweater (ppullover. There is a cardigan version of it HERE. Since this is a top down sweater / cardigan, you can easily adjust the length by adding some rows at the bottom. Happy Stitching!
13.07.2021 - 01:52
![]() Camilla wrote:
Camilla wrote:
Jag ska sticka denna i M. Lägger upp 114 m. Sedan stickar jag 12 +27+27+27+15 m enligt texten. Men det blir bara 108 m. Vad har jag missat?
29.06.2021 - 08:07DROPS Design answered:
Hej Camilla. Du missar några maskor i texten, du ska sticka 12+1+1+27+1+27+1+1+27+1+15 = 114 m. Läs texten igen så ser du nog vilka maskor du missat. Mvh DROPS Design
29.06.2021 - 08:31
![]() Gro Anita Johannesdotter Pedersen wrote:
Gro Anita Johannesdotter Pedersen wrote:
Bol: Her står det ikke at man skal skifte til pinne fra 3 til 2.5 når man skal strikke vrangborden. Skal den da strikkes på 3, det samme som resten av bolen?
16.06.2021 - 23:02DROPS Design answered:
Hei Gro, Det står i oppskriften at man skal bytte til pinne 2,5 for å strikke vrangbord. God fornøyelse!
17.06.2021 - 08:41
![]() Monika Dostálová wrote:
Monika Dostálová wrote:
Dobrý den, chápu správně že po nahození ok přepletu jednu řadu jen hladce a potom pokračuju podle rozpisu. První řada rozpisu a schématu potom bude rubová nebo lícová? Prostě jestli ta první řada hladce bude na lícu jako ta co tvoří véčko nebo vlnky. Děkuji, jsem začátečník a pořád trochu tápu.
22.05.2021 - 00:36DROPS Design answered:
Dobrý den, Moniko! Pleteme v kruhových řadách , takže stále z lícové strany (díl neotáčíme). Na ícové straně svetru budou "véčka". Hodně zdaru! Hana
29.05.2021 - 23:03
![]() Claudia wrote:
Claudia wrote:
Hallo, ich habe einen kleinen Fehler in der deutschen Anleitung gefunden. Zitat: 12-12-16-18-20-22 Maschen abketten (= an der Seite unter dem Arm). Es muss nicht abketten sondern anschlagen heißen. Ich war erst etwas verdutzt, aber erklärt sich dann wenn man weiter liest und die Maschen für den Ärmel aus den angeschlagenen Maschen aufnehmen muss. Ansonsten klappt alles wunderbar. Danke für die schöne Anleitung!
18.05.2021 - 17:58DROPS Design answered:
Liebe Claudia, danke für den Hinweis, die deutsche Anleitung wurde korrigiert. Viel Spaß beim stricken!
19.05.2021 - 15:54
![]() Zjiraffe wrote:
Zjiraffe wrote:
Wanneer moet ik naald 3mm gaan gebruiken? Ik heb de eerste steken opgezet met nld 2,5. Ik verwacht na de halsboord op nld 3mm door te moeten gaan...?
04.05.2021 - 19:30DROPS Design answered:
Dag Zjiraffe,
Staat inderdaad niet aangegeven, maar de (hals)boord en de boorden onderaan brei je in maat 2,5, de rest in maat 3 mm.
05.05.2021 - 13:40
![]() Helle Mouritzen wrote:
Helle Mouritzen wrote:
Jeg har strikket “næste omgang strikkes således” - jeg strikker i str.xl og slog 140 m op. Jeg har gjort nøjagtigt som der står i det afsnit. Dog har jeg nu 42 m tilbage, som jeg skal gøre hvad med???
26.04.2021 - 05:48DROPS Design answered:
Hej Helle. Strik * 1 ret, 2 vrang * over de næste 18 masker, 1 ret (= ½ bagstykket), strik A.1a (vælg diagram for din størrelse) over de næste 33 masker (= højre skulder), * 1 ret, 2 vrang *, strik fra *-* over de næste 36 masker, 1 ret (= forstykket), strik A.1a over de næste 33 masker (= venstre skulder), strik * 1 ret, 2 vrang *, strik fra *-* over de næste 18 masker. Fortsæt ribben rundt således i 2 cm (A.1a repeteres i højden). Gör du det så ska du inte få några m tilbake. Mvh DROPS Design
27.04.2021 - 09:50
|
||||||||||||||||||||||||||||
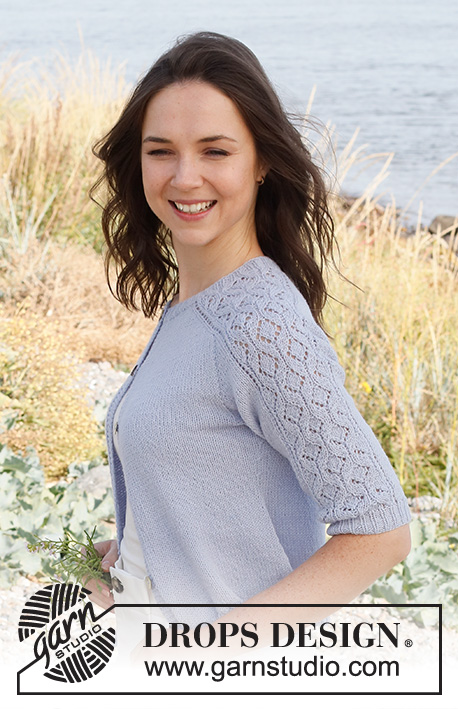
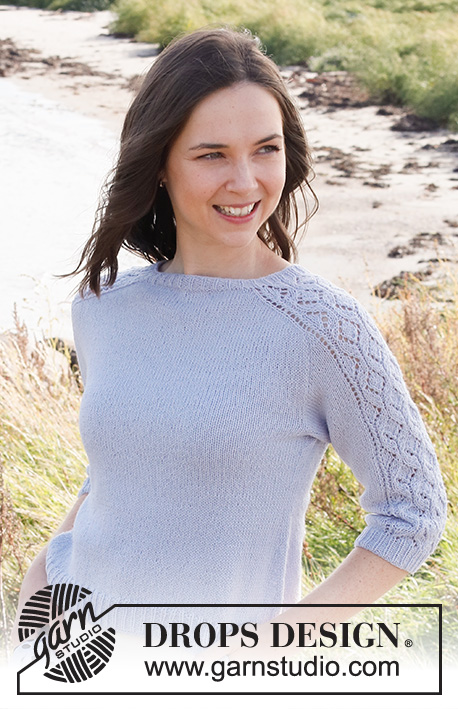
Dancing Diamonds#dancingdiamondssweater |
||||||||||||||||||||||||||||
 |
 |
|||||||||||||||||||||||||||
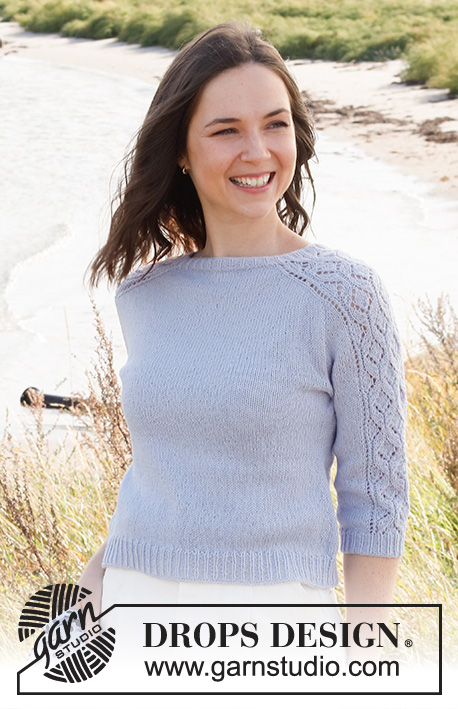
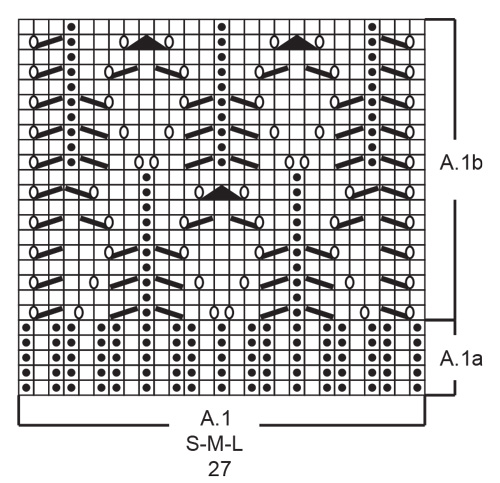
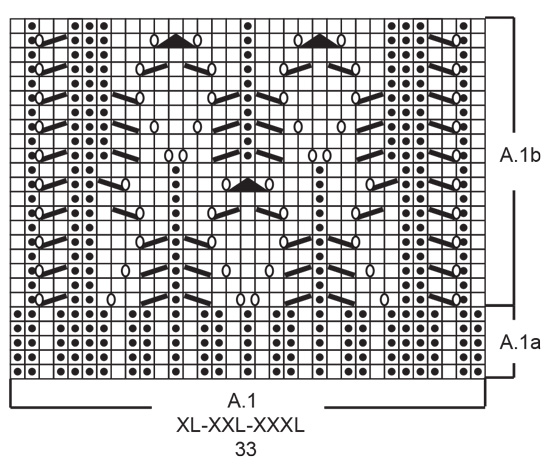
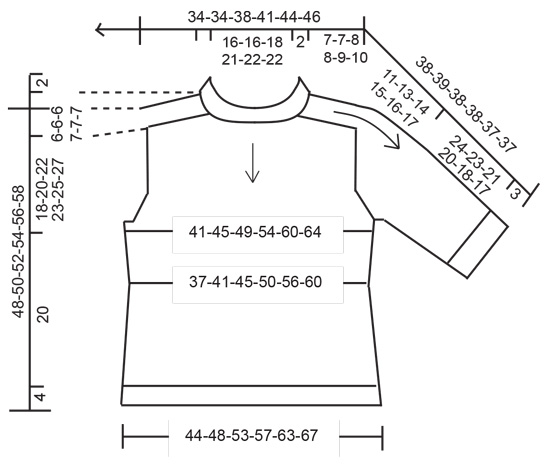
Knitted jumper in DROPS BabyMerino. The piece is worked top down with saddle-shoulders, lace pattern and ¾-length sleeves. Sizes S - XXXL.
DROPS 221-7 |
||||||||||||||||||||||||||||
|
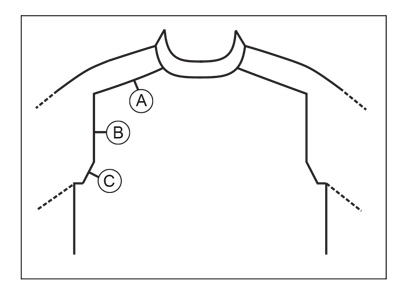
------------------------------------------------------- EXPLANATIONS FOR THE PATTERN: ------------------------------------------------------- PATTERN: See diagram A.1. Choose diagram for your size. INCREASE TIP-1 (evenly spaced): To work out how to increase evenly, count the total number of stitches to be increased over (e.g. 14 stitches) and divide by the number of increases to be made (e.g. 5) = 2.8. In this example, increase by making 1 yarn over after approx each 3rd stitch. On the next round work the yarn overs twisted to avoid holes. INCREASE TIP-2: BEFORE THE MARKERS: The new stitch twists to the right. Use the left needle to pick up the back strand between 2 stitches from the previous round and knit in the front loop. AFTER THE MARKERS: The new stitch twists to the left. Use the left needle to pick up the front strand between 2 stitches from the previous round and knit in the back loop. INCREASE TIP-3 (for sides of body): Work until there are 3-3-3-4-4-4 stitches left before the marker thread, 1 yarn over, knit 6-6-6-8-8-8 (the marker thread sits in the middle of these stitches), 1 yarn over (= 2 stitches increased). On the next round knit the yarn over twisted to avoid a hole. Then work the new stitch in stocking stitch. DECREASE TIP (for sides of body and sleeves): Decrease 1 stitch on each side of the marker thread as follows: Work until there are 4-4-4-5-5-5 stitches left before the marker thread, knit 2 together, knit 4-4-4-6-6-6 (the marker thread sits in the middle of these stitches), slip 1 stitch as if to knit, knit 1 and pass the slipped stitch over the knitted stitch (= 2 stitches decreased). CASTING-OFF TIP: To avoid the cast-off edge being tight you can cast off with a larger size needle. If the edge is still tight, make 1 yarn over after either each 3rd or each 6th stitch, at the same time as casting off; the yarn overs are cast off as normal stitches. ------------------------------------------------------- START THE PIECE HERE: ------------------------------------------------------- JUMPER – SHORT OVERVIEW OF THE PIECE: The neck and yoke are worked in the round with circular needle, from mid back and top down. The yoke is divided for body and sleeves and the body is continued in the round with circular needle. The sleeves are worked with double pointed needles/short circular needle, top down. NECK: Cast on 114-114-126-140-146-146 stitches with circular needle size 2.5 mm and Baby Merino. Knit 1 round. Then work rib in the different sizes as follows: Sizes S, M and L: * Knit 1, purl 2 * work from *-* over the first 12-12-15 stitches, knit 1, purl 1 (= ½ back piece), work A.1a (choose diagram for your size) over the next 27-27-27 stitches (= right shoulder), purl 1, * knit 1, purl 2 *, work from *-* over the next 27-27-33 stitches, knit 1, purl 1 (= front piece), work A.1a over the next 27-27-27 stitches (= left shoulder), purl 1, * knit 1, purl 2 *, work from *-* over the next 15-15-18 stitches. Continue this rib in the round for 2 cm (A.1a is repeated in height). Sizes XL, XXL and XXXL: *Knit 1, purl 2 *, work from *-* over the first 18-18-18 stitches, knit 1, (= ½ back piece), work A.1a (choose diagram for your size) over the next 33-33-33 stitches (= right shoulder), * knit 1, purl 2 *, work from *-* over the next 36-39-39 stitches, knit 1 (= front piece), work A.1a over the next 33-33-33 stitches (= left shoulder), * knit 1, purl 2 *, work from *-* over the next 18-21-21 stitches. Continue this rib in the round for 2 cm (A.1a is repeated in height). The next round is worked as follows: Knit 14-14-17-19-19-19 stitches and increase 5-7-5-7-9-9 evenly over these stitches – read INCREASE TIP-1, work A.1a as before over the next 27-27-27-33-33-33 stitches, knit 30-30-36-37-40-40 stitches and increase 10-14-10-15-18-18 evenly over these stitches, work A.1a as before over the next 27-27-27-33-33-33 stitches, knit 16-16-19-18-21-21 stitches and increase 5-7-5-8-9-9 evenly over these stitches = 134-142-146-170-182-182 stitches. Change to circular needle size 3. YOKE: Insert 1 marker after 66-70-72-86-90-90 stitches (= approx. mid-front) – THE PIECE IS MEASURED FROM HERE! In addition, insert 4 other markers as described below, without working the stitches and each marker is inserted between 2 stitches. The markers are used when increasing for the shoulders. Marker 1: Start mid-back, count 19-21-22-26-28-28 stitches (= ½ back piece), insert the marker before the next stitch. Marker 2: Count 27-27-27-33-33-33 stitches from marker 1 (= shoulder), insert the marker before the next stitch. Marker 3: Count 40-44-46-52-58-58 stitches from marker 2 (= front piece), insert the marker before the next stitch. Marker 4: Count 27-27-27-33-33-33 stitches from marker 3 (= shoulder), insert the marker before the next stitch. There are 21-23-24-26-30-30 stitches left after marker 4 (= ½ back piece). Allow the markers to follow your work onwards. INCREASES FOR SADDLE SHOULDERS: Read the whole section before continuing! Continue working with A.1b over A.1a on the sleeves and stocking stitch on the front and back pieces. AT THE SAME TIME on the first round increase 4 stitches for the shoulders as follows: Increase BEFORE markers 1 and 3 and AFTER markers 2and 4 – read INCREASE TIP-2. You are only increasing on the front and back pieces, the number of stitches on the shoulders remain the same. Continue the pattern and increase like this every round a total of 22-22-27-27-29-32 times = 222-230-254-278-298-310 stitches (the increased stitches are worked in stocking stitch). REMEMBER THE KNITTING TENSION! After the last increase, the piece measures approx. 7-7-8-8-9-10 cm from the marker on the neck. Now increase for the sleeves as follows. INCREASES FOR SLEEVES: Continue the pattern. AT THE SAME TIME, on the next round, increase 4 stitches for the sleeves as follows: Increase AFTER markers 1 and 3 and BEFORE markers 2 and 4 – remember INCREASE TIP-2. You are only increasing on the shoulders and the number of stitches on the front and back pieces remains the same. The increased stitches are worked in stocking stitch. Increase like this every 2nd round a total of 18-19-18-19-18-16 times = 294-306-326-354-370-374 stitches. The piece measures approx. 18-19-19-20-20-20 cm from the marker on the neck. Now increase for the yoke as follows. INCREASES FOR YOKE: Move the 4 markers so each one sits in the outermost stitch on each sleeve. There are 61-63-61-69-67-63 stitches between the marker-stitches on the sleeves. On the next round, increase 8 stitches for the yoke by increasing both before and after all 4 marker-stitches – remember INCREASE TIP-2. You are increasing on both the front and back pieces and on the sleeves and the increased stitches are worked in stocking stitch. Increase like this every 2nd round a total of 1-4-4-5-7-9 times = 302-338-358-394-426-446 stitches. When all the increases are finished, the piece measures approx. 18-20-22-23-25-27 cm from the marker on the neck. If the piece is shorter than this, continue working to the correct length. Now divide the piece for body and sleeves on the next round as follows: Work the first 42-47-50-56-61-65 stitches (= ½ back piece), place the next 65-73-77-85-89-91 stitches on a thread for the sleeve, cast on 12-12-16-18-20-22 stitches (= in side under sleeve), work the next 86-96-102-112-124-132 stitches (= front piece), place the next 65-73-77-85-89-91 stitches on a thread for the sleeve, cast on 12-12-16-18-20-22 stitches (= in side under sleeve), work the last 44-49-52-56-63-67 stitches (= ½ back piece). Body and sleeves are finished separately. THE PIECE IS NOW MEASURED FROM HERE. BODY: = 196-216-236-260-288-308 stitches. Insert 1 marker thread in the middle of the cast-on stitches under each sleeve. There are 98-108-118-130-144-154 stitches between the marker threads on the front and back pieces. Allow the threads to follow your work onwards; they are used when decreasing and increasing in the sides. Continue in the round with stocking stitch. When the piece measures 3 cm from the division, decrease 1 stitch on each side of both marker threads – read DECREASE TIP (= 4 stitches decreased). Decrease like this every 1½ cm a total of 5-5-5-5-5-5 times = 176-196-216-240-268-288 stitches. When the piece measures 11 cm from the division, increase 1 stitch on each side of both marker threads – read INCREASE TIP-3 (= 4 stitches increased). Increase like this every cm a total of 9-9-9-8-8-8 times = 212-232-252-272-300-320 stitches. When the piece measures 20 cm in all sizes (try the jumper on and work to desired length; there is approx 4 cm left to finished length), increase 13-14-15-16-18-19 stitches evenly spaced = 225-246-267-288-318-339 stitches. Change to circular needle size 2,5. Work rib (knit 1, purl 2) for 4 cm. Cast off with knit over knit and purl over purl - read CASTING-OFF TIP. The jumper measures approx. 48-50-52-54-56-58 cm from the shoulder down. SLEEVES: Place the 65-73-77-85-89-91 stitches from the thread on the one side of the piece on double pointed needles/short circular needle size 3 mm and knit up 1 stitch in each of the 12-12-16-18-20-22 stitches cast on under the sleeve = 77-85-93-103-109-113 stitches. Insert a marker thread in the middle of the new stitches under the sleeve. Insert a marker thread in the middle of the new stitches under sleeve. Allow the thread to follow your work onwards; it will be used when decreasing under the sleeve. Work pattern as before over the middle 27-27-27-33-33-33 stitches. The other stitches are worked in stocking stitch. When the sleeve measures 3-3-3-3-2-2 cm, decrease 1 stitch on each side of the marker thread under the sleeve - read DECREASE TIP. Decrease like this every 3-2-1½-1-1-1 cm a total of 6-9-12-14-15-15 times = 65-67-69-75-79-83 stitches. When the sleeve measures 24-23-21-20-18-17 cm from the division, increase 2-3-4-4-3-5 stitches evenly over the stocking stitches (A.1b is continued as before) = 67-70-73-79-82-88 stitches. Change to double pointed needles size 2.5 mm and work A.1a over A.1B and rib over the other stitches (knit 1, purl 2). When the rib measures 3 cm, cast off with knit over knit and purl over purl. The sleeve measures approx. 27-26-24-23-21-20 cm from the division. Work the other sleeve in the same way. |
||||||||||||||||||||||||||||
Diagram explanations |
||||||||||||||||||||||||||||
|
||||||||||||||||||||||||||||
 |
||||||||||||||||||||||||||||
 |
||||||||||||||||||||||||||||
 |
||||||||||||||||||||||||||||
 |
||||||||||||||||||||||||||||
Have you finished this pattern?Tag your pictures with #dropspattern #dancingdiamondssweater or submit them to the #dropsfan gallery. Do you need help with this pattern?You'll find 32 tutorial videos, a Comments/Questions area and more by visiting the pattern on garnstudio.com. © 1982-2026 DROPS Design A/S. We reserve all rights. This document, including all its sub-sections, has copyrights. Read more about what you can do with our patterns at the bottom of each pattern on our site. |
||||||||||||||||||||||||||||


With over 40 years in knitting and crochet design, DROPS Design offers one of the most extensive collections of free patterns on the internet - translated to 17 languages. As of today we count 324 catalogues and 12290 patterns translated into English (UK/cm). 12290
We work hard to bring you the best knitting and crochet have to offer, inspiration and advice as well as great quality yarns at incredible prices! Would you like to use our patterns for other than personal use? You can read what you are allowed to do in the Copyright text at the bottom of all our patterns. Happy crafting!
Post a comment to pattern DROPS 221-7
We would love to hear what you have to say about this pattern!
If you want to leave a question, please make sure you select the correct category in the form below, to speed up the answering process. Required fields are marked *.