
Popular categories
Looking for a yarn?


Comments / Questions (62)
![]() Lynn wrote:
Lynn wrote:
Are the (include one edge stitch on each side) already included in the cast on number of stitches or are you in fact adding 2 more stitches to the total. Example for size large, would the total number of stitches on the needle be 117 or 119 on the first row? Thank you
01.03.2025 - 18:44DROPS Design answered:
Dear Lynn, yes, the edge stitches are included in the total number of stitches. So it's 117 stitches, of which 1 stitch on each side is worked in garter stitch. Happy knitting!
02.03.2025 - 19:05
![]() Monika wrote:
Monika wrote:
Im Abschnitt "nach allen Raglan- und V-Ausschnittabnahmen" heißt es: 56-54-54-60-62-60 Maschen – fell samtidig 12-8-8-12-13-9 Maschen. Was bedeutet Fell samtitig? Leider kann ich daher den Rest des Satzes nicht verstehen. Vielen Dank für eine Erklärung. Viele Grüße Monika
07.02.2025 - 20:06DROPS Design answered:
Liebe Monika, hier sollte man "abnehmen" lesen sollen, danke für den Hinweis, eine Korrektur erfolgt, dh bei dieser Reihe soll man 12-8-8-12-13-9 Maschen über die nächsten 56-54-54-60-62-60 Maschen abnehmen. Viel Spaß beim Stricken!
10.02.2025 - 09:11
![]() Faiza wrote:
Faiza wrote:
Bonjour, pour le raglan je crois que les diminutions ne se font pas de la même façon transition manche droite et gauche ?
29.01.2025 - 10:06DROPS Design answered:
Bonjour Faiza, on diminue de la même façon à chaque raglan, comme indiqué sous RAGLAN et comme on le montre dans cette vidéo. Bon tricot!
29.01.2025 - 13:44
![]() Patrycja wrote:
Patrycja wrote:
Hello, is width of the sweater measured after washing or before? I suppose that this wool will stretch out a little. I don't it to be too lose on me.
19.01.2025 - 20:20DROPS Design answered:
Dear Patrycja, these are the final measurements of the garment. If you wash the garment as specified for this yarn (you can see more information on how to wash this in the "Care" section here: https://www.garnstudio.com/yarn.php?show=drops-air&cid=19) the wool should barely stretch out so these measurements should match. Happy knitting!
19.01.2025 - 22:56
![]() Diana wrote:
Diana wrote:
Ich verstehe nun gar nichts mehr. Ich habe mir auch mal die Kommentare der anderen durchgelesen. Da wurde unter anderem auch nach der Raglanabnahme gefragt und diese wurde so erklärt, daß vor und nach dem Markierer je eine Masche abgenommen wird. In der Beschreibung steht aber dass vor dem Markierer zwei Maschen zusammen abgenommen werden. Was ist denn nun richtig? Könnten sie bitte nochmal genau erklären, wie die Raglanabnahmen erfolgen sollen,weil so kann man es leider nicht verstehen.
13.11.2024 - 10:23DROPS Design answered:
Liebe Diana, schauen Sie mal die vorige Antwort, vielliecht kann sie zusmmen mit dem Video helfen? Sonnst fragen Sie uns noch mehr gerne weiter hier.
13.11.2024 - 17:05
![]() Diana wrote:
Diana wrote:
Ich habe nun doch noch eine Frage zur Raglanabnahme. Es ist in der Anleitung die Abnahme am ersten Übergang des Ärmels zum Rumpfteil beschrieben. Wenn ich es richtig verstanden habe, muss auch am zweiten Übergang dieses Ärmels eine Abnahme vorgenommen werden. Wie mache ich die denn? Ich kann sie doch nicht wie am ersten Übergang machen. Dann geht doch die Linie in die falsche Richtung. 13.11.2024 - 09:38
13.11.2024 - 09:45DROPS Design answered:
Liebe Diana, für den Raglan jeweils 1 Masche beidseitig von der Markierung abnehmen: stricken Sie bis 1 M vor der Masche mit der Markierung übrig ist, die 2 nächsten Maschen (= die Masche vor der Markierung + die Masche mit der Markierung) zusammen wie zum Rechtsstricken abheben, 1 Masche rechts stricken (= die Masche nach der Markierung), die beiden abgehobenen Maschen über die gestrickte ziehen (= 2 Maschen abgenommen = 1 Masche beidseitig von der Markierung) = die Markierung soll jetzt in dieser Masche sein. Siehe auch Video. Viel Spaß beim Stricken!
13.11.2024 - 17:00
![]() Diana wrote:
Diana wrote:
Korrektur: nicht Übernahme sondern Abnahme
13.11.2024 - 09:39
![]() Diana wrote:
Diana wrote:
Ich habe nun doch noch eine Frage zur Raglanabnahme. Es ist in der Anleitung die Abnahme am ersten Übergang des Ärmels zum Rumpfteil beschrieben. Wenn ich es richtig verstanden habe, muss auch am zweiten Übergang dieses Ärmels eine Übernahme vorgenommen werden. Wie mache ich die denn? Ich kann sie doch nicht wie am ersten Übergang machen. Dann geht doch die Linie in die falsche Richtung.
13.11.2024 - 09:38
![]() Diana wrote:
Diana wrote:
Ich benötige keine Antwort mehr. Ich habe überlesen,dass ich den Faden beim Rumpfteil auch abschneide und somit ja auch mit einer Hinreihe weiterarbeiten kann.
12.11.2024 - 21:00
![]() Diana wrote:
Diana wrote:
Natürlich soll es Rückreihe heißen. 😉
12.11.2024 - 19:27
|
|
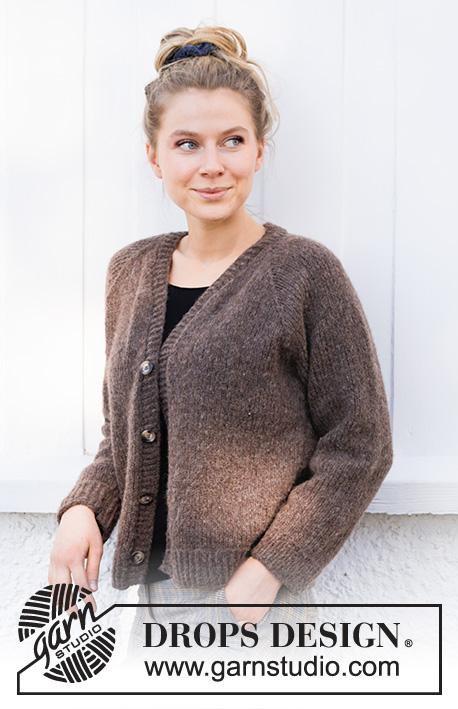
Autumn Pathways#autumnpathwayscardigan |
|
 |
 |
Knitted jacket with raglan in DROPS Air. The piece is worked with V-neck and split in the sides. Sizes S - XXXL.
DROPS 216-11 |
|
|
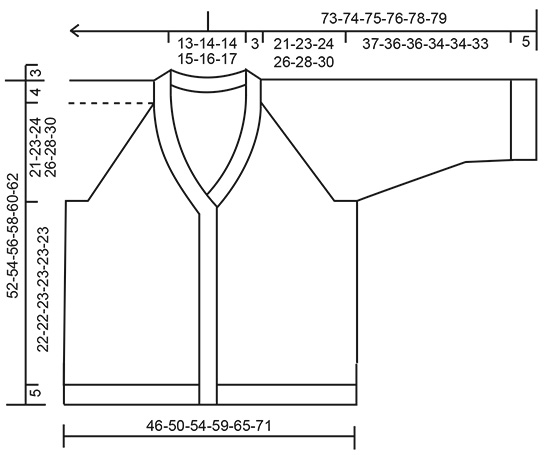
------------------------------------------------------- EXPLANATIONS FOR THE PATTERN: ------------------------------------------------------- RIDGE/GARTER STITCH (worked back and forth): Knit all rows. 1 ridge in height = Knit 2 rows. DECREASE TIP (evenly spaced): To work out how to decrease evenly, count the total number of stitches to be worked (e.g. 45 stitches) and divide by the number of decreases to be made (e.g. 8) = 5.6. In this example decrease by knitting together alternately each 4th and 5th stitch and each 5th and 6th stitch. INCREASE TIP (for sleeves): Work until there are 2 stitches left before the marker thread, 1 yarn over, knit 4 (marker thread sits between these 4 stitches), 1 yarn over. On the next round knit the yarn overs twisted to avoid holes. Then work the new stitches in stocking stitch. RAGLAN: Decrease 2 stitches in each transition between body and sleeves as follows: Work until there is 1 stitch left before the marker-stitch, slip 2 stitches as if to knit together, knit 1, pass the 2 slipped stitches over the knitted stitch (= 2 stitches decreased). BUTTONHOLES: Work buttonholes on the right band (when the garment is worn). 1 buttonhole = Make 1 yarn over, knit 2 together. On the next row (wrong side), knit the yarn over to leave a hole. The first buttonhole is worked when the band measures approx. 5 cm (transition between rib and stocking stitch on body). Then work the 3 other buttonholes with approx. 8 cm between each one. ------------------------------------------------------- START THE PIECE HERE: ------------------------------------------------------- JACKET – SHORT OVERVIEW OF THE PIECE: Front and back pieces are worked separately, back and forth, until the rib is nearly finished. Then all sections are placed on the same circular needle and worked back and forth as far as the armholes. The sleeves are worked in the round with double pointed needles/short circular needle, then placed on the same circular needle as the body. The yoke is finished back and forth. The bands and neck are worked to finish. BACK PIECE: Cast on 91-101-109-117-129-141 stitches (including 1 edge stitch on each side) with circular needle size 4 mm and Air. Purl 1 row from the wrong side. Then work rib as follows: ROW 1 (right side): 1 edge stitch in GARTER STITCH – read description above, * knit 1 twisted, purl 1 *, work from *-* until there are 2 stitches left, knit 1 twisted and 1 edge stitch in garter stitch. ROW 2 (wrong side): 1 edge stitch in garter stitch * purl 1 twisted, knit 1 *, work from *-* until there are 2 stitches left, purl 1 twisted and 1 edge stitch in garter stitch. Repeat rows 1 and 2 until the rib measures 5 cm. Cut the strand, lay the piece to one side and work the front pieces. LEFT FRONT PIECE: Cast on 47-51-55-59-65-71 stitches (including 1 edge stitch on each side) with circular needle size 4 mm and Air. Purl 1 row from the wrong side. Then work rib as follows: ROW 1 (right side): 1 edge stitch in garter stitch, * knit 1 twisted, purl 1 *, work from *-* until there are 2 stitches left, knit 1 twisted and 1 edge stitch in garter stitch. ROW 2 (wrong side): 1 edge stitch in garter stitch * purl 1 twisted, knit 1 *, work from *-* until there are 2 stitches left, purl 1 twisted and 1 edge stitch in garter stitch. Repeat rows 1 and 2 until the rib measures 5 cm. Cut the strand, lay the piece to one side and work the right front piece. RIGHT FRONT PIECE: Work in the same way as the left front piece until it measures 5 cm – adjust so you finish after a row from the wrong side. Do not cut the strand. BODY: Now work the sections together. Work over the right front piece, from the right side, as follows: 1 edge stitch in garter stitch, knit 45-49-53-57-63-69 and decrease at the same time 8-9-10-10-11-12 stitches evenly over these stitches, knit the last stitch on the right front piece together with the first stitch on the back piece (= 1 stitch decreased), knit 89-99-107-115-127-139 and decrease at the same time 17-21-23-23-25-27 stitches evenly over these stitches, knit the last stitch on the back piece together with the first stitch on the left front piece (= 1 stitch decreased), knit 45-49-53-57-63-69 and decrease at the same time 8-9-10-10-11-12 stitches evenly over these stitches and work the last stitch in garter stitch = 150-162-174-190-210-230 stitches. Change to circular needle size 5.5 mm and continue back and forth with stocking stitch and 1 edge stitch in garter stitch on each side towards mid front. REMEMBER THE KNITTING TENSION!. When the piece measures 27-27-28-28-28-28 cm from the cast-on edge, cast off stitches for the armholes as follows: Work the first 34-37-39-43-47-51 stitches as before (right front piece), cast off the next 8-8-10-10-12-14 stitches (= armhole), work the next 66-72-76-84-92-100 stitches (= back piece), cast off the next 8-8-10-10-12-14 stitches (= armhole), work the last 34-37-39-43-47-51 stitches (= left front piece). Cut the strand, lay the piece to one side and work the sleeves. SLEEVE: Cast on 46-48-50-52-52-56 stitches with double pointed needles size 4 mm and Air. Knit 1 round, then work rib (= knit 1 twisted /purl 1) in the round for 5 cm. Knit 1 round where you decrease 8-8-8-8-8-10 stitches evenly spaced = 38-40-42-44-44-46 stitches. Change to double pointed needles size 5.5 mm and insert a marker thread at the beginning of the round (= mid under sleeve). Allow the thread to follow your work onwards; it will be used when increasing under the sleeve. Continue with stocking stitch until the sleeve measures 11-10-10-10-7-7 cm, then increase 1 stitch on each side of the marker thread – read INCREASE TIP. Increase like this every 3-3-2½-2-2-2 cm a total of 10-10-12-13-15-15 times = 58-60-66-70-74-76 stitches. When the sleeve measures 42-41-41-39-39-38 cm, cast off 8-8-10-10-12-14 stitches under the sleeve (4-4-5-5-6-7 stitches on each side of the marker thread) = 50-52-56-60-62-62 stitches. Cut the strand, lay the piece to one side and work the other sleeve in the same way. YOKE: Place the sleeves on the same circular needle as the body, where stitches were cast off for the armholes = 234-250-266-290-310-326 stitches. Work the first row from the right side as follows: 1 edge stitch in garter stitch, knit 30-32-34-38-41-44, knit 1 more stitch and insert 1 marker in this stitch (right front piece), knit 54-58-62-66-70-72 (= sleeve), knit 1 more stitch and insert 1 marker in this stitch, knit 60-64-68-76-82-88 (= back piece), knit 1 more stitch and insert 1 marker in this stitch, knit 54-58-62-66-70-72 (= sleeve), knit 1 more stitch and insert 1 marker in this stitch, knit 30-32-34-38-41-44 and 1 edge stitch in garter stitch (= left front piece). The marker stitches are in the transitions between body and sleeves. Continue back and forth with stocking stitch and 1 edge stitch in garter stitch on each side towards mid front. Now decrease for raglan and V-neck as follows. RAGLAN: When you have worked 4-4-2-2-2-2 rows on the yoke, begin to decrease for RAGLAN – read description above. Decrease like this every 2nd row a total of 19-21-23-25-27-29 times. V-NECK: When you have worked 2-4-4-4-4-4 rows on the yoke, begin to decrease for the V-neck from right side as follows: 1 edge stitch in garter stitch, slip 1 stitch as if to knit, knit 1 and pass the slipped stitch over the knitted stitch (= 1 stitch decreased), work until there are 3 stitches left, knit 2 together (= 1 stitch decreased) and1 edge stitch in garter stitch. Decrease like this one more time after 7 rows and then on every 4th row 8-9-9-10-11-12 times = 10-11-11-12-13-14 decreases in total for V-neck on each side. When all the decreases for raglan and V-neck are finished there are 62-60-60-66-68-66 stitches left on the needle. The next row from the right side is worked as follows: 1 edge stitch in garter stitch, slip 1 stitch as if to knit, knit 1, pass the slipped stitch over (= 1 stitch decreased), knit 56-54-54-60-62-60 stitches – decrease at the same time 12-8-8-12-13-9 stitches evenly spaced, knit 2 together (= 1 stitch decreased), 1 edge stitch in garter stitch = 48-50-50-52-53-55 stitches. Cast off. RIGHT BAND: Start from the right side at the bottom of the right front piece, with circular needle size 4 mm, and knit up, inside the 1 edge stitch, 123 to 147 stitches (number of stitches must be divisible by 2 + 1) along the front piece and up to mid back. Purl 1 row from the wrong side – increase with yarn overs just where the first decrease for the neck started by working as follows: * Purl 1, 1 yarn over *, work from *-* 2 times (= 2 stitches increased) – on the next row work the yarn overs twisted to avoid holes. Now work rib from the right side as follows: ROW 1 (right side): 1 edge stitch in garter stitch, * knit 1 twisted, purl 1 *, work from *-* until there are 2 stitches left, knit 1 twisted and 1 edge stitch in garter stitch. ROW 2 (wrong side): 1 edge stitch in garter stitch * purl 1 twisted, knit 1 *, work from *-* until there are 2 stitches left, purl 1 twisted and 1 edge stitch in garter stitch. Repeat rows 1 and 2 until the band measures 1-1½ cm. Now work BUTTONHOLES – read description above. Continue working until the band measures a total of 3-3½ cm. Cast off with knit over knit and purl over purl. LEFT BAND: Knit up 123 to 147 stitches (number of stitches must be divisible by 2 + 1) from the right side and inside the 1 edge stitch, starting from mid back and down the left front piece. Purl 1 row from the wrong side – increase with yarn overs where the first decrease for the neck started by working as follows: * Purl 1, 1 yarn over *, work from *-* 2 times (= 2 stitches increased) – on the next row work the yarn overs twisted to avoid holes. Now work rib from the right side as follows: ROW 1 (right side): 1 edge stitch in garter stitch, * knit 1 twisted, purl 1 *, work from *-* until there are 2 stitches left, knit 1 twisted and 1 edge stitch in garter stitch. ROW 2 (wrong side): 1 edge stitch in garter stitch * purl 1 twisted, knit 1 *, work from *-* until there are 2 stitches left, purl 1 twisted and 1 edge stitch in garter stitch. Repeat rows 1 and 2 until the band measures 3-3½ cm. Cast off with knit over knit and purl over purl. ASSEMBLY: Sew bands together mid-back inside the 1 edge stitch. Sew the buttons onto the left band. Sew the openings under the sleeves. |
|
 |
|
Have you finished this pattern?Tag your pictures with #dropspattern #autumnpathwayscardigan or submit them to the #dropsfan gallery. Do you need help with this pattern?You'll find 34 tutorial videos, a Comments/Questions area and more by visiting the pattern on garnstudio.com. © 1982-2026 DROPS Design A/S. We reserve all rights. This document, including all its sub-sections, has copyrights. Read more about what you can do with our patterns at the bottom of each pattern on our site. |
|
With over 40 years in knitting and crochet design, DROPS Design offers one of the most extensive collections of free patterns on the internet - translated to 17 languages. As of today we count 324 catalogues and 12202 patterns translated into English (UK/cm). 12202
We work hard to bring you the best knitting and crochet have to offer, inspiration and advice as well as great quality yarns at incredible prices! Would you like to use our patterns for other than personal use? You can read what you are allowed to do in the Copyright text at the bottom of all our patterns. Happy crafting!
Post a comment to pattern DROPS 216-11
We would love to hear what you have to say about this pattern!
If you want to leave a question, please make sure you select the correct category in the form below, to speed up the answering process. Required fields are marked *.