
Popular categories
Looking for a yarn?


|
|
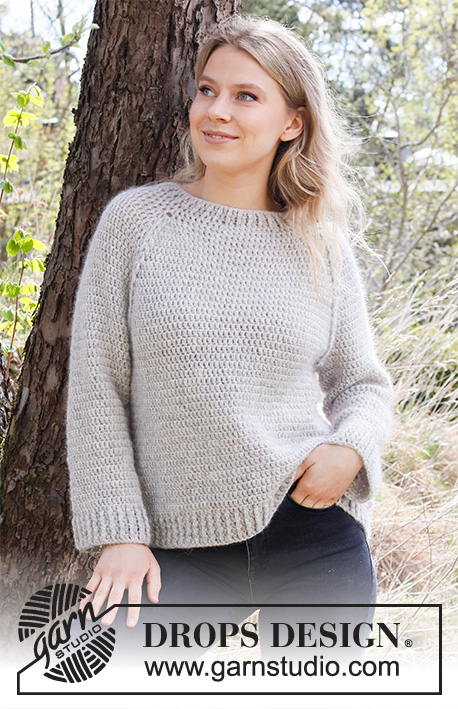
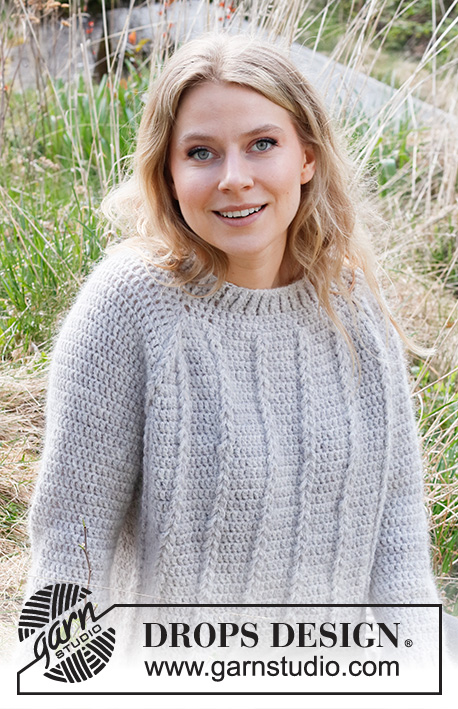
Autumn Pathways |
|
 |
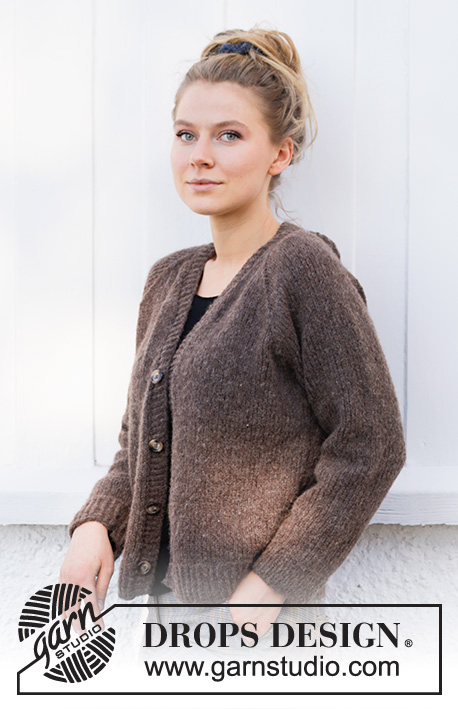 |
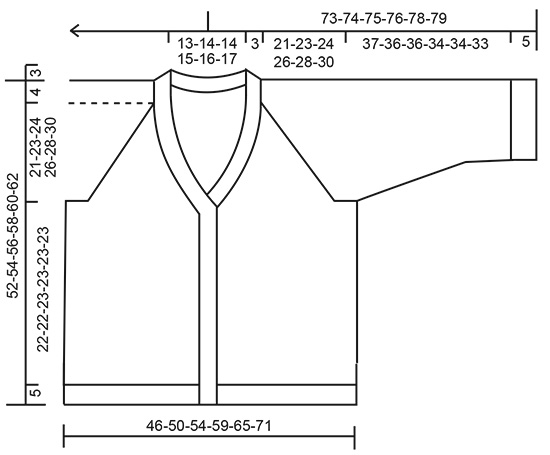
Knitted jacket with raglan in DROPS Air. The piece is worked with V-neck and split in the sides. Sizes S - XXXL.
DROPS 216-11 |
|
|
------------------------------------------------------- EXPLANATIONS FOR THE PATTERN: ------------------------------------------------------- RIDGE/GARTER STITCH (worked back and forth): Knit all rows. 1 ridge in height = Knit 2 rows. DECREASE TIP (evenly spaced): To work out how to decrease evenly, count the total number of stitches to be worked (e.g. 45 stitches) and divide by the number of decreases to be made (e.g. 8) = 5.6. In this example decrease by knitting together alternately each 4th and 5th stitch and each 5th and 6th stitch. INCREASE TIP (for sleeves): Work until there are 2 stitches left before the marker thread, 1 yarn over, knit 4 (marker thread sits between these 4 stitches), 1 yarn over. On the next round knit the yarn overs twisted to avoid holes. Then work the new stitches in stockinette stitch. RAGLAN: Decrease 2 stitches in each transition between body and sleeves as follows: Work until there is 1 stitch left before the marker-stitch, slip 2 stitches as if to knit together, knit 1, pass the 2 slipped stitches over the knitted stitch (= 2 stitches decreased). BUTTONHOLES: Work buttonholes on the right band (when the garment is worn). 1 buttonhole = Make 1 yarn over, knit 2 together. On the next row (wrong side), knit the yarn over to leave a hole. The first buttonhole is worked when the band measures approx. 5 cm = 2" (transition between rib and stockinette stitch on body). Then work the 3 other buttonholes with approx. 8 cm = 3⅛" between each one. ------------------------------------------------------- START THE PIECE HERE: ------------------------------------------------------- JACKET – SHORT OVERVIEW OF THE PIECE: Front and back pieces are worked separately, back and forth, until the rib is nearly finished. Then all sections are placed on the same circular needle and worked back and forth as far as the armholes. The sleeves are worked in the round with double pointed needles/short circular needle, then placed on the same circular needle as the body. The yoke is finished back and forth. The bands and neck are worked to finish. BACK PIECE: Cast on 91-101-109-117-129-141 stitches (including 1 edge stitch on each side) with circular needle size 4 mm = US 6 and Air. Purl 1 row from the wrong side. Then work rib as follows: ROW 1 (right side): 1 edge stitch in GARTER STITCH – read description above, * knit 1 twisted, purl 1 *, work from *-* until there are 2 stitches left, knit 1 twisted and 1 edge stitch in garter stitch. ROW 2 (wrong side): 1 edge stitch in garter stitch * purl 1 twisted, knit 1 *, work from *-* until there are 2 stitches left, purl 1 twisted and 1 edge stitch in garter stitch. Repeat rows 1 and 2 until the rib measures 5 cm = 2". Cut the strand, lay the piece to one side and work the front pieces. LEFT FRONT PIECE: Cast on 47-51-55-59-65-71 stitches (including 1 edge stitch on each side) with circular needle size 4 mm = US 6 and Air. Purl 1 row from the wrong side. Then work rib as follows: ROW 1 (right side): 1 edge stitch in garter stitch, * knit 1 twisted, purl 1 *, work from *-* until there are 2 stitches left, knit 1 twisted and 1 edge stitch in garter stitch. ROW 2 (wrong side): 1 edge stitch in garter stitch * purl 1 twisted, knit 1 *, work from *-* until there are 2 stitches left, purl 1 twisted and 1 edge stitch in garter stitch. Repeat rows 1 and 2 until the rib measures 5 cm = 2". Cut the strand, lay the piece to one side and work the right front piece. RIGHT FRONT PIECE: Work in the same way as the left front piece until it measures 5 cm = 2" – adjust so you finish after a row from the wrong side. Do not cut the strand. BODY: Now work the sections together. Work over the right front piece, from the right side, as follows: 1 edge stitch in garter stitch, knit 45-49-53-57-63-69 and decrease at the same time 8-9-10-10-11-12 stitches evenly over these stitches, knit the last stitch on the right front piece together with the first stitch on the back piece (= 1 stitch decreased), knit 89-99-107-115-127-139 and decrease at the same time 17-21-23-23-25-27 stitches evenly over these stitches, knit the last stitch on the back piece together with the first stitch on the left front piece (= 1 stitch decreased), knit 45-49-53-57-63-69 and decrease at the same time 8-9-10-10-11-12 stitches evenly over these stitches and work the last stitch in garter stitch = 150-162-174-190-210-230 stitches. Change to circular needle size 5.5 mm = US 9 and continue back and forth with stockinette stitch and 1 edge stitch in garter stitch on each side towards mid front. REMEMBER THE KNITTING GAUGE!. When the piece measures 27-27-28-28-28-28 cm = 10⅝"-10⅝"-11"-11"-11"-11" from the cast-on edge, bind off stitches for the armholes as follows: Work the first 34-37-39-43-47-51 stitches as before (right front piece), bind off the next 8-8-10-10-12-14 stitches (= armhole), work the next 66-72-76-84-92-100 stitches (= back piece), bind off the next 8-8-10-10-12-14 stitches (= armhole), work the last 34-37-39-43-47-51 stitches (= left front piece). Cut the strand, lay the piece to one side and work the sleeves. SLEEVE: Cast on 46-48-50-52-52-56 stitches with double pointed needles size 4 mm = US 6 and Air. Knit 1 round, then work rib (= knit 1 twisted /purl 1) in the round for 5 cm = 2". Knit 1 round where you decrease 8-8-8-8-8-10 stitches evenly spaced = 38-40-42-44-44-46 stitches. Change to double pointed needles size 5.5 mm = US 9 and insert a marker thread at the beginning of the round (= mid under sleeve). Allow the thread to follow your work onwards; it will be used when increasing under the sleeve. Continue with stockinette stitch until the sleeve measures 11-10-10-10-7-7 cm = 4⅜"-4"-4"-4"-2¾"-2¾", then increase 1 stitch on each side of the marker thread – read INCREASE TIP. Increase like this every 3-3-2½-2-2-2 cm = 1⅛"-1⅛"-1"-¾"-¾"-¾" a total of 10-10-12-13-15-15 times = 58-60-66-70-74-76 stitches. When the sleeve measures 42-41-41-39-39-38 cm = 16½"-16⅛"-16⅛"-15¼"-15¼"-15", bind off 8-8-10-10-12-14 stitches under the sleeve (4-4-5-5-6-7 stitches on each side of the marker thread) = 50-52-56-60-62-62 stitches. Cut the strand, lay the piece to one side and work the other sleeve in the same way. YOKE: Place the sleeves on the same circular needle as the body, where stitches were bind off for the armholes = 234-250-266-290-310-326 stitches. Work the first row from the right side as follows: 1 edge stitch in garter stitch, knit 30-32-34-38-41-44, knit 1 more stitch and insert 1 marker in this stitch (right front piece), knit 54-58-62-66-70-72 (= sleeve), knit 1 more stitch and insert 1 marker in this stitch, knit 60-64-68-76-82-88 (= back piece), knit 1 more stitch and insert 1 marker in this stitch, knit 54-58-62-66-70-72 (= sleeve), knit 1 more stitch and insert 1 marker in this stitch, knit 30-32-34-38-41-44 and 1 edge stitch in garter stitch (= left front piece). The marker stitches are in the transitions between body and sleeves. Continue back and forth with stockinette stitch and 1 edge stitch in garter stitch on each side towards mid front. Now decrease for raglan and V-neck as follows. RAGLAN: When you have worked 4-4-2-2-2-2 rows on the yoke, begin to decrease for RAGLAN – read description above. Decrease like this every 2nd row a total of 19-21-23-25-27-29 times. V-NECK: When you have worked 2-4-4-4-4-4 rows on the yoke, begin to decrease for the V-neck from right side as follows: 1 edge stitch in garter stitch, slip 1 stitch as if to knit, knit 1 and pass the slipped stitch over the knitted stitch (= 1 stitch decreased), work until there are 3 stitches left, knit 2 together (= 1 stitch decreased) and1 edge stitch in garter stitch. Decrease like this one more time after 7 rows and then on every 4th row 8-9-9-10-11-12 times = 10-11-11-12-13-14 decreases in total for V-neck on each side. When all the decreases for raglan and V-neck are finished there are 62-60-60-66-68-66 stitches left on the needle. The next row from the right side is worked as follows: 1 edge stitch in garter stitch, slip 1 stitch as if to knit, knit 1, pass the slipped stitch over (= 1 stitch decreased), knit 56-54-54-60-62-60 stitches – decrease at the same time 12-8-8-12-13-9 stitches evenly spaced, knit 2 together (= 1 stitch decreased), 1 edge stitch in garter stitch = 48-50-50-52-53-55 stitches. Bind off. RIGHT BAND: Start from the right side at the bottom of the right front piece, with circular needle size 4 mm = US 6, and knit up, inside the 1 edge stitch, 123 to 147 stitches (number of stitches must be divisible by 2 + 1) along the front piece and up to mid back. Purl 1 row from the wrong side – increase with yarn overs just where the first decrease for the neck started by working as follows: * Purl 1, 1 yarn over *, work from *-* 2 times (= 2 stitches increased) – on the next row work the yarn overs twisted to avoid holes. Now work rib from the right side as follows: ROW 1 (right side): 1 edge stitch in garter stitch, * knit 1 twisted, purl 1 *, work from *-* until there are 2 stitches left, knit 1 twisted and 1 edge stitch in garter stitch. ROW 2 (wrong side): 1 edge stitch in garter stitch * purl 1 twisted, knit 1 *, work from *-* until there are 2 stitches left, purl 1 twisted and 1 edge stitch in garter stitch. Repeat rows 1 and 2 until the band measures 1-1½ cm = ⅜"-½". Now work BUTTONHOLES – read description above. Continue working until the band measures a total of 3-3½ cm = 1⅛"-1¼". Bind off with knit over knit and purl over purl. LEFT BAND: Knit up 123 to 147 stitches (number of stitches must be divisible by 2 + 1) from the right side and inside the 1 edge stitch, starting from mid back and down the left front piece. Purl 1 row from the wrong side – increase with yarn overs where the first decrease for the neck started by working as follows: * Purl 1, 1 yarn over *, work from *-* 2 times (= 2 stitches increased) – on the next row work the yarn overs twisted to avoid holes. Now work rib from the right side as follows: ROW 1 (right side): 1 edge stitch in garter stitch, * knit 1 twisted, purl 1 *, work from *-* until there are 2 stitches left, knit 1 twisted and 1 edge stitch in garter stitch. ROW 2 (wrong side): 1 edge stitch in garter stitch * purl 1 twisted, knit 1 *, work from *-* until there are 2 stitches left, purl 1 twisted and 1 edge stitch in garter stitch. Repeat rows 1 and 2 until the band measures 3-3½ cm = 1⅛"-1¼". Bind off with knit over knit and purl over purl. ASSEMBLY: Sew bands together mid-back inside the 1 edge stitch. Sew the buttons onto the left band. Sew the openings under the sleeves. |
|
|
|
|
Have you made this or any other of our designs? Tag your pictures in social media with #dropsdesign so we can see them! Do you need help with this pattern?You'll find tutorial videos, a Comments/Questions area and more by visiting the pattern on garnstudio.com. © 1982-2024 DROPS Design A/S. We reserve all rights. This document, including all its sub-sections, has copyrights. Read more about what you can do with our patterns at the bottom of each pattern on our site. |
|


With over 40 years in knitting and crochet design, DROPS Design offers one of the most extensive collections of free patterns on the internet - translated to 17 languages. As of today we count 304 catalogs and 11422 patterns - 11417 of which are translated into English (US/in).
We work hard to bring you the best knitting and crochet have to offer, inspiration and advice as well as great quality yarns at incredible prices! Would you like to use our patterns for other than personal use? You can read what you are allowed to do in the Copyright text at the bottom of all our patterns. Happy crafting!
Comments / Questions (39)
Bonjour, J'ai parfaitement compris ce qu'il y à faire. Relisez ma question, vous n'y répondez pas. Vos comptes sont faux.
20.02.2024 - 02:22DROPS Design answered:
Bonjour Sylvaine, je suis désolée de m'être mal exprimée, indiquez-nous votre taille, je pourrais ainsi vous aider plus en détail, merci pour votre compréhension.
20.02.2024 - 08:16Bonjour, Section empiècement, vous indiquez pour les manches 54-58-62-66-70-72. Section manches on fini avec 50-52-56-60-62-62 D'après la réponse que vous avez faite à S. Gaspard, ne devrions-nous pas avoir, plutôt, 54-56-60-64-64-66 ?
17.02.2024 - 16:22DROPS Design answered:
Bonjour Sylvaine, les dernières mailles du devant vont être attribuées à la manche, autrement dit, vous devez tricoter le 1er rang de l'empiècement en plaçant bien vos marqueurs comme indiqué (le nombre de mailles des devants/du dos attribué à la manche varie en fonction de la taille, suivez bien votre taille, vous aurez bien le bon nombre de mailles à la fin de ce rang, mais le début des manches se trouve avant la fin du devant/après le début du dos + avant la fin du dos/après le début du devant. Bon tricot!
19.02.2024 - 09:04Hallo, Mijn vest is af en het is heel mooi geworden, er is wel iets wat ik heel gek vind en waar jullie misschien een oplossing voor hebben . Als ik het aan heb dan gaat het heel gek tuiten aan de voor of achterkant, als ik het voor goed vind zitten tuit het achter en als ik het achter goed trek dan tuit het voor. Hoe kan ik dit oplossen? Bij voorbaat dank. Groet Willy
08.02.2024 - 14:17DROPS Design answered:
Dag Willy,
Wat je met tuiten precies bedoeld weet ik niet, maar als de randen omkrullen dan zou je deze heel voorzichtig op kunnen persen. hiervoor leg je een natte theedoek over het werk en dep je heel voorzichtig met een warme strijkbout. Let erop dat je dit heel voorzichtig doet, anders kun je de structuur van het breiwerk vernielen.
28.02.2024 - 20:47Hallo, ik ben het vest in maat L aan het breien. Klopt het dat de boord een grotere afmeting heeft dan aangegeven staat in de tekening? Mijn steek verhouding klopt precies. Mijn boord van het achterland meet al 63 cm. Ik zie dat je wel meteen na het boord moet minderen, maar ziet dat er dan niet erg raar uit?
15.12.2023 - 19:02DROPS Design answered:
Dag Willy,
Er wordt inderdaad geminderd vlak voordat je met tricotsteek op de panden begint. Ik denk dat dit zo is gedaan om te voorkomen dat de boordsteek het werk samentrekt, bovendien is het geen standaard boordsteek maar met gedraaid recht. Waarschijnlijk klopt het dus wel.
17.12.2023 - 17:40Ich komme mit den Raglanabnahmen nicht klar. Nach meinem Verständnis muss ich am Vorder- und Rückenteil abnehmen. Die Maschenzahl der Ärmel bleibt. Somit liegen die Abnahmen, wie beschrieben, einmal vor der Markierung aber auch einmal hinter der Markierung. Wie hier abgenomen werden soll erschließt sich mir nicht. Oder verstehe ich da was nicht?? Vielen Dank für den Support
02.10.2023 - 18:20DROPS Design answered:
Liebe Maria, mit den Raglanabnahmen wird man 1 Masche beidseitig von der Masche mit dem Markierer abnehmen - in diesem Video zeigen wir, wie man so eine Abnahme strickt. Viel Spaß beim stricken!
03.10.2023 - 07:50Désolée mais votre réponse est confuse il me reste 62m j'ai fini le raglan dos je rabat les 62m ou 55 m comme vous expliquez merci de bien vouloir me donner une réponse claire je vous avoue que je ne comprends pas votre réponse
29.06.2023 - 14:00DROPS Design answered:
Bonjour Christine, donc vous tricotez bien la taille S en suivant les explications (et pas chaque partie séparément), et il vous reste bien 62 mailles quand toutes les diminutions de l'encolure et du raglan sont faites. Tricotez le rang suivant sur l'endroit comme indiqué en diminuant comme indiqué de sorte qu'il vous reste 48 mailles et vous rabattez ces 48 dernières mailles au rang suivant (sur l'envers). Si je me suis trompée dans la taille, n'hésitez pas à ajouter d'autres informations complémentaires, merci pour votre compréhension. Bon tricot!
29.06.2023 - 15:42Bonjour Auriez-vous l'amabilité de me répondre, voilà ce que vous écrivez ! je rabat ou non "On ne rabat pas de mailles spécialement pour l'encolure dos, quand les diminutions des raglans sont terminées, il reste 62-66 m (cf taille), on va diminuer à 48-55 mailles et on rabat ces mailles."
29.06.2023 - 12:27DROPS Design answered:
Bonjour Christine, vous retrouverez la réponse ci-dessous, j'avoue ne plus trop savoir où vous en êtes exactement de votre ouvrage, raison pour laquelle j'ai sans doute mal compris votre question? N'hésitez pas à nous en dire davantage si la réponse précédente n'a pas pu vous aider. Merci pour votre compréhension.
29.06.2023 - 13:08Je fais dos et devant séparément vous dite il reste 62m et vous rabattez 55m je rabat 62 ou non je ne comprends pas désolée
28.06.2023 - 18:19DROPS Design answered:
Bonjour Christine, à quel niveau précis en êtes vous du devant? Le dos et les devants se tricotent séparément jusqu'à la fin des fentes puis on les tricote en une seule partie jusqu'aux emmanchures, puis on tricote les manches jusqu'aux emmanchures et on tricote toutes les pièces ensemble pour diminuer pour le raglan, quand toutes les diminutions du raglan et de l'encolure V sont faites, il vous reste 62 à 66 mailles en fonction de la taille, diminuez comme indiqué, pour qu'il vous reste 48 à 55 mailles et rabattez toutes ces mailles. Si vous avez choisi de tricoter chaque partie séparément, il vous faudra recalculer le nombre pour chaque pièce. Bon tricot!
29.06.2023 - 12:40Pour le col derrière vous ne dites pas combien de diminutions ?? merci
28.06.2023 - 12:50DROPS Design answered:
Bonjour Christine, pensez-vous à l'encolure dos? On ne rabat pas de mailles spécialement pour l'encolure dos, quand les diminutions des raglans sont terminées, il reste 62-66 m (cf taille), on va diminuer à 48-55 mailles et on rabat ces mailles. Vous tricoterez ensuite les bordures des devants séparément en relevant les mailles le long du devant droit, de l'encolure V, en haut de la manche jusqu'à la moitié de l'encolure dos, puis pour la bordure du devant gauche, à partir du milieu dos en descendant jusqu'en bas du devant gauche. Assemblez ensuite les deux bordures ensemble au milieu dos. Bon tricot!
28.06.2023 - 16:26Bonjour, A la fin de la manche on a 50-52-56... mailles. Or lorsqu'on les reprend dans l'empiécement vous indiquez 54-56-60... m. pour les mailles à reprendre. Pourquoi cette différence ?
20.04.2023 - 22:18DROPS Design answered:
Bonjour Mme Gaspard, on attribue 2 mailles de chaque devant et 2 mailles du dos à chacune des manches, autrement dit, en taille S, vous aviez 34 m pour le devant mais vous tricotez ainsi: 1 m lis, 30 m end,1 m avec 1 marqueur (= 32 m pour le devant), 54 m pour la manche (= 2 m du devant + 50 m de la manche + 2 m du dos), et de même pour la 2ème manche. Bon tricot!
21.04.2023 - 08:17