
Popular categories
Looking for a yarn?


Comments / Questions (260)
![]() Sônia Santanna wrote:
Sônia Santanna wrote:
Apenas deixar registrado, apesar de saber que não devo ser a primeira a falar sobre. Tricoto desde a infância, miha mãe me ensinou, e agora, já uma avó, sempre que preciso de uma indicação ou tenho uma dúvida, recorro as padrões e explicações do Garnstudio, e até o momento sempre tive sucesso em minhas buscas. Agradeço a vocês por compartilhar conhecimento de qualidade e desejo sucesso sempre. Atenciosamente, Sônia Santanna.
07.02.2026 - 22:58DROPS Design answered:
Muito obrigado pelas suas bonitas palavras em nome da equipa DROPS.
09.02.2026 - 10:38
![]() Martha Schreiter wrote:
Martha Schreiter wrote:
Hallo, ich habe die Wolle "Safran" gekauft um mir den Pullover "Catch the Wind" zu stricken, aber leider finde ich kein Diagramm. Wie komme ich daran.? Anklicken - da tut sich leider nichts. VG - M. Schreiter
05.01.2026 - 18:08DROPS Design answered:
Liebe Martha, leider kam es kurzzeitig zu einer technischen Störung, für die wir uns entschuldigen möchten. Die Diagramme sind inzwischen wieder vollständig verfügbar. Bitte aktualisieren Sie die Seite, danach sollten die Diagramme wieder wie gewohnt angezeigt werden. Vielen Dank für Ihr Verständnis und viel Freude beim Stricken Ihres Projekts!
05.01.2026 - 19:14
![]() Christine Westerlund wrote:
Christine Westerlund wrote:
Tillägg till fråga 5.11. Jag har stickat mönstret ända till sista varvet. Jag vill veta hur jag fortsätter med mönstret.
06.11.2025 - 11:06
![]() Christine Westerlund wrote:
Christine Westerlund wrote:
Jag vill veta hur jag går vidare i mönster Drops 211-5. Saknas diagram
05.11.2025 - 17:35DROPS Design answered:
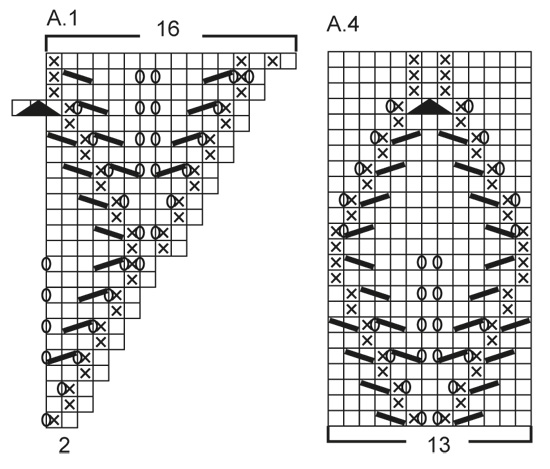
Hei Christine. Da fortsetter du på 1. rad igjen, og siden du har økt i diagrammene A.1 og A.3 vil det strikkes flere rapporter av A.2 / A.4. mvh DROPS Design
17.11.2025 - 09:03
![]() Catherine Fyon wrote:
Catherine Fyon wrote:
En ce qui concerne l'empiècement je n'ai pas bien compris ce qu'il convient de faire au niveau des manches lorsqu'on a tricoté les 24 rangs des diagrammes mais qu'il reste encore 10 augmentations (pour moi qui tricote en XS) de raglan à effectuer. Faut il recommencer au rang 1 des diagrammes mais en tricotant 2 fois A2? Merci pour votre réponse
14.10.2025 - 19:34DROPS Design answered:
Bonjour Mme Fyon, lorsque les diagrammes ont été tricotés 1 fois en hauteur, vous avez augmenté 14 m dans A.1 = 1 motif en plus de A.2 et14 m dans A.3 = 1 motif de plus de A.2,reprenez les diagrammes au 1er rang et tricotez ainsi A.1, A.2 (2 motifs en plus que la 1ère fois en largeur) et A.3. Bon tricot!
15.10.2025 - 10:29
![]() Hélène wrote:
Hélène wrote:
J'ai fait comme indiqué au début du Dos & Devant, i.e. couper le fil et commencer le tour 6 m avant le fil marqueur ; mais après un tour complet, il s'est créé une démarcation entre l'ancien début (milieu dos) et le tour d'après. La maille est étirée et ça parait. Qu'est-ce que j'aurais dû faire ?
04.10.2025 - 15:21DROPS Design answered:
Bonjour Hélène, vous pouvez fermer ce petit trou lorsque vous rentrerez les fils. Bon tricot!
08.10.2025 - 08:01
![]() Hélène wrote:
Hélène wrote:
Pourquoi faut-il arrêter le travail au milieu dos (après avoir mis les mailles des manches en attente) et recommencer tout de suite 6 mailles avant la maille avec le fil marqueur de la manche ? Comment continuer ? Doit-on tout simplement passer les mailles non tricotées jusqu'au nouveau point de départ et reprendre avec un nouveau fil ? Merci
02.10.2025 - 17:20DROPS Design answered:
Bonjour Hélène, tout à fait, glissez les premières mailles sur l'aiguille gauche jusqu'au milieu des mailles montées sous la 1ère manche (sans les tricoter), joignez le fil et commencez le bas du pull à partir de là. Bon tricot!
02.10.2025 - 17:26
![]() Sylvia wrote:
Sylvia wrote:
Bei Gr. L soll ich 120 maschen anschlagen. Beim Übergang zur Passe komme ich nur auf 116 Maschen (19+19+39+19+20) was mache ich falsch?
09.09.2025 - 20:15DROPS Design answered:
Hi Sylvia, you insert 1 marker thread in the stitch (not between 2 stitches), so you have 4 missing stitches > 120 sts in total in the round. Happy knitting!
12.09.2025 - 12:03
![]() Sara wrote:
Sara wrote:
Hej! Stämmer verkligen diagrammet A4 Rad 13 och 14? Ska det verkligen vara en avig maska på ett omslag? MVH Sara
04.09.2025 - 14:07DROPS Design answered:
Hei Sara. Ja, det stemmer. mvh DROPS design
15.09.2025 - 08:31
![]() Helle Brinkmann Larsen wrote:
Helle Brinkmann Larsen wrote:
Jeg strikker str M. Har slået 116 masker op. Jeg forstår ikke regnestykket med hvordan 116 + 28 udtagninger af 8 masker bliver til 356. Det giver 340. Hvor misser jeg de 16 masker henne?
30.08.2025 - 22:24DROPS Design answered:
Hej Helle. De extra ökningarna är i diagram A.1 och A.3 (dvs ökningarna på ärmarna där du ökar 14 masker per diagram som stickas på höjden). Mvh DROPS Design
01.09.2025 - 07:37
|
|||||||||||||||||||
Catch the Wind#catchthewindtop |
|||||||||||||||||||
 |
 |
||||||||||||||||||
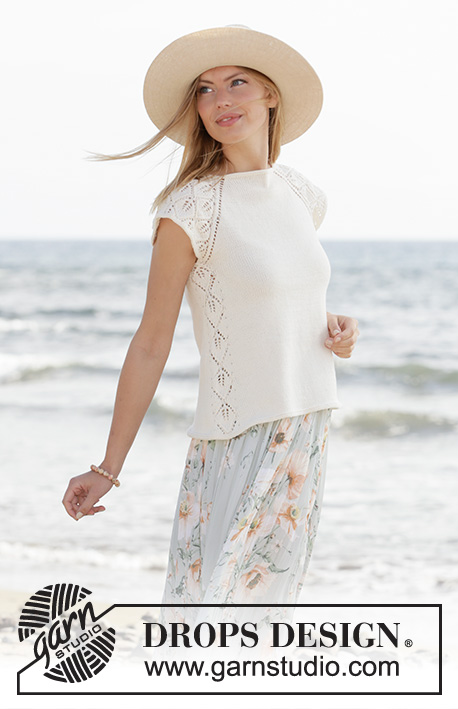
Knitted top with raglan and short sleeves in DROPS Safran. The piece is worked top down with lace pattern. Sizes XS - XXL.
DROPS 211-5 |
|||||||||||||||||||
|
------------------------------------------------------- EXPLANATIONS FOR THE PATTERN: ------------------------------------------------------- RIDGE/GARTER STITCH (worked in the round): 1 ridge in height = 2 rounds; Knit 1 round and purl 1 round. PATTERN: See diagrams A.1 to A.4. RAGLAN: Increase to raglan on each side of the back piece and each side of the front piece (towards the sleeves). Increase by making 1 yarn over before/after the stitch with the marker thread; on the next round knit the yarn overs to leave holes. The increases on the sleeves are drawn into patterns A.1 and A.3. ------------------------------------------------------- START THE PIECE HERE: ------------------------------------------------------- TOP – SHORT OVERVIEW OF THE PIECE: The neck and yoke are worked in the round with circular needle, top down. The yoke is divided for body and sleeves and the body continued in the round. A small edge is worked around the armholes. NECK: Cast on 106-110-116-120-124-132 stitches with circular needle size 3 mm and Safran. Work 2 RIDGES – read description above. Then work the yoke as described below. YOKE: Insert 4 marker threads in the piece as described below (without working the stitches). The threads will be used when increasing to raglan. Count 16-17-18-19-20-22 stitches (= half back piece), insert 1 marker thread in the next stitch, count 19 stitches (= sleeve), insert 1 marker thread in the next stitch, count 32-34-37-39-41-45 stitches (= front piece), insert 1 marker thread in the next stitch, count 19 stitches (= sleeve), insert 1 marker thread in the next stitch. There are 16-17-19-20-21-23 stitches after the last marker thread (half back piece). The first round is worked as follows: Work stocking stitch as far as the first marker-stitch, make 1 yarn over (first increase to RAGLAN – see description above), work the marker-stitch in stocking stitch, A.1 (= 2 stitches), A.2 (= 14 stitches) and A.3 ( = 3 stitches) (= 19 stitches on the sleeve), work the marker-stitch in stocking stitch, 1 yarn over, work stocking stitch as far as the next marker-stitch (= front piece), 1 yarn over, work the marker-stitch in stocking stitch, A.1 (= 2 stitches), A.2 (= 14 stitches) and A.3 (= 3 stitches) (= 19 stitches on the sleeve), work the marker-stitch in stocking stitch, 1 yarn over, work stocking stitch over the remaining stitches (= half back piece). Continue this pattern with stocking stitch on the front and back pieces and A.1, A.2 and A.3 on the sleeves. Each time A.1, A.2 and A.3 are worked 1 time in height, you work 2 more repeats of A.2 between A.1 and A.3. REMEMBER THE KNITTING TENSION! AT THE SAME TIME continue to increase to raglan every 2nd round a total of 22-26-28-31-35-39 times at each marker thread (including the first increase described above). The new stitches are worked in stocking stitch on the front and back pieces and in lace pattern as shown in the diagrams on the sleeves. When the increases to raglan are finished there are 294-334-356-388-424-468 stitches on the needle. The next round is worked as follows: Work 39-44-47-51-56-62 stitches (= half the back piece), place the next 69-79-83-91-99-109 stitches on 1 thread for the sleeve, cast on 9-9-9-11-13-15 new stitches on the needle (= in side under sleeve), work 78-88-95-103-113-125 stitches (= front piece), place the next 69-79-83-91-99-109 stitches on 1 thread for the sleeve, cast on 9-9-9-11-13-15 new stitches on the needle (= in side under sleeve), work the last 39-44-48-52-57-63 stitches (= half back piece). Body and sleeves are finished separately. THE PIECE IS NOW MEASURED FROM HERE! BODY: = 174-194-208-228-252-280 stitches. Insert 1 marker thread in the middle of the 9-9-9-11-13-15 stitches cast on under each sleeve. Cut the strand and begin the round 6 stitches before 1 of the stitches with marker thread. Work A.4 (= 13 stitches), work 74-84-91-101-113-127 stitches in stocking stitch, work A.4 and then stocking stitch over the last 74-84-91-101-113-127 stitches. Continue this pattern, AT THE SAME TIME, when the piece measures 2 cm, increase by making 1 yarn over on each side of A.4, on the next round knit the yarn overs twisted to avoid holes (= 4 increased stitches). Repeat the increase every 1 ½ cm a total of 18 times; the increased stitches are worked in stocking stitch = 246-266-280-300-324-352 stitches. When the piece measures 28-29-29-30-29-29 cm from the division work 2 ridges over all stitches, then cast off. SLEEVE-EDGE: Place the 69-79-83-91-99-109 stitches on one of the threads on short circular needle size 3 mm and knit up 1 stitch in each of the 9-9-9-11-13-15 new stitches under the sleeve = 78-88-92-102-112-124 stitches. Work 2 ridges over all stitches, then cast off. Work the other sleeve-edge in the same way. |
|||||||||||||||||||
Diagram explanations |
|||||||||||||||||||
|
|||||||||||||||||||
 |
|||||||||||||||||||
 |
|||||||||||||||||||
 |
|||||||||||||||||||
Have you finished this pattern?Tag your pictures with #dropspattern #catchthewindtop or submit them to the #dropsfan gallery. Do you need help with this pattern?You'll find 20 tutorial videos, a Comments/Questions area and more by visiting the pattern on garnstudio.com. © 1982-2026 DROPS Design A/S. We reserve all rights. This document, including all its sub-sections, has copyrights. Read more about what you can do with our patterns at the bottom of each pattern on our site. |
|||||||||||||||||||


With over 40 years in knitting and crochet design, DROPS Design offers one of the most extensive collections of free patterns on the internet - translated to 17 languages. As of today we count 324 catalogues and 12290 patterns translated into English (UK/cm). 12290
We work hard to bring you the best knitting and crochet have to offer, inspiration and advice as well as great quality yarns at incredible prices! Would you like to use our patterns for other than personal use? You can read what you are allowed to do in the Copyright text at the bottom of all our patterns. Happy crafting!
Post a comment to pattern DROPS 211-5
We would love to hear what you have to say about this pattern!
If you want to leave a question, please make sure you select the correct category in the form below, to speed up the answering process. Required fields are marked *.