
Popular categories
Looking for a yarn?


Comments / Questions (11)
![]() Anna wrote:
Anna wrote:
Hej! Jag skylle vilja sticka i ett tunnare garn, type alpaca. Hur ska man tänka då med storleken? Tack på förhand, Anna
11.11.2024 - 21:32DROPS Design answered:
Hej Anna. Om du stickar med ett tunnare garn så kommer du inte att få stickfastheten som står i mönstret att stämma, så det är dessvärre svårt. I såfall behöver du själv räkna om mönstret utifrån den stickfasthet du får med det tunnare garnet och måtten i måttskissen. MVh DROPS Design
12.11.2024 - 14:07
![]() Anna Von Waldenfels wrote:
Anna Von Waldenfels wrote:
Kann man diese Wolle auch steeken? Ich stricke mit Merino extra fine!
06.09.2022 - 08:20DROPS Design answered:
Liebe Frau Von Waldenfels, Merino Extra Fine ist vielleicht nicht die beste Wolle um mit Steek Maschen zu stricken. Viel Spaß beim stricken!
06.09.2022 - 09:41
![]() Vanja Holm wrote:
Vanja Holm wrote:
Hejsan! Detta mönster är helt omöjligt att sticka fram o tillbaka när man gör koftan i och med att oftast så när det är färgbyte så har man inte det andra garnändan åt det håll man ska sticka ifrån = den är på andra sidan då. Vill gärna ha förklaringar hur man ska ändra när man stickar vit o ska gå över till röd t.ex. Annars så tycker jag mönstret är jättefint!
04.05.2022 - 17:54
![]() Sima wrote:
Sima wrote:
Bonsoir; en faisons mon échantillon j’ai trouvé que pour 10x10 cm il me faudrait 22 m et 28 rg une maille de plus que l’échantillon du modèle et je voudrais faire une maille M est ce que pour une maille de plus je garde le même nombre de mailles que celui du modèle à savoir 112 m pour M où je monte 114 m merci beaucoup😊
23.01.2022 - 13:39DROPS Design answered:
cf réponse ci-dessous :) Bon tricot!
24.01.2022 - 09:41
![]() Sima wrote:
Sima wrote:
Bonsoir; en faisons mon échantillon j’ai trouvé que pour 10x10 cm il me faudrait 22 m et 28 rg une maille de plus que l’échantillon du modèle et je voudrais faire une maille M est ce que pour une maille de plus je garde le même nombre de mailles que celui du modèle à savoir 112 m pour M où je monte 114 m merci beaucoup
22.01.2022 - 20:30DROPS Design answered:
Bonjour Sima, essayez de laver/bloquer votre échantillon pour vérifier si vous "récupérez" cette maille; sinon, essayez une aiguille d'une taille au-dessus, sinon votre gilet sera trop court. Retrouvez plus d'infos sur l'échantillon dans la FAQ. Bon tricot!
24.01.2022 - 09:17
![]() Anita wrote:
Anita wrote:
Vielen Dank. Liebe Grüsse, Anita
30.09.2021 - 15:36
![]() Anita wrote:
Anita wrote:
Hallo liebes DropsTeam, Ich wollte diese Jacke mit Drops Nepal stricken, da mir Karisma zu kratzig ist. Könnt ihr mir bei der Menge der Wolle helfen? Karisma hat 100 lm und Nadel 4 und Nepal hat nur 75lm umd Nadel 5. Jetzt weiss ich nicht genau wie ich da den Wollverbrauch ausrechnen kann. Vielen Dank. Liebe Grüsse, Anita
28.09.2021 - 16:00DROPS Design answered:
Liebe Anita, Nepal gehört zur Garngruppe C und ist hier für Karisma keine Alternative, benutzen Sie unseren Garnumrechner um die unterschiedlichen Alternative zu sehen (z.B. DROPS Lima, mit gleichen Zusammensetzung wie DROPS Nepal). Viel Spaß beim stricken!
28.09.2021 - 16:11
![]() Michelle wrote:
Michelle wrote:
Bonjour, pour ce modèle je suppose qu'il faut changer d'aiguille circulaire et passer à la 4 ??? juste à cette endroit là au col : ou dois je continuer avec l aiguille 3 ? Quand le col mesure 3 cm dans toutes les tailles continuer avec l'aiguille circulaire et tricoter le rang suivant sur l'endroit ainsi: ............ merci
28.09.2020 - 16:28DROPS Design answered:
Bonjour Michelle, effectivement, on continue avec l'aiguille circulaire 4 quand le col mesure 3 cm - la taille de l'aiguille est bien là maintenant, merci. Bon tricot!
28.09.2020 - 16:40
![]() Julie wrote:
Julie wrote:
I'm happy to see Scandinavian patterns modernized for sleeker fits.
20.08.2019 - 19:28
![]() Andrea wrote:
Andrea wrote:
Traumhaft schön!
12.08.2019 - 08:55
|
||||||||||
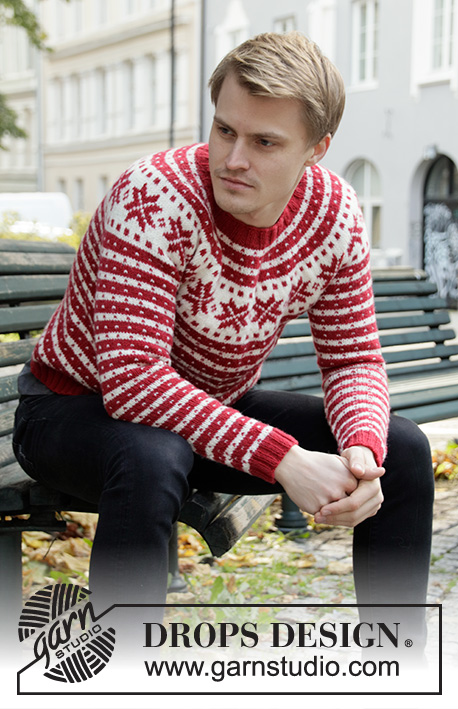
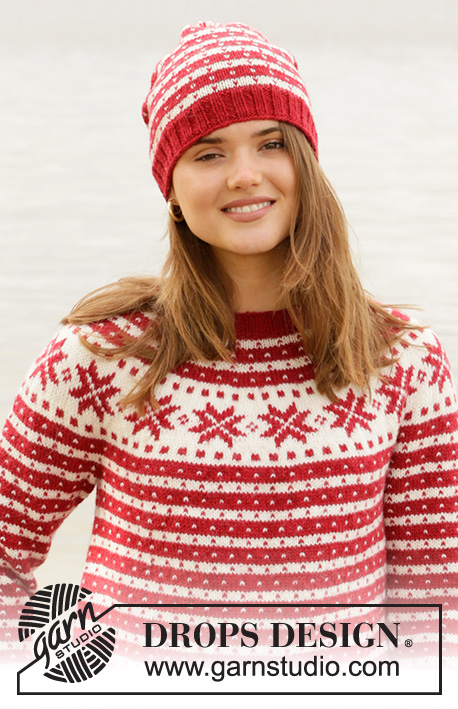
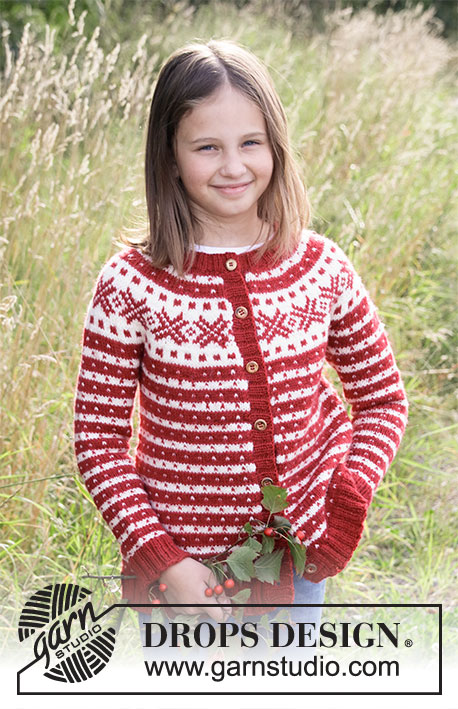
Candy Cane Lane Jacket#candycanelanejacket |
||||||||||
 |
 |
|||||||||
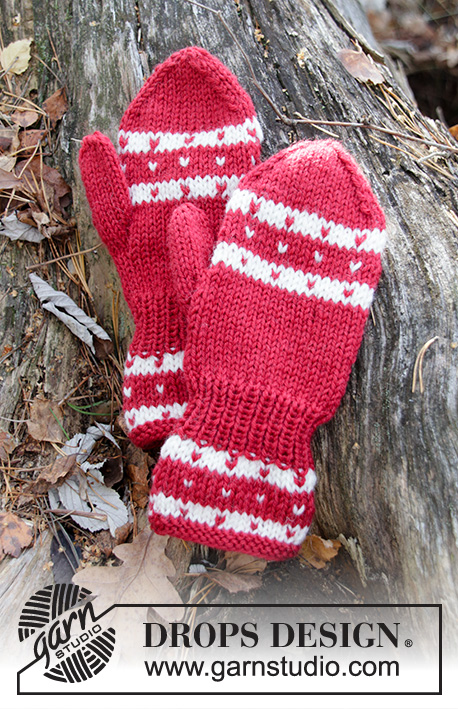
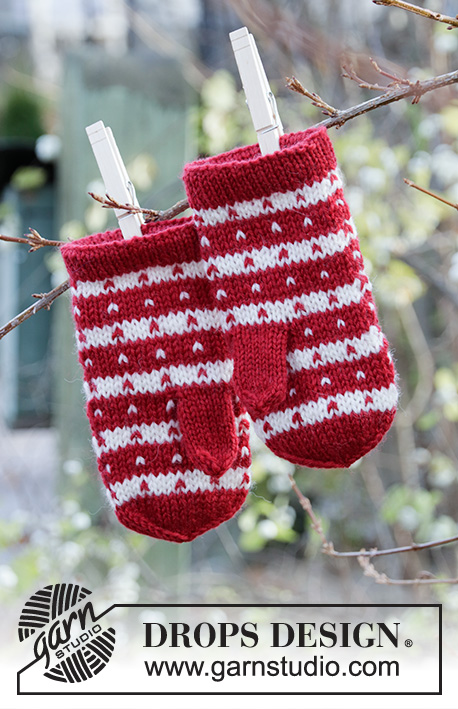
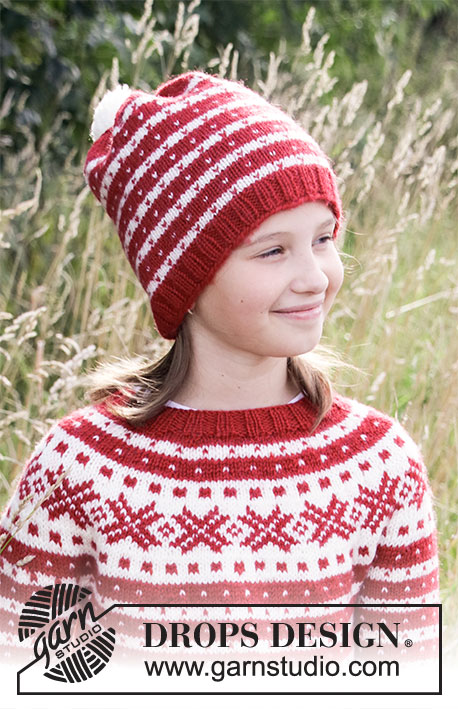
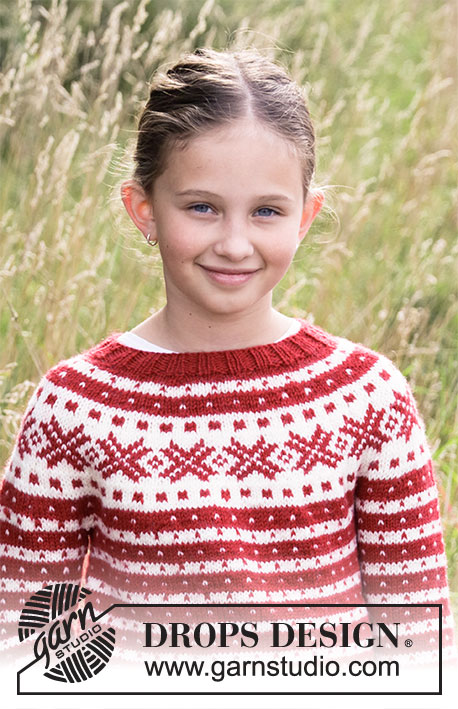
Knitted jacket with nordic Fana pattern in DROPS Karisma or DROPS Lima. The piece is worked top down with round yoke and Nordic pattern. Sizes S - XXXL.
DROPS 205-21 |
||||||||||
|
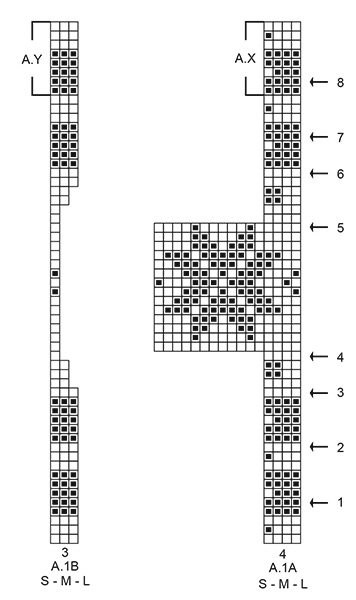
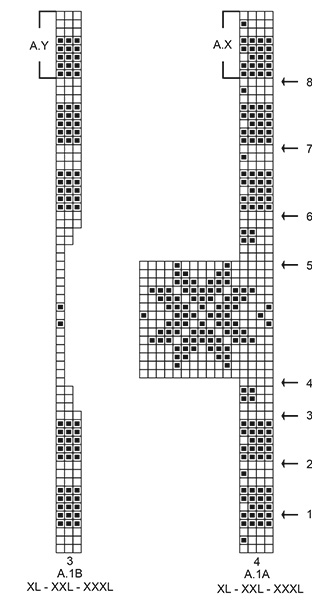
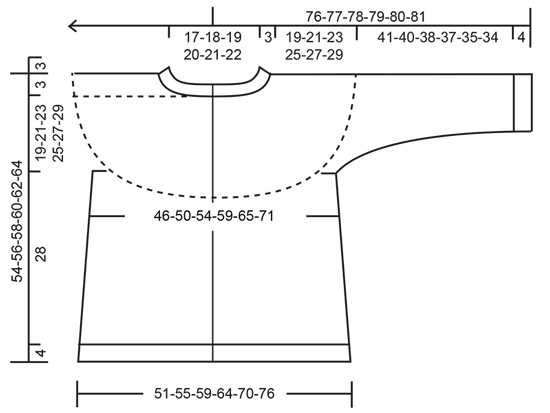
------------------------------------------------------- EXPLANATIONS FOR THE PATTERN: ------------------------------------------------------- RIDGE/GARTER STITCH (worked back and forth): Knit all rows. 1 ridge in height = Knit 2 rows. INCREASE TIP-1 (evenly spaced): To work out how to increase evenly, count the total number of stitches on the needle (e.g. 121 stitches) minus edge stitches (e.g. 2 stitches) and divide the remaining stitches by the number of increases to be made (e.g. 44) = 2.7. In this example, increase by making 1 yarn over after alternately each 2nd and 3rd stitch (approx.). Do not increase over edge stitches. On the next row work the yarn overs twisted to avoid holes. ELEVATION (in back of neck): To make the jacket slightly higher at the back of the neck when working round yoke, you can work an elevation as described here. Skip this section if you do not want an elevation. Insert 1 marker in the middle stitch of the round = mid back. Start from the right side with wine red / red and knit 12-13-14-15-15-16 stitches past the stitch with the marker, turn, tighten strand and purl 25-27-29-31-31-33 stitches back. Turn, tighten strand and knit 37-40-43-46-46-49 stitches, turn, tighten strand and purl 49-53-57-61-61-65 stitches back. Turn, tighten strand and knit 61-66-71-76-76-81 stitches, turn, tighten strand and purl 72-78-84-90-90-96 stitches, turn, tighten strand and knit to end of row (edge stitches worked in garter stitch). Turn, purl 1 row across all stitches. Then work YOKE as described in the text. PATTERN: See diagram A.1. Choose diagram for your size. The whole pattern is worked in stocking stitch. KNITTING TIP: To avoid the knitting tension becoming tighter when working pattern, it is important that the strands at the back are not tight. You can use a larger size needle when working pattern if this is a problem. DECREASE TIP (for mid under sleeve): Start 3 stitches before the marker thread, knit 2 together, knit 2 (marker thread sits between these 2 stitches), slip 1 stitch as if to knit, knit 1 and pass the slipped stitch over the knitted stitch (= 2 stitches decreased). CASTING OFF TIP: To avoid the cast-off edge being tight you can cast off with a larger size needle or make 1 yarn over after approx. each 8th stitch at the same time as casting off (yarn overs cast off as normal stitches). BUTTONHOLES (for right band when garment is worn): Work 6-6-6-7-7-7 buttonholes on the right band (the first buttonhole is in the neck). 1 buttonhole = Work 2 stitches together and make 1 yarn over – NOTE: It is neatest if the buttonholes are made by purling 2 together in a section of 2 purled stitches (seen from the right side). On the next row knit the yarn over to leave a hole. The bottom buttonhole should be approx. 4 cm from the bottom edge and the top buttonhole approx. 7½-8½ cm from the buttonhole in the neck. The remaining 4-4-4-5-5-5 buttonholes are worked with approx. 7½-8½ cm between each one. ------------------------------------------------------- START THE PIECE HERE: ------------------------------------------------------- JACKET – SHORT OVERVIEW OF THE PIECE: The neck and yoke are worked back and forth from mid front with circular needle, top down. The yoke is divided for body and sleeves and the body continued back and forth with circular needle. The sleeves are worked in the round with double pointed needles/short circular needle, top down. The bands are worked to finish. NECK: Cast on 108-112-116-120-124-128 stitches with circular needle size 3 mm and wine red / red. Purl 1 row (= wrong side). The next row is worked as follows from the right side: Work 1 edge stitch in GARTER STITCH – read description above, * knit 2, purl 2 *, work from *-* until there are 3 stitches left on the row, knit 2 and finish with 1 edge stitch in garter stitch. Continue this rib, but after approx. 1-1½ cm work 1 buttonhole on the right band (when garment is worn). Work the buttonhole by working as before from the right side, until there are 5 stitches left on the row, purl 2 together, 1 yarn over, knit 2 and 1 edge stitch in garter stitch. Continue the rib. When the neck measures 3 cm in all sizes change to circular needle size 4 mm. The next row is worked as follows from the right side: Cast off 6 stitches at the beginning of the row (the band will be sewn here), knit until there are 6 stitches left on the row and increase at the same time 25-29-33-37-37-37 stitches evenly spaced over these 96-100-104-108-112-116 stitches – read INCREASE TIP, then continue the rib over the remaining 6 stitches. Turn the piece and cast off the first 6 stitches at the beginning of the row = 121-129-137-145-149-153 stitches on the needle. Purl until there is 1 stitch left on the row and finish with 1 edge stitch in garter stitch. Insert 1 marker on the row; the yoke will now be measured from here! Now you can work an ELEVATION in the back of the neck – read description above. If you do not want an elevation, go straight to YOKE. YOKE: Read KNITTING TIP! The first row is worked as follows from the right side: Work 1 edge stitch in garter stitch, A.1A until there are 4 stitches left on the row (= 29-31-33-35-36-37 repeats of 4 stitches), work A.1B (= 3 stitches) and finish with 1 edge stitch in garter stitch. Continue this pattern. REMEMBER THE KNITTING TENSION! AT THE SAME TIME on each row marked with an arrow in A.1A, increase stitches evenly as described below: Arrow-1: Increase 44-44-44-52-52-56 stitches evenly spaced = 165-173-181-197-201-209 stitches (there is now room for 40-42-44-48-49-51 repeats of A.1 with 4 stitches). Arrow-2: Increase 40-40-44-48-52-52 stitches evenly spaced = 205-213-225-245-253-261 stitches (there is now room for 50-52-55-60-62-64 repeats of A.1 with 4 stitches). Arrow-3: Increase 35-39-43-47-51-51 stitches evenly spaced = 240-252-268-292-304-312 stitches (there is now room for 59-62-66-72-75-77 repeats of A.1 with 4 stitches and A.1B covers 2 stitches). Arrow-4: Increase 3-7-7-15-19-27 stitches evenly spaced = 243-259-275-307-323-339 stitches (there is now room for 15-16-17-19-20-21 repeats of A.1 with 16 stitches and A.1B covers 1 stitch). Arrow-5: Increase 25-29-29-25-29-33 stitches evenly spaced, but make sure you increase using off-white so the star is not affected = 268-288-304-332-352-372 stitches (there is now room for 66-71-75-82-87-92 repeats of A.1 with 4 stitches and A.1B covers 2 stitches). Arrow-6: Increase 13-13-17-17-17-21 stitches evenly spaced = 281-301-321-349-369-393 stitches (there is now room for 69-74-79-86-91-97 repeats of A.1 with 4 stitches and A.1B covers 3 stitches). Arrow-7: Increase 12-12-12-16-16-20 stitches evenly spaced = 293-313-333-365-385-413 stitches (there is now room for 72-77-82-90-95-102 repeats of A.1 with 4 stitches). Arrow-8: Increase 8-12-8-12-12-16 stitches evenly spaced = 301-325-341-377-397-429 stitches (there is now room for 74-80-84-93-98-106 repeats of A.1 with 4 stitches). Continue A.X and A.Y without increasing until the piece measures 19-21-23-25-27-29 cm from the marker on the neck Now the yoke is divided for body and sleeves and the next row is worked as follows: Work 46-50-52-57-62-68 stitches as before (= front piece), place the next 60-64-68-76-76-80 stitches on 1 thread for sleeve, cast on 8-8-12-12-16-16 new stitches on the needle (= in side under sleeve), work 89-97-101-111-121-133 stitches as before (= back piece), place the next 60-64-68-76-76-80 stitches on 1 thread for sleeve, cast on 8-8-12-12-16-16 new stitches on the needle (= in side under sleeve) and work the remaining 46-50-52-57-62-68 stitches as before (= front piece). Body and sleeves are finished separately. THE PIECE IS NOW MEASURED FROM HERE! BODY: = 197-213-229-249-277-301 stitches. Continue A.X and A.Y back and forth as before with 1 edge stitch in garter stitch on each side (make sure you start on the right round in relation to where you stopped on the yoke). When the piece measures approx. 3 cm from the division, increase 4 stitches evenly spaced (increase on a row of wine red / red). Increase like this approx. every 6 cm a total of 5 times = 217-233-249-269-297-321 stitches. Work until the piece measures approx. 28 cm from the division but adjust so you finish after a whole stripe of off-white (there is approx.4 cm left to finished length, you can try the jacket on and work to desired length). Change to circular needle size 3 mm and knit 1 row from the right side with wine red / red where you increase 51-55-59-63-71-75 stitches evenly spaced = 268-288-308-332-368-396 stitches (so the rib is not tight). The next row is worked as follows from the wrong side: Work 1 edge stitch in garter stitch, * purl 2, knit 2 *, work from *-* until there are 3 stitches left on the row, purl 2 and finish with 1 edge stitch in garter stitch. Continue this rib for 4 cm. Cast off with knit over knit and purl over purl – read CASTING-OFF TIP! The jacket measures approx. 54-56-58-60-62-64 cm from the shoulder down. SLEEVE: Place the 60-64-68-76-76-80 stitches from the thread on the one side of the piece on double pointed needles/short circular needle size 4 mm and knit up 1 stitch in each of the 8-8-12-12-16-16 stitches cast on under the sleeve = 68-72-80-88-92-96 stitches. Insert 1 marker thread in the middle of the 8-8-12-12-16-16 stitches under the sleeve and allow the marker to follow your work onwards; it will be used when decreasing mid under sleeve. Start the round at the marker thread and work A.X in the round (make sure you start on the right round in relation to where you stopped on the yoke). When the sleeve measures approx. 4-4-4-2-2-2 cm from the division decrease 2 stitches mid under sleeve – read DECREASE TIP. Decrease like this every 3-3-2-2-1½-1½ cm a total of 12-12-16-18-20-20 times = 44-48-48-52-52-56 stitches. Continue working until the sleeve measures 41-40-38-37-35-34 cm; adjust to after a whole stripe of off-white (there is approx. 4 cm to finished length; you can try the jacket on and work to desired length). NOTE: Shorter measurements in larger sizes due to wider neck and longer yoke. Change to double pointed needles size 3 mm and wine red / red and knit 1 round where you increase 4-4-4-8-8-8 stitches evenly spaced = 48-52-52-60-60-64 stitches. Work rib in the round (= knit 2 / purl 2) for 4 cm. Cast off with knit over knit and purl over purl – remember CASTING OFF TIP! The sleeve measures approx. 45-44-42-41-39-38 cm from the division. Work the other sleeve in the same way. LEFT BAND (when the garment is worn): Knit up from the right side with circular needle size 3 mm and wine red / red as follows: Knit up approx. 124-128-132-140-144-148 stitches inside the 1 edge stitch in garter stitch along mid front (the number of stitches should be divisible by 4). Work rib as follows (first row = wrong side): 1 edge stitch in garter stitch, * purl 2, knit 2 *, work from *-* until there are 3 stitches left on the row, purl 2 and finish with 1 edge stitch in garter stitch. Continue this rib for approx. 3 cm – adjust so it is the same width as the 6 stitches cast off at the neck. Cast off with garter stitch over garter stitch, knit over knit and purl over purl. RIGHT BAND (when the garment is worn): Work in the same way as the left band but after 1-1½ cm work 6-6-6-7-7-7 BUTTONHOLES evenly spaced – read description above. ASSEMBLY: Sew the neck-edge neatly to the edge of the bands with the seam towards the wrong side. Sew buttons onto the left band. |
||||||||||
Diagram explanations |
||||||||||
|
||||||||||
 |
||||||||||
 |
||||||||||
 |
||||||||||
Have you finished this pattern?Tag your pictures with #dropspattern #candycanelanejacket or submit them to the #dropsfan gallery. Do you need help with this pattern?You'll find 34 tutorial videos, a Comments/Questions area and more by visiting the pattern on garnstudio.com. © 1982-2026 DROPS Design A/S. We reserve all rights. This document, including all its sub-sections, has copyrights. Read more about what you can do with our patterns at the bottom of each pattern on our site. |
||||||||||


With over 40 years in knitting and crochet design, DROPS Design offers one of the most extensive collections of free patterns on the internet - translated to 17 languages. As of today we count 324 catalogues and 12290 patterns translated into English (UK/cm). 12290
We work hard to bring you the best knitting and crochet have to offer, inspiration and advice as well as great quality yarns at incredible prices! Would you like to use our patterns for other than personal use? You can read what you are allowed to do in the Copyright text at the bottom of all our patterns. Happy crafting!
Post a comment to pattern DROPS 205-21
We would love to hear what you have to say about this pattern!
If you want to leave a question, please make sure you select the correct category in the form below, to speed up the answering process. Required fields are marked *.