
Popular categories
Looking for a yarn?


Comments / Questions (64)
![]() Karin wrote:
Karin wrote:
Tack för svar, men jag har förstått att jag ska sticka A6 över A5, men dom andra maskorna? Är det vanlig slätstickning eller? Jag stickar storlek S.
22.03.2024 - 13:25DROPS Design answered:
Hej Karin, de andre masker fortsætter som tidligere :)
03.04.2024 - 13:59
![]() Karin wrote:
Karin wrote:
Hej! Undrar när jag ska få svar på min fråga om mönstret. Ställde min fråga för fyra dagar sedan och vad jag kan se så har andra fått svar efter 1-2 dagar. Hoppas på snabbt svar.
22.03.2024 - 08:58
![]() Karin wrote:
Karin wrote:
Hej! Hur många A4 efter första A6 innan de 3 A6 mitt bak? Är det så här: 5 kantm 2 släta, A6x1, A4x4, A6x3? Hur är det sedan efter A6x3?
18.03.2024 - 12:04DROPS Design answered:
Hej Karin. Vilken storlek stickar du? Du stickar A.6 över varje rapport av A.5 efter att A.5 har stickats klart. Sätt gärna ut markörer mellan rapporterna för att göra det enklare att se. Mvh DROPS Design
22.03.2024 - 10:06
![]() Lamaletie wrote:
Lamaletie wrote:
Bonjour, un peu perdue!! Pour l’empiècement on a 163 mailles ,on tricote ensuite si j’ai bien compris 12 deA1, 14foisles 10 de A2 1deA3 sans oublier les 10 pour obtenir les 342 mailles en tailleL comment doit on procéder ?mon amietrès bonne tricoteuse ne comprend pas Merci
04.11.2023 - 15:39DROPS Design answered:
Bonjour Lamaletie, tricotez les diagrammes comme indiqués, vous allez ainsi augmenter progressivement dans A.1 et A.2 (cf ovales noirs = 3ème symbole de la légende; lorsque les diagrammes seront terminés vous aurez: 5m de bordure devant, 24 m dans A.1, 22 m dans chaque A.2 soit ( 22x 14= 308m), 1 m de A.3 et 5 m de bordure devant = 343 mailles au total. Bon tricot!
06.11.2023 - 08:16
![]() Chantale wrote:
Chantale wrote:
Au début des explications c est inscrit ,que tous les rangs du points de fantaisie sont vue sur l endroit alors moi je comprend que le diagramme ne montre que les rangs endroits ,quand vous avez répondue à ma question précédente vous avez inscrit que je doit suivre le diagramme de gauche à droite pour les rangs envers ,désolé pour mon incompréhension je suis débutante merci
16.08.2023 - 23:59DROPS Design answered:
Bonjour Chantale, retrouvez dans cette leçon comment on doit lire des diagrammes tricot, cela pourra fort probablement vous aider. Bon tricot!
17.08.2023 - 09:45
![]() Chantale wrote:
Chantale wrote:
Bonjour vous dite de lire le diagramme de gauche à droite pour l envers?au début des explications c est inscrit,tous les diagrammes montres tous les rangs du point de fantaisie vus sur l endroit ,alors pour moi je comprend que ce ne sont que les rangs endroits qu il y as sur le diagramme .Veuillez excusez mes incompréhensions je ne fait pas du tricot depuis très très longtemps .merci
16.08.2023 - 23:55DROPS Design answered:
Bonjour Chantale, effectivement, les diagrammes montrent tous les rangs, vus sur l'endroit, autrement dit, les rangs sur l'endroit et les rangs sur l'envers, ainsi, 1 case blanche se tricote en jersey endroit (cf 1er symbole) : à l'endroit sur l'endroit et à l'envers sur l'envers, dans ces diagrammes, vous tricoterez tous les rangs à l'envers sur l'envers (tricotez certains des jetés torse à l'envers - cf 3ème symbole). Bon tricot!
17.08.2023 - 09:44
![]() Chantale wrote:
Chantale wrote:
Bonjour ,très beau model merci de le partagé gratuitement .Je ne comprend pas trop je vous dirais ,je fait la grandeur large ,je ne dois pas faire a1 et a2 et a3 en même temps,avec un motif qui se répètes 14x dans mes mailles je n arrivé pas bref je suis mêle, merci pour votre aide
14.08.2023 - 19:32DROPS Design answered:
Bonjour Chantale, en taille L, vous avez 163 mailles que vous allez tricoter ainsi, sur l'endroit: 5 m de bordure devant au point mousse, puis vous allez tricoter les 12 mailles de A.1, puis vous répétez 14 fois les 10 mailles de A.2, vous tricotez la maille de A.3 (pour que le motif soit symétrique), et vous terminez par 5 m de bordure devant au point mousse; autrement dit: 5+12+140+1+5= 163. Sur l'envers, tricotez ainsi en lisant les diagrammes de gauche à droite: 5 m point mousse, A.3, répétez 14 fois A.2, A.1 et 5 m point mousse. Bon tricot!
15.08.2023 - 09:04
![]() Copla wrote:
Copla wrote:
Bonjour, je ne comprends pas pourquoi les boutonnières se font en fin de rang alors que le devant droit se tricote au début du tricot à droite. On devrait ouvrir ces boutonnières en début de rang ?
07.06.2023 - 17:48DROPS Design answered:
Bonjour Mme Copla, quand on tricote de haut en bas, on commence (sur l'endroit) par le devant gauche et on termine par le devant droit, on va ainsi ouvrir les boutonnières en fin de rang sur l'endroit. Bon tricot!
08.06.2023 - 09:21
![]() Maureen wrote:
Maureen wrote:
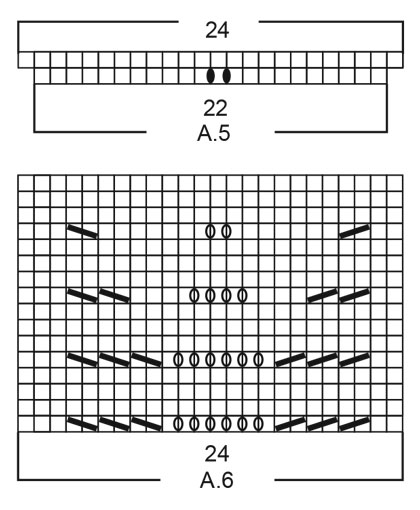
DROPS 19941 Can you tell me whether the A6 pattern is carried (repeat three times) right down the back of the cardigan or does it finish after the first sixteen rows Thanks Love your patterns this is my fifth design I’ve knitted
31.07.2022 - 18:13DROPS Design answered:
Dear Maureen, you should continue working A.6. Happy knitting!
31.07.2022 - 19:01
![]() Enrica wrote:
Enrica wrote:
Grazie mille per avermi risposto subito! Però quello che non capisco è perché c’è scritto ripetere una volta A6 sul davanti e 6 volte sul dietro 😞
03.06.2022 - 11:40DROPS Design answered:
Buongiorno Enrica, A.6 va ripetuto 3 volte sul dietro, come A.5. Buon lavoro!
03.06.2022 - 12:59
|
|||||||||||||||||||
Spring Melt#springmeltcardi |
|||||||||||||||||||
 |
 |
||||||||||||||||||
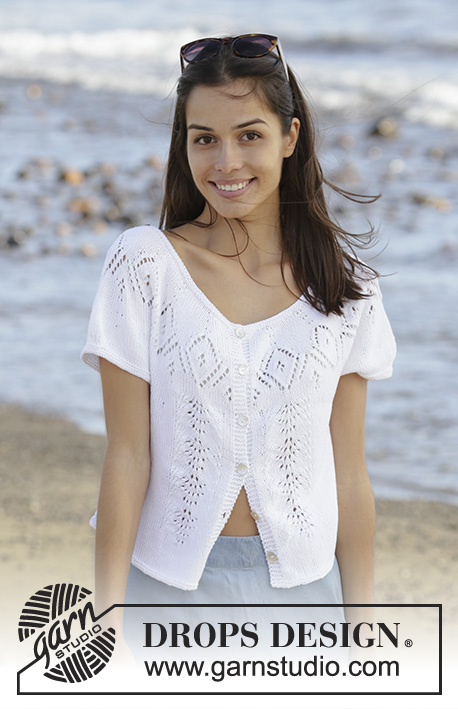
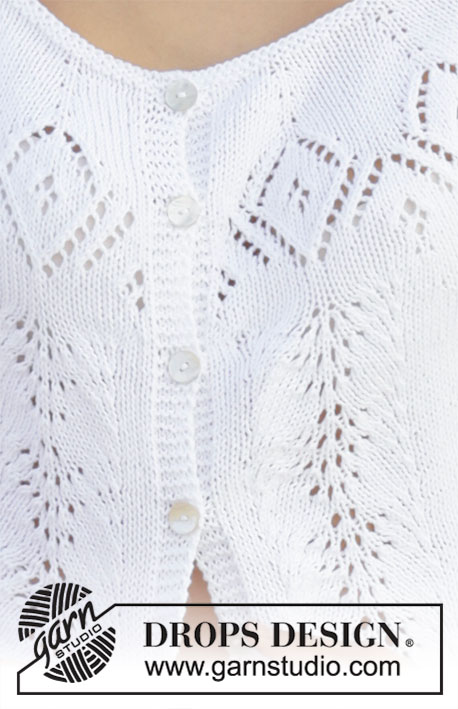
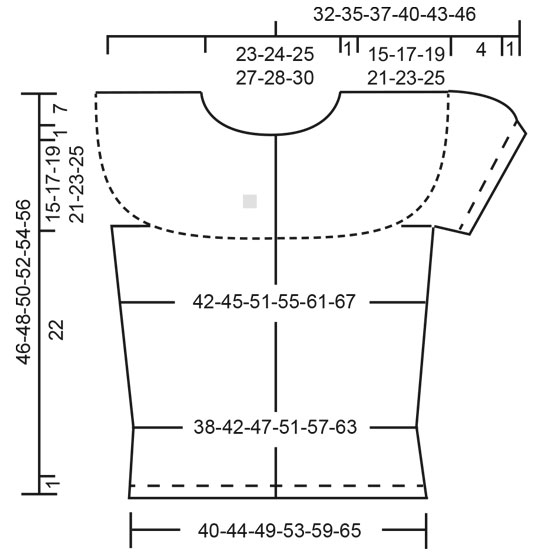
Knitted jacket with round yoke and short sleeves in DROPS Safran. The piece is worked top down with lace pattern. Sizes S - XXXL.
DROPS 199-41 |
|||||||||||||||||||
|
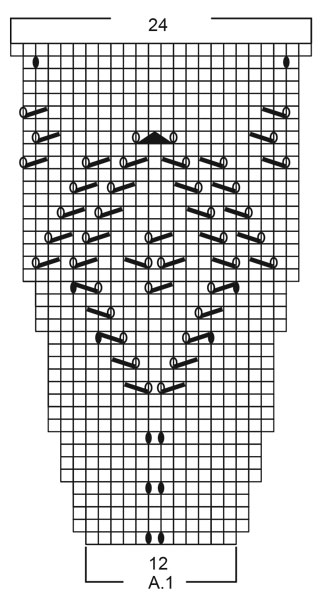
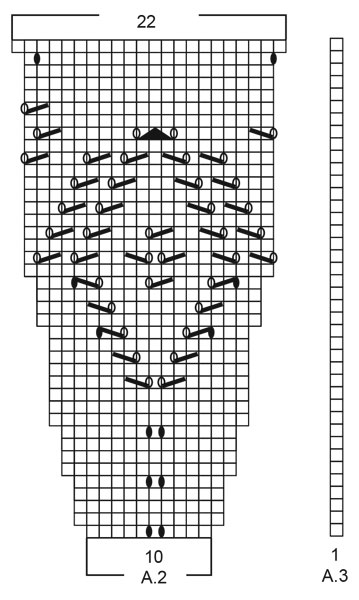
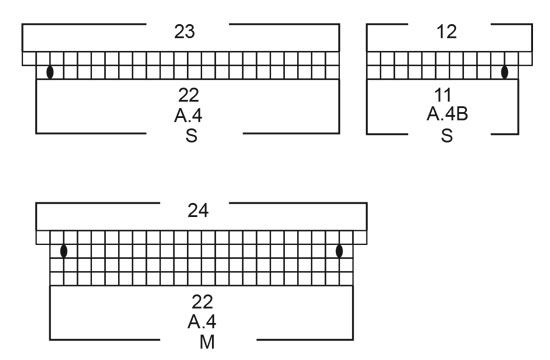
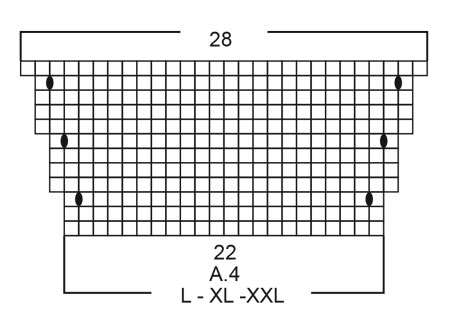
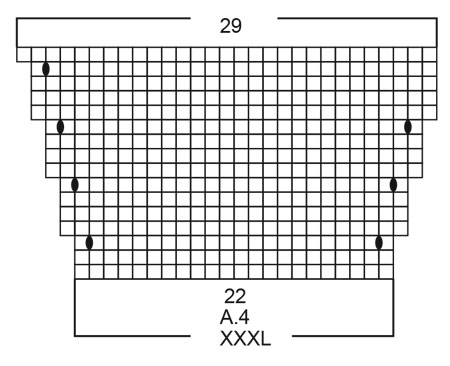
------------------------------------------------------- EXPLANATIONS FOR THE PATTERN: ------------------------------------------------------- RIDGE/GARTER STITCH (worked in the round): 1 ridge in height = 2 rounds; knit 1 round and purl 1 round. RIDGE/GARTER STITCH (worked back and forth): Knit all rows. 1 ridge in height = Knit 2 rows. PATTERN: See diagrams A.1 to A.6. Choose diagram for your size. The diagrams show all the rows in the pattern seen from the right side. INCREASE TIP (evenly spaced): To work out how to increase evenly, count the total number of stitches on the needle (e.g. 158 stitches) minus the bands (e.g. 10 stitches) and divide by the number of increases to be made (e.g. 5) = 29.6. In this example increase by making 1 yarn over after approx. each 30th stitch. On the next row knit the yarn overs twisted to avoid holes (do not increase on bands). DECREASE TIP: Decrease 1 stitch on each side of marker thread as follows: Work until there are 3 stitches left before the marker thread, knit 2 together, knit 2 (marker thread sits between these stitches), slip 1 stitch as if to knit, knit 1 and pass the slipped stitch over the knitted stitch. BUTTONHOLES: Work buttonholes on right band (when garment is worn). Work from the right side when there are 3 stitches left on row as follows: Make 1 yarn over, knit 2 together and knit the last stitch. On the next row knit the yarn over to leave a hole. First buttonhole worked on first row after the garter stitch edge for neck. Then the other 5-5-5-5-6-6 buttonholes with approx. 7-7-7½-8-7-7½ cm between each one. ------------------------------------------------------- START THE PIECE HERE: ------------------------------------------------------- JACKET - SHORT OVERVIEW OF THE PIECE: The piece is worked back and forth with circular needle, top down. The sleeves are worked in the round with short circular needle/double pointed needles. JACKET: YOKE: Cast on 153-158-163-171-178-183 stitches (including 5 band stitches on each side) with circular needle size 2.5 mm and Safran. Work 2 RIDGES – read description above. Change to circular needle size 3 mm. Then work 2 rows stocking stitch with 5 band stitches in garter stitch on each side towards mid front, AT THE SAME TIME increase 0-5-0-2-5-10 stitches evenly spaced on 1st row – read INCREASE TIP and REMEMBER BUTTONHOLES = 153-163-163-173-183-193 stitches. Now work pattern as follows: Work 5 band stitches in garter stitch, A.1 (= 12 stitches), A.2 (= 10 stitches) a total of 13-14-14-15-16-17 times, A.3 (= 1 stitch), 5 band stitches in garter stitch. Continue like this back and forth. REMEMBER THE KNITTING TENSION! When A.1 to A.3 have been completed there are 321-343-343-365-387-409 stitches on the needle. The piece measures approx. 14 cm from the cast-on edge. Now work pattern in the different sizes as follows: Sizes S, XL and XXXL: The next row is worked as follows: 5 band stitches in garter stitch, 2 stitches in stocking stitch, A.5 over the next 22 stitches, A.4 over the next 88-110-132 stitches (= 4-5-6 repeats in width). Work A.4B (= 11 stitches), A.5 over the next 66 stitches (= 3 repeats), work the last 11 stitches in A.4, A.4 over the next 88-110-132 stitches (= 4-5-6 repeats in width), A.5 over the next 22 stitches, 1 stitch in stocking stitch, 5 band stitches in garter stitch. Continue like this back and forth. When A.5 has been completed, work A.6 over each repeat of A.5; i.e. work a repeat of A.6 beside each band (+ 1 or 2 stitches in stocking stitch) and 3 repeats of A.6 mid back. When A.4 has been completed there are 341-441-511 stitches on the needle. Continue with stocking stitch, A.6 (+ 1 or 2 stitches stocking stitch) and 5 band stitches in garter stitch towards mid front until the piece measures 15-21-25 cm. Sizes M, L and XXL: The next row is worked as follows: 5 band stitches in garter stitch, 2 stitches in stocking stitch, A.5 over the next 22 stitches, A.4 over the next 110-110-132 stitches (= 5-5-6 repeats in width), work A.5 over the next 66 stitches (= 3 repeats), A.4 over the next 110-110-132 stitches (= 5-5-6 repeats in width), A.5 over the next 22 stitches, 1 stitch in stocking stitch, 5 band stitches in garter stitch. Continue like this back and forth. When A.5 has been completed, work A.6 over each repeat of A.5; i.e. work one repeat of A.6 beside each band (+ 1 or 2 stitches in stocking stitch) and there are 3 repeats of A.6 mid back. When A.4 has beeen completed, there are 373-413-469 stitches on the needle. Continue with stocking stitch, A.6 (+ 1 or 2 stitches in stocking stitch) and 5 band stitches in garter stitch towards mid front until the piece measures 17-19-23 cm. All sizes: The next row is worked as follows from the right side: Work pattern as before over the first 31 stitches, knit the next 104-120-140-154-168-189 stitches and increase at the same time 5-5-5-5-11-13 stitches evenly spaced, work pattern as before over the next 72 stitches, knit the next 104-120-140-154-168-189 stitches and increase at the same time 5-5-5-5-11-13 stitches evenly spaced, work pattern as before over the remaining 30 stitches = 351-383-423-451-491-537 stitches. Turn and work the last row on the yoke as follows (from the wrong side): Work pattern as before over the first 54-59-64-69-75-82 stitches, place the next 72-79-89-93-101-110 stitches on a thread for sleeve and cast on 8-8-10-10-12-12 new stitches on the needle, work pattern as before over the next 99-107-117-127-139-153 stitches, place the next 72-79-89-93-101-110 stitches on a thread for sleeve and cast on 8-8-10-10-12-12 new stitches on the needle, work pattern as before over the remaining 54-59-64-69-75-82 stitches. BODY: = 223-241-265-285-313-341 stitches. Insert a marker thread in the middle of the 8-8-10-10-12-12 new stitches cast on under the sleeves on each side (= 4-4-5-5-6-6 new stitches on each side of the marker thread). Continue back and forth with A.6, stocking stitch and 5 band stitches in garter stitch on each side towards mid front as before. NOTE: You work 2 stitches stocking stitch between the first 5 band stitches and A.6 at the start of the row (seen from the right side) and 1 stitch stocking stitch between A.6 and the last 5 band stitches at the end of the row (seen from the right side). When the piece measures 4 cm decrease 1 stitch on each side of the marker threads in each side – read DECREASE TIP. Decrease like this every 2 cm a total of 5 times = 203-221-245-265-293-321 stitches. When the piece measures 17 cm – adjust so that you finish after a complete repeat of A.6 in height (there are now 6 cm left to finished length), continue with stocking stitch and 5 band stitches in garter stitch on each side. When the piece measures 22 cm change to circular needle size 2.5 mm and work 2 ridges over all stitches. Cast off, but to avoid the cast-off edge being tight you can make a yarn over after each 6th stitch. Yarn overs cast off as normal stitches. SLEEVE: Place the 72-79-89-93-101-110 stitches from the thread on the one side of the piece back onto double pointed needles/short circular needle size 3 mm and knit up 1 stitch in each of the 8-8-10-10-12-12 new stitches cast on under the sleeve = 80-87-99-103-113-122 stitches. Work stocking stitch in the round for 3 cm. Now decrease stitches mid top of sleeve as follows: Work the first 30-33-35-37-41-45 stitches, knit 2 and 2 stitches together over the next 20-20-28-28-30-32 stitches (= 10-10-14-14-15-16 stitches decreased), knit the next 30-34-36-38-42-45 stitches = 70-77-85-89-98-106 stitches. Work 2 rounds stocking stitch. Change to double pointed needles size 2.5 mm and work 3 ridges. Cast off. Work the other sleeve in the same way. ASSEMBLY: Sew buttons on to left front band. |
|||||||||||||||||||
Diagram explanations |
|||||||||||||||||||
|
|||||||||||||||||||
 |
|||||||||||||||||||
 |
|||||||||||||||||||
 |
|||||||||||||||||||
 |
|||||||||||||||||||
 |
|||||||||||||||||||
 |
|||||||||||||||||||
 |
|||||||||||||||||||
 |
|||||||||||||||||||
Have you finished this pattern?Tag your pictures with #dropspattern #springmeltcardi or submit them to the #dropsfan gallery. Do you need help with this pattern?You'll find 27 tutorial videos, a Comments/Questions area and more by visiting the pattern on garnstudio.com. © 1982-2026 DROPS Design A/S. We reserve all rights. This document, including all its sub-sections, has copyrights. Read more about what you can do with our patterns at the bottom of each pattern on our site. |
|||||||||||||||||||


With over 40 years in knitting and crochet design, DROPS Design offers one of the most extensive collections of free patterns on the internet - translated to 17 languages. As of today we count 324 catalogues and 12290 patterns translated into English (UK/cm). 12290
We work hard to bring you the best knitting and crochet have to offer, inspiration and advice as well as great quality yarns at incredible prices! Would you like to use our patterns for other than personal use? You can read what you are allowed to do in the Copyright text at the bottom of all our patterns. Happy crafting!
Post a comment to pattern DROPS 199-41
We would love to hear what you have to say about this pattern!
If you want to leave a question, please make sure you select the correct category in the form below, to speed up the answering process. Required fields are marked *.