
Popular categories
Looking for a yarn?


Comments / Questions (68)
![]() Astrid wrote:
Astrid wrote:
Ich verstehe nicht, warum man das Muster A1 UNTEN am Ärmel strickt und nicht oben auf dem Ärmel Dann stimmt doch auch die Anleitung für die kleine Armkugel nicht, wenn das kleine Muster oben auf dem Arm liegt. Und: kann ich auch die Maschen des Armlochs auffassen und den Ärmel anstricken? Danke für Ihre Mühe
22.04.2026 - 22:07DROPS Design answered:
Liebe Astrid, so wurde dieses Modell designed und gestrickt , dh mit A.1 in der Mitte unter (und nicht oben) vom Ärmel; wahrscheinlich können Sie aber A.1 auch oben stricken, wenn Sie es so möchten. Bei der Armkugel wird man hier die Maschen A.1 in 2 aufteilen und den Ärmel in Hin- und Rückreihe ab der Mitte vom früheren A.1 stricken - in diesem Video schauen Sie einen ähnlichen Ärmel (ohne Lochmuster) und hier sehen Sie, wie man dann die Armkugel näht. Hier zeigt man, einen Ärmel, der vom Armloch gestrickt wird. Viel Spaß beim Stricken!
23.04.2026 - 10:50
![]() Astrid wrote:
Astrid wrote:
Ich habe Vorder- und Rückenteil mit kraus rechter Randmasche gestrickt. Wie nähe ich diese Seitenteile zusammen?
22.04.2026 - 14:25DROPS Design answered:
Liebe Astrid, in wdiesem Video zeigen wir, wie man zwei Teilen zusammennäht. Viel Spaß beim Fertigstellen!
22.04.2026 - 16:52
![]() Heather wrote:
Heather wrote:
Can you explain what the purpose is for doing the last 4 cm of the sleeves in a back and forth pattern? When insetting the sleeve is this 4 cm slit worked into the diameter of the sleeve and sewn onto the body of the sweater?
28.02.2026 - 19:06DROPS Design answered:
Dear Heather, this splitt is for the sleeve cap, you can see here how to sew such a sleeve onto a armhole. Happy knitting!
02.03.2026 - 09:21
![]() Catherine wrote:
Catherine wrote:
Bonjour, j'aimerais savoir combien de pelotes en Drops air il faut pour la taille XXL. D'avance merci pour votre réponse. Catherine
27.01.2026 - 23:06DROPS Design answered:
Bonjour Catherine, retrouvez la quantité requise pour chaque taille, en haut de page, sous l'onglet "Explications", il vous faudra en XXL (entourez la taille pour afficher toutes les infos de votre taille): 400 g DROPS Air / 50 g la pelote = 8 pelotes Air. Bon tricot!
28.01.2026 - 09:00
![]() Tine wrote:
Tine wrote:
Kan ikke se at det står noe om overvidde, og da kan jeg ikke vite hvilken str jeg skal strikke?
21.09.2025 - 14:08DROPS Design answered:
Hei Tine, Målskissen er på bunnen av oppskriften. Hilsen Drops Team.
22.09.2025 - 06:14
![]() Nina wrote:
Nina wrote:
Hei. Jeg forstår ikke forklaringen til ermene. Det skal strikkes 2 m rett, mønster A1 over de neste to maskene,så rett ut omgangen. Så kommer det til øking: sånn jeg forstår det ,utifra øketipset,skal det økes to ganger( kast) i begynnelsen av omg? Da blir jo mønsterrapporten helt skjev... Er det meningen at mønsterrapporten går over første og siste maske på omgangen,også skal det økes på hver side av denne??
13.04.2025 - 00:27DROPS Design answered:
Hei Nina. Du strikker 2 masker rett, deretter A.1 (= midt under ermet) og så rett pinnen ut = hullmønster under ermet og resten av maskene strikkes i glattstrikk. Omgangens start blir da 2 masker før A.1, men A.1 = midt under ermet. Ved økning: Lag et kast, strikk 2 masker rett, strikk A.2 (= 2 masker), strikk 2 masker rett, gjør 1 kast, resten av maskene strikkes i glattstrikk. Du vil nå få: Økning, 6 masker, økning. mvh DROPS Design
22.04.2025 - 13:56
![]() Ypie Postma wrote:
Ypie Postma wrote:
Hoe werk je de hals af?
16.02.2025 - 17:13DROPS Design answered:
Dag Ypie,
De hals wordt niet achteraf gebreid, maar tijdens het breien van de panden. Dus als je de instructies volgt, brei je gelijk ook de halsrand.
19.02.2025 - 09:33
![]() Christine wrote:
Christine wrote:
Bonjour, Puisqu'il y a un Dos et un Devant, il est possible de tricoter avec des aiguilles droites, n'est-ce pas ? Par avance merci.
01.02.2025 - 19:02DROPS Design answered:
Bonjour Christine, tout à fait, on tricote ici en allers et retours sur aiguille circulaire pour avoir suffisamment de place pour y loger toutes les mailles, ainsi, vous pouvez naturellement tricoter sur aiguilles droites, vos mailles seront juste plus serrées. Retrouvez plus d'infos sur les aiguilles circulaires ici. Bon tricot!
03.02.2025 - 08:41
![]() Nour wrote:
Nour wrote:
Bonjour J’ai une petite question vu que je me suis bloquée au niveau du devant. Sur l’explication c’est écrit : le diagramme montre 3 diminutions) jusqu'à ce que on ait diminué 8-8-9-9-10-10 fois au total. 3 dimunitions de chaque côté cad 6 dim pourquoi c’est écrit 8? Parceque le nombre de mailles qui restent dans chaque épaule est 41 pas 35. Merci
21.09.2024 - 15:45DROPS Design answered:
Bonjour Mme Nour, en taille L vous avez 96 mailles, vous diminuez 2 m dans A.2 = 94 / 2 côtés(devants/épaules) = 47 mailles, vous diminuez 8 fois 1 maille pour l'encolure et vous rabattez 4 mailles pour l'emmanchure: 47-8-4=35 mailles pour l'épaule. Bon tricot!
23.09.2024 - 09:06
![]() Anne wrote:
Anne wrote:
Bonjour, je n'arrive pas à tricoter en rond, puis je avoir le modèle pour tricoter avec des aiguilles droites ? Merci beaucoup
22.07.2023 - 13:38DROPS Design answered:
Bonjour Anne, la plupart de nos modeles qui sont tricotes en rond peuvent etre tricotes en aller retours. Regardez la lecon DROPS ICI. Nos modeles plus anciens sont en majorite executes en aller retours. Recherchez sur notre site parmi nos modèles gratuits. Bon tricot!
22.07.2023 - 19:42
|
||||||||||||||||||||||
Robin Song#robinsongsweater |
||||||||||||||||||||||
 |
 |
|||||||||||||||||||||
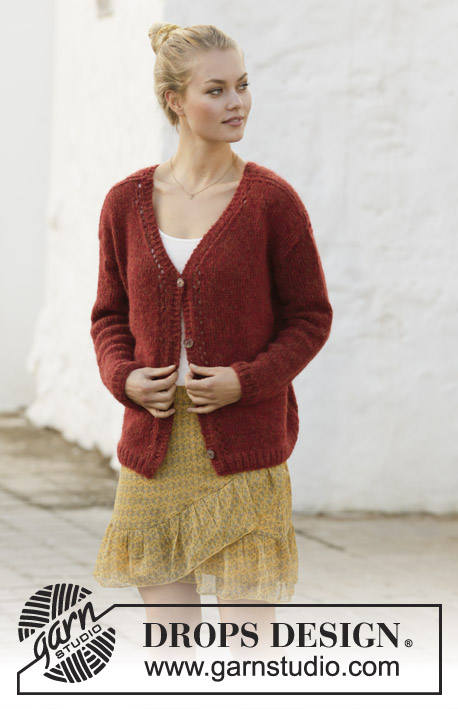
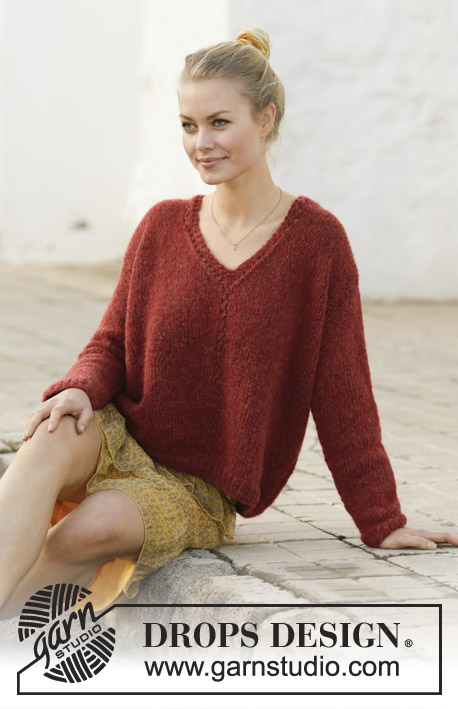
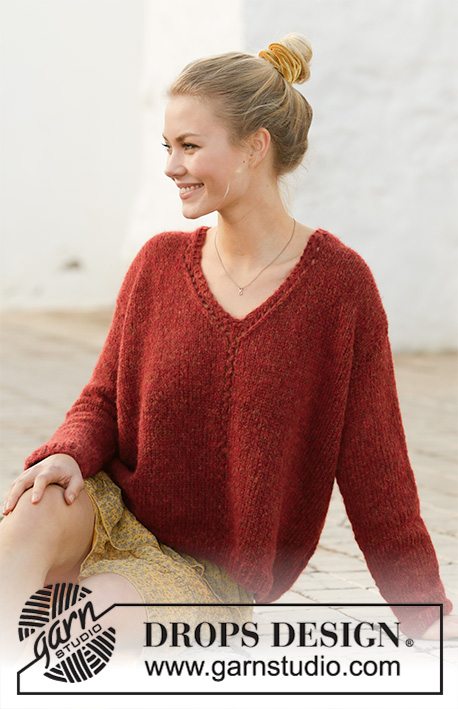
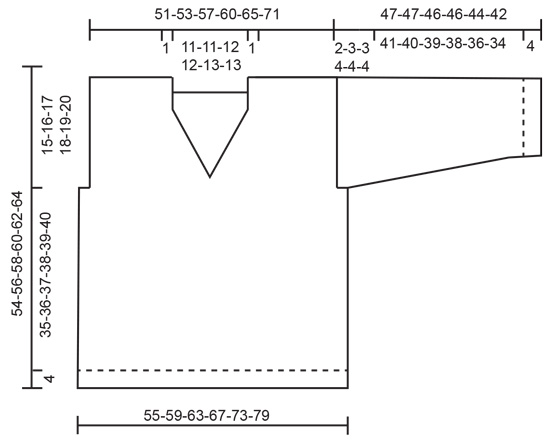
Knitted jumper with V-neck in DROPS Air. The piece is worked with lace pattern. Sizes S - XXXL.
DROPS 202-27 |
||||||||||||||||||||||
|
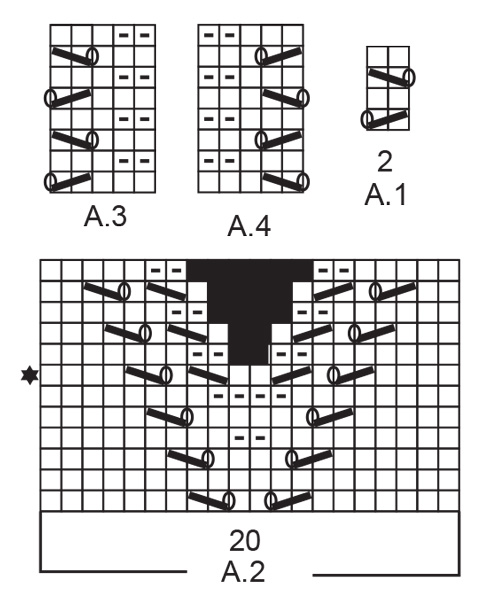
------------------------------------------------------- EXPLANATIONS FOR THE PATTERN: ------------------------------------------------------- RIDGE/GARTER STITCH (worked back and forth): Knit all rows. 1 ridge in height = Knit 2 rows. PATTERN: See diagrams A.1 to A.4. Diagrams show all rows in pattern seen from the right side. DECREASE TIP-1 (evenly spaced): To work out how to decrease evenly, count the total number of stitches on needle (e.g. 105 stitches) minus edge stitches (= 2 stitches) and divide the remaining stitches by number of decreases to be made (e.g. 21) = 4.9. In this example, decrease by knitting together approx. each 4th and 5th stitch DECREASE TIP-2 (for neck on back piece): All decreases worked from right side. Decrease 1 stitch after the 2 stitches in garter stitch from the neck as follows: Slip 1 stitch as if to knit, knit 1 and pass the slipped stitch over the knitted stitch. Decrease 1 stitch before the 2 stitches in garter stitch towards the neck as follows: Knit 2 together. INCREASE TIP (for sleeves): Work until there are 2 stitches left before A.1 under the sleeve, make 1 yarn over, knit 2, A.1, knit 2, make 1 yarn over. On the next round knit yarn overs twisted to avoid holes. Then work new stitches in stocking stitch ------------------------------------------------------- START THE PIECE HERE: ------------------------------------------------------- JUMPER - SHORT OVERVIEW OF THE PIECE: The piece is worked back and forth with circular needle in sections and sewn together to finish. The sleeves are worked in the round with double pointed needles. BACK PIECE: Cast on 105-111-117-129-141-153 stitches (including 1 edge stitch on each side) with circular needle size 5 mm and Air. Purl 1 row from the wrong side. Then work rib as follows: 1 edge stitch in GARTER STITCH – read description above, (knit 1, purl 2) until there are 2 stitches left on row, knit 1 and 1 edge stitch in garter stitch. Continue like this back and forth for 4 cm. Now knit 1 row from the right side where you decrease 21-21-21-27-29-33 stitches evenly spaced – read DECREASE TIP-1 = 84-90-96-102-112-120 STITCHES. Change to circular needle size 6 mm. Work stocking stitch with 1 edge stitch in garter stitch on each side until the piece measures 39-40-41-42-43-44 cm. REMEMBER THE KNITTING TENSION! At the beginning of the next 2 rows cast off 3-4-4-5-6-6 stitches for armholes = 78-82-88-92-100-108 stitches. Continue with stocking stitch and 1 edge stitch in garter stitch on each side. When the piece measures 50-52-54-56-58-60 cm, work garter stitch over the middle 18-18-20-20-22-22 stitches on the row. When you have worked 2 ridges over these stitches work the next row from the right side as follows: Work the first 32-34-36-38-41-45 stitches and place on 1 thread for right shoulder, cast off the next 14-14-16-16-18-18 stitches for neck and work the remaining 32-34-36-38-41-45 stitches. Then finish the shoulders separately. Work 1 edge stitch in garter stitch towards the armhole, 2 stitches in garter stitch towards the neck and stocking stitch over the remaining stitches. On the next row from the right side decrease 1 stitch inside the 2 stitches in garter stitch towards neck – read DECREASE TIP-2 = 31-33-35-37-40-44 stitches. Continue working until the armhole measures 15-16-17-18-19-20 cm. Cast off. The piece measures approx. 54-56-58-60-62-64 cm from the shoulder down. Work the other shoulder in the same way. FRONT PIECE: Cast on 105-111-117-129-141-153 stitches (including 1 edge stitch on each side) with circular needle size 5 mm and Air. Purl 1 row from the wrong side then work rib as follows: 1 edge stitch in garter stitch, (knit 1, purl 2) until there are 2 stitches left on row, knit 1 and 1 edge stitch in garter stitch. Continue back and forth like this until the piece measures 4 cm. Now work as follows: Work the first 51-54-57-63-68-75 stitches and decrease at the same time 10-10-10-13-14-16 stitches evenly spaced, work A.1 (= 2 stitches), work the remaining stitches on the row and decrease at the same time 11-11-11-14-15-17 stitches evenly spaced = 84-90-96-102-112-120 stitches. Change to circular needle size 6 mm. Continue back and forth with A.1 over the middle 2 stitches, stocking stitch and 1 edge stitch in garter stitch on each side. When the piece measures 34-36-37-39-40-42 cm work A.2 over the middle 20 stitches on the row. The 2 middle stitches in A.2 should match the 2 stitches in A.1. When you have worked the row with the star, you have decreased 2 stitches in A.2 and the piece is now divided in the middle. Place the first half of the stitches (seen from the right side) on a thread (= right front piece/shoulder) and continue back and forth over the left front piece/shoulder. Continue with stocking stitch, 1 edge stitch in garter stitch towards the armhole and A.2 towards the neck; i.e. you decrease for neck as shown in the last 6 rows of the diagram (3 decreases are shown in diagram) until you have decreased a total of 8-8-9-9-10-10 times. AT THE SAME TIME when the piece measures 39-40-41-42-43-44 cm cast off 3-4-4-5-6-6 stitches at the beginning of the row from the armhole. When all the decreases are finished, work as shown in A.3 over the outermost 5 stitches on the left front piece (towards the neck) to finished length. When all the decreases to neck and armhole are finished there are 31-33-35-37-40-44 stitches on shoulder. Continue working until the armhole measures approx. 15-16-17-18-19-20 cm - adjust to match the back piece. Cast off. The piece measures approx. 54-56-58-60-62-64 cm from the shoulder down. Place the stitches from the thread back on the circular needle and work right front piece/shoulder in the same way as the left, but reversed; i.e. start from the wrong side, at the neck on the row after the star in A.2 and work as follows: Work the 9 stitches in A.2, stocking stitch until there is 1 stitch left and 1 edge stitch in garter stitch. Continue back and forth like this and decrease for neck and armhole in the same way as on the left front piece. When the 8-8-9-9-10-10 decreases for neck are finished work A.4 over the outermost 5 stitches towards the neck to finished length. Adjust the length to match left front piece/shoulder and back piece. SLEEVE: The sleeve is worked in the round with double pointed needles. Cast on 42-42-45-48-48-51 stitches with double pointed needles size 5 mm. Knit 1 round. Then work rib (knit 1, purl 2) for 4 cm. Change to double pointed needles size 6 mm. The next round is worked as follows: Knit 2, work A.1 over the next 2 stitches (= purl 1 and knit 1), knit to end of round at the same time as you decrease 9-8-8-10-9-11 stitches evenly spaced = 33-34-37-38-39-40 stitches. Continue in the round with stocking stitch and A.1 mid under sleeve. AT THE SAME TIME when the piece measures 8-9-9-9-8-8 cm, increase 1 stitch on each side – read INCREASE TIP. Increase in the different sizes as follows: Size S: Increase alternately every 6 and 7 cm a total of 6 times. Size M: Increase every 5 cm a total of 7 times. Size L: Increase every 5 cm a total of 7 times. Size XL: Increase every 4 cm a total of 8 times. Size XXL: Increase alternately every 3 and 4 cm a total of 9 times. Size XXXL: Increase every 3 cm a total of 10 times. When all the increases are finished there are 45-48-51-54-57-60 stitches on the round. Continue working until the piece measures 45-44-43-42-40-38 cm (shorter measurements in larger sizes due to wider shoulders). Finish the round in the middle of diagram A.1 (= mid under sleeve). Now continue back and forth with stocking stitch over all stitches (to allow you to sew the sleeve to the armhole). When you have worked back and forth for 2-3-3-4-4-4 cm the sleeve measures a total of 47-47-46-46-44-42 cm. Cast off. Work the other sleeve in the same way. ASSEMBLY: Sew shoulder seams with grafting stitches inside the cast-off edge. Sew sleeves to body. Sew side seams inside the 1 edge stitch in garter stitch on each side. |
||||||||||||||||||||||
Diagram explanations |
||||||||||||||||||||||
|
||||||||||||||||||||||
 |
||||||||||||||||||||||
 |
||||||||||||||||||||||
Have you finished this pattern?Tag your pictures with #dropspattern #robinsongsweater or submit them to the #dropsfan gallery. Do you need help with this pattern?You'll find 27 tutorial videos, a Comments/Questions area and more by visiting the pattern on garnstudio.com. © 1982-2026 DROPS Design A/S. We reserve all rights. This document, including all its sub-sections, has copyrights. Read more about what you can do with our patterns at the bottom of each pattern on our site. |
||||||||||||||||||||||


With over 40 years in knitting and crochet design, DROPS Design offers one of the most extensive collections of free patterns on the internet - translated to 17 languages. As of today we count 324 catalogues and 12290 patterns translated into English (UK/cm). 12290
We work hard to bring you the best knitting and crochet have to offer, inspiration and advice as well as great quality yarns at incredible prices! Would you like to use our patterns for other than personal use? You can read what you are allowed to do in the Copyright text at the bottom of all our patterns. Happy crafting!
Post a comment to pattern DROPS 202-27
We would love to hear what you have to say about this pattern!
If you want to leave a question, please make sure you select the correct category in the form below, to speed up the answering process. Required fields are marked *.