
Popular categories
Looking for a yarn?


Comments / Questions (197)
![]() Matilda Lahtinen wrote:
Matilda Lahtinen wrote:
Työssä kun neulotaan mallineuletta A.3 en saa mainittua 16 mallikertaa kerroksella tehtyä sillä silmukoiden määrä ei riitä. Tuleeko mallikertojen määrään mukaan tässä kohtaa kädenteiden kohdille luotavat silmukat
13.12.2024 - 19:07DROPS Design answered:
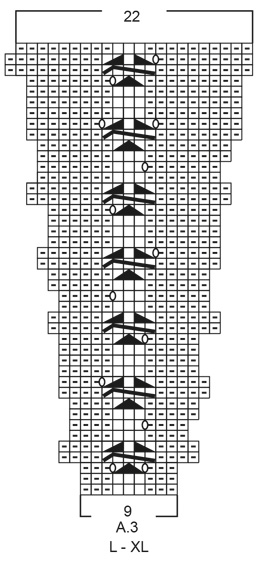
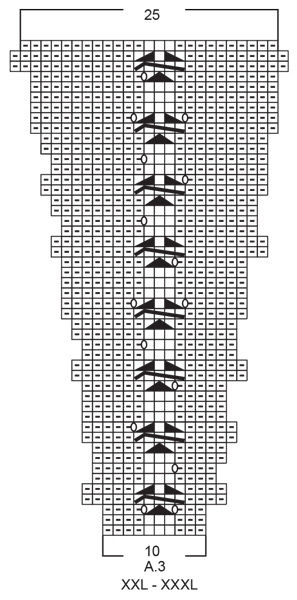
Hei, kädenteille luotavilla silmukoilla neulotaan myös mallineuletta piirroksen A.3 mukaisesti. Eli esim. koossa S silmukoita on yhteensä 128 ja piirroksen A.3 mallikertoja (8 silmukkaa) on 16.
18.12.2024 - 17:04
![]() Mairika wrote:
Mairika wrote:
Küsimus muster A.4 kohta. Suurus XXL. Olen tõstnud 124 silmust abilõngale. Koon hõlmad ja seljaosa alumine osa. Kas kasvatus toimub mustri A.4 ridadel 3 ja 4 igal kordusel 7 korda? Või on mingi muu kasvatuskohtade samm? Nõnda peaks kudumiseks hõlmade jaoks jääma kokku 150 silmust. Hiljem lisanduvad mõlema hõlma kasvatused ja kahandused. Mõlemal hõlmal servadest maha igal real kokku -7 ja kasvatus mustri A.4 igal 2. ja 4.real?
17.10.2024 - 21:39DROPS Design answered:
Tere Mairika! Õhksilmused skeemil lisavad jah silmuseid, lisaks kasvatatakse juhendis 3. ja 4. real pärast iga skeemi A.4 1 silmus. Siis igal 4. real, kuni on tehtud 7 mustrikordust kõrguses (= 42 rida). Siis kasvatatakse hõlmadel 2. real pärast iga skeemi A.4 1 silmus ning korratakse lisasilmuste kasvatamist igal 4. real, kuni on tehtud skeemi A.4 3 mustrikordust (=18 rida). Head kudumist!
05.11.2024 - 19:36
![]() Mariana wrote:
Mariana wrote:
Why don't you make the pattern a pdf download. Who can use a phone to knit a pattern. Veru disappointing to get to the pattern and then have to scroll down just to find that's it.
20.06.2024 - 11:26DROPS Design answered:
Dear Mariana, our patterns can only be printed, but using a virtual printer will allow you to save them as a .PDF file. Happy knitting!
20.06.2024 - 12:58
![]() Inge wrote:
Inge wrote:
Jeg forstår ikke Diagram forklaring, ( den på 6 linie) med symbol med sort trekant. Kan der evt laves på YouTube? Der står: stik højre pind gennem den midterste af de 3 retmasker 4 omgange nedenfor, slå om og træk tråden tilbage til retsiden. Hvad menes med retsiden? Hvor er den her? Er det på højre en venstre pind? Og længere nede står der også det samme, træk tråden tilbage til retsiden? Vil meget gerne have billed vejledning, eller video. Håber det kan lade sig gøre.Mvh Inge
11.06.2024 - 22:42
![]() Connie Bach wrote:
Connie Bach wrote:
Er færdig med A3 men nu opstår problemet så : Sæt de første x antal m på en tråd (mellem de 2 mærketråde) Der har jeg kun 6 m Forstår ikke hvad der er galt ! Og et andet ? Mærketråden følger med op men hvad så når man tager ud, skal mærketråden så sidde det samme sted, eller rykkes den en m for hver udtagning ?
22.05.2024 - 13:19DROPS Design answered:
Hei Connie. Usikker på hvor det har blitt feil hos deg, men 1. merketråd settes ved begynnelsen av omgangen. Etter nest siste omgang i A.2 er det x antall masker på pinnen, og når du skal strikke siste omgang av A.2, strikkes det fra 1.merketråd/begynnelsen av omgangen 39-39-45-45-49-49 masker, sett en ny merketråd her. Du har nå mange masker mellom merketrådene. Når du er ferdig med A.3 har du samtidig økt masker og du har derfor flere masker mellom merketrådene. mvh DROPS Design
27.05.2024 - 08:07
![]() Monica Køpke wrote:
Monica Køpke wrote:
Hej kan ikke få det til af passe med at efter jeg har strikkede a1 at jeg skal have 48 masker på, har kun 24 va kan jeg ha gjort forkert? mvh monica
13.05.2024 - 20:16DROPS Design answered:
Hej Monica, du har 8 masker, strikker A.1 8 gange (A.1 = 5 udtagninger ifølge diagrammet) x 8 = 40 = 48 masker
14.05.2024 - 13:34
![]() Ilse wrote:
Ilse wrote:
Hi, Kan het zijn dat er een foutje zit in het patroon A2 voor de XXXL? Van naald 23 naar naald 24 komt er slechts 1 steek bij terwijl hetzelfde patroon van naald 17 naar naald 18 er 2 steken bijkomen. Ik zie niet waar ik het fout zie, tenzij het patroon het fout stelt. bedankt om na te kijken Ilse
07.02.2024 - 08:49DROPS Design answered:
Dag Ilse,
Dag Ilse, waarschijnlijk heb je gelijk een moet er 1 omslag minder gemaakt worden in de een na laatste naald van A.2, dus de eerste omslag zou je dan niet moeten maken. Ik zal het doorgeven aan de ontwerpafdeling om na te kijken.
07.02.2024 - 19:06
![]() Barbara Dobbs wrote:
Barbara Dobbs wrote:
Thank you so much for this pattern I knitted it in red Aran with a couple of changes, I added a flower to the back centre circle, and I used the sleeves stocking stitch out. I would add a picture but not sure where I can do that, but very happy with the end result
26.01.2024 - 15:10
![]() Barbara D wrote:
Barbara D wrote:
What do I do with the 124 stitches I’ve put on a thread please?
20.01.2024 - 19:54DROPS Design answered:
Hi Barbara D., these sts you use again when working the Edge - these stitches on a thread are at the top of the sweater, behind the neck. Happy knitting!
21.01.2024 - 11:11
![]() Ingrid Hens wrote:
Ingrid Hens wrote:
Maat moet je berekenen met een vergelijkbaar kledingstuk in je bezit. Ik heb geen vergelijkbaar kledingstuk. Graag een echte matentabel. S komt overeen met werkelijke borstomtrek van x cm, etc. Dat maakt het voor iedereen duidelijker. Nu kan ik moeilijk een maat kiezen.
06.01.2024 - 11:17DROPS Design answered:
Dag Ingrid,
De maten komen redelijk goed overeen met de confectiematen zoals je kledingstukken in de winkel koopt, dus als je normaal bijvoorbeeld altijd een shirt in maat M koopt, zou je dat nu ook aan kunnen houden.
07.01.2024 - 14:00
|
|||||||||||||||||||||||||||||||
Empress#empressjacket |
|||||||||||||||||||||||||||||||
 |
 |
||||||||||||||||||||||||||||||
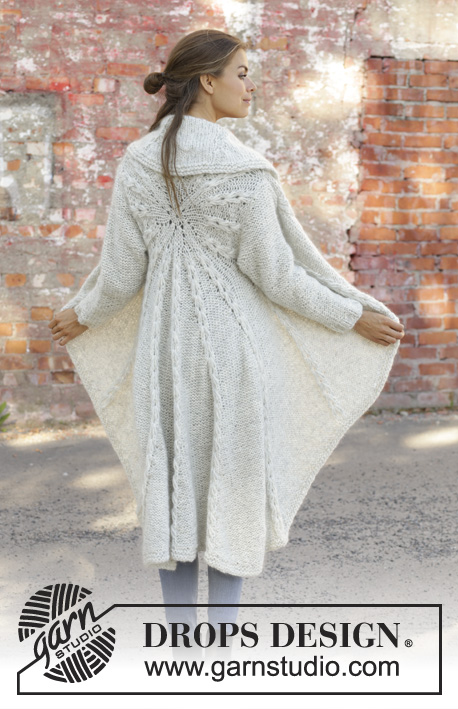
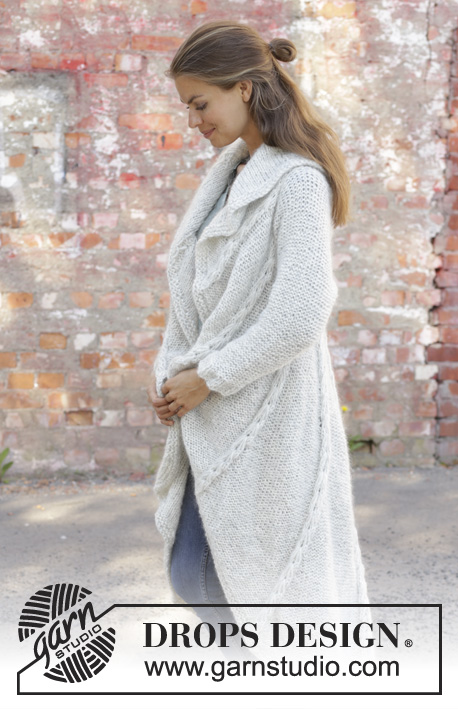
Knitted long circle jacket in 1 strand DROPS Air and 1 strand DROPS Brushed Alpaca Silk. The piece is worked in the round in a circle with texture. Sizes S - XXXL.
DROPS 194-17 |
|||||||||||||||||||||||||||||||
|
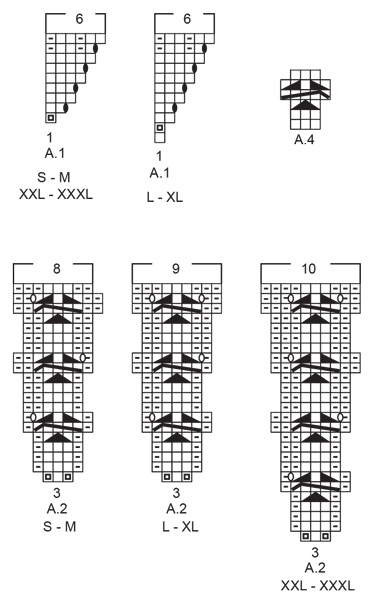
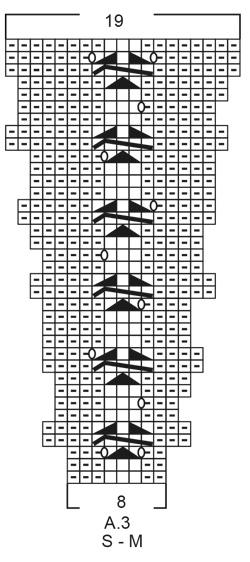
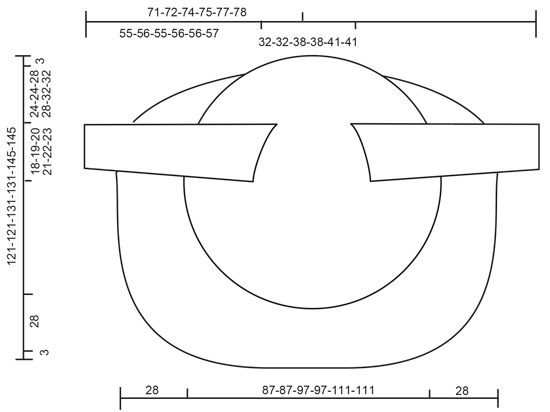
------------------------------------------------------- EXPLANATIONS FOR THE PATTERN: ------------------------------------------------------- RIDGE/GARTER STITCH (worked in the round): 1 ridge = 2 rounds. Knit 1 round and purl 1 round. RIDGE/GARTER STITCH (worked back and forth): 1 ridge = knit 2 rows. PATTERN: See diagrams A.1 to A.4. Choose diagram for your size. The diagrams show all the rows in the pattern seen from the right side! DECREASE TIP (for sleeves): All decreases are made from the side in purl! Decrease 1 stitch by purling 2 stitches together ------------------------------------------------------- START THE PIECE HERE: ------------------------------------------------------- CIRCLE JACKET - SHORT OVERVIEW OF THE PIECE: The piece is worked in the round in a circle from the middle of the back outwards. Change to circular needle(s) when necessary. Then work back and forth with short rows for the front pieces and down the back. The sleeves are worked top down in stocking stitch with the wrong side out. Because of the weight of the yarn, the garment will stretch somewhat after use. CIRCLE JACKET: CIRCLE: Cast on 8 stitches with double pointed needles size 8 mm and 1 strand Air and 1 strand Brushed Alpaca Silk (= 2 strands). Divide the stitches between 4 needles so that there are 2 stitches on each. Insert a marker thread at the beginning of the round. Allow the marker thread to follow your work onwards. Work pattern in the round according to A.1 – choose diagram for your size, a total of 8 times on the round. REMEMBER THE KNITTING TENSION! When A.1 is finished, there are 48 stitches on the round. Now work pattern as follows: Work A.2 – choose diagram for your size, a total of 16 times on the round. After the next-to-last round in A.2 there are 128-128-144-144-160-160 stitches on the round. The last round in A.2 is worked as follows: Work the first 39-39-45-45-49-49 stitches (there is now 1-1-0-0-1-1 stitch left in the last repeat of A.2 worked), insert a new marker thread here (follows your work onwards and is later used when you work short rows from the front pieces and down the body on the back piece), cast off the next 20-21-22-23-24-25 stitches (= armhole), work the next 49-47-55-53-63-61 stitches, cast off the last 20-21-22-23-24-25 stitches (= armhole). The piece measures approx. 39-39-41-41-47-47 cm in diameter. The next round is worked as follows: Work A.3 – choose diagram for your size (= 8-8-9-9-10-10 stitches on the first round in the diagram) a total of 16 times on the round and at the same time cast on 20-21-22-23-24-25 new stitches on the needle where the stitches were cast off for the armholes = 128-128-144-144-160-160 stitches. Continue in the round with A.3 until the whole diagram has been completed in height. There are now 304-304-352-352-400-400 stitches on the round. The piece measures approx. 87-87-97-97-111-111 cm in diameter. Cut the strand. Place the first 94-94-110-110-124-124 stitches on the round (= stitches between the 2 marker threads) on a thread. FRONT PIECES AND DOWN THE BODY: There are now 210-210-242-242-276-276 stitches for the front pieces and down the body on the back piece. Start from the right side after the second marker thread and work short rows back and forth for the front pieces and down the body on the back piece as follows: ROW 1 (right side): Purl over purl and work A.4 (= 3 stitches) over each cable until there are 3 stitches left before the next marker thread (i.e. start of round), turn. ROW 2 (wrong side): Work back until there are 3 stitches left before the marker thread, turn. ROW 3: Purl over purl and work A.4 over each of the cables until there are 6 stitches left before the marker thread, AT THE SAME TIME increase 1 purled stitch after each cable/A.4, turn. ROW 4: Work back until there are 6 stitches left before the marker thread, turn. Continue back and forth like this by working 3 fewer stitches than the previous row and increase 1 stitch after each cable/A.4 every 4th row until you have worked 7 repeats of A.4 in height (= 42 rows). The piece measures approx. 72-72-77-77-84-84 cm from the middle of the circle and down mid back. The last row is worked from the wrong side. Do not cut the strand. Insert a marker thread in the middle cable/A.4 mid back of jacket. Continue back and forth with pattern as before over the bottom of the left front piece as follows: ROW 1 (right side): Work until there are 4 stitches left before the cable/A.4 with the marker thread mid back, turn. ROW 2 (wrong side): Work until there are 3 more stitches left before the marker thread than the previous row (start of round), AT THE SAME TIME increase 1 purled stitch after each cable/A.4, turn. ROW 3 (right side): Work until there are 4 more stitches than last time left before the cable/A.4 with the marker thread mid back, turn. ROW 4 (wrong side): Work until there are 3 more stitches before the marker thread than the previous row, turn. Continue back and forth with pattern and increase after each cable/A.4 every 4th row until you have worked 3 repeats of A.4 in height (= 18 rows). Cut the strand. Start from the right side and after A.4/mid back and work short rows back and forth over the bottom of the right front piece in the same way, but reversed, i.e. each row from the wrong side is turned when there are 4 more stitches before the cable/A.4 with the marker thread mid back than the previous time and on each row from the right side is turned when there are 3 more stitches left than the previous time. EDGE: Place all stitches on the circle back on circular needle and work 2 RIDGES – read description above, around the whole circle. Cast off, but to avoid the cast-off edge being tight you can make 1 yarn over after approx. each 5th stitch - the yarn overs are cast off as normal stitches. SLEEVE: The sleeve is worked in stocking stitch with the wrong side out (reversed stocking stitch). Cast on 11-11-12-12-14-14 stitches with circular needle size 8 mm and 1 strand Air and 1 strand Brushed Alpaca Silk (= 2 strands). Work stocking stitch back and forth, AT THE SAME TIME cast on new stitches at the end of each row in each side as follows: Cast on 2 stitches 2 times, 1 stitch 3-4-5-6-6-7 times, 2 stitches 1 time and 4 stitches 1 time = 37-39-42-44-46-48 stitches. THE PIECE IS NOW MEASURED FROM HERE. Continue back and forth with stocking stitch and 1 edge stitch in GARTER STITCH – read description above, in each side. When the piece measures 4 cm decrease 1 stitch inside the 1 edge stitch in garter stitch in each side – read DECREASE TIP. Decrease like this every 7-6-6-5-5-4 cm a total of 6-7-7-8-8-9 times = 25-25-28-28-30-30 stitches. When the piece measures 42-42-40-40-39-39 cm increase 7-7-4-9-7-7 stitches evenly on row = 32-32-32-37-37-37 stitches. Change to circular needle size 7 mm. Work rib, starting from the side with purl (reversed stocking stitch/the wrong side out) as follows: 1 edge stitch in garter stitch (knit 2, purl 3) until there is 1 stitch left, 1 edge stitch in garter stitch. When the rib measures 5 cm cast off with knit over knit and purl over purl. The sleeve measures approx. 55-56-55-56-56-57 cm from the sleeve cap down. Work the other sleeve in the same way. ASSEMBLY: Sew sleeves to body inside the cast-off/cast-on edge. Sew sleeve seams. Make sure that the seam is not tight. |
|||||||||||||||||||||||||||||||
Diagram explanations |
|||||||||||||||||||||||||||||||
|
|||||||||||||||||||||||||||||||
 |
|||||||||||||||||||||||||||||||
 |
|||||||||||||||||||||||||||||||
 |
|||||||||||||||||||||||||||||||
 |
|||||||||||||||||||||||||||||||
 |
|||||||||||||||||||||||||||||||
Have you finished this pattern?Tag your pictures with #dropspattern #empressjacket or submit them to the #dropsfan gallery. Do you need help with this pattern?You'll find 31 tutorial videos, a Comments/Questions area and more by visiting the pattern on garnstudio.com. © 1982-2026 DROPS Design A/S. We reserve all rights. This document, including all its sub-sections, has copyrights. Read more about what you can do with our patterns at the bottom of each pattern on our site. |
|||||||||||||||||||||||||||||||


With over 40 years in knitting and crochet design, DROPS Design offers one of the most extensive collections of free patterns on the internet - translated to 17 languages. As of today we count 324 catalogues and 12290 patterns translated into English (UK/cm). 12290
We work hard to bring you the best knitting and crochet have to offer, inspiration and advice as well as great quality yarns at incredible prices! Would you like to use our patterns for other than personal use? You can read what you are allowed to do in the Copyright text at the bottom of all our patterns. Happy crafting!
Post a comment to pattern DROPS 194-17
We would love to hear what you have to say about this pattern!
If you want to leave a question, please make sure you select the correct category in the form below, to speed up the answering process. Required fields are marked *.