
Popular categories
Looking for a yarn?


Comments / Questions (13)
![]() Veronica Neu wrote:
Veronica Neu wrote:
I want to do Taormina sweater and it says to cast on with circular needles to start mid back work 2 ridges -see description above but there’s no description on how to do could you please help me I want to make this sweater for my daughter she real likes it
05.02.2025 - 20:49DROPS Design answered:
Hi Veronica, The ridges are worked in garter stitch (there is an explanation of garter stitch at the top of the pattern). To work 2 ridges in the round, knit 1 round, purl 1 round, knit 1 round and purl 1 round. Happy knitting!
06.02.2025 - 09:58
![]() Iwona Harris wrote:
Iwona Harris wrote:
Is there a pattern chart for A1, I can only find A1a and A1b . Thank you
24.09.2024 - 12:10DROPS Design answered:
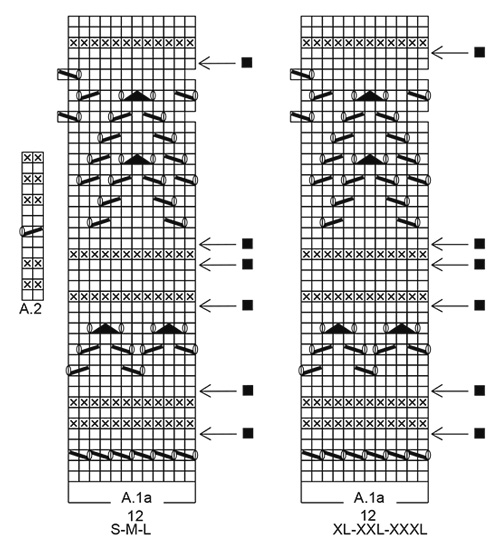
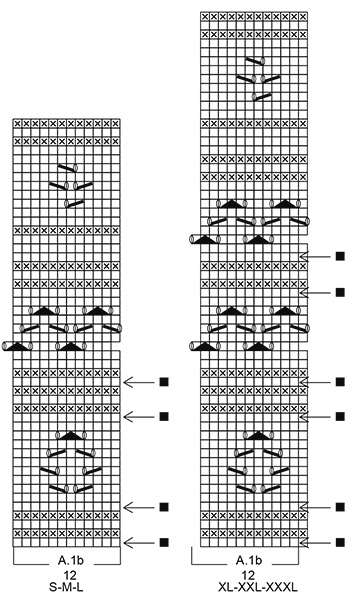
Dear Mrs Harris, A.1 has been splinted for technical reasons into 2 parts, start with A.1a then work A.1b. Happy knitting!
25.09.2024 - 08:36
![]() Diane Neusch wrote:
Diane Neusch wrote:
I'm working size large. Dividing for sleeves, the pattern shows 53 + 53 stitches in the back and 106 stitches in the front, making 212 stitches. When the BODY: section begins, it notes that there are 232 stitches. Where do I get the extra 20 stitches? Thanks, I love your patterns!
04.05.2024 - 21:26DROPS Design answered:
Dear Diane, in all sizes you cast on 10 stitches for the side under each sleeve. These stitches account for the space in the body where the sleeves will later be joined and you will pick up these stitches when working the sleeves. So these are the 20 extra stitches (10 for each sleeve). Happy knitting!
05.05.2024 - 21:22
![]() Bükki Márta wrote:
Bükki Márta wrote:
A szaporítások szemszáma hibás
26.03.2024 - 14:58DROPS Design answered:
Kedves Márta, köszönjük, hogy felhívta a figyelmünket a hibára, a minta javításra került. Sikeres kézimunkázást!
27.03.2024 - 22:43
![]() Sara wrote:
Sara wrote:
Che significa questo: " lavorare le maglie che non completano una intera ripetizione come segue: lavorarle a diritto quando le maglie del motivo vengono lavorate a diritto e a rovescio quando vengono lavorate a rovescio" ? Potreste spiegarmi a cosa si riferisce? Perché se si tratta dello schema non è fatto solo di diritti e rovesci , ci sono gettati , diminuzioni, ecc. , per cui non capisco a cosa si riferisce. Grazie
11.02.2022 - 19:10DROPS Design answered:
Buonasera Sara, deve lavorare le maglie che non rientrano nel motivo come si presentano. Buon lavoro!
05.03.2022 - 22:19
![]() Sara wrote:
Sara wrote:
Questo capo indossato dalla modella che taglia è ?
01.02.2022 - 13:27DROPS Design answered:
Buonasera Sara, solitamente le modelle indossano la taglia M. Buon lavoro!
01.02.2022 - 22:17
![]() Brongkoll wrote:
Brongkoll wrote:
Ich habe ein Problem bei der Anleitung, ich steicke A 1a und weiß nicht wie ich die 35 Reihe stricken muss, nach dem ersten Rapport 12 Maschen weiß ich nicht weiter
03.11.2020 - 13:51DROPS Design answered:
Liebe Frau Brongkoll, A.1a wird je nach der Größe 11 bis 15 Mal in der Breite wiederholt: stricken Sie die 1. Reihe von A.1a x 11-12-13-14-15-15 Mal in der Runde, dann 2. Reihe, dann 2. Reihe, usw. Gleichzeitig sollen Sie Maschen regelmäßig zunehmen, wenn Sie 12 M zunehmen, stricken Sie A.1a 1 Mal mehr in der Runde und wenn Sie 24 M zunehmen, stricken Sie A.1a 2 Mal mehr in der Runde - hier lesen Sie, wie man ein Diagram in Runden strickt. Viel Spaß beim stricken!
03.11.2020 - 15:29
![]() Vickie Parsons wrote:
Vickie Parsons wrote:
Where is the pattern chart for A2? I checked 'to the left' (where the person from Germany was told to look, and it's not there. Is chart A1b actually chart A2? Help! Thanks :)
06.10.2018 - 23:31DROPS Design answered:
Dear Vickie, the pattern for A.2 is just to the left of the pattern A.1a It is small, the column of two stitches and 14 round/ rows. Happy Knitting!
07.10.2018 - 23:03
![]() Sabina Jansen wrote:
Sabina Jansen wrote:
Eigentlich komme ich gut zurecht mit dieser Anleitung. Aber wo ist dasMuster A2??? Hab jetzt alles schon mehrfach ausgedruckt, finde es nicht !! Hilfe
01.09.2018 - 13:31DROPS Design answered:
Liebe Frau Janse, A.2 ist links auf der Seite (vor A.1a in der Grösse S-M-L), es wird über 2 M und 14 Reihen. Viel Spaß beim stricken!
04.09.2018 - 11:22
![]() Ricarda Klein wrote:
Ricarda Klein wrote:
Obwohl ich genau nach Anleitung gestrickt, habe rollt am Rumpf die untere Abschlusskante ein. Schade und ärgerlich.
23.06.2018 - 17:52DROPS Design answered:
Liebe Frau Klein, Sie können den Pullover mit Stecknadeln auf einer geeigneten Unterlage spannen, anfeuchten (z.B. mit einer Sprühflasche für Blumen) und trocknen lassen, danach entfernen Sie die Stecknadeln, dann sollte sich der Rand nicht mehr rollen.
25.06.2018 - 09:36
|
||||||||||||||||||||||
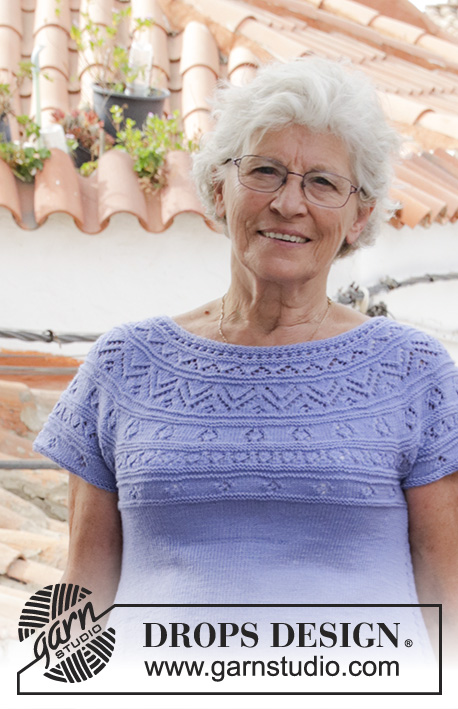
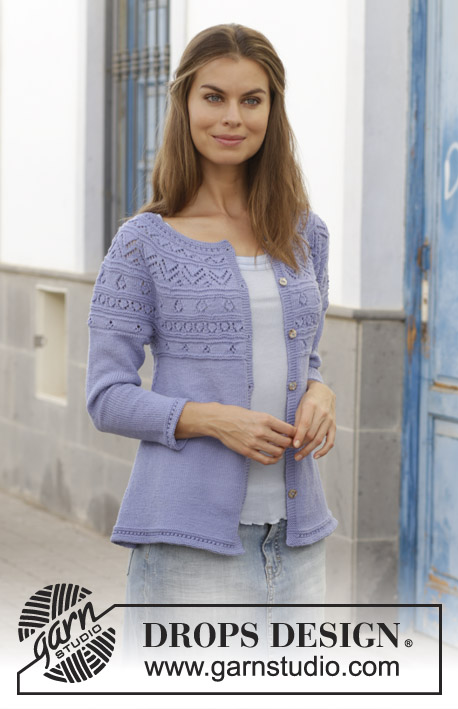
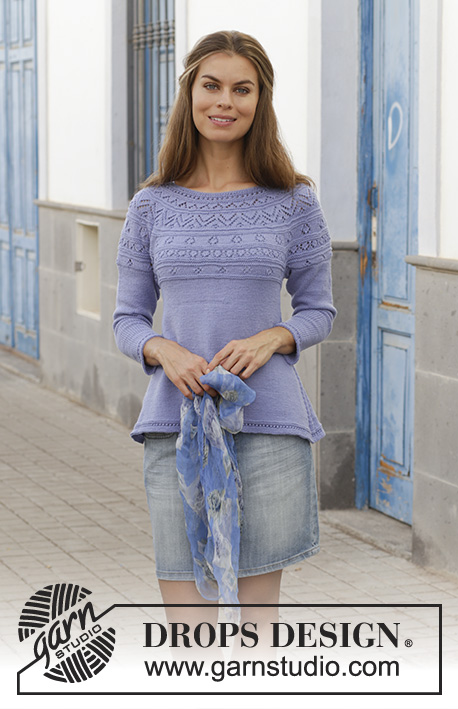
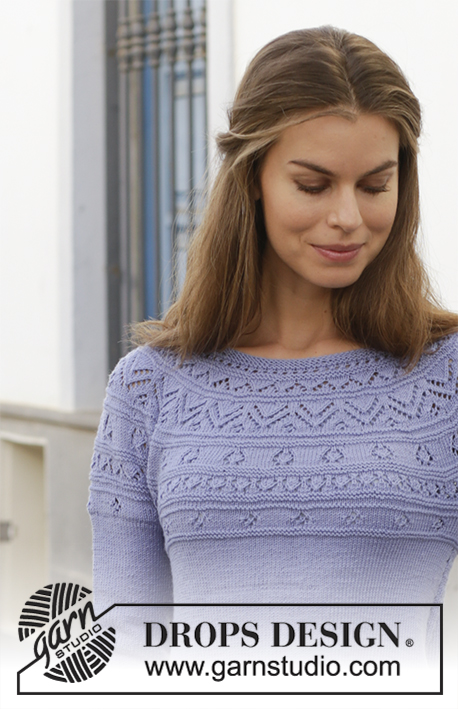
Taormina Sweater#taorminasweater |
||||||||||||||||||||||
 |
 |
|||||||||||||||||||||
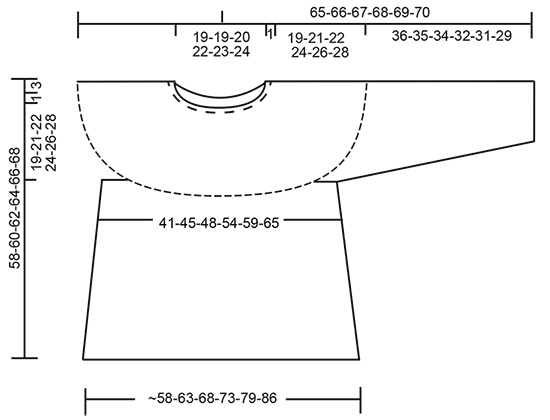
Knitted jumper with lace pattern and round yoke, worked top down. Sizes S - XXXL. The piece is worked in DROPS BabyMerino.
DROPS 186-29 |
||||||||||||||||||||||
|
INFORMATION FOR THE PATTERN: RIDGE/GARTER STITCH (worked in the round): 1 ridge = 2 rounds. Knit 1 round and purl 1 round. PATTERN: See diagrams A.1 and A.2. Choose diagram for your size (applies to A.1). INCREASE TIP-1 (for increases on yoke): To work out how to increase evenly, count the total number of stitches on the needle (e.g. 116 stitches) and divide by the number of increases to be made (e.g. 16) = 7.25. In this example, increase by making 1 yarn over after approx. every 7th stitch. On the next round, work the yarn overs twisted into the pattern to avoid holes. INCREASE TIP-2 (for increases on body): Work until there are 2 stitches left before the marker thread, 1 yarn over, knit 4 stitches (the marker thread sits in the middle of these 4 stitches), 1 yarn over (= 2 stitches increased), increase like this at both marker threads (= a total of 4 stitches increased). The yarn overs are not worked twisted on the next round, there will be holes. DECREASE TIP (for mid under sleeve): Start 3 stitches before the marker thread, knit 2 together, knit 2 (the marker thread sits in the middle of these 2 stitches), slip 1 stitch as if to knit, knit 1, pass the slipped stitch over the knitted stitch (= 2 stitches decreased). ---------------------------------------------------------- JUMPER: The yoke and body are worked in the round with circular needle, top down. The sleeves are worked in the round with double pointed needles. YOKE: Cast on 116-120-126-132-139-144 stitches with circular needle size 2.5 mm and BabyMerino. The round starts mid back. Work 2 RIDGES – see description above. Knit 1 round and increase 16-24-30-36-41-36 stitches evenly on round – read INCREASE TIP-1 = 132-144-156-168-180-180 stitches. Purl 1 round (the yarn overs are worked twisted to avoid holes). REMEMBER THE KNITTING TENSION! Change to circular needle size 3 mm. Work A.1a (= 12 stitches) in the round over all stitches (= 11-12-13-14-15-15 times in width) Continue the pattern like this AT THE SAME TIME as you increase evenly on each round marked with and arrow in diagram A.1 as follows: Each time you increase 12 stitches, work A.1 one more time in width. Each time you increase 24 stitches, work A.1 two more times in width. Each time you increase 36 stitches, work A.1 three more times in width. INCREASE 1: Increase 24-24-24-24-24-36 stitches = 156-168-180-192-204-216 stitches. INCREASE 2: Increase 24-24-24-24-24-36 stitches = 180-192-204-216-228-252 stitches. INCREASE 3: Increase 24 stitches = 204-216-228-240-252-276 stitches. INCREASE 4: Increase 24 stitches = 228-240-252-264-276-300 stitches. INCREASE 5: Increase 24 stitches = 252-264-276-288-300-324 stitches. INCREASE 6: Increase 24 stitches = 276-288-300-312-324-348 stitches. When A.1a has been worked 1 time in height the piece measures approx. 14 cm from the neck edge. Now work A.1b over A.1a and then continue to increase as follows: INCREASE 7: Increase 12-24-24-24-24-24 stitches = 288-312-324-336-348-372 stitches. INCREASE 8: Increase 12-12-24-24-24-24 stitches = 300-324-348-360-372-396 stitches. INCREASE 9: Increase 12-12-24-24-24-24 stitches = 312-336-372-384-396-420 stitches. INCREASE 10: Increase 12-12-12-12-24-24 stitches = 324-348-384-396-420-444 stitches. The increases are now finished in sizes S, M and L, but continue in sizes XL, XXL and XXXL as follows: INCREASE 11: Increase 12-24-24 stitches = 408-444-468 stitches. INCREASE 12: Increase 12-12-24 stitches = 420-456-492 stitches. ALL SIZES: = 324-348-384-420-456-492 stitches (A.1b is now repeated 27-29-32-35-38-41 times in width). Work pattern until the piece measures 20-22-23-25-27-29 cm from the cast-on edge. Now divide the piece into body and sleeves as follows: (The stitches which do not fit into the pattern are knitted when the stitches are knitted and purled when the stitches are purled). Work pattern as before over the first 44-49-53-60-66-73 stitches (= half back piece), place the next 74-76-86-90-96-100 stitches on a thread for sleeve, cast on 10 new stitches on the needle (= side under sleeve), insert 1 marker thread in the middle of the new stitches, work pattern as before over the next 88-98-106-120-132-146 stitches (= front piece), place the next 74-76-86-90-96-100 stitches on a thread for sleeve, cast on 10 new stitches on the needle (= side under sleeve), insert 1 marker thread in the middle of the new stitches and work pattern as before over the last 44-49-53-60-66-73 stitches (= half back piece). Body and sleeves are finished separately. THE PIECE IS NOW MEASURED FROM HERE! BODY: = 196-216-232-260-284-312 stitches. Continue the pattern, the stitches which do not fit into the pattern under the sleeve are knitted when the stitches are knitted and purled when the stitches are purled. When A.1b has been worked 1 time in height the piece measures approx. 27-27-27-30-30-30 cm. Continue working in stocking stitch. On the next round increase 1 stitch on each side of each marker thread – read INCREASE TIP-2! Increase like this every 4th round until the piece measures 32-32-33-33-33-33 cm from where the body was divided from the sleeves = approx. 276-300-324-348-380-412 stitches. Change to circular needle size 2.5 mm. Work A.2 in the round over all stitches. When A.2 has been worked 1 time in height, the piece measures approx. 35-35-36-36-36-36 cm from where the body was divided from the sleeves and approx. 55-57-59-61-63-65 cm from the neck edge. Cast off (make sure you cast off loosely; you can use a needle 1 size larger if necessary). SLEEVE: The piece is worked in the round with double pointed needles. Place the 74-76-86-90-96-100 stitches from the thread on the one side of the piece on double pointed needles size 3 mm and knit up 1 stitch in each of the 10 stitches cast on under the sleeve = 84-86-96-100-106-110 stitches. Insert 1 marker thread in the middle of these 10 new stitches. Continue working A.1b over the stitches which fit into the pattern; the stitches which do not fit mid under sleeve are knitted when the stitches are knitted and purled when the stitches are purled. When A.1b has been completed in height, the sleeve measures approx. 7-5-4-5-3-1 cm from where the sleeve was divided from the body. Continue with stocking stitch. On the next round decrease 1 stitch on each side of the marker thread – read DECREASE TIP! Decrease like this every 1½-1½-1-1-1-1 cm a total of 14-15-19-20-22-23 times = 56-56-58-60-62-64 stitches. Continue working until the sleeve measures 33-32-31-29-28-26 cm from the division (shorter measurements in larger sizes due to longer yoke). Change to double pointed needles size 2.5 mm and work A.2 over all stitches. When A.2 has been worked 1 time in height cast off all stitches (make sure you cast off loosely, you can use a needle 1 size larger if necessary). The sleeve measures approx. 36-35-34-32-31-29 cm from where the sleeve was divided from the body. Work the other sleeve in the same way. |
||||||||||||||||||||||
Diagram explanations |
||||||||||||||||||||||
|
||||||||||||||||||||||
 |
||||||||||||||||||||||
 |
||||||||||||||||||||||
 |
||||||||||||||||||||||
Have you finished this pattern?Tag your pictures with #dropspattern #taorminasweater or submit them to the #dropsfan gallery. Do you need help with this pattern?You'll find 26 tutorial videos, a Comments/Questions area and more by visiting the pattern on garnstudio.com. © 1982-2026 DROPS Design A/S. We reserve all rights. This document, including all its sub-sections, has copyrights. Read more about what you can do with our patterns at the bottom of each pattern on our site. |
||||||||||||||||||||||


With over 40 years in knitting and crochet design, DROPS Design offers one of the most extensive collections of free patterns on the internet - translated to 17 languages. As of today we count 324 catalogues and 12290 patterns translated into English (UK/cm). 12290
We work hard to bring you the best knitting and crochet have to offer, inspiration and advice as well as great quality yarns at incredible prices! Would you like to use our patterns for other than personal use? You can read what you are allowed to do in the Copyright text at the bottom of all our patterns. Happy crafting!
Post a comment to pattern DROPS 186-29
We would love to hear what you have to say about this pattern!
If you want to leave a question, please make sure you select the correct category in the form below, to speed up the answering process. Required fields are marked *.