
Popular categories
Looking for a yarn?


Comments / Questions (55)
![]() Natasa Papadopoulou wrote:
Natasa Papadopoulou wrote:
Hi, I'd like to knit the Sailor's Luck jumper with only 1 thread of Alpaca Drops and 3 and 3,5 mm needles. How do I convert the number of stitches. Is there anything else l should pay attention to? Thanks in advance
29.11.2020 - 08:42DROPS Design answered:
Dear Natasa, you need to make a gauge with the new conditions (one thread and 3-3.5 mm needles) and check how many stitches/ rows you need for 10x10 cm. From there, you need to adapt the pattern taking that into account. Happy knitting!
29.11.2020 - 18:30
![]() TUCHENDLER Madeleine wrote:
TUCHENDLER Madeleine wrote:
Bonjour. pourquoi n'y a-t-il pas de symétrie pour le montage des mailles ajoutées pour dessous de manches: ajout après la mise sur un fil des mailles pour chaque manche, alors que je m'attendais que ce soit après la première manche et avant la seconde (si ajout côté dos devant), ou avant la première et après la seconde (si ajout côte dos). Merci beaucoup pour votre aide Cordialement M. Tuchendler
21.11.2020 - 20:21DROPS Design answered:
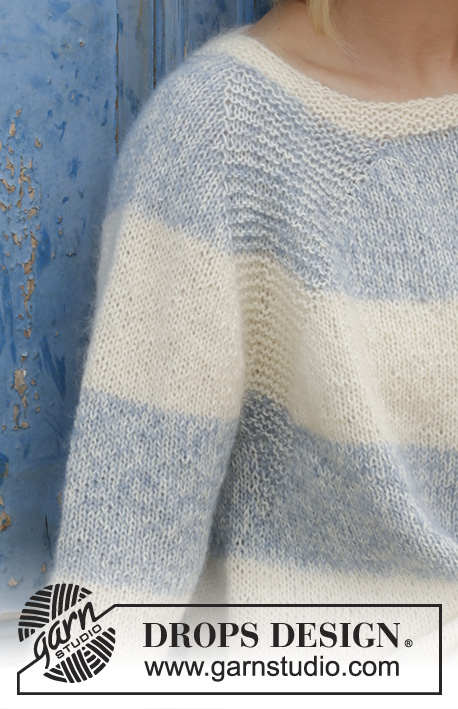
Bonjour Mme Tuchendler, les manches sont symétriquement placées: les tours commencent au milieu dos, vous tricotez les mailles du demi-dos, glissez les mailles de la manche en attente et montez les mailles du dessous de la manche, tricotez les mailles du devant, glissez les mailles de la 2ème manche en attente et montez les mailles du dessous de la manche et terminez par les mailles du demi-dos. Cette leçon montre à partir de la photo 9), comment faire cette division. Bon tricot!
23.11.2020 - 08:58
![]() Buchler Monique wrote:
Buchler Monique wrote:
Je ne comprends pas comment je dois tricoter les 4 x 16 mailles du raglan, est-ce avec le dos et devant ou avec la manche ? Ce n'est pas clair dans l'explication 191-2 Merci
05.06.2020 - 02:39DROPS Design answered:
Bonjour Mme Buchler, les 16 mailles du raglan se tricotent au point mousse, soit 1 tour en mailles endroit, 1 tour en mailles envers. Elles servent de délimitation aux différentes pièces (devant, manches, dos) et on va augmenter de part et d'autre de ces 16 mailles pour le raglan = 2 mailles x 4 raglans de 16 mailles = on augmente 8 mailles au total par tour d'augmentations. Bon tricot!
05.06.2020 - 07:43
![]() Amina wrote:
Amina wrote:
Bonjour, Peut-on prévoir pour ce modèle une réhausse à l'arrière du col ? C'est pour avoir une encolure un peu plus morphologique, ce que ne permet pas la technique top-down. Si oui, comment distribuer les rangs raccourcis ? Merci pour vos conseils
12.02.2020 - 18:54DROPS Design answered:
Bonjour Amina, vous pouvez tout à fait tricoter une réhausse pour l'encolure dos, nous ne sommes malheureusement pas en mesure de pouvoir ajuster chacun de nos modèles à chaque demande, mais vous devriez pouvoir trouver l'inspiration parmi nos modèles avec réhausse et cette tension. En cas de doute, n'hésitez pas à contacter votre magasin DROPS, même par mail ou téléphone. Bon tricot!
13.02.2020 - 11:49
![]() Heidi Christina Jespersen wrote:
Heidi Christina Jespersen wrote:
Hej drops Hvordan kan det være at der skal tages ud med omslag og ikke med usynlig udtagning? Der kommer jo huller. Kan jeg lave udtagning en med usynlig istedet? Udtagningen som jeg spørger om er i starten af opskriften, altså efter rib i halsen :)
08.01.2020 - 10:50DROPS Design answered:
Hej Heidi, Ja absolut, du laver den udtagning som passer dig bedst :)
31.01.2020 - 11:08
![]() Gudrun wrote:
Gudrun wrote:
Der er en fejl i opskriften vedrørende ærme. Næstsidste beskrivelse: "Ærmet måler 42-40-39-37-35-34 cm" Det burde vel være omvendt, så man starter med den mindste størrelse. Det er også tilfældet på skitsen.
02.11.2019 - 13:52
![]() Marjan wrote:
Marjan wrote:
Ik ben vergeten te vermelden dat het voor de maat L is
29.10.2019 - 15:38DROPS Design answered:
Dag Marjan,
In dat geval zou je dus moeten kijken naar de totale looplengte van 6 bollen (300 gr.) alpaca.
30.10.2019 - 10:52
![]() Marjan wrote:
Marjan wrote:
Ik zou deze trui graag maken met drops sky. Zou u me kunnen zeggen hoeveel ik hiervoor nodig ben. Het lukt me niet om uit te rekenen met de garenvervanger.
29.10.2019 - 14:55DROPS Design answered:
Dag Marjan,
Deze trui heeft een stekenverhouding van garen uit categorie C en Sky valt in categorie B, vandaar dat dit lastig is om om te rekenen. Als je garen uit categorie B wilt gebruiken en dus met een andere stekenverhouding, dan zou je het patroon ook om moeten rekenen, dus het aantal op te zetten steken, de meerderingen, minderingen etc. Je kunt de looplengte (deze staat bij de pagina van het garen) van het gebruikte garen aanhouden en dit omrekenen naar het garen wat je zou willen gebruiken. Vraag je verkooppunt binnen welke termijn je overgebleven bollen in kunt leveren, zodat je wat extra bollen aan kunt schaffen voor de zekerheid.
30.10.2019 - 10:50
![]() Line wrote:
Line wrote:
Jeg kan ikke få strikkeprøven til at passe. Jeg har valgt at strikke med 2 tråde kid slik i stedet for alpaka. Skal man ikke lave sin strikkeprøve med 2 tråde?
29.06.2019 - 17:54DROPS Design answered:
Hej. Jo du ska sticka med 2 trådar för att få den stickfasthet vi uppgett. Får du inte det så får du prova att gå upp eller ned i storlek på pinnen till du får det att passa. Lycka till!
01.07.2019 - 10:43
![]() Johanna wrote:
Johanna wrote:
Hej! Jag förstår inte hur man ska göra mönstret vid ränderna, första och andra varvet förstår jag, men senare vet jag inte var jag skall göra omslag? Skall jag lägga omslag efter varje 5e, 16e maska och så vidare ? Eller hur gör jag? (gör strl s)
09.04.2019 - 21:03DROPS Design answered:
Hej. Det ökas 1 maska på varje sida av de 16 maskorna rätstickning i varje övergång mellan fram- och bakstycke och ärmar (= 8 maskor ökade på varvet). De ökade maskorna stickas sedan i slätstickning. Lycka till!
10.04.2019 - 07:56
|
|
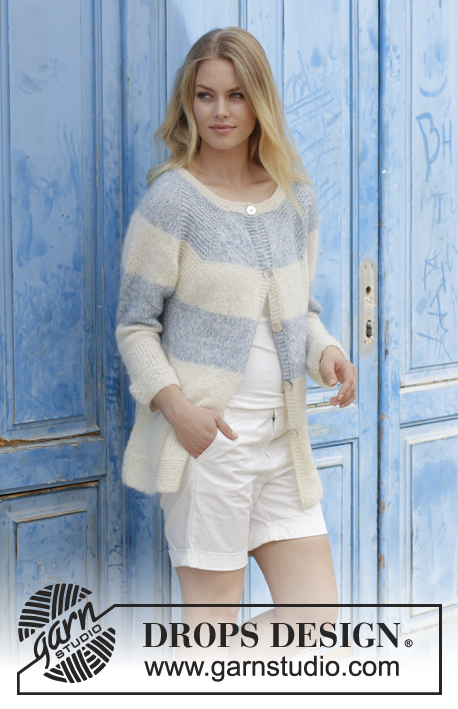
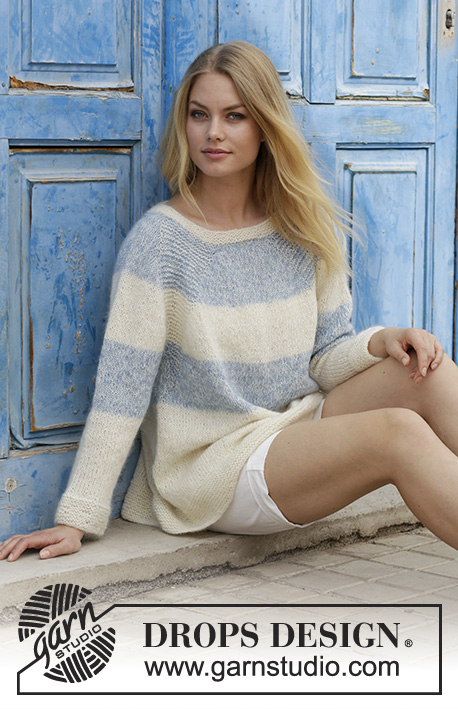
Sailor's Luck#sailorslucksweater |
|
 |
 |
Knitted jumper with raglan and stripes, worked top down. Sizes S - XXXL. The piece is worked in DROPS Alpaca and DROPS Kid-Silk.
DROPS 191-2 |
|
|
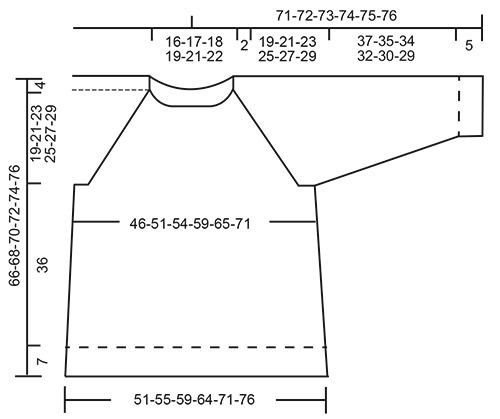
INFORMATION FOR THE PATTERN: RIDGE/GARTER STITCH (worked in the round): 1 ridge = 2 rounds. Knit 1 round and purl 1 round. INCREASE TIP-1 (evenly spaced): To work out how to increase evenly, count the total number of stitches on the needle (e.g. 82 stitches) and divide by the number of increases to be made (e.g. 4) = 20.5. In this example, increase by making 1 yarn over alternately after the 20th and 21st stitch. On the next round, knit the yarn overs twisted to avoid holes. INCREASE TIP-2 (for sides of body): Work until there are 2 stitches left before the marker thread, 1 yarn over, knit 4 stitches (the marker thread sits in the middle of these 4 stitches), 1 yarn over. On the next round knit the yarn overs twisted to avoid holes. Then work the new stitches in stocking stitch. STRIPES: 11-11-11-12-12-12 cm with 1 strand off-white Alpaca and 1 strand grey blue Kid-Silk. 11-11-11-12-12-12 cm with 1 strand off-white Alpaca and 1 strand off-white Kid-Silk. 11-11-11-12-12-12 cm with 1 strand off-white Alpaca and 1 strand grey blue Kid-Silk. Then work with 1 strand off-white Alpaca and 1 strand off-white Kid-Silk to finished length. RAGLAN: Increase 1 stitch on each side of the 16 stitches in garter stitch in each transition between body and sleeves (= 8 stitches increased on the round). Increase 1 stitch by making 1 yarn over. On the next round knit the yarn overs twisted to avoid holes. Then work the new stitches in stocking stitch. DECREASE TIP (for sleeves): Decrease 1 stitch on each side of the marker thread as follows: Work until there are 3 stitches left before the marker thread, knit 2 stitches together, knit 2 stitches (the marker thread sits in the middle of these 2 stitches), slip 1 stitch as if to knit, knit1, pass the slipped stitch over the knitted stitch --------------------------------------------------------- JUMPER: The piece is worked in the round with circular needle, top down. The sleeves are worked in the round with double pointed needles. The round starts mid back. YOKE: Cast on 82-85-88-91-97-102 stitches with circular needle size 4.5 mm and 1 strand off-white Alpaca and 1 strand off-white Kid-Silk (= 2 strands). Knit 1 round then work 3 RIDGES - see description above. Change to circular needle size 5 mm. Work 1 ridge where, on the first round, you increase 4-13-18-19-17-16 stitches evenly on round – read INCREASE TIP-1 (evenly spaced) = 86-98-106-110-114-118 stitches. Now work STRIPES – see description above, work pattern and increase to RAGLAN – see description above, as follows: Knit 5-8-10-11-12-13 stitches (= half back piece), make 1 yarn over, 16 stitches in garter stitch (= raglan line), make 1 yarn over, knit 1 (= sleeve), make 1 yarn over, 16 stitches in garter stitch (= raglan line), make 1 yarn over, knit 10-16-20-22-24-26 stitches (= front piece), make 1 yarn over, 16 stitches in garter stitch (= raglan line), make 1 yarn over, knit 1 (= sleeve), make 1 yarn over, 16 stitches in garter stitch (= raglan line), make 1 yarn over, knit 5-8-10-11-12-13 stitches (= half back piece). The first increase to raglan is now finished (= 8 stitches increased on the round). Continue in the round like this and increase to raglan every 2nd round a total of 21-23-25-27-30-32 times = 254-282-306-326-354-374 stitches. When all the increases to raglan are finished, the piece should measure 21-23-25-27-29-31 cm from the cast on edge mid front and down. If the piece is shorter than this continue with pattern as before until you have reached the correct length (without increasing any more stitches). The next round is worked as follows (continue with the pattern as before): Work 36-40-42-46-50-54 stitches (= half back piece), place the next 55-61-69-71-77-79 stitches on a thread (= sleeve), cast on 6-6-8-8-10-12 new stitches on the needle (= side under sleeve), work the next 72-80-84-92-100-108 stitches (= front piece), place the next 55-61-69-71-77-79 stitches on a thread (= sleeve), cast on 6-6-8-8-10-12 new stitches on the needle (= side under sleeve), work the remaining 36-40-42-46-50-54 stitches (= half back piece). BODY: = 156-172-184-200-220-240 stitches. THE PIECE IS NOW MEASURED FROM HERE! Insert a marker thread in each side (= in the middle of the new stitches cast on under each sleeve = 3-3-4-4-5-6 new stitches on each side of the marker thread). Continue in the round with stocking stitch and work garter stitch over the 10-9-7-8-8-9 stitches left on the front/back pieces (from the garter stitch section in the raglan line), AT THE SAME TIME on every 2nd round make 1 yarn over on the outside of each garter stitch section towards mid front and towards mid back (= a total of 4 stitches increased on round) and decrease 1 stitch in each garter stitch section by knitting the 2 outermost stitches in garter stitch section towards the side of the jumper together (= 1 stitch decreased in each garter stitch section towards the side, a total of 4 stitches decreased on round). NOTE! The number of stitches stays the same, but the stitches in garter stitch will gradually disappear and there will be more stitches in stocking stitch, (i.e.4 stitches increased and 4 stitches decreased on every 2nd round). When all the stitches in garter stitch are gone continue working in stocking stitch, AT THE SAME TIME on the first round increase 1 stitch on each side of the marker thread in each side – read INCREASE TIP-2. Increase like this every 8-8-9-9-7-7 cm a total of 4-4-4-4-5-5 times = 172-188-200-216-240-260 stitches. Continue working until the piece measures 36 cm in all sizes. Change to circular needle size 4.5 mm. Work garter stitch for 7 cm. Cast off with knit. You can use a needle 1 size larger if necessary to avoid the cast-off edge being tight. The piece measures approx. 66-68-70-72-74-76 cm from the shoulder down. SLEEVE: Place the 55-61-69-71-77-79 stitches from the thread on the one side of the piece on double pointed needles size 5 mm and, in addition, cast on 6-6-8-8-10-12 new stitches mid under the sleeve = 61-67-77-79-87-91 stitches on the needles. Insert a marker thread in the middle of the new stitches – THE PIECE IS NOW MEASURED FROM HERE! Work stocking stitch over stocking stitch and garter stitch over garter stitch, at the same time as the stitches in garter stitch are decreased in the same way as on the body (the number of stitches stays the same). When all the stitches in garter stitch have gone, continue working in stocking stitch over all stitches, at the same time on the first round decrease 2 stitches mid under sleeve – read DECREASE TIP. Decrease like this every 6th-5th-3rd-3rd-2nd-2nd round a total of 12-13-18-18-20-22 times = 37-41-41-43-47-47 stitches. Continue with stocking stitch in the round until the piece measures 36-34-34-32-30-29 cm. Change to double pointed needles size 4.5 mm. Work garter stitch for 5 cm. Cast off with knit. You can use a needle 1 size larger if necessary to avoid the cast-off edge being tight. The sleeve measures 42-40-39-37-35-34 cm. Work the other sleeve in the same way. ASSEMBLY: Sew the openings under the sleeves. |
|
 |
|
Have you finished this pattern?Tag your pictures with #dropspattern #sailorslucksweater or submit them to the #dropsfan gallery. Do you need help with this pattern?You'll find 28 tutorial videos, a Comments/Questions area and more by visiting the pattern on garnstudio.com. © 1982-2026 DROPS Design A/S. We reserve all rights. This document, including all its sub-sections, has copyrights. Read more about what you can do with our patterns at the bottom of each pattern on our site. |
|


With over 40 years in knitting and crochet design, DROPS Design offers one of the most extensive collections of free patterns on the internet - translated to 17 languages. As of today we count 324 catalogues and 12290 patterns translated into English (UK/cm). 12290
We work hard to bring you the best knitting and crochet have to offer, inspiration and advice as well as great quality yarns at incredible prices! Would you like to use our patterns for other than personal use? You can read what you are allowed to do in the Copyright text at the bottom of all our patterns. Happy crafting!
Post a comment to pattern DROPS 191-2
We would love to hear what you have to say about this pattern!
If you want to leave a question, please make sure you select the correct category in the form below, to speed up the answering process. Required fields are marked *.